Sometimes I think my favorite thing about Christmas is the music. Every year starting November 1st I start blasting Christmas music! We have several Christmas playlists we love, but this one is a favorite of ours. It’s full of a lot of great vintage peppy holiday music, it’s perfect for a party or to fill your home with Christmas cheer. We love this playlist so much we’re calling it the Ultimate. You can easily download these songs and create your own playlist with Apple Music or at Amazon music which I’ve linked down below and it’s free with Amazon Prime membership!
Happy Saturday y’all! I thought I’d show you a peek at our backyard Christmas lights and also how we made these simple lighted wire balls. They’re so fun and festive and really make our yard sparkle! I must confess we decorate our backyard much better than our front yard. I’m kind of embarrassed that we don’t do more to the front, but it all started with our covered patio we had built. That first year we decided to move Frosty and the reindeer to the backyard because we were spending so much time out there… and the rest is history.
We love to bundle up at night on the patio and admire our pretty Christmas lights. With the layout of our home we’re able to see our backyard more than our front anyway, even in the kitchen and living room, so we really enjoy Christmas lights in our backyard. These ornament balls are so simple to make, it’s basically just chicken wire wrapped in a ball with string lights. We certainly didn’t invent this, I found it one day on a Google search, but we’d love to show your our version, the tips we learned, and our fun festive decorated Christmas backyard!
So, as you can see above, to make these you will need a roll of chicken wire, wire cutters, good gloves, and Christmas lights. It’s also a good idea to buy an extension cord for each ball, I would say a minimum of 6 feet long, so you can spread them out. We made our balls in two sizes. The small balls are 2 feet wide and the large are 4 feet wide. You will need to purchase a roll of chicken wire that is 4 feet wide. For a 2 foot ball, cut a section of chicken wire that is 2′ x 4′. For a 4′ ball, your wire should be 4′ x 8′. Do you see the pattern? How ever wide (or tall) you want your ball to be, that is the length of your chicken wire, and then double that for the width.
So basically, you splice the ends of the chicken wire section together to form a cylinder, then you bend the two ends closed and mash it all around to form a ball. I can’t stress enough how important good gloves are! Once you have your ball shape just start wrapping your lights around it. Don’t overthink it, it is as easy as it sounds! Oh and one last thing…your wire balls will look pretty gnarly and jagged at first. Don’t worry about this, once you wrap them with lights they will take on more of a spherical shape.
As far as the lights go, I suggest going with the old school incandescent bulbs, NOT LED bulbs. They just have a warmer glow in my opinion. And here’s the rule of thumb…a 2′ ball will need 2 strings of lights, and a 4′ ball will need 4 strings. Check the label on your lights to see how many you can string together without blowing the fuse. Ours said we could connect 5 strings in line so we’re all good!
Here is Corey helping to string up these rain drop lights in the trees, he’s using our famous Amazon hook. Years ago when we hung our tall living room curtains I would struggle to open and close them. One day while at a store watching a sales person reach clothes on the high up clothing racks I decided that was one tool we needed in our lives. You guys, this clothing hook has 10,000 uses, from retail to closing curtains and hanging outdoor lights in trees!
I will say I’m not completely in love with how the light balls look during they day, but they are stunning at night! The larger balls were harder to keep in a tight ball shape, the smaller ones definitely hold their shape better.
I love how they look at night with our other decorations! And I’m still in love with our curtain string lights on the pergola… I may not take them down. These string curtain lights would look so pretty indoors too!
The result is that we love these and we plan on doing more next year for the front yard… yes we’re going to get it together and decorate our front yard better next year! One thing I’m not sure about is how we’re planning on storing these. I’ll need to get back to you on that! Are we going to take them apart, or smash them down for storage? At this point we’re clueless. If I don’t update in the future feel free to ask me in the comments how we stored these.
I think this is a great budget Christmas light project, and you can make a variety of sizes and colors. You can do a full yard or just a few to compliment other decorations. What are your thoughts on decorating your backyard, have you ever done anything like this before?
Oh how I love spiced nuts this time of year! It took me a little bit to recover from Thanksgiving but I’m back in the spirit of cooking and baking. So I thought I would share my Brown Sugar Cinnamon Spiced Nuts recipe. It’s a great indulgent treat and you can whip up a batch in under 20 minutes! It makes for great party snack food but they taste great on salads too. This is one of those recipes that’s just fun to play around with, and with most of the recipe being made in the microwave it’s pretty much fool proof!
I like to roast my nuts a few minutes in the oven first, it’s not essential you do this, but it really brings out the flavor of the nuts. You can play around with any variety of nuts you like, my favorite is definitely pecans. I’m kinda weird about walnuts, sometimes I love them, and other times I can’t stand how bitter they are.
After roasting the nuts in the oven, the rest of the recipe quickly comes together in the microwave. We like to add a pinch of chipotle pepper for just a hint of spice, you can add a big pinch though if you want! Once the nuts are finished in the microwave I dry them on parchment paper. About 10 minutes later they should be dried, with no sticky residue. I could eat an entire bowl, especially while they’re still warm! Store any leftovers in an airtight container, that is if you have any leftovers!
Place nuts on a rimmed baking sheet and roast at 350 for 5-7 minutes.
Melt butter in a large microwave safe bowl. Stir in the brown sugar, cinnamon, nutmeg, chipotle, salt, and water and microwave for 1 minute.
Add the roasted nuts and stir until the nuts are thoroughly coated. Microwave 4-5 more minutes, STIRRING HALF WAY THROUGH.
Remove nuts from the microwave and stir for about a minute until all the liquid is gone from the bottom of the bowl.
Spread the nuts to cool on parchment paper for 10 minutes.
It’s on my list of things to do to add a print function to my recipes, I’ll get to it eventually I promise. I love to play around and experiment a lot with my recipes so if you come up with any interesting flavor combinations let me know. Happy snacking!
I’m back with another Christmas tablescape! I just love parties, entertaining, and family meals, so I find decorating our table really fun. I did a simple table for the Christmas tour, but I was ready to change it up. I wasn’t sure what to do, I was just certain I didn’t want to buy anything new. So I walked around my house and it didn’t take long to find inspiration to create this Candy Land inspired tablescape – just with a bit more Christmas flair! That was my favorite game as a kid, and luckily I had a ton of leftover candy. After our Thanksgiving meal we decorated gingerbread houses with my daughters, her friend, and my little niece Lilly. Luckily I saved all our unused candy.
I created this tablescape with everything I already had on hand, and you can create this tablescape for very little cost too!
I used kraft paper from the Dollar Tree, I simply cut the paper to the length of my table, the ends curl under a bit so if your cut is a little uneven you won’t be able to tell. I pulled out my metal charger plates again, they just look great with nearly every table I do!
I used sugar to fill our trifle bowl and martini glasses to create a pretty snowy look, it’s also great for holding candy canes in place. You can use anything really, wine glasses of different heights, bowls, jars… whatever you can get your hands on! Or if you’re needing some new glassware what a good excuse to buy some… it doubles as decor too. Then I added our leftover candy.
The napkins placed into the glasses create a pretty poinsettia looking flower, don’t they? This was a total win because I didn’t feel like ironing my napkins and now you can’t tell!
I think the best thing about this Christmas tablescape is after your party or dinner you can just throw the kraft paper away for easy clean up! This especially worked out great for me because we have a custom made table, so I have lots of trouble finding tablecloths that fit our table.
Some of my cinnamon salt dough gingerbread ornaments were just perfect for our Candy Land table, but I think regular gingerbread cookies would be great too. We love entertaining and creating beautiful tables, but I’m a firm believer in shopping your own house before you buy new stuff. Sometimes you need to add items to your collections, but sometimes you don’t. You have a lot more to work with in your home that you realize!
If you love creating beautiful tables make sure to have a few staple items, such as various napkins and a few chargers or placemats and then you can create endless looks! I love working with white dishes because they’re so versatile and you can just throw color and patterns right in.
I love how the sugar makes the candy so vivid and pop, it’s Candy Land meets the North Pole! I just can’t seem to leave my house alone and I’ve swapped a few things around since the home tour. Since I have our poinsettia arrangement on our kitchen table the mini budget Christmas trees made it to the dining room buffet table and they look so cute! I love how bright and cheerful our table looks!
HOW TO CREATE A FLOWER ARRANGEMENT WITH CUT POINSETTIAS
Have you ever thought of using poinsettias as cut flowers? Many of you know that I love keeping fresh flowers in our home, it adds a sparkle to your home like nothing else can. I enjoy trying different types of flowers, so I decided to experiment with poinsettias. I’ve always loved the vibrant red color of the flowers but I’ve never been a fan of those cheesy foil wrapped pots. To be honest they horrify me but I ended up buying a large one to use for cutting flowers.
I experimented with some cut poinsettias and used them in my Christmas home tour, I was really pleased with how well they held up. This single flower in my office has especially lasted a long time. So I decided to make a larger arrangement for some Christmas cheer, I’ll tell you what flowers I used and some tips along the way.
First off I’m still using the same plant! Each time I’m ready for more flowers I take a pair of scissors and snip it off right at the dirt. Poinsettias will ooze a milky substance after being cut, this isn’t a big deal but it can cloud your water if you’re using a clear vase. I recommend soaking for 10-15 minutes and then adding it to the arrangement for nice clear water.
Depending on how you want your arrangement to look you’ll need to snip off some of the large green leaves. Take a paper towel and blot off any milky residue.
For this arrangement I used white roses, elegance ranunculus to compliment the red, and bells of Ireland for a gorgeous pop of green and some fun height and texture.
I not a fan of using the flower food package that comes with flowers, it’s more of a hassle for it to dissolve and depending on the brand they have different dilution ratios. I’ve love this liquid flower food from Amazon, a bottle lasted me a year and I just ordered my second. It really helps preserve the life of your flowers.
Did you know that poinsettias are not actually poisonous? I’d always heard that growing up, but I watched a man eat one on YouTube haha, he said it tasted bad though and may give you an upset stomach. I wonder how that myth got started?
Poinsettias last quite well being cut, be sure to check your flower arrangement every few days, add additional water if necessary and pull out any decaying flowers, one bad flower can spread bacteria cutting the life of your pretty flowers!
I absolutely love how vibrant and colorful this arrangement turned out. Why not grab a poinsettia plant and play around with some ways to use them as fresh cut flowers? It’s a way to give this Christmas flower a fresh new modern look. I still have enough plant left over for another arrangement too. I think next time I’ll try ivory poinsettias. The possibilities are endless!
Cheers to Friday and another pinecone project! First off, no I am not out of pinecones yet. Like I mentioned before, we collected about 500 pinecones one weekend, and although I’ve made several projects with them I still have a ton scattered all over the garage floor. I love the versatility of pinecones and the fact that you can get them for free. I’m continually brainstorming new ways to use them, so I came up with sugar plum fairy pinecone garland. It was a really fun project and there are lots of ways to customize. I think any girly girl or anyone just loving pretty decor would love this.
Making pinecone garland is simple, I’ll show you how I did this one. If you’re not using store bought pinecones, which I am not, you’ll want to bake these in the oven at 200 degrees for about 30 minutes on a cookie sheet to make sure they’re bug free. I’ve bleached pinecones, which will kill off bugs and icky stuff, but it’s not necessary for this project unless you’re going for a light weathered look.
To create a snowy effect I just dabbed on a little white paint. I used cheap craft paint, although I think using any kind of white paint would be fine. Dab on as much as you want, I was careful painting at first, then I realized the ones I painted sloppy looked just as good.
While the paint is still wet sprinkle some glitter, I used a fine silver glitter. My glitter stuck just fine to the wet paint, but you may want a little glue on hand in case yours doesn’t stick as well or if you want to add glitter deeper into the pinecone where the paint didn’t reach. Let the pinecones dry. By the way I keep rolls of brown paper from the Dollar Tree on hand for easy clean up when I’m crafting messy projects. It’s great, I just throw it all away when I’m done.
Wow, this hot glue gun has some years on it… and this is its good side! Next I glued on little pink puffs, we used 2 sizes from Hobby Lobby. Ashley chose pink and only pink but I also think a combination of colors would be pretty. I’ve lost count of how many hot glue burns I’ve had this year.
This is my secret for how I get all my pinecone garland to work. I found these little rings in the jewelry aisle, I’ve seen them at Walmart and Hobby Lobby, they’re just a few dollars. I hot glue them on the pinecones so that I can easily string the garland. If your pinecone is uneven on the bottom or it sinks in too much, gluing it off to the side a bit works just fine. Honestly this method works really well. Out of all my stair garland I’ve only had 1 ring fall off. Just let it really dry before you string it. This method is much better then tying or gluing directly to the string in my opinion because you can slide the pinecones around and adjust them. If you want the pinecones to stay in a certain spot that’s where the ribbon comes in.
Cut a bunch of ribbon into strips about 3-4 inches long. Tulle is a definite must here, not just because it’s cheap but because we’re making dancing sugar plum pinecones here! They are girly and demand fluffy tulle! For the second ribbon use anything you fancy.
Now string your pinecones along with a thin ribbon, yarn, or twine. Don’t worry too much what it looks like, we’ll cover most of it up. I started with my silver ribbon strips and tied them on, then I added the tulle ribbon strips. It’s really easy to slide and adjust everything around until you get the look you want.
When I make garland I usually tie a loop at the end, this way you can use a command hook, a thumb tack, or tie it in place with another piece of twine or ribbon. For this photo I used tape.
The only problem we had was trying to decide where to hang our sugar plum fairy garland, because it looked cute everywhere! There are two things in life I really hate doing, that’s peeling garlic and the other is pulling off hot glue strings. I pulled off so many glue strings, then I eventually thought screw it… I’ll pretend they’re icicles. Haha. Would you like to work for me seasonally pulling my hot glue strings off all my 10,000 projects? Send me a resume.
I’ve done so many pinecone projects lately, am I driving you crazy with them? Should I change my blog name to Everyday Pinecone?? Warning: I may do a Valentine’s Day pinecone project.
Our weekend will be really busy, I’m insisting we take more family photos… which means I will need to bribe my kids again with cash and prizes. Plus we have our annual Neiman Marcus Christmas Lunch at the flagship store in downtown Dallas, it’s a tradition we love, plus we have a Christmas party and it’s also my son’s birthday weekend. If you’re new to my blog or just stumbled upon it be sure and check out my Christmas tour and my budget tips.
I’ve been meaning to review the MakeUp Eraser for some time now. I know those who are really into makeup and skincare have already heard of this product, and you may even already have one. But still on occasion I’ll bring it up in conversation and I find there are women who have never heard of the product.
Now there are even more MakeUp Eraser options than ever and so I thought it would be a fun blog post to compare the sizes, give my tips on using it correctly, and a few other ways I’ve discovered to use it.
I had heard of the MakeUp Eraser but never really understood it’s purpose or even thought it was necessary until one day I got a sample from Sephora, it was just a small cut square without edging. I threw it in my travel bag to Europe over the summer and didn’t give it much thought. One day I ran out of my makeup removing wipes, I tried the magical little sample and the rest is history.
Makeup needs to be removed from the skin so you can properly cleanse the skin and apply skincare. Face wash doesn’t always thoroughly remove your makeup, I’ve verified this plenty of times by looking at my skin in my makeup mirror. So like most of you, I got in the habit of using makeup removing wipes, these do a good job of removing makeup BUT sometimes I find them to be drying, the fragrance can bother my skin, and you must constantly buy them. The MakeUp Eraser can be washed and used over and over which is better for the environment! So in the long run you’ll end up saving money.
HOW DO YOU USE IT?
It’s simple, just wet the cloth with water and in circular motions gently cleanse the skin. I’m especially gentle around my eyes. It’s amazing how the makeup just comes right off, yes even eye makeup! I can’t speak for waterproof mascara, but regular mascara and eyeliner just melt right off. There is no need to use separate eye makeup remover or oils. After I remove my makeup I go forward with cleansing my skin with my regular glycolic acid cleanser.
COMPARING SIZE OPTIONS
Like I said, I started with the tiny cute square as a sample. I actually made this work quite well for weeks in Europe. I still use the sample size, it’s been washed countless times both by hand and in the washing machine. I love how it hasn’t frayed.
The Original is a good size and probably the most versatile, but I find it to be longer than I really need. I’m actually tempted to cut it in half, I seem to gravitate towards square shaped cloths. It’s priced at $20 for a single, but this lip print 2 pack is just $25!
The Mini is a great size for those who don’t wear a ton of make up, the narrow size is especially great at removing eye make up. Again I wish it was a little more square shaped though. What is great about the mini is if you’re just starting out you can buy a 4-pack so you have enough to get the dirty ones washed, that’s a great value. It’s priced at $12 for a single or $40 for a 4 pack.
The Glove I didn’t think I would like at all but it’s really cool. It comes as a set but I just use one glove for each wash so it’s 2 individual ones for the price. It’s especially helpful at removing makeup around my eyes. It’s priced at $30 for the set.
The Jumbo is absurdly large and I can’t understand the purpose. Why on earth would you want one this big? Maybe for Halloween if you’re covered head to toe with body makeup. It’s priced at $40.
POTENTIAL PROBLEMS
People in some of the reviews I’ve seen have commented that it’s made them break out. I have two responses to that. First off it just removes makeup, it’s not cleansing your skin. So don’t think that’s it, you still have to cleanse your skin afterwards. On days I don’t wear makeup I just use my regular cleanser.
Just as important, don’t use a dirty MakeUp Eraser on your face! You’re trying to take makeup off, there’s no reason for yesterday’s dirty makeup eraser to come into contact with your skin again. I recommend you wash it each time or buy a few so that you always have a clean one on hand. My skin is very acne prone and I’ve not had a problem.
In Europe I washed mine out by hand with tons of bar soap and made sure it had 100 percent air dried before I used it again. The easiest way is to just throw it in the washer and dryer. Being 100% polyester it washes up great and I’m even able to get black eye makeup stains out.
OTHER WAYS I USE THE MAKEUP ERASER
It’s great for getting makeup off bathroom counters. I also use it to clean the outsides of my makeup compacts and wiping out my makeup drawer… seriously my makeup drawer gets so filthy! I’ve also used it to get dirt off my purses, and my favorite…it gets rid of shoe funk! What’s shoe funk? It’s that build up of funk that happens when I don’t wear socks with my shoes. It’s so gross, it happens to all my flip flops, flats, sandals, and pumps. I always start with clean feet so I’m not sure how it gets so bad.
This miracle product completely removes all shoe funk! Remove it each time, if you let shoe funk build up it’s harder to remove. I love how there is no harsh chemicals that could damage my shoes!
Lots of fun colors and prints are available, and I recommend all of these sizes except the jumbo. By the way… please tell me I’m not the only person who gets shoe funk!!
Hello loves! I’m back today with more Christmas talk, how to have a beautifully decorated home for Christmas on a budget. Going out to a store and buying every decoration you see to decorate with is easy if you have that luxury. What’s hard is finding frugal ways and still creating a gorgeous home. I know there have been times I’ve purchased things then the credit card bill comes in January and I’m like “you spent $68 on seasonal napkin rings??” We did replace two Christmas trees this year, which was unavoidable for us, but those purchases made me determined to keep everything else on a strict tight budget. I’d rather drop the dough on the gifts than the decor, but that doesn’t mean I’ll accept anything less than a perfect Christmas home.
So here are some of my favorite budget friendly Christmas decorating secrets and tips. Most of these photos are from the Christmas 2018 home tour, but I did find a few photos I took last year that never made it to the blog.
RIBBON IS YOUR BEST FRIEND
Ribbon is your best friend! It’s usually on sale at craft stores this time of year, you may even have some great ribbon on hand already, or pick some up from the dollar store. The possibilities are endless with ribbon, you can create a simple ribbon garland like I did over my bed by cutting small strips and tying them into a bow on twine.
I was able to take a $2 roll of gold ribbon and tie it to some ornaments from last year to create my beautiful festive chandelier! You can use ribbon to decorate your tree, add a bow to a boring wreath, and use leftover ribbon to wrap presents.
STALK YOUR LOCAL DOLLAR STORE
I love the Dollar Tree for seasonal, party, and craft items. Some visits can be hit or miss, during busy seasons like Christmas you almost need to stop by every few days, and when you find a great items that have potential you better buy plenty. Sometimes I’ll go back the next day to buy more and they’re gone. I made these cute mini budget Christmas trees from $1 trees, at the Dollar Tree, if they’re gone hopefully they’ll restock them. A Dollar Tree staple this time of year is white tissue paper and red Christmas ornament balls, it’s insane how much I go through those!
USE WHAT YOU HAVE
Use what you have, really let that sink in. The possibilities are endless! Our outdoor wooden glass recycling bin was brought inside and filled with tissue paper and little presents and it’s so cute.
If you have pretty crystal or china, pull it out and set the table for a gorgeous look. You have more items in your home that can be used than you really know. Do you have pretty martini glasses? Fill them up with candy, pull out that gorgeous crystal cake stand you never use and stack it with little Christmas trinkets.
I was able to clear out a few empty baskets we had on hand and filled them with old ornaments and draped some old lights around them. Tip: that’s not all ornaments, most of the baskets are filled with tissue paper, and the ornaments are on the top.
FRAME OLD CHRISTMAS CARDS
A simple and easy way to add Christmas decor is to frame cards. You can frame your own cards, or others. This card my Mother in Law sent out years ago was just so funny I made sure to hang on to it. The next year it was still making me laugh so I decided to frame it and suddenly a new idea was born! I save all old christmas cards and I’ll pick new ones to frame from the previous years. Sometimes I frame our old photo cards too.
Here in our bedroom I’m doing it all, free pinecones, old framed cards, and I pulled out the ol’ trifle bowl to hold ornaments.
FORGET EXPENSIVE TREE SKIRTS AND USE SCRAP FABRIC
I couldn’t get a tree collar to work on any tree we had this year, the stand of each tree was too wide. One day while up in the attic – seriously, when I’m decorating I’m there all the time – I found some old white fur fabric. It was from my old vanity stool I had re-covered, so I used the leftover fabric to make a tree skirt. It’s cut straight, but I cut a slit in the back and slipped it around the tree base. Then I tucked the edges under to make a circle. I found a ton of old tulle too and did the same thing with our dining room tree. So use what you have, old scrap fabric or a small blanket.
DECORATE WITH BOXES
I’ve been saving large boxes for a while now, I knew this year I wasn’t going to do an upstairs tree, but I wanted to do something fun for the kids. I needed a way to fill a large area cheaply without buying much and wrapping up big boxes came to mind. I also like to wrap up little boxes, you can wrap up jello, pudding, or raisin boxes and group them together in a bowl for some festive cheer, and just unwrap everything afterwards. Another trick is boxes of bar soap, I used those to decorate some shelves and stockings. I removed the soap and just wrapped up the empty boxes. Bonus is we have a ton of soap to use now, haha.
Why not decorate with real wrapped gifts, who said they need to be under the Christmas tree?
USE WHAT NATURE GIVES YOU FOR FREE
Collect pinecones, acorns, and tree branches for endless possibilities. You can create natural rustic decorations, or add some glam with paint and ribbion. We had a lot of fun collecting pinecones, and large burr oak acorns! I’ve listed some of my pinecone projects, such as this snowy pinecone berry wreath, but I have a few more I’m in the process of making!
When we came home from Europe our holly tree had died in the front yard. I was so upset, but that’s Texas in the summer for ya. The landscapers thought I was a little nuts when I insisted they remove the tree in 1 piece. I think they wanted to hack it up into pieces to make it easier, but I stood my ground. I decided it would be a Christmas tree in our bedroom. It took a long time to prune it into the shape I wanted, then I flocked the tree with my leftover SnoFlock (the bag has lasted years) then I wrapped the root ball in burlap and tied with twine. It’s a simple winter tree and I’m going to use it every year.
If you have a small dead tree or bush don’t throw it away, it has so much potential from Halloween to Christmas, save it for yourself or pass it along to another!!
I saved some of the branches I cut off the holly tree and made this snowy little tree for the kitchen. No, our kitchen window isn’t filthy. It must be something with your computer monitor… you should probably get that checked out!
GRAB SOME SPRAY PAINT
I freakin love spray paint any time of the year but this is the time of year it really shines! Gold spray paint is the perfect way to take your decor up a notch, and a can will last you quite a while. I didn’t like my nativity set and last year I was finding myself not wanting to put it out. I wanted a more modern sparkly one and never found one and one day after too much coffee I spray painted the entire set gold and I now LOVE IT!! Do you have any cheap candlesticks or old blah Christmas decorations that need a spray paint makeover?
MAKE YOUR OWN ORNAMENTS
I love making cinnamon salt dough ornaments, they’re inexpensive to make and once you get the hang of it it’s pretty easy. I did gingerbread but the sky’s the limit with what you could create, adding a little glitter and a ribbon to pinecone would be simple and pretty. Years ago when we first moved into this house we decorated the upstairs kids tree with small stuffed animals and it was so cute. So get creative!
SNOW FLUFF
A bag of snow fluff can be $4-7 depending on where you live and the sizes. It’s like pillow fluff and it can be used for everything. I used it to fill in some bare spots in my dining room Christmas tree, I used it to top off the gold potted trees in my office, these dollar store trees, and we used a ton of it around the wrapped up presents upstairs in the loft. I think you could even use it to cover up your Christmas tree stand. You can use old pillow fluff if you want, but actual snow fluff in the Christmas aisle will be a bit softer and whiter.
FILL BOWLS AND CONTAINERS
I love filling bowls, baskets, and boxes with little Christmas items. We all end up with a few leftover items we aren’t sure what to do with. A few ornaments, little bells, some leftover ribbon, or even a bow from a gift, throw them all in a bowl! Maybe add a tiny little present too, like a wrapped up jello box. It’s a nice was to use up everything, and it’s a bowl of Christmas cheer.
I hope these have given you some good ideas! Now I’m off to make taco soup, and do another pinecone project with Ashley. Yep… haha you read that right. I also want to do another fashion post with a look I love, but I have that post Thanksgiving puff so I’ll just go play with pinecones for now.
We’re now officially into the holiday season, and although this sugar cookie martini can be appropriate and yummy year round it’s especially great this time of year! After all, who doesn’t love delicious sugar cookies, and who doesn’t love a great tasting martini? This recipe is a total win win! I love indulging in a delicious cocktail during the holidays and this recipe is a great fun adult way to indulge the kid inside you!
You can use any favorite brand of alcohol but for testing purposes I’ll tell you we used Svedka vodka, After All chocolate liqueur, and Bailey’s Irish Cream. For the butterscotch syrup anything from the baking or ice cream aisle will work, if you can’t find butterscotch syrup use butterscotch topping, it’s just a little thicker. The butterscotch gives it that rich butter flavor, much like you find in a sugar cookie.
Merry Almost Christmas! I’m so excited to show you our Christmas 2018 Home Tour. Just ask any of my family members and they will confirm I am truly a Christmas decorating nut, one year I put up 4 Christmas trees! Every year I like to switch things up a little, it’s just too fun for me to leave it the same every year! Sadly last year I failed getting a tour up on the blog, it didn’t happen because we we’re really busy with photography classes and planning a Colorado trip, but I’m here this year.
I mentioned I blew my budget on a few things, but they were essential…I needed new Christmas trees, they were really old and bad, but I made a ton of my own decorations this year. I have a lot of tips and tricks for maximizing Christmas decor on a low budget. That won’t be in today’s tour, but next week I will blog about all my secrets and ways to save money. I’m all about balance. Be sure to sign up for the email list so you don’t miss anything good!
In case anyone is interested in any decor items related to the tour I’m going to link where to buy them below, although many things are no longer available.
These white branch trees have been a favorite for a few years in our home. Originally I bought them at Restoration Hardware, I found nearly identical trees at Amazon for a lot less. The ones above are RH and the one shorter one below is from Amazon… save and go with the Amazon ones! This year I put them in gold pots.
I love adding Christmas cheer to my office, plus the room is in the front of the house so we all get to enjoy it. I’m thinking I may leave these trees up after Christmas and do something Valentine’s Day-ish with them. Alexis my sassy mannequin is in full Santa spirit as well.
Those with a good eye did you notice our plantation shutters? I love them, I planned on reviewing our process but they just arrived. We are ordering ones for the upstairs loft after Christmas so I’ll give you a review of how we ordered, how we saved, and the installation process.
My lovable golden deer head, Goldie Fawn, (yes I know that doesn’t make sense) freakin’ loves getting decked out for Christmas. I love the sparkle that mirrors give to a room and the berry wreath really warms the area up. I just love wreathes over mirrors.
Hello, meet my naughty purchase of the year… this Christmas tree, I’d link it but it’s already out of stock everywhere. But it’s tall, pre-lit, and gorgeous! I’m all about the flocking this year baby! I think the merry burlap bag is just so cute too!
So what I did to cut costs is do a lot of decorating with the 500 pinecones I collected. I bleached them, made wreaths, and now garland. The garland took a long time but I love it! See my gingerbread salt dough garland back there? The Merry Christmas banner was a new purchase, and I tied some old burlap ribbon to it to jazz it up.
A couple years ago I was shopping around for a trendier nativity set and I couldn’t find one I loved so one day I decided to spray paint my existing set gold and it’s LOVE!! Jesus loves his glam makeover… missing are the 3 wise men and shepherd boy… what can I say? There was no room at the end table.
I hung letters for each child and I’m really glad I didn’t name my kids Alexander, Sidney, and Sophia right now…hahaha. Brian says I have a stocking problem, yeah… I do buy new ones a lot, but I can’t help it. These knit stockings are awesome and also come in red.
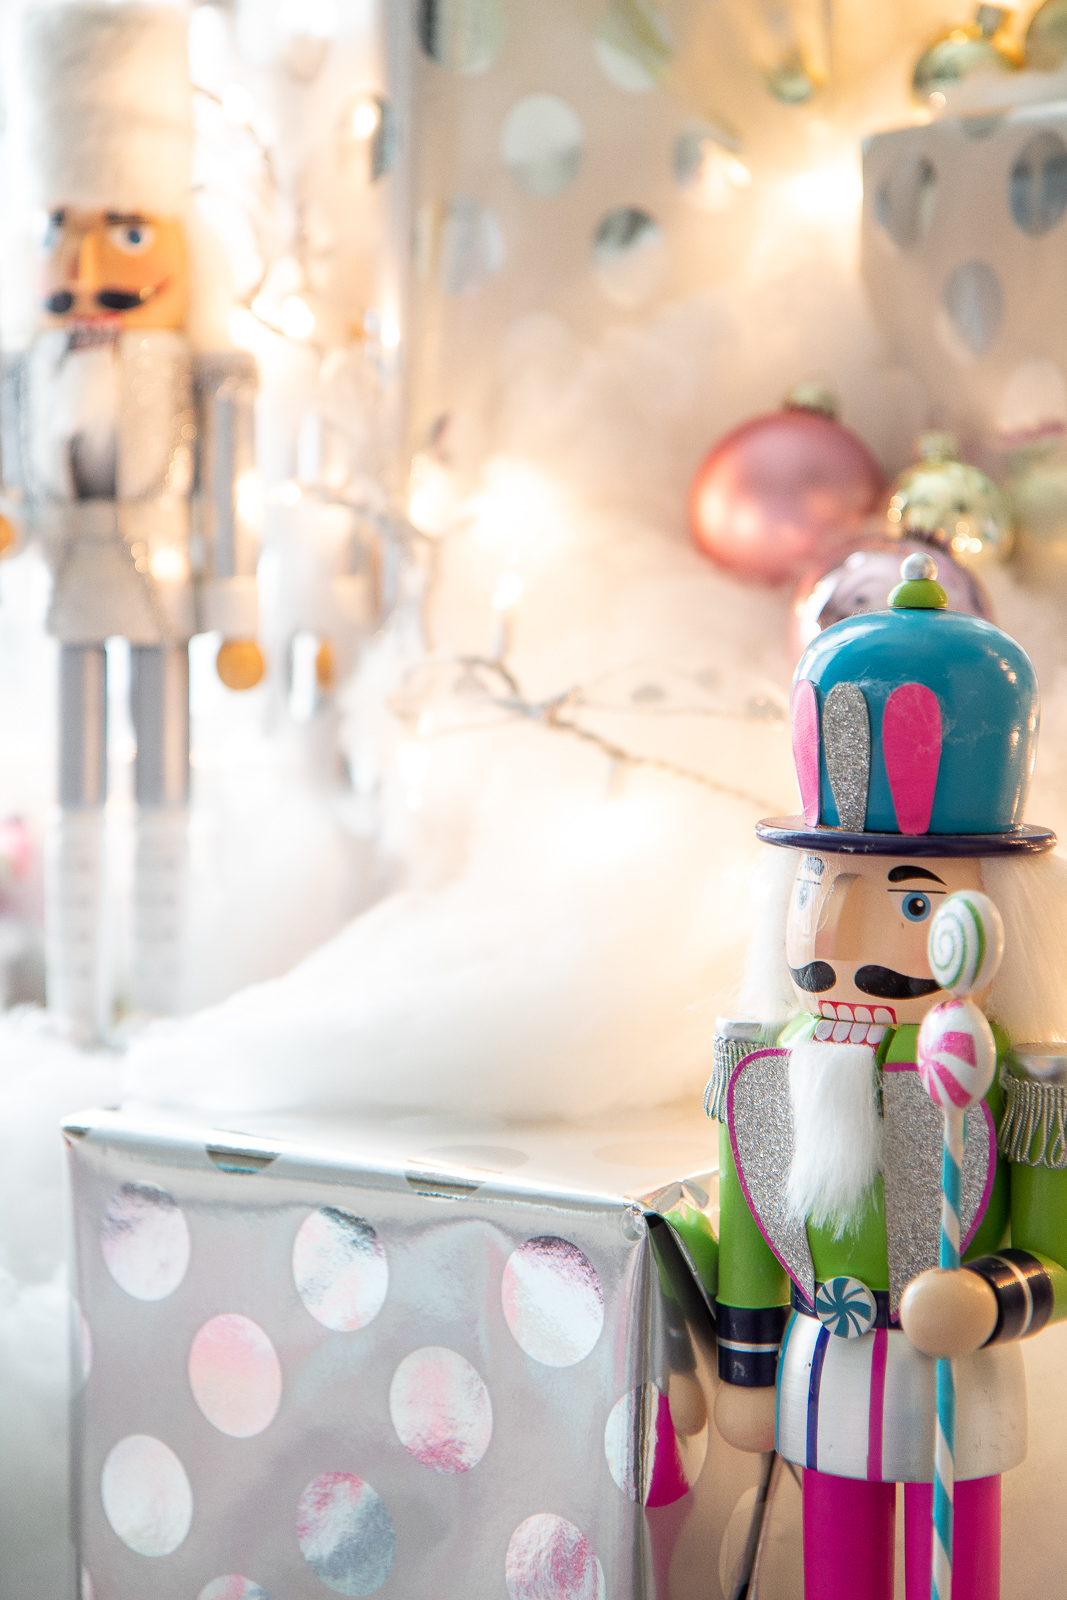
Now for the loft, up here has a funky relaxed teen vibe. The vivid stripes on the bookshelf make styling a breeze and so fun. Below is where I put a Christmas tree last year but we decided it was time to mix it up. So I collected boxes of various sizes over the last few months and wrapped them up and added lots of fun pizazz.
Many thanks to Ashley who helped me pull off our Christmas present snow scene, I couldn’t get this area right and she helped me work out the kinks. She was a trooper waiting in that 45 minute Hobby Lobby checkout line with me… I only wish I was kidding about that.
Our bedroom I needed to keep a little simpler or I would never go to sleep! I made most of the decorations in here, the pinecone wreath, garland, and the snowy winter burlap tree. Brian is obsessed with our flannel sheets by the way! I can’t blame him… those things are good.
Mr. Nutcracker said he’s for indoor use only but I put like 40 coats of clear varnish on him. So fingers crossed… let’s see how he does!
Thanks for stopping by my Christmas 2018 Home Tour, I think it’s the most magical time of year! I will soon blog my tips and tricks for decorating, and don’t worry we’ll have many more Christmas and holiday projects on the blog…more projects, food, and fun! Have a wonderful Thanksgiving!
Do you ever make salt dough ornaments during the holidays? I’ve always thought it was a lot of fun, and you can do a variety of things with them. In my early years I would make basic salt dough ornaments and paint them, now I prefer the simple charm of cinnamon salt dough ornaments. Not only does the cinnamon scent the ornaments, it also gives them their pretty brown color. It’s perfect for rustic looking ornaments and especially my favorite, gingerbread!
I used to try really hard to get my dough ornaments perfect, then one day I realized that really defeated the purpose. These ornaments are supposed to be homemade and charming looking! The trick is not to worry about making them perfect. If you’ve never made these before I’ll show you how easy it is, and give you a few tips I’ve learned along the way.
SUPPLIES NEEDED
1 cup salt
1 cup cinnamon, plus more for dusting
3 cups flour, plus more for dusting
1 1/2 to 1 3/4 cup warm water
Straw
Rolling pin
Parchment paper
Cookie cutters
Begin by blending the salt, cinnamon, and flour into a bowl. Gradually pour water into the bowl and stir until mixture starts to clump together. At this point I start using my hands to really work the dough together. Add additional small amounts of water but be careful not to over wet the mixture. It shouldn’t feel sticky. Some batches require a little more or less water I’ve noticed.
After the dough is comes together in the bowl I continue to knead the mixture on the counter until it’s soft and pliable. Sometimes I’ll split the dough up into 2 batches to make it easier. You do not need to dust the surface with flour for this step.
In a small bowl mix equal parts flour and cinnamon – around a few tablespoons of each will do. Be sure to add the cinnamon so your ornaments do not turn white! Dust your counter lightly with flour mixture and begin to roll the dough.
Rolling the dough can take a little patience, I roll slowly at first, then end with shorter quicker motions. Any cracks can be smoothed with your fingers and the rolling pin. You want to roll the dough at least 1/4 of an inch thin. If you can get it a little thinner than that, that’s good too. To lift the dough you want a smooth metal spatula. This wide one from Wilton is AMAZING! It’s a lifesaver for making gingerbread houses, cakes, and so many things!
Transfer the gingerbread to a cookie sheet lined with parchment paper. The paper will help absorb moisture and keep the dough from sticking to the cookie sheet. Another reason I like to use parchment paper is if you only have 1 pan you can continue to cut more ornaments and place them onto the paper, then when your pan is ready just slide the paper onto the pan.
Grab a straw and poke holes in each ornament, the straw creates a perfect uniform hole. A straw can quickly clog up with dough so a trick I’ve learned is to blow the dough out each time. As long as your dough wasn’t rolled too thick it’s easy to do. You can also do holes on each side for stringing garland. I do this with bigger gingerbread.
Bake at 300 degrees for about 30-45 minutes. The ornaments will continue to harden as they cool.
Sometimes salt dough ornaments will puff in the oven. It used to really bother me, but now I find it cute, especially on gingerbread. They have little round tummies! I’ve also noticed they puff less when on the very lowest rack in my oven.
You can also air dry your ornaments to be completely flat like the one I did on the left. It will take 3-5 days to dry out, but they don’t seem to turn out as dark.
TIPS
If your dough starts cracking after it’s cut, but before baking in the oven you can just smooth it with your fingers and a little water.
Grab your supplies at the Dollar Tree and you can make these ornaments for nearly nothing! You can leave the ornaments plain or decorate with puff paint or paint pens. Save cut up ribbon and fabric scraps to tie to your ornaments.
If this is your first time making cinnamon salt dough ornaments have extra supplies on hand, in case the project goes wrong. I mentioned how the ornaments will sometimes puff. Sometimes they oven dry perfectly flat too, then I also have one that puffs up so crooked and wonky it goes into the trash. First timers just play around with it.
You can clear coat your ornaments if desired, clear satin spray paint works well although I hardly ever do this because they hold up great without.
I find metal cookie cutters work best, but feel free to experiment with plastic ones.
I made 3 strands of this garland for decorating this year, I just added some red wooden beads and jute twine. Sometimes I leave out the hole and just decorate gingerbread to place around the house, stockings, or in a bowl. I love these little guys, but I think any shape would be cute, and hearts are always simple and cute.
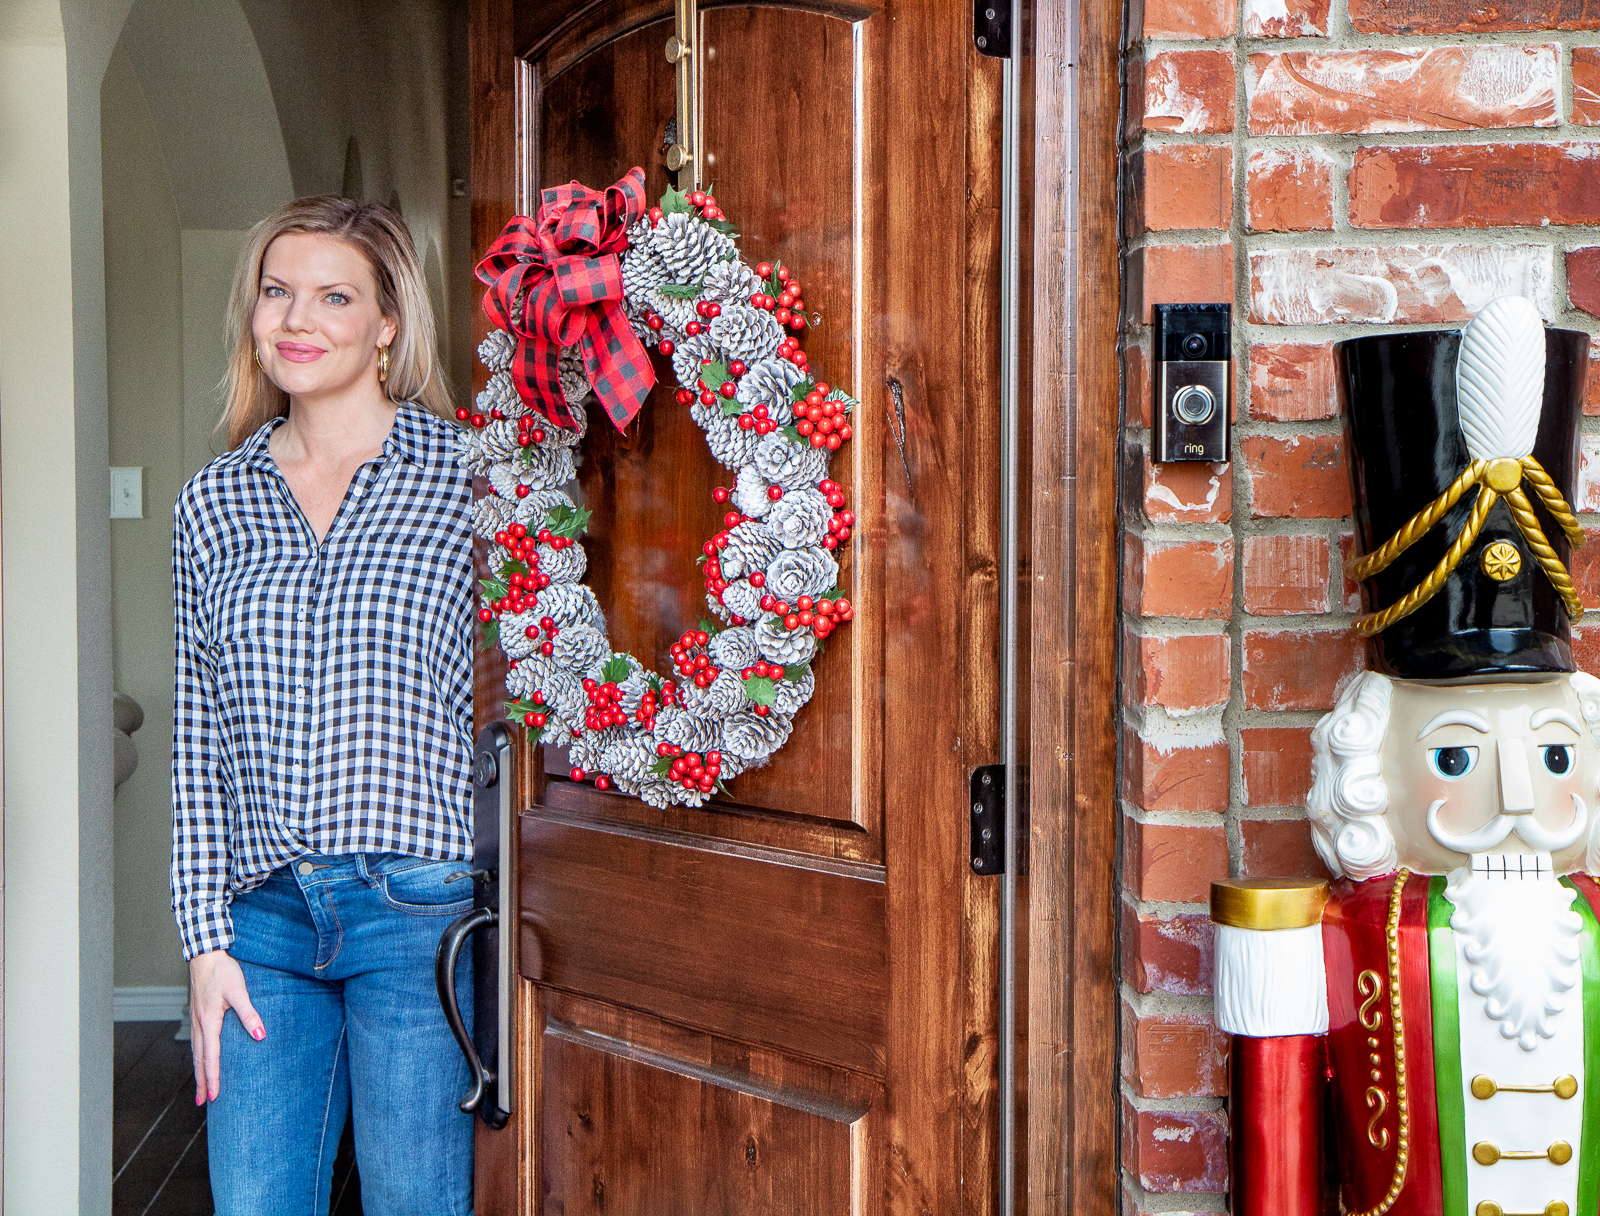
I actually botched my Christmas decor budget already buying 2 new trees and Mr. Nutcracker on my porch, but hey… it could have been worse! At least I threw in some decor that cost next to nothing, after our home tour is out I’ll share more of my secrets for cutting Christmas decorating costs.
I am overflowing with pinecones… remember we collected 3 huge boxes weeks ago? I’ve been having a lot of fun experimenting and crafting with them. You already know I’ve bleached them, and it was a cool effect. Now I’ve made a gorgeous snowy pinecone berry wreath for my front door with them and I’m thrilled with the result.
When working with pinecones you’ve collected outside you need to kill off the bugs by baking them on a cookie sheet at 200 degrees for about 30 minutes, this will also help pinecones open up a bit more. Line the pan with foil in case you have any sap that drips out.
I’m gearing up for my Christmas home tour soon, yeah… I know it’s early, but isn’t that a bloggers job to be early? I’ve already confessed I’m an early decorator regardless. Blogging just adds to my excuses. I’ve been warning everyone coming to our Thanksgiving and they seem pretty cool with it.
Before you begin, tie some yarn or ribbon to make a hook for hanging. Then start hot gluing the pinecones to the inside of the frame, in whatever position you like, once you finish do this to the outside of the frame. I placed hot glue at the bottom and also the sides to anchor them to each other more. Now we add another row of pinecones to the center to fill in the gap – oops I forgot to get a photo of that.
Here’s the trick, once the hot glue is set turn the wreath over and squeeze on some regular glue too. Hot glue is a blessing but we all know it gets moody in extreme hot or cold temperatures. That’s why a combo of regular and hot glue is your best bet.
Once dried it’s time to add the snow. My plan was to use white spray paint but I changed my mind and decided to use my SnoFlock instead. I still have a TON of it and I love the texture it gives. Flocking is really easy to do. You basically just add water, sprinkle it on, and let it dry. Big projects should be done outside or in the garage, little ones are fine in the sink. You can see more in depth steps from my tutorial last year. FYI small projects do not need a long dry time like a huge Christmas tree does.
After the flock dried I added berries to fill in the pinecone gaps. Then I found a big bag of holly berries from last year so I thought I’d add those too. They were on the dining room Christmas tree last year, I only remember that because I just happened to glance at the tree flocking photos.
I decided to add a bow because I always like a pop of color, I’ll pass on giving you bow making instructions. Mine always look ok, but are seriously a hot mess in the back. You don’t even want to know what’s going on back there.
I get such a thrill crafting from free pinecones. They’re adorable, natures gift! I adore this gold wreath hanger not just because it’s beautiful, but it’s adjustable. You can purchase SnoFlock from Amazon, and the ribbon, wreath form, berries, and Mr. Nutcracker all came from Hobby Lobby.
We recently had our front door refinished and while I love the result it’s so shiny it’s hard to photograph for real! Not complaining though, I love it in real life. Because our door was recently refinished I glued some snow fluff to the back of any rough spots that could scratch the door.
.
Am I done with pinecone crafts yet?? Nope, I’m making pinecone garland for the stairs and a simple wreath for over our bed. ‘Tis the season for hot glue burns! Christmas home tour will probably debut next week… that or a nervous breakdown. Haven’t quite decided yet.