It’s almost St. Patrick’s Day! Are you celebrating this year? Whether we’re traveling to Ireland or creating a festive Irish-inspired recipe, we always have lots of fun celebrating the day! With traveling and home projects it seems like we’ve been eating heavier meals lately, so I thought I would lighten things up this year and celebrate the day with this yummy St. Patrick’s Day snack tray.
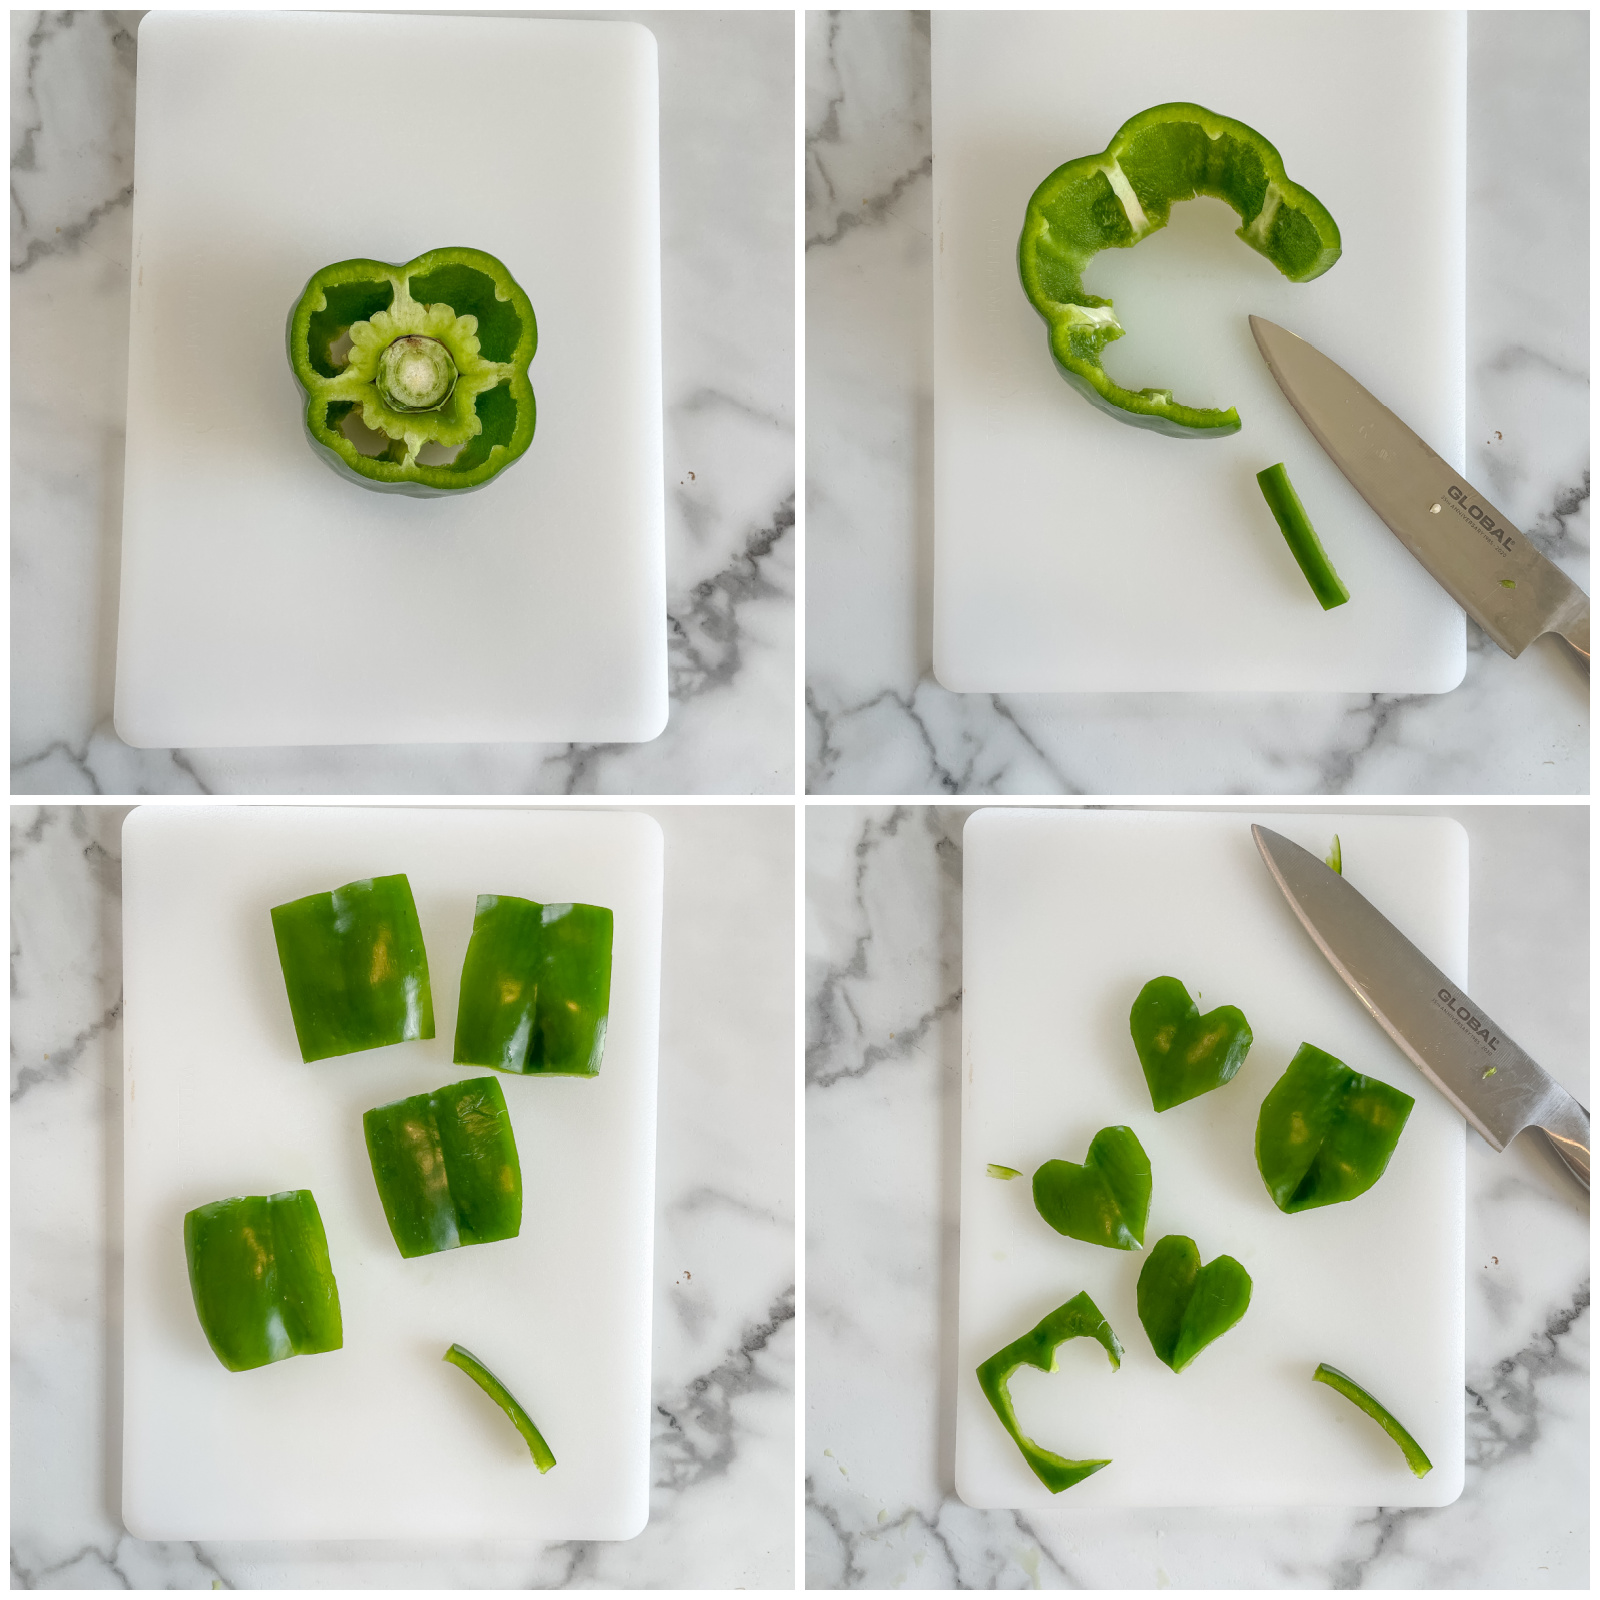
Complete with a savory pesto parmesan vegetable dip this snack tray is the perfect mix of sweet, salty, and savory! You can throw this snack tray together in a short amount of time, and it was lots of fun arranging the rainbow, clover, and other fruits and vegetables.
I love putting together snack trays and cheese and charcuterie boards, it’s a fun way to eat, and not just for entertaining… we often make it our dinner! All you’ll need is a food safe cutting or serving board, I’m using this one here, and your own creativity. The sky’s the limit!
To celebrate Saint Paddy’s day I usually make Guinness Stew with White Cheddar Mashed Potatoes, and we’re definitely adding this snack tray to our yearly celebration! The pesto parmesan dip was my favorite part and it’s green!! Feel free to double it… it’s that good!
I’m so excited to be sharing another new home space with you, the wood room! The wood room? What? We decided to name our rooms because it makes the rooms feel more special. Honestly though we were also getting a little confused… we have a lot of rooms so we’re naming them. As we spend time planning and getting to know our new rooms, names just naturally come to us and so the wood room was born.
Unlike the rest of our house luckily this space didn’t need much work. Just a little drywall repair, a new light, a fresh coat of paint, and furniture. Since our Colorado buyers bought our furniture we’ve pretty much started from square one. I can’t complain though… I love furniture shopping and decorating new spaces!
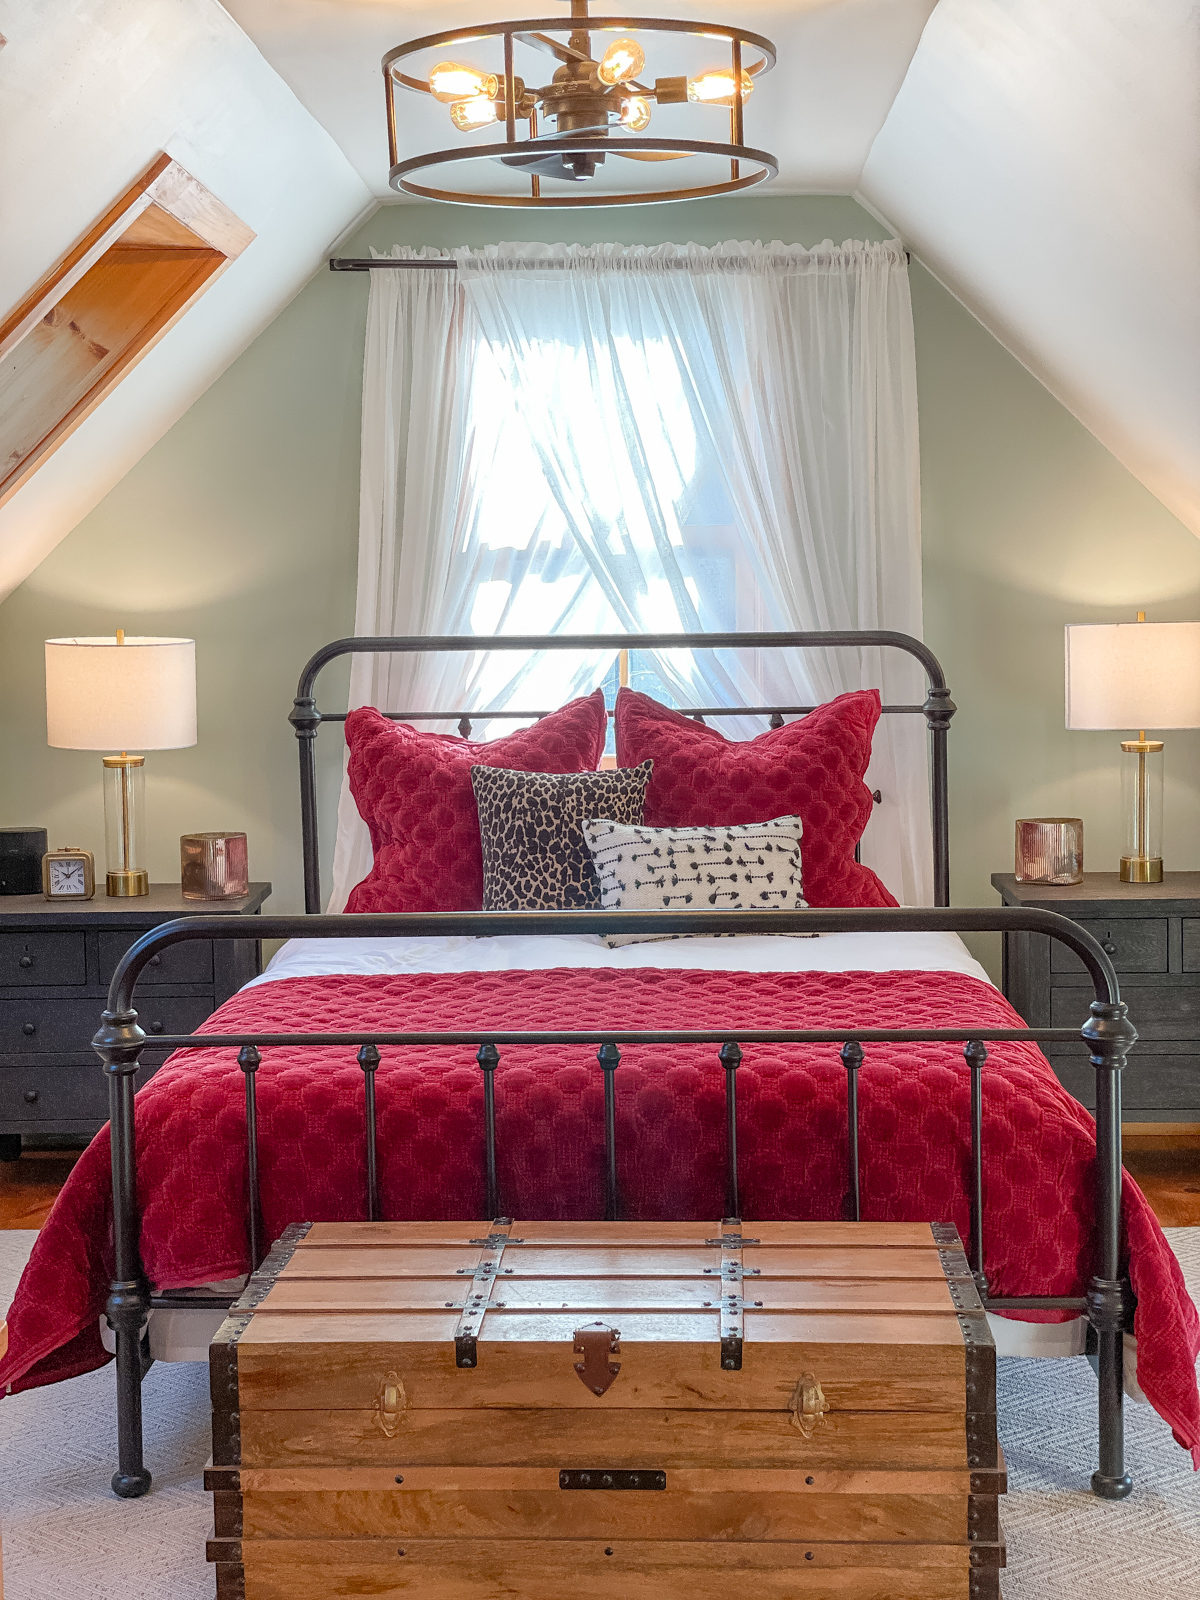
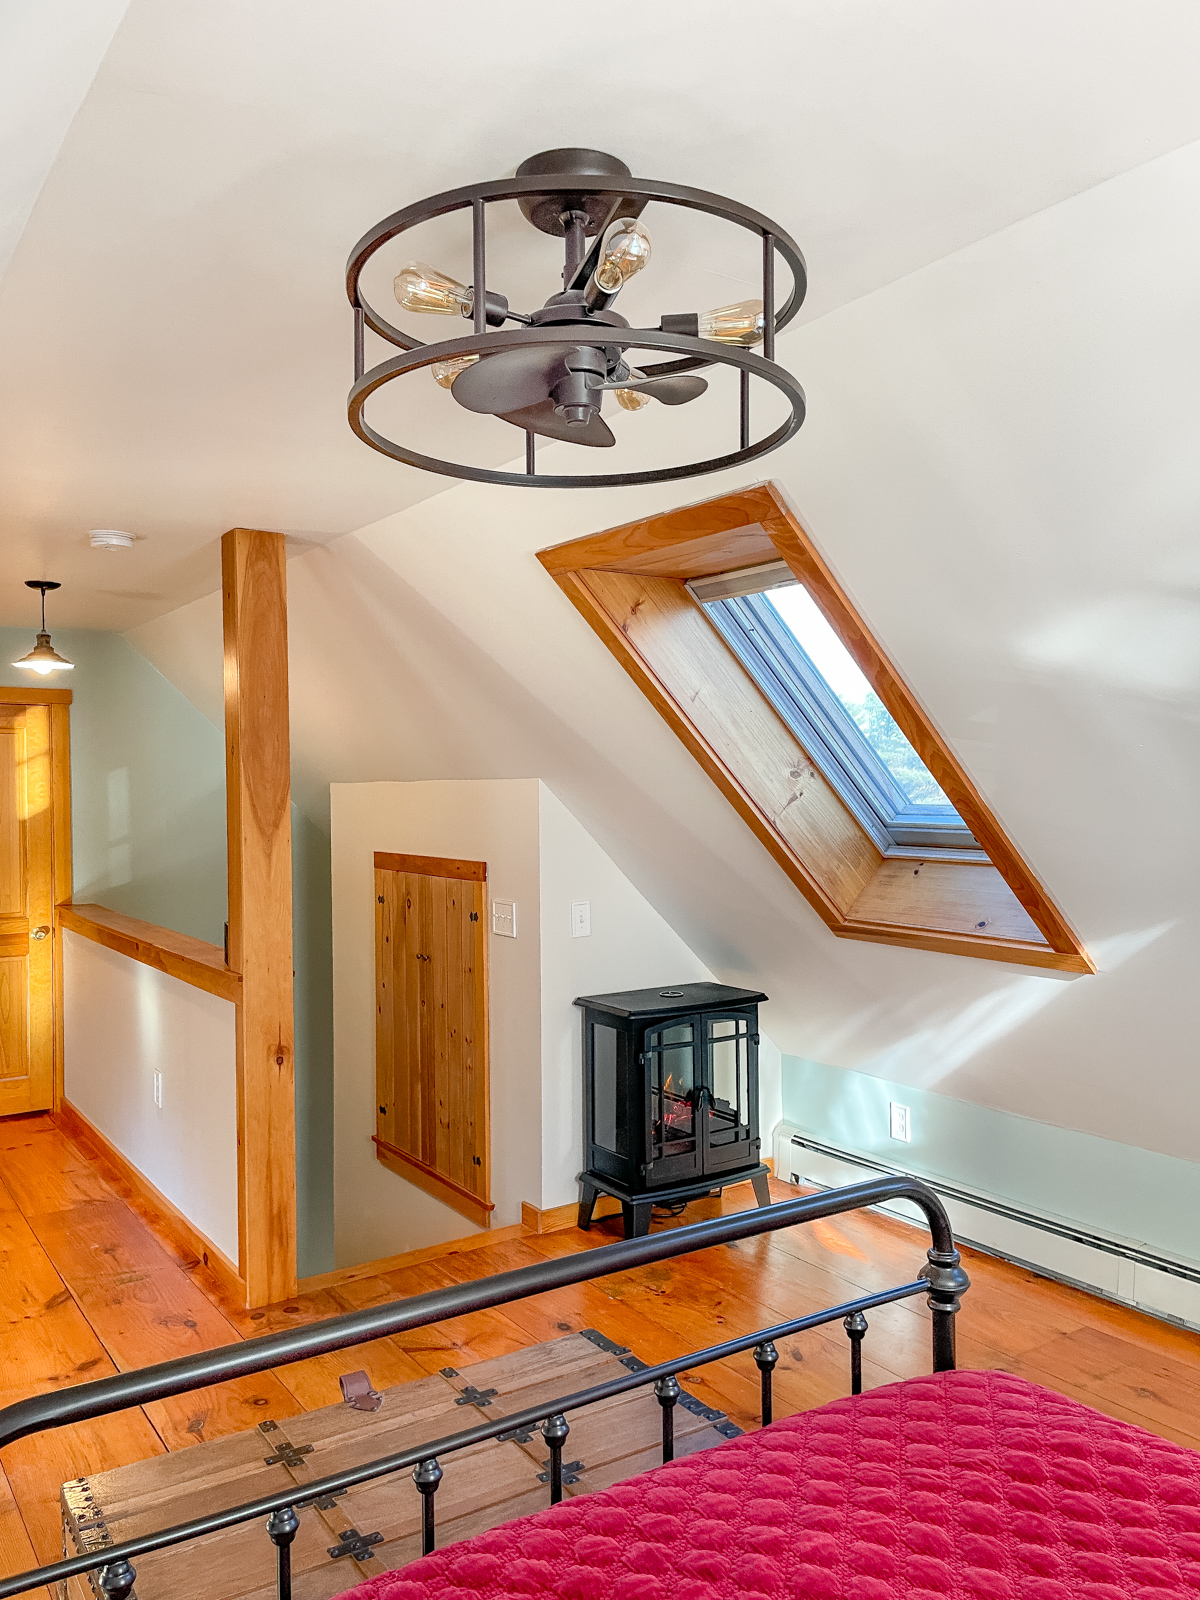
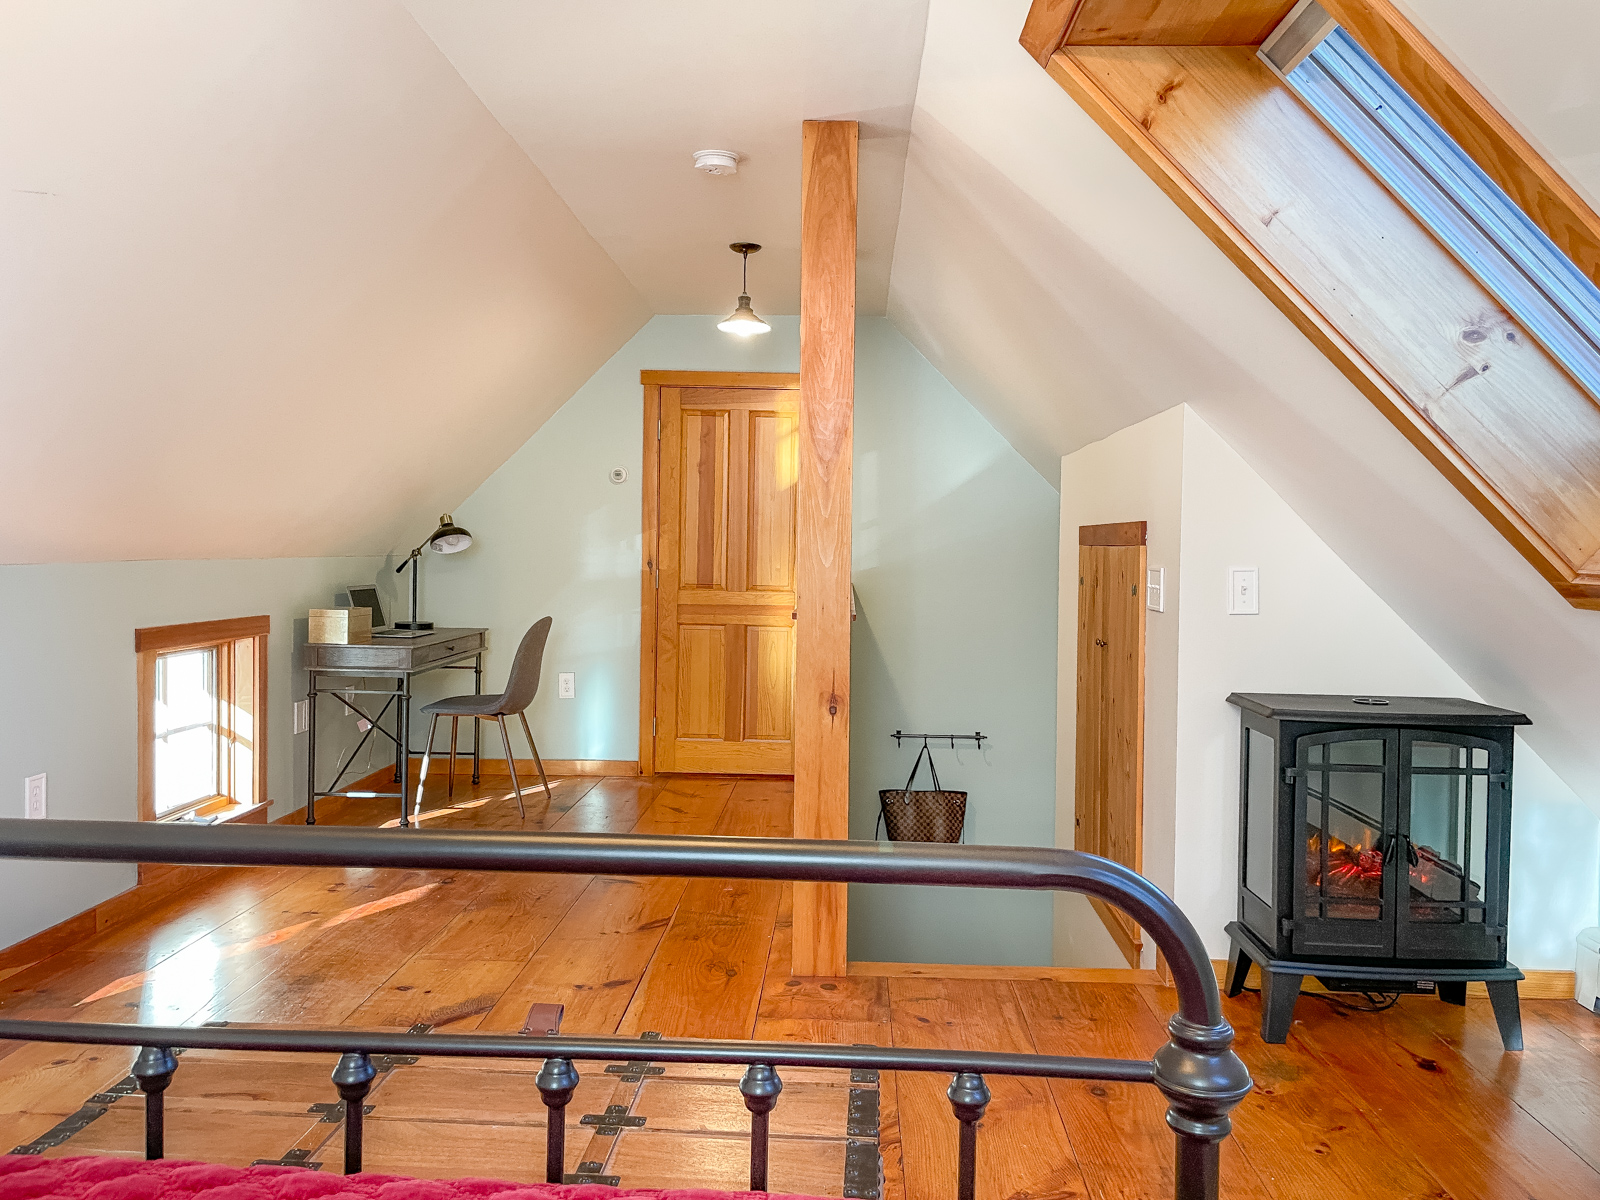
My biggest challenge though has been trying find furniture that could be quickly delivered. Since 2021 everything seems to be on backorder. We’re currently staying in the wood room until our master is done (that’s going to be a while) but that’s ok, I really love this room we’re staying in. With it’s own private wooden staircase, angled ceiling, wide plank pine floors, and skylights it has a playful yet cozy vibe to it.
I’ve never been a fan of placing beds in front of windows, but with the layout of the room we had no choice. To balance the window behind the bed I decided to add curtains, but I didn’t want the space to feel heavy so I went with a gauzy sheer curtain from Amazon and I love it! I washed them first to give them more of a relaxed casual look. I went with a French return double curtain rod so I could get the curtains as wide as possible for balance. I love how it turned out! It gives the room the perfect amount of softness and balances the wall behind the bed.
We went with our same ceiling fan cage light that we had in Colorado. Yep, it’s that awesome, this fan has nice clean lines and really puts out some air.
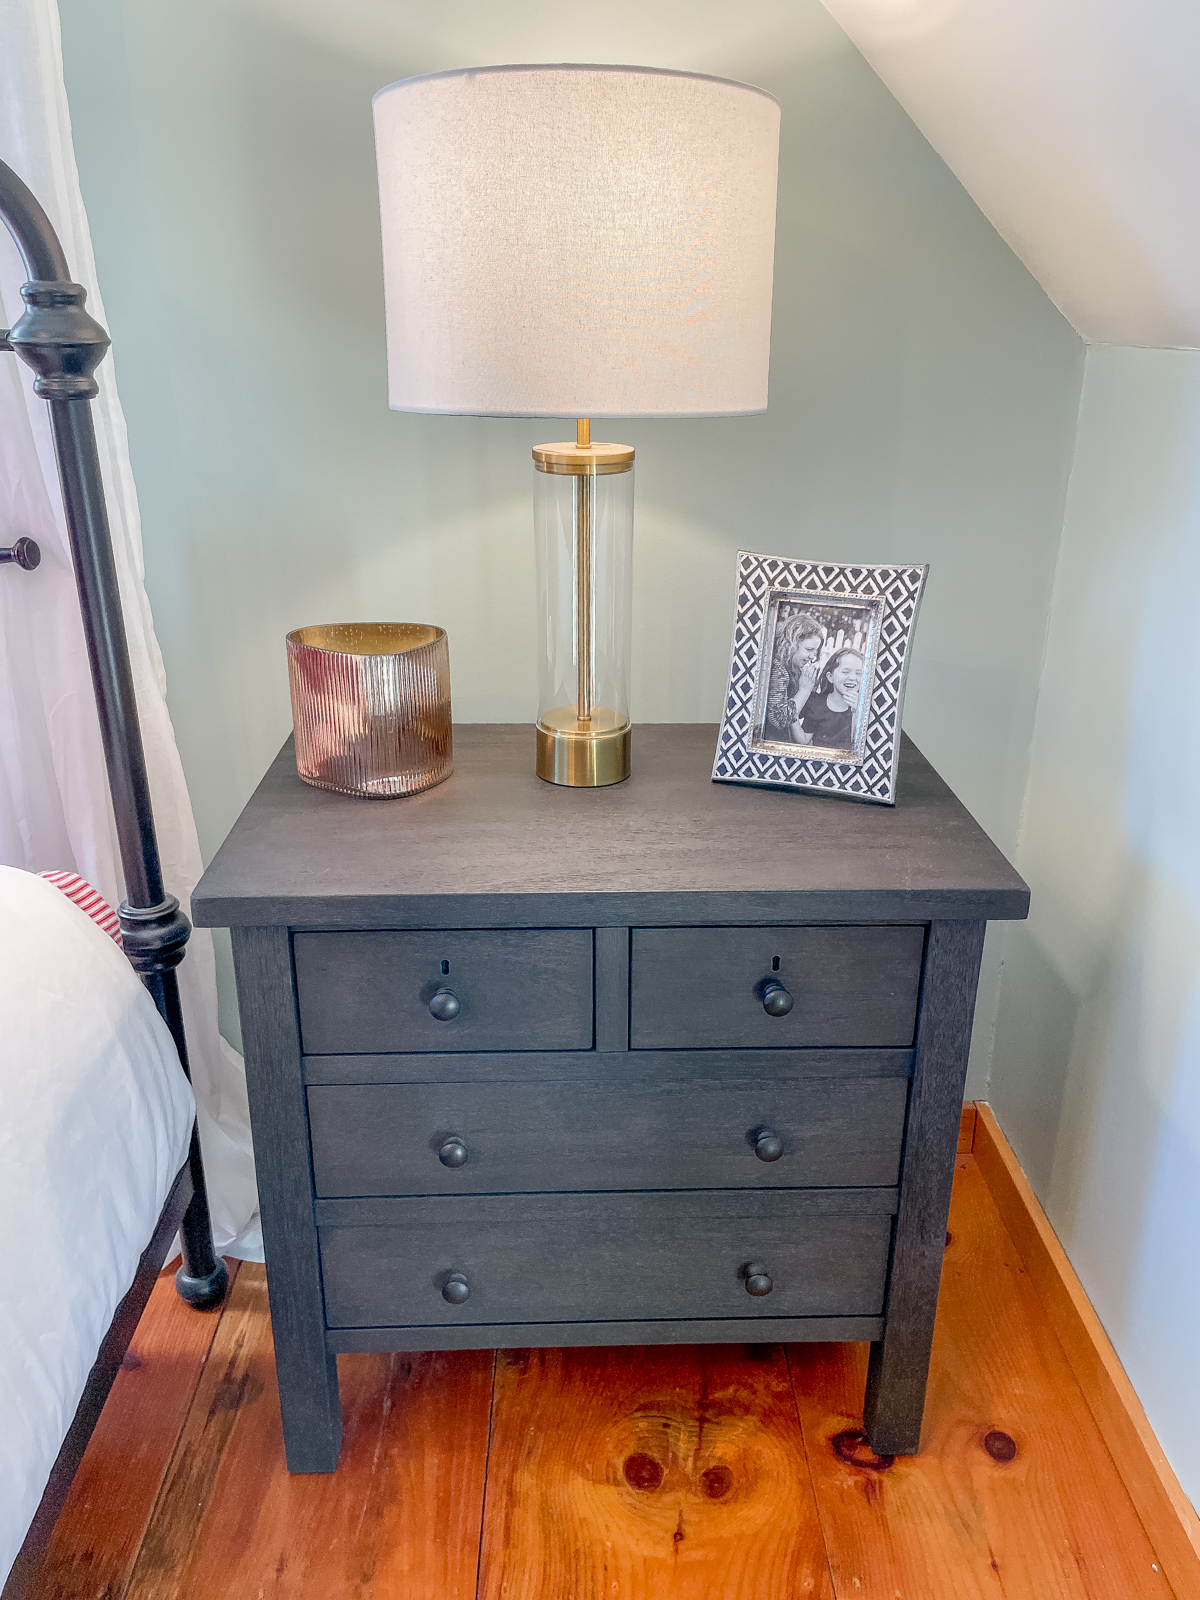
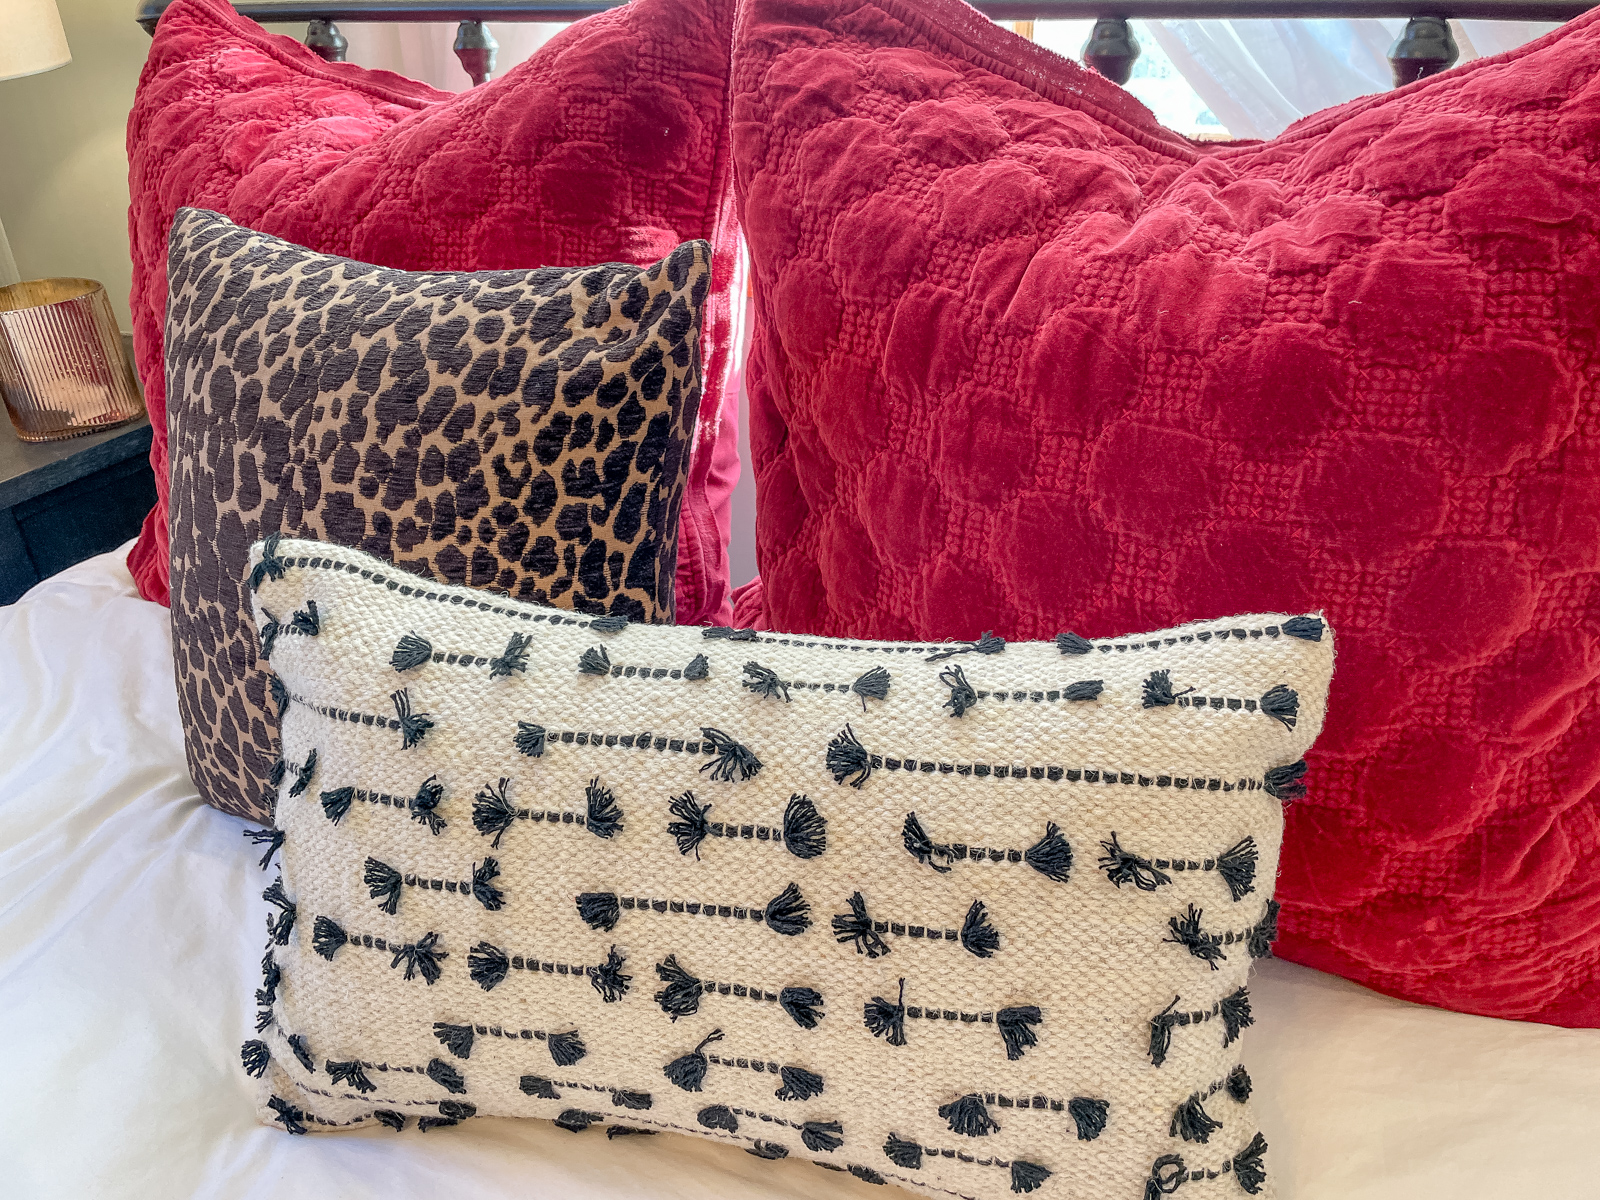
We did manage to leave Colorado with a few small furniture items, but I do mean small. A coat rack, this trunk, and a twin headboard. I despise night time throw pillow clutter, and if you do too I recommend adding a trunk or large baskets to your room to hold it all at night. I just can’t pile my pillows on the floor, I like to wake up to a clean non-cluttered space!
I really do love this space, it’s so cozy! On a clear night I can look out the skylights and see the moon and the stars right from my bed. I’m a little bit obsessed with electric fireplaces and I spend a lot of time looking for perfect ones online. We love real working fireplaces but due to chimney codes we have restrictions, but so far I’m impressed with the advances they’ve made, the 3D flames look very realistic.
Our floor heaters are currently turned off because they make a clicking noise at night that wakes me up but this electric fireplace keeps us toasty warm at night and the soft glow provides a nice nightlight for us too.
Besides electric fireplaces my other current obsession is USB lamps! We live in a charging world now, and not only are these lamps convenient for that, they also help reduce clutter. A total win! Loving the rug too, it adds great texture to the room.
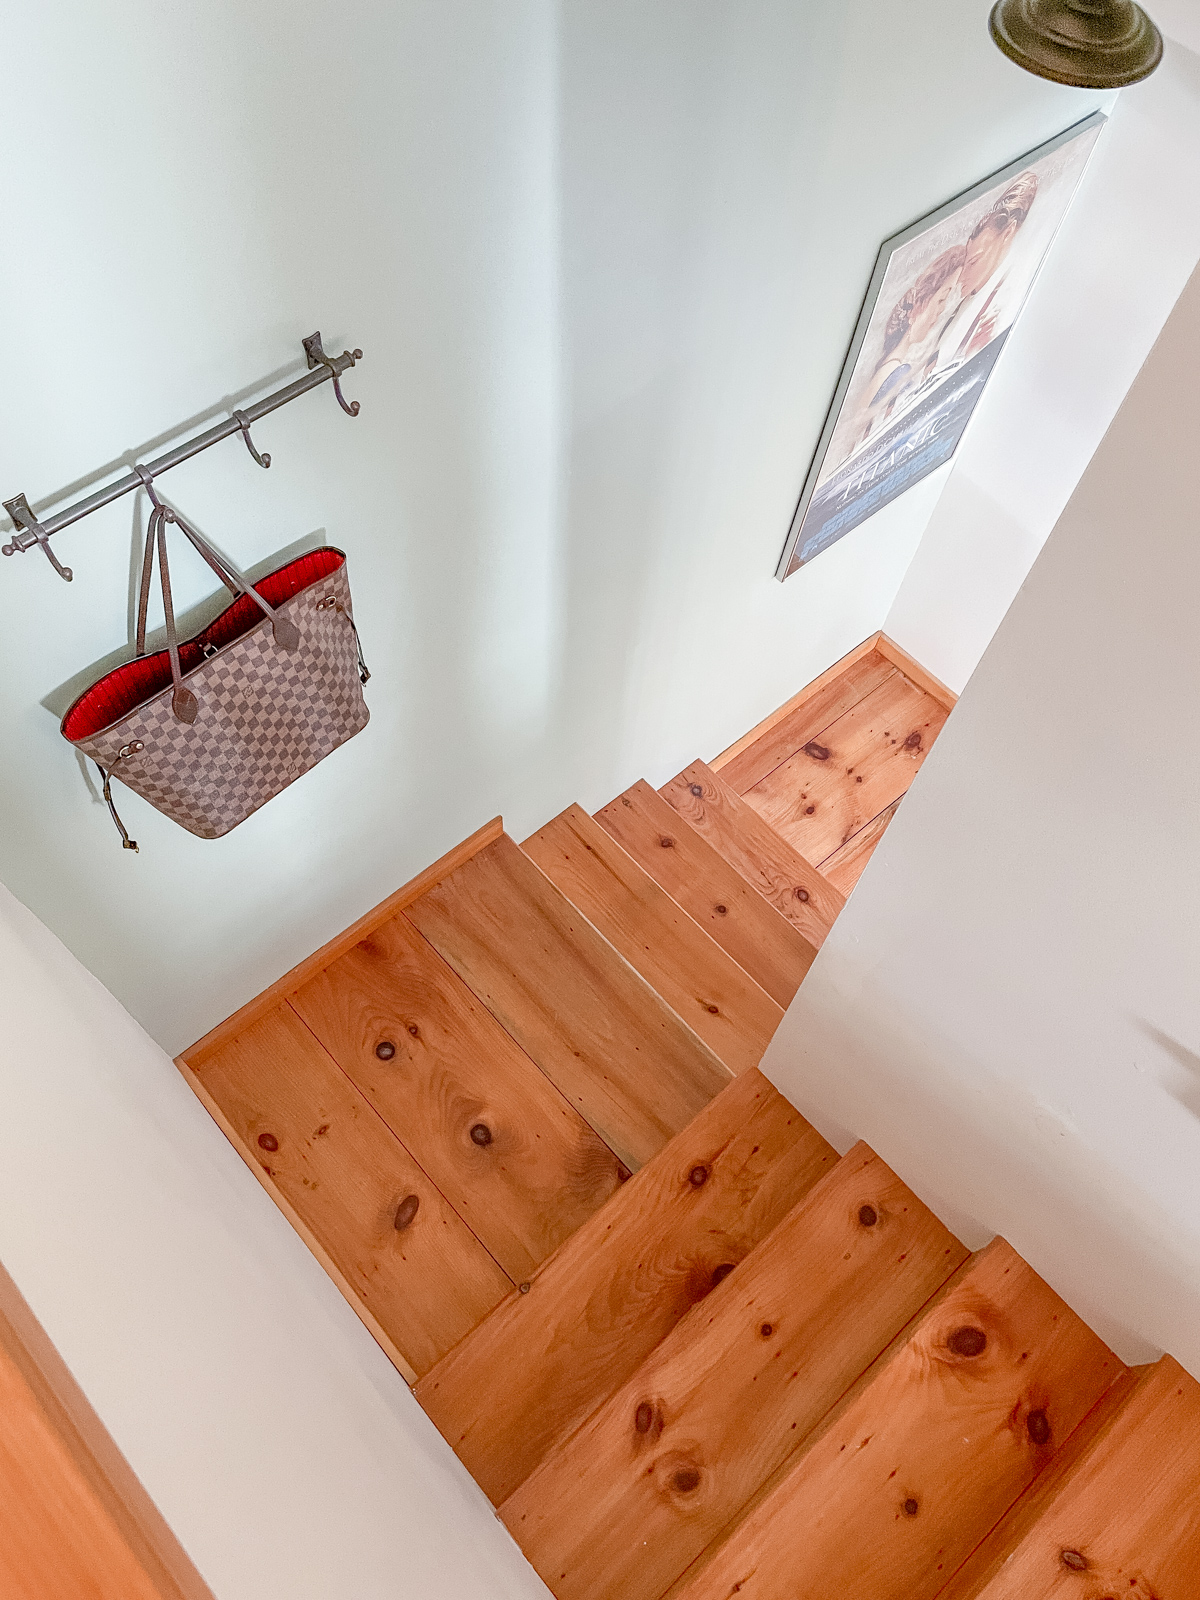
I love the warm wood tones throughout the room and especially the wide pine hardwoods! Benjamin Moore Palladian Blue has been a longtime favorite of mine, it was the color of our Texas bedroom and I found it so soothing. So again we went with Palladian Blue mixed in with Benjamin Moore Cloud Cover that flows up the stairwell from the lower den.
A quirky thing about Palladian Blue is how different it photographs. It’s blue but sometimes it looks green. Every wall looks slightly different with the light. It’s something that used to annoy me while taking and editing our home photographs, once upon a time I would try to color correct it. Not anymore, now I just go with it. I let Palladian Blue do it’s thang. Scroll back! Every photo except the before photo is Palladiun Blue being its unpredictable adorable true self.
It was an easy space to transform and now it’s perfect, and I’m happy I get to share it with you. I’ll be happy when our master bedroom is done but I think I’ll always long for my wood room! Speaking of named rooms, we have our next guest room in the works and yes it has a name but I can’t share it just yet. Stay tuned!
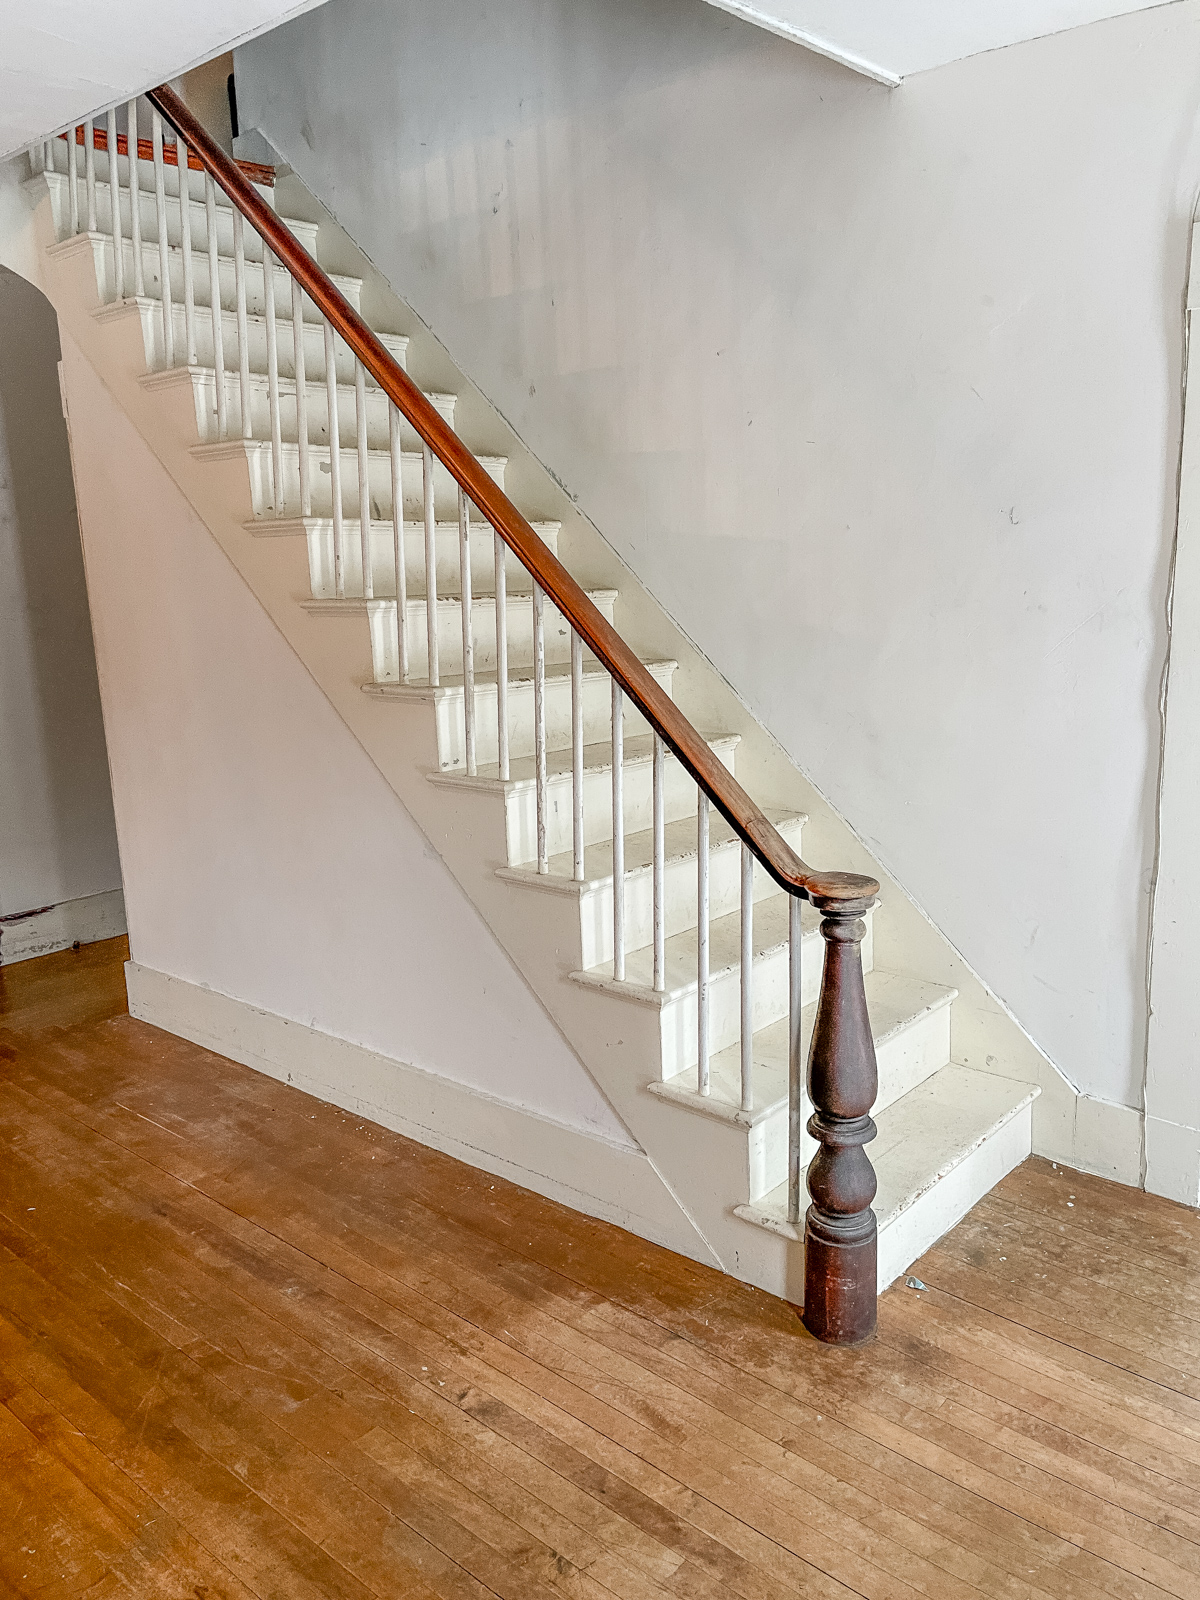
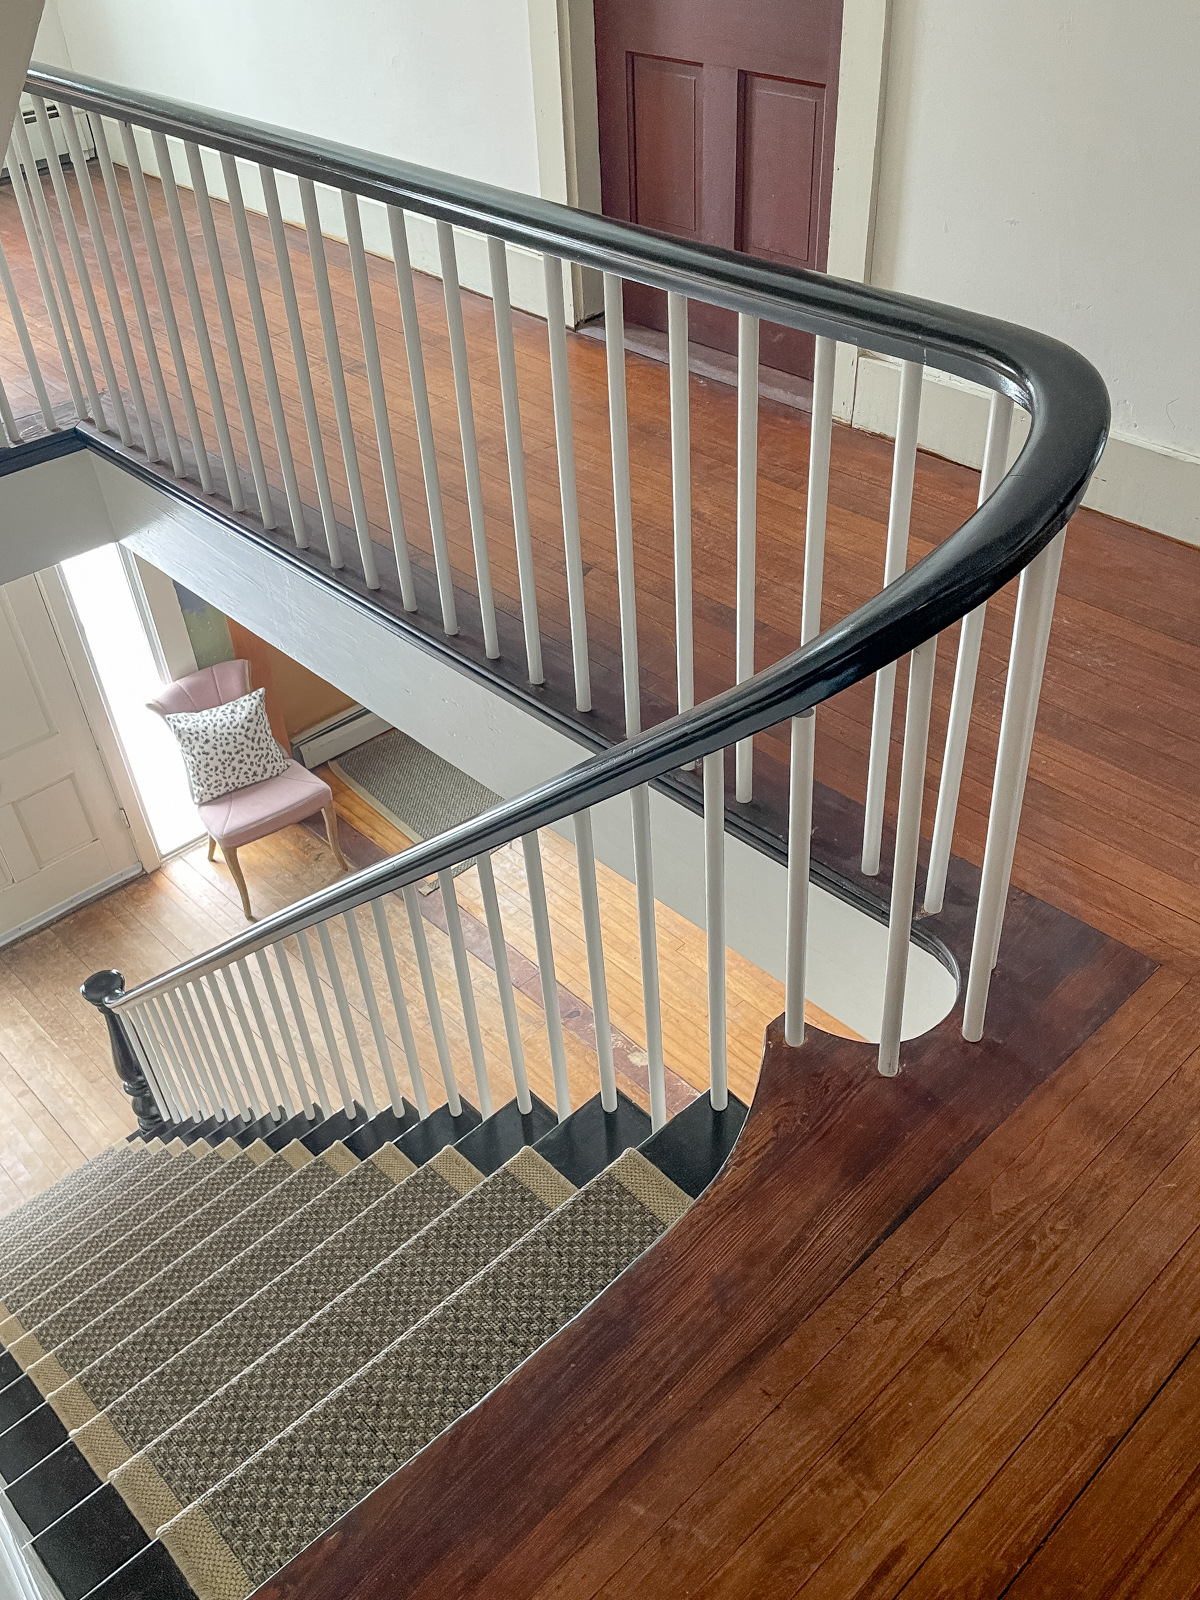
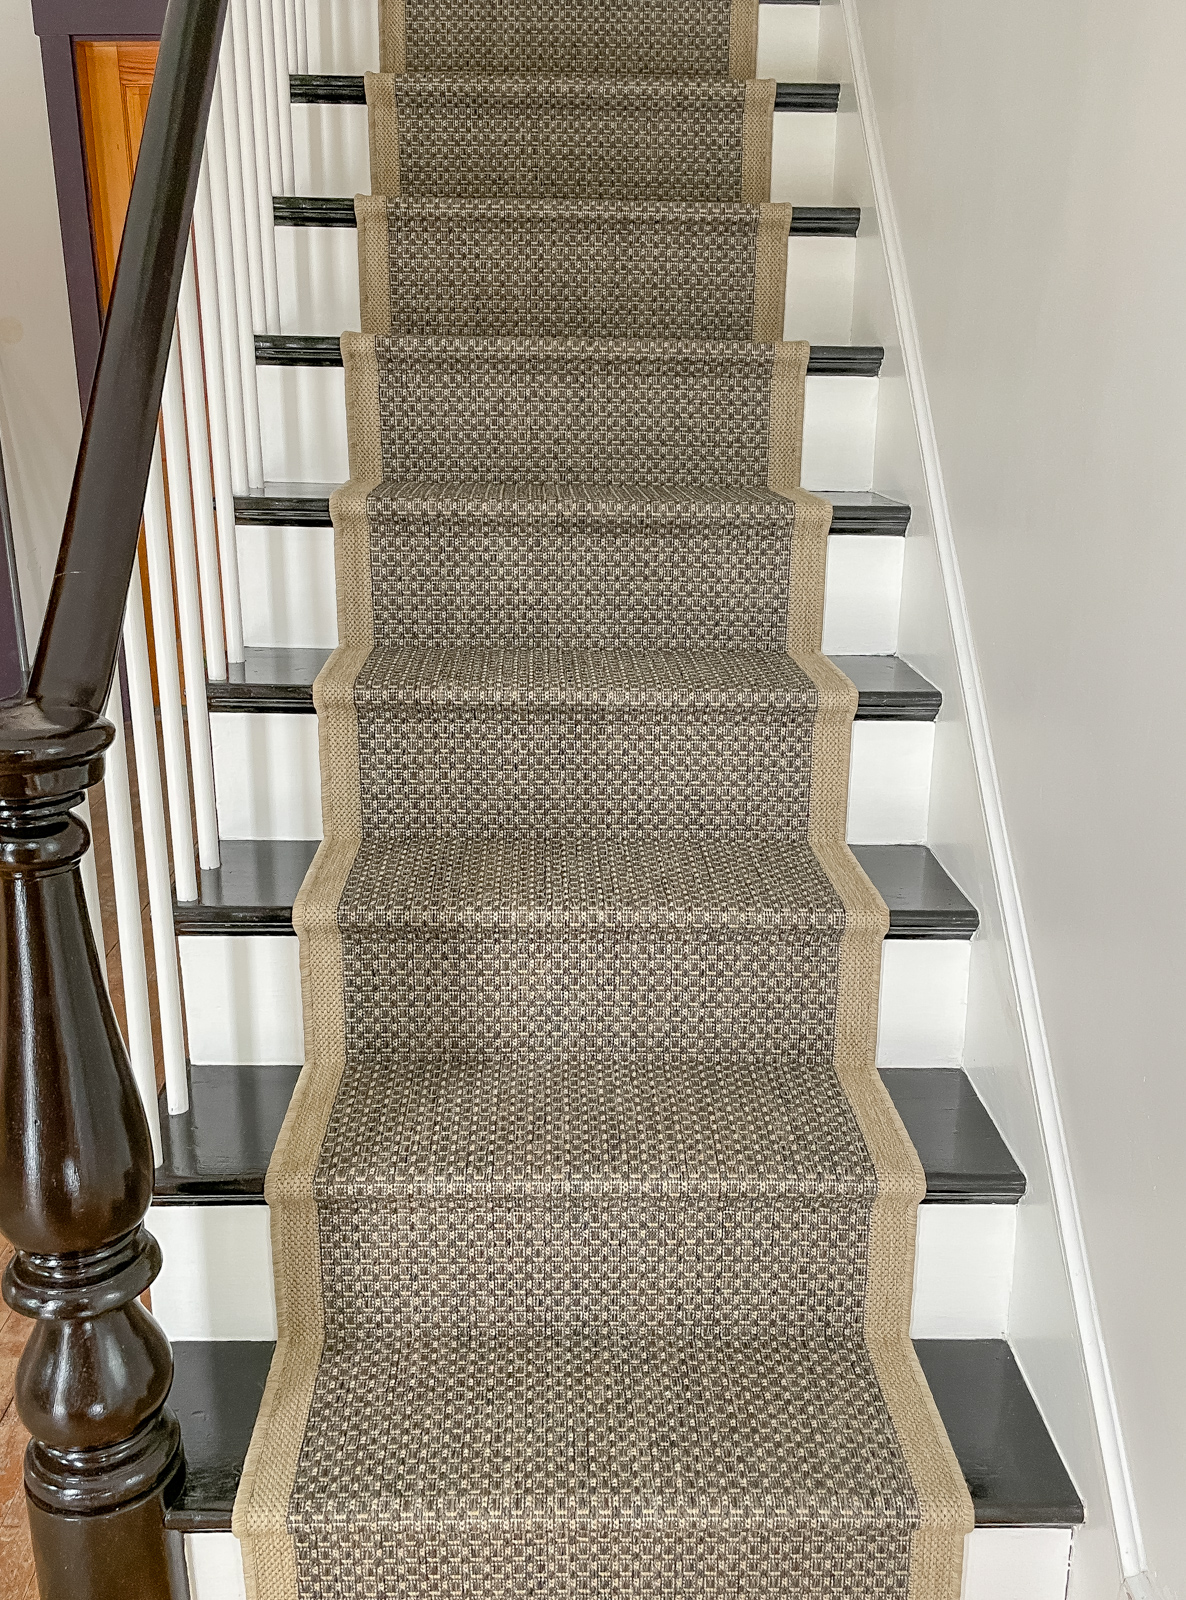
I’m so excited to share our dramatic staircase makeover with you! It’s our first DIY project in our Colonial New England home, and we are thrilled with the results! I just love stair makeovers don’t you? As I have mentioned before, I think stairs really set the tone of your home, fireplaces too, but that’s a much more complicated and not so DIY project later in our future.
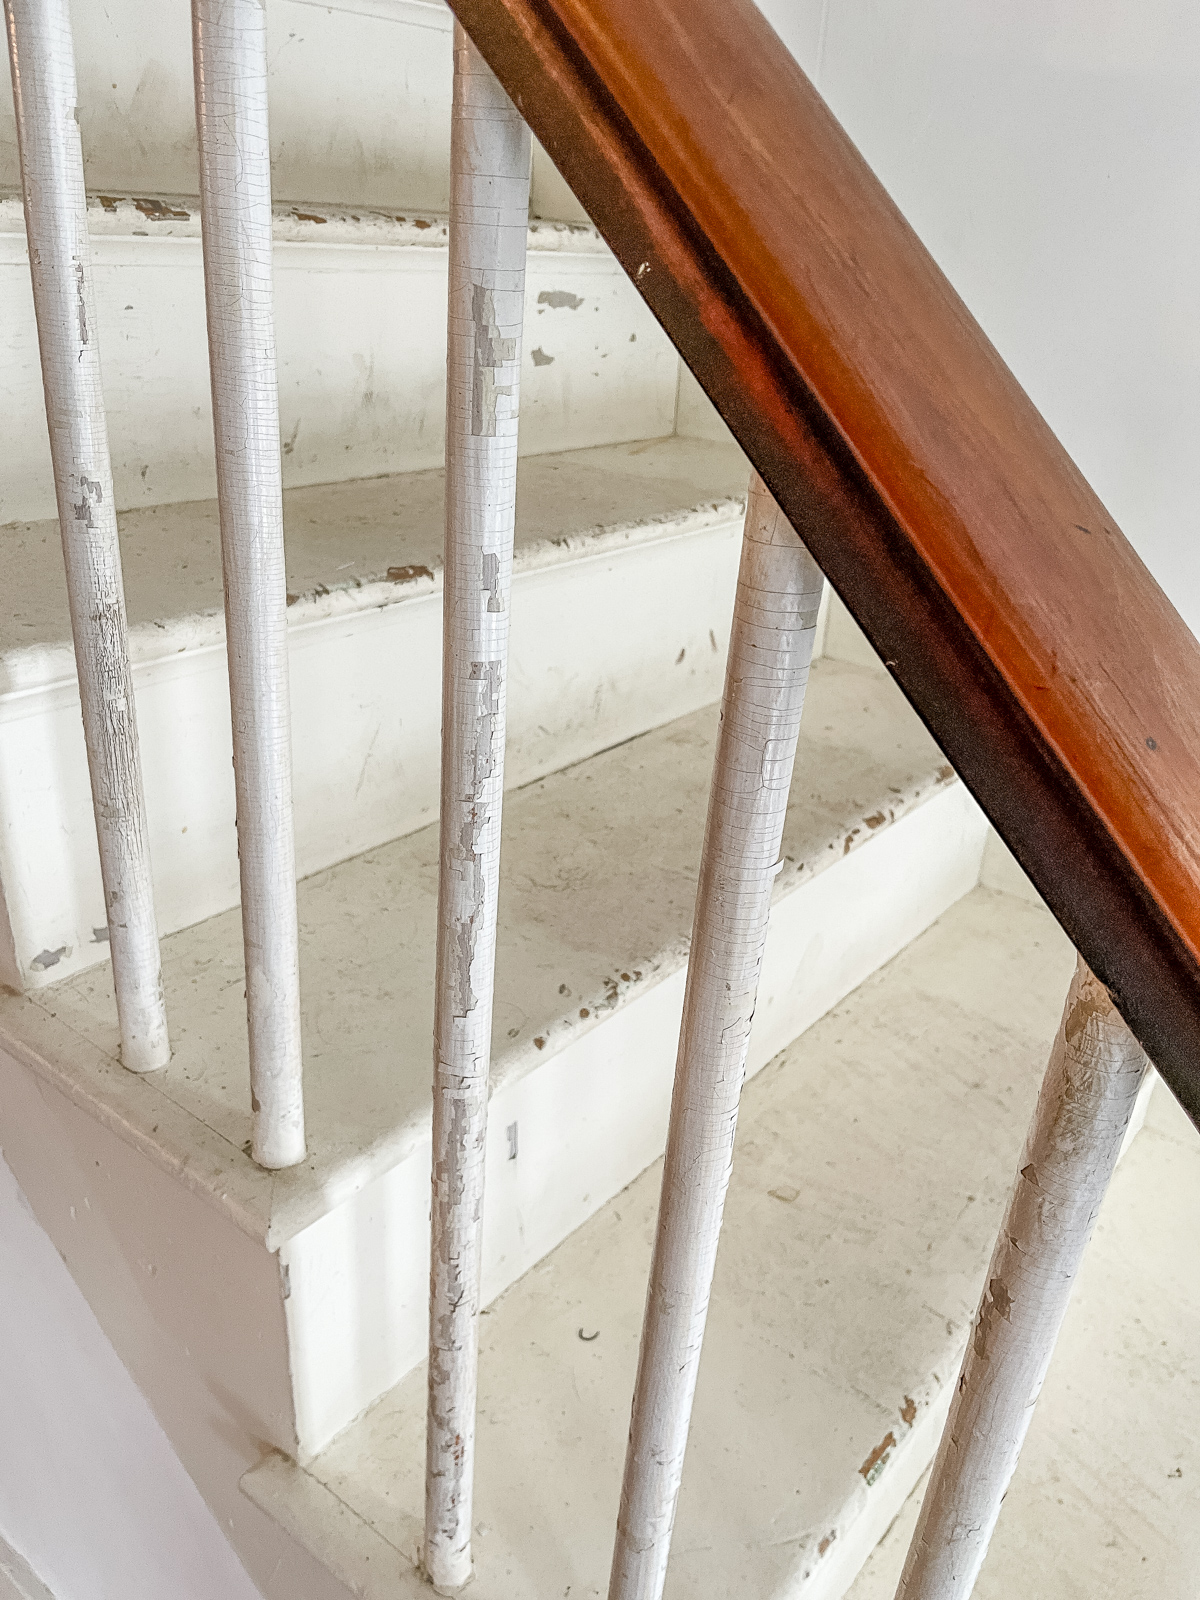
These poor stairs were in sad shape, they are original with the house, making them 122 years old. Not only were they in sad shape but the stair rails and balusters were very wobbly and unsafe, and with what I’m assuming is lead paint that was peeling. Brian and I spent hours each day working on them for 3 weeks. It was exhausting but we did it and it was totally worth it!
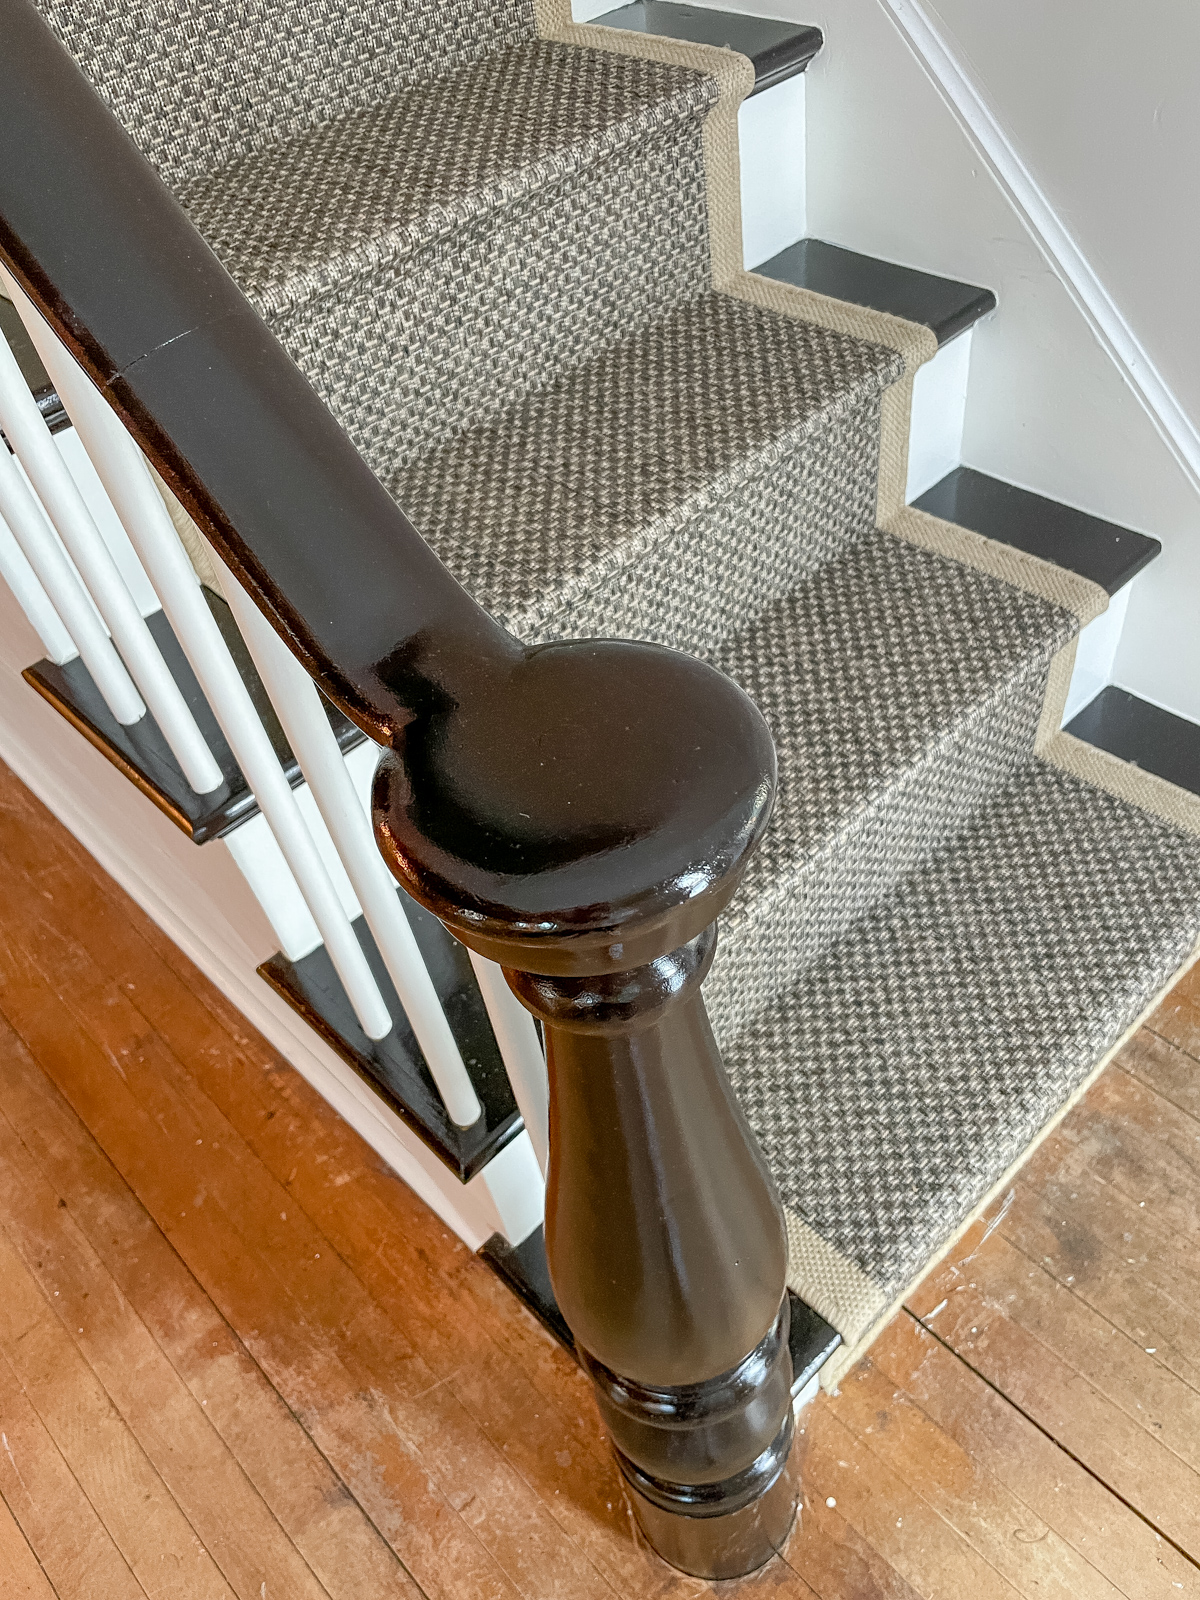
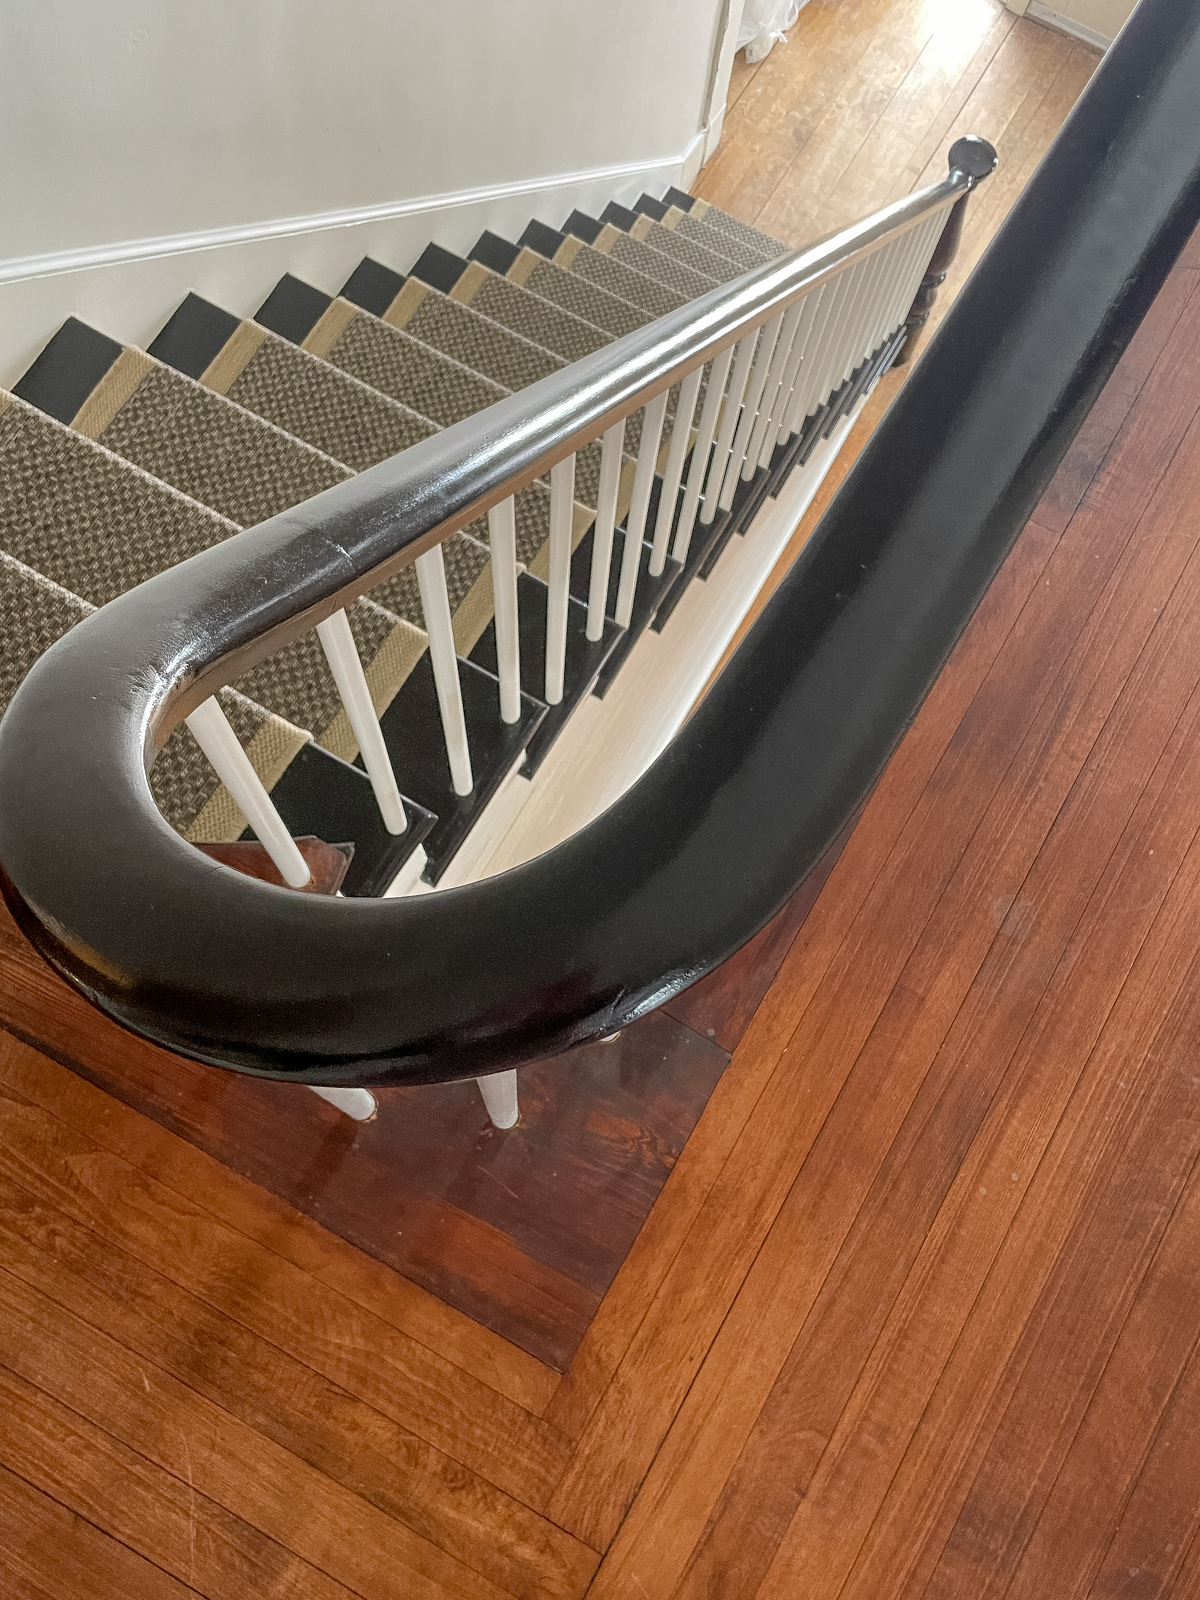
I’ve always loved black and white stairs, they’re elegant and dramatic. So I decided to go with General Finishes Gel Stain in Java because it has an almost black look and gel stain is so easy to work with. I used a blend of Java and Antique Walnut gel stain on our Texas stairs if you want to read more about that, but this time I decided to go with the full Java color.
The balusters were peeling badly and very unstable so we decided to toss them and replace them with new 7/8-inch wooden dowel rods. I was really upset that the end of the newel post was broken and I was going to try to mold it with wood putty until one day we found the end piece in a different room. Score!
You only need to lightly sand or degloss areas where you’re using gel stain, but I was a little more aggressive sanding the stain off because it had a rough almost orange peel texture.
I knew I wanted some kind of accent wall on the stairs with a table and lamp so we ripped out the wall and Brian installed a plug. Our stair rail is one long curved piece so Brian built an X bracket at the top to stabilize the rail while the balusters were off.
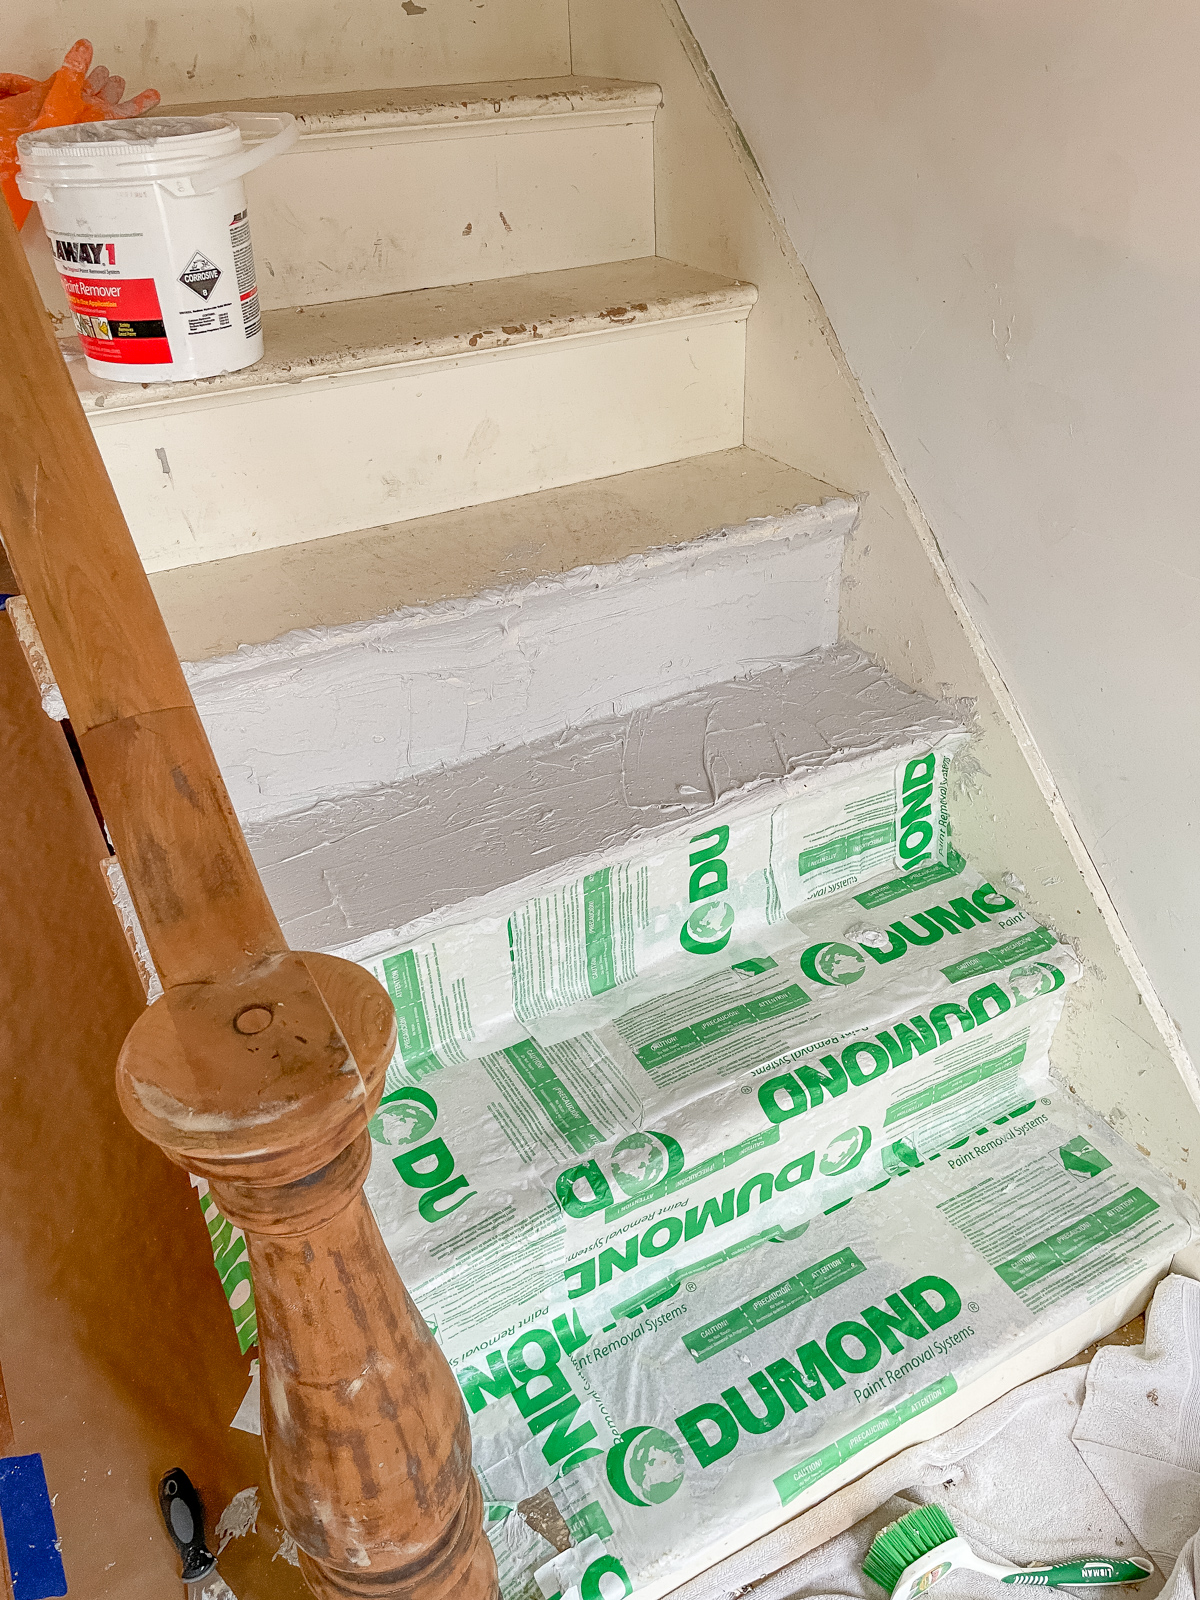
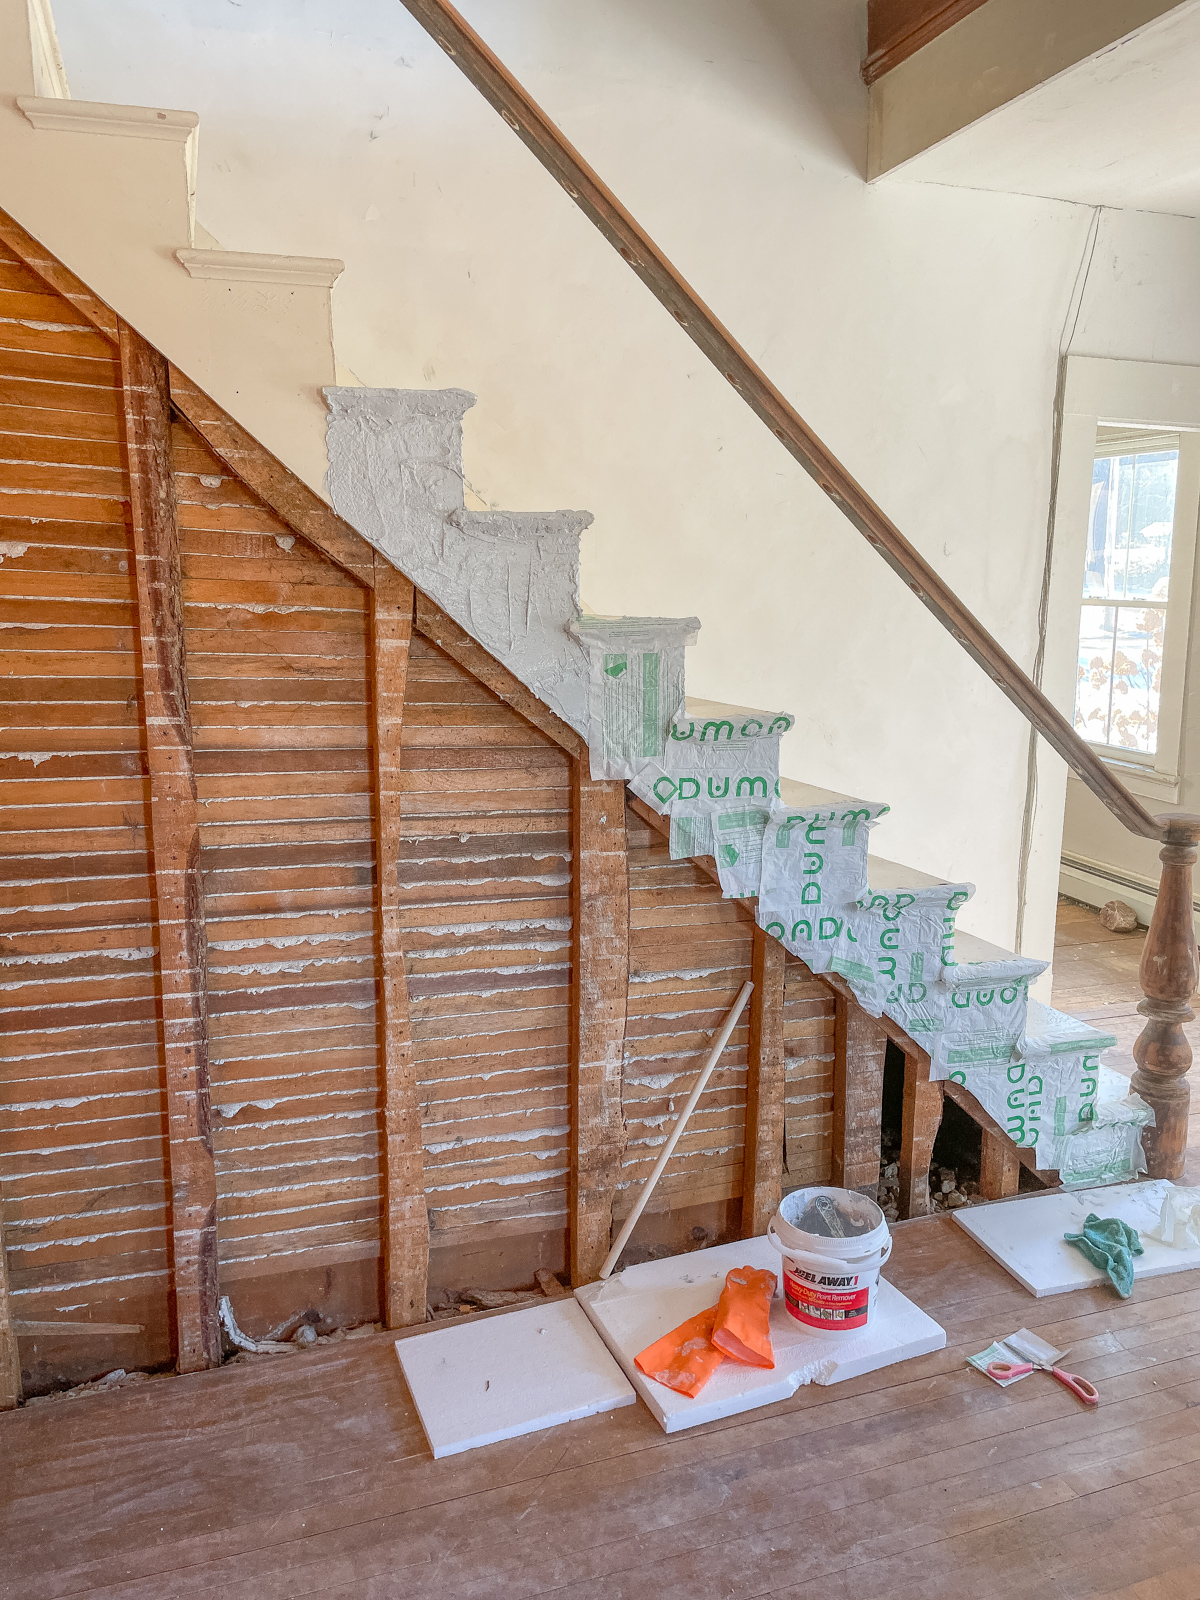
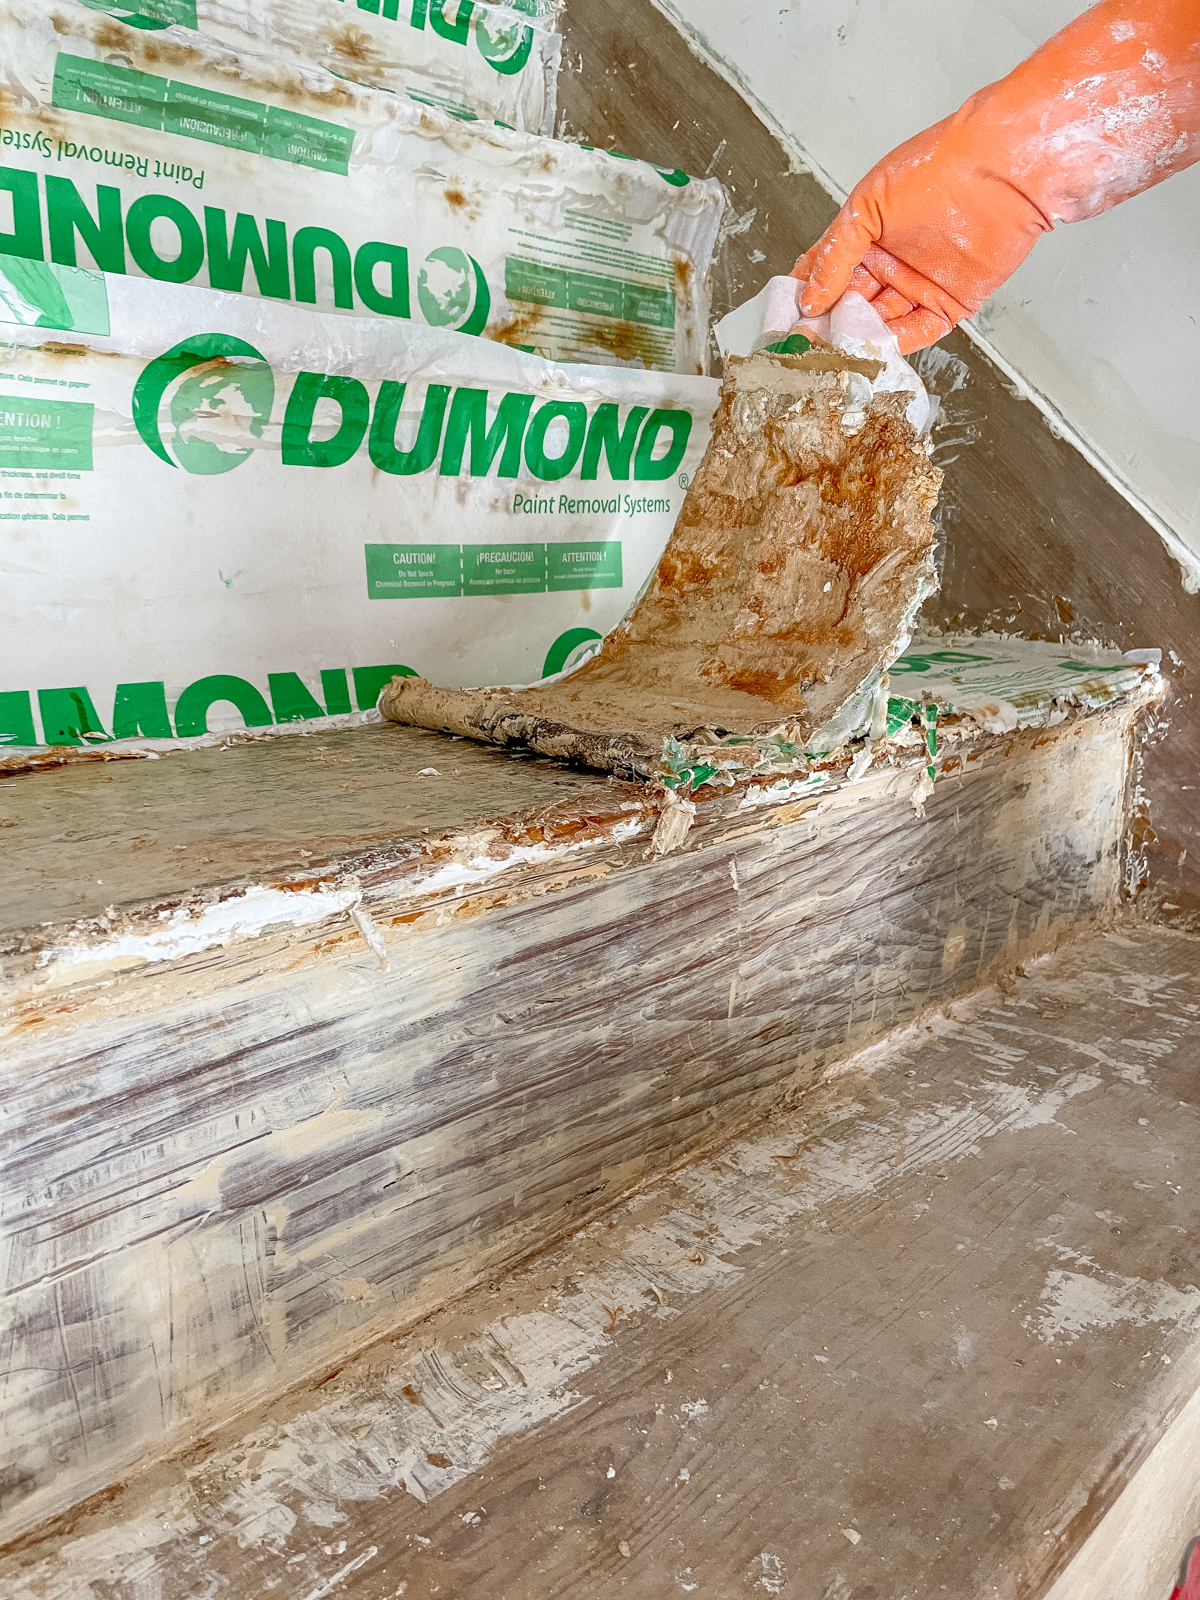
Now we we’re on to the miserable part, removing 122 years of old crunchy peeling paint. You shouldn’t sand off lead paint so stripping was the only way to go. After lots of research we went with Peel Away 1. We thickly applied the product, covered with paper and waited. It took 2 days of soaking before the paint was stripped. We went through 4 containers and worked in sections. It was a slow process but the paint came off in thick strips stuck to the paper. Any residue was easily scraped off. It’s really the easiest and safest way to remove thick old layers of paint.
Once the paint was stripped I applied 3 coats of gel stain, letting each coat dry a good 24 hours in between. There are many ways to apply gel stain but like our last stair project I used the sock method with a glove underneath and I did not wipe any stain off. Starting at the top I used long smooth strokes to apply the stain and it applied flawlessly.
In between dry time we worked on other projects like the painting the balusters and installing the shiplap. If you’re installing shiplap I highly recommend you paint the boards on sawhorses first! Otherwise the paint gunks up between the boards.
After adding 3 coats of gel stain, when it was completely dry I added 3 layers of General Finishes Oil Based Top Coat in Satin. This is where the gel stain comes to life and shines!
I used the same sock method above and let each coat dry 24 hours, some areas needed even longer than 24 hours. I didn’t sand between coats because I was just so tired and I didn’t feel like it needed it. (I have this all summarized below)
Luckily we have a back staircase we can take otherwise I guess we would have had to sleep downstairs.
After the treads were done I primed with Kilz 3 and painted with Benjamin Moore Simply White. We also added a top trim piece along the stair baseboard for a more finished look.
No matter how well I tape off areas I always get some leakage! I’ve tried every brand and it’s always the same. So my trick is to fix little spots with a craft brush.
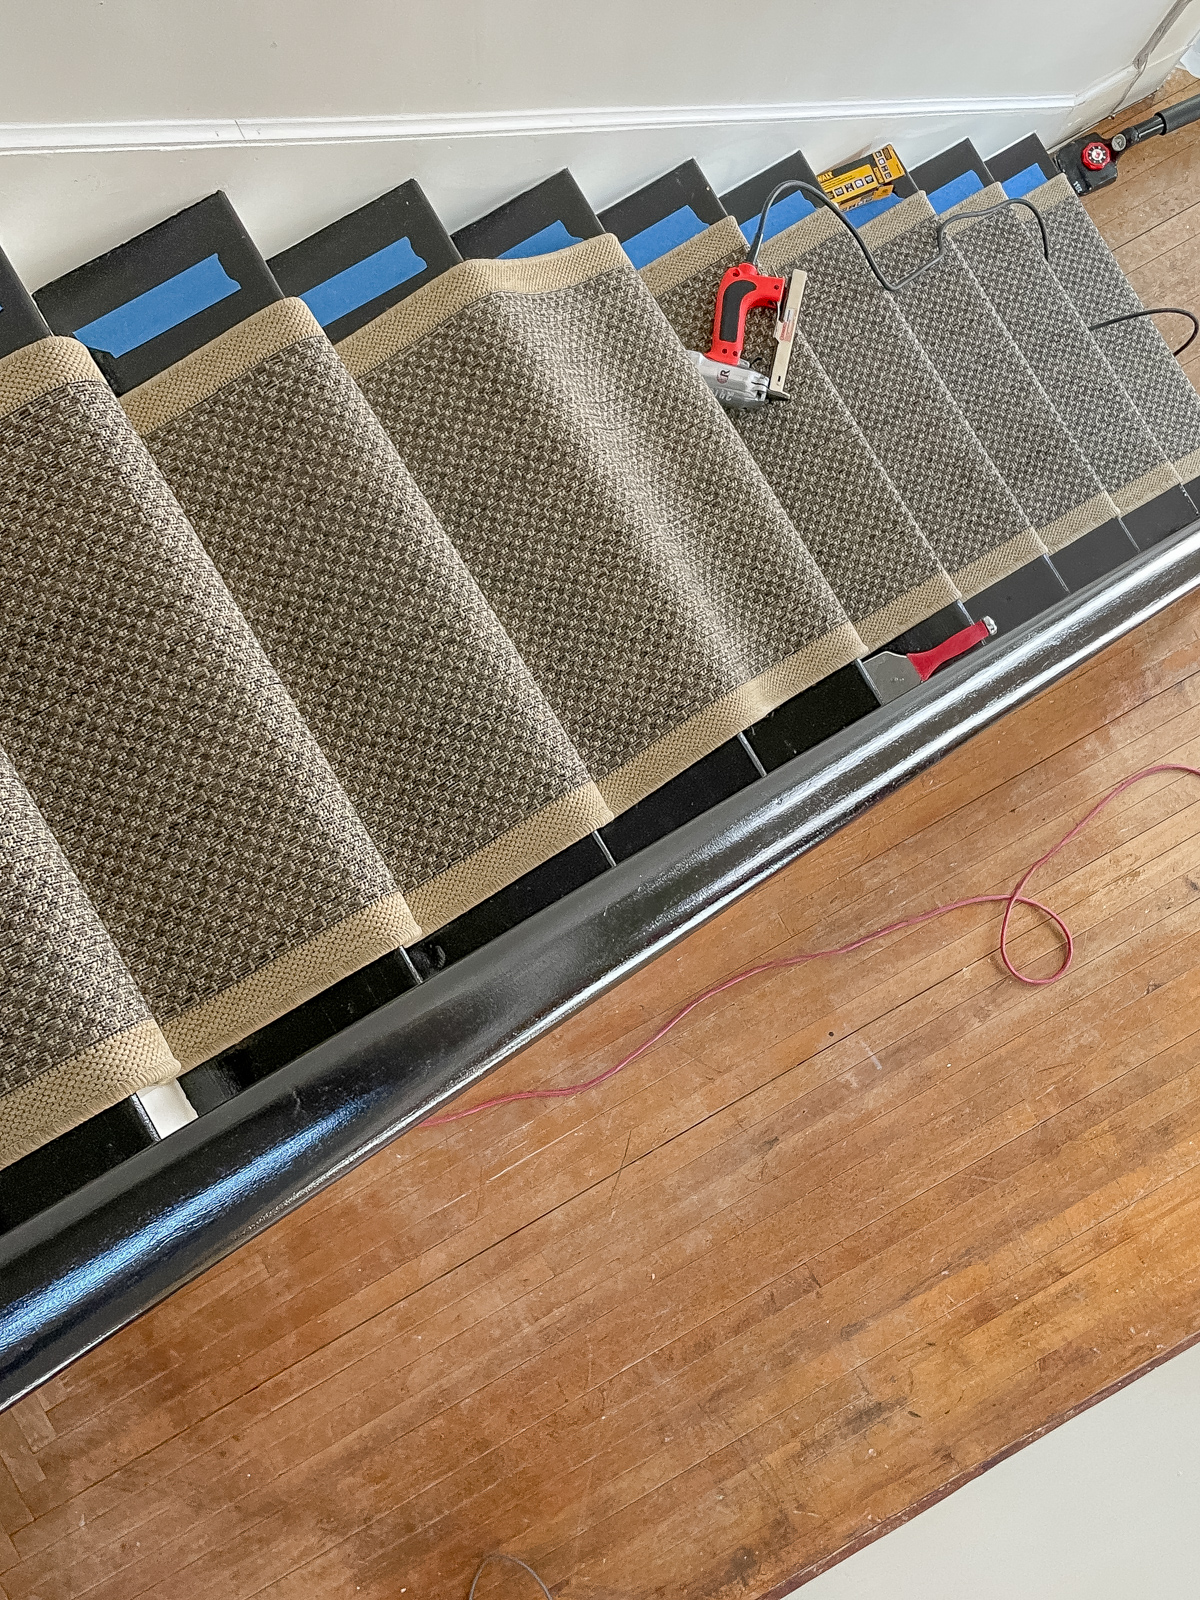
Now it was time for a runner! Not just for aesthetics but to protect the wood and prevent slipping. Our runner is from Run Rug in Gingham Tweed Beige.
We rented a carpet installation kit from Home Depot for about $60 and it made installation a breeze! We watched several Youtube videos to get comfortable but it really was an easy process. Some people added carpet padding but I didn’t feel it was necessary and I didn’t want the runner to look puffy. Another thing we noticed on Youtube was that some would start at the top and others the bottom for runner installation.
We knew we had to cut at least one end of the carpet and I wanted the hemmed edge on the floor for durability. Plus we have a small curved edge at the very top that we needed to cut to fit so it made more sense to start from the bottom up.
Like I said we are thrilled with how our stairs turned out, but we’re so relieved to be done! Now if I can just get the courage and the energy to refinish our hardwood floors!
Oftentimes I’ll read someone’s DIY blog post and it’s so long that I find it hard to see their exact steps. So I thought I’d do a condensed version below that’s quick and easy.
Working quickly I used a sock over a gloved hand and applied 3 layers of General Finishes Gel Stain in Javato the handrail, treads, and newel post letting each application dry 24 hours. I started at the top and used smooth long strokes with the sock going in one direction. I let the stain dry and did not wipe any off.
In between dry times I painted the balusters with 3 coats of Benjamin Moore Simply White in a pearl finish with a 1 inch craft brush. I did lightly sand with a 320 grit after the first coat of paint.
Working quickly again I used a sock over a gloved hand and applied 3 layers of General Finishes Oil Based Gel Top Coat in Satin letting each coat dry 24-36 hours each. I started at the top and used smooth long strokes with the sock going in one direction. I did not sand between coats.
Primed the risers, molding, and trim with Kilz 3, let dry 4 hours.
Painted the risers, molding, and trim with Benjamin Moore Simply White in a pearl finish with a 3 inch angled brush.
Touched up small areas with a craft brush.
48 hours later we installed the carpet runner with a staple gun starting from the bottom working our way up to the top. We rented a carpet installation kit from Home Depot.
Our runner is from Run Rug in Gingham Tweed Beige and the back wall of the stairs is painted Benjamin Moore Cloud Cover. Hope this helps with any questions you may have but feel free to ask me anything else in the comments below.
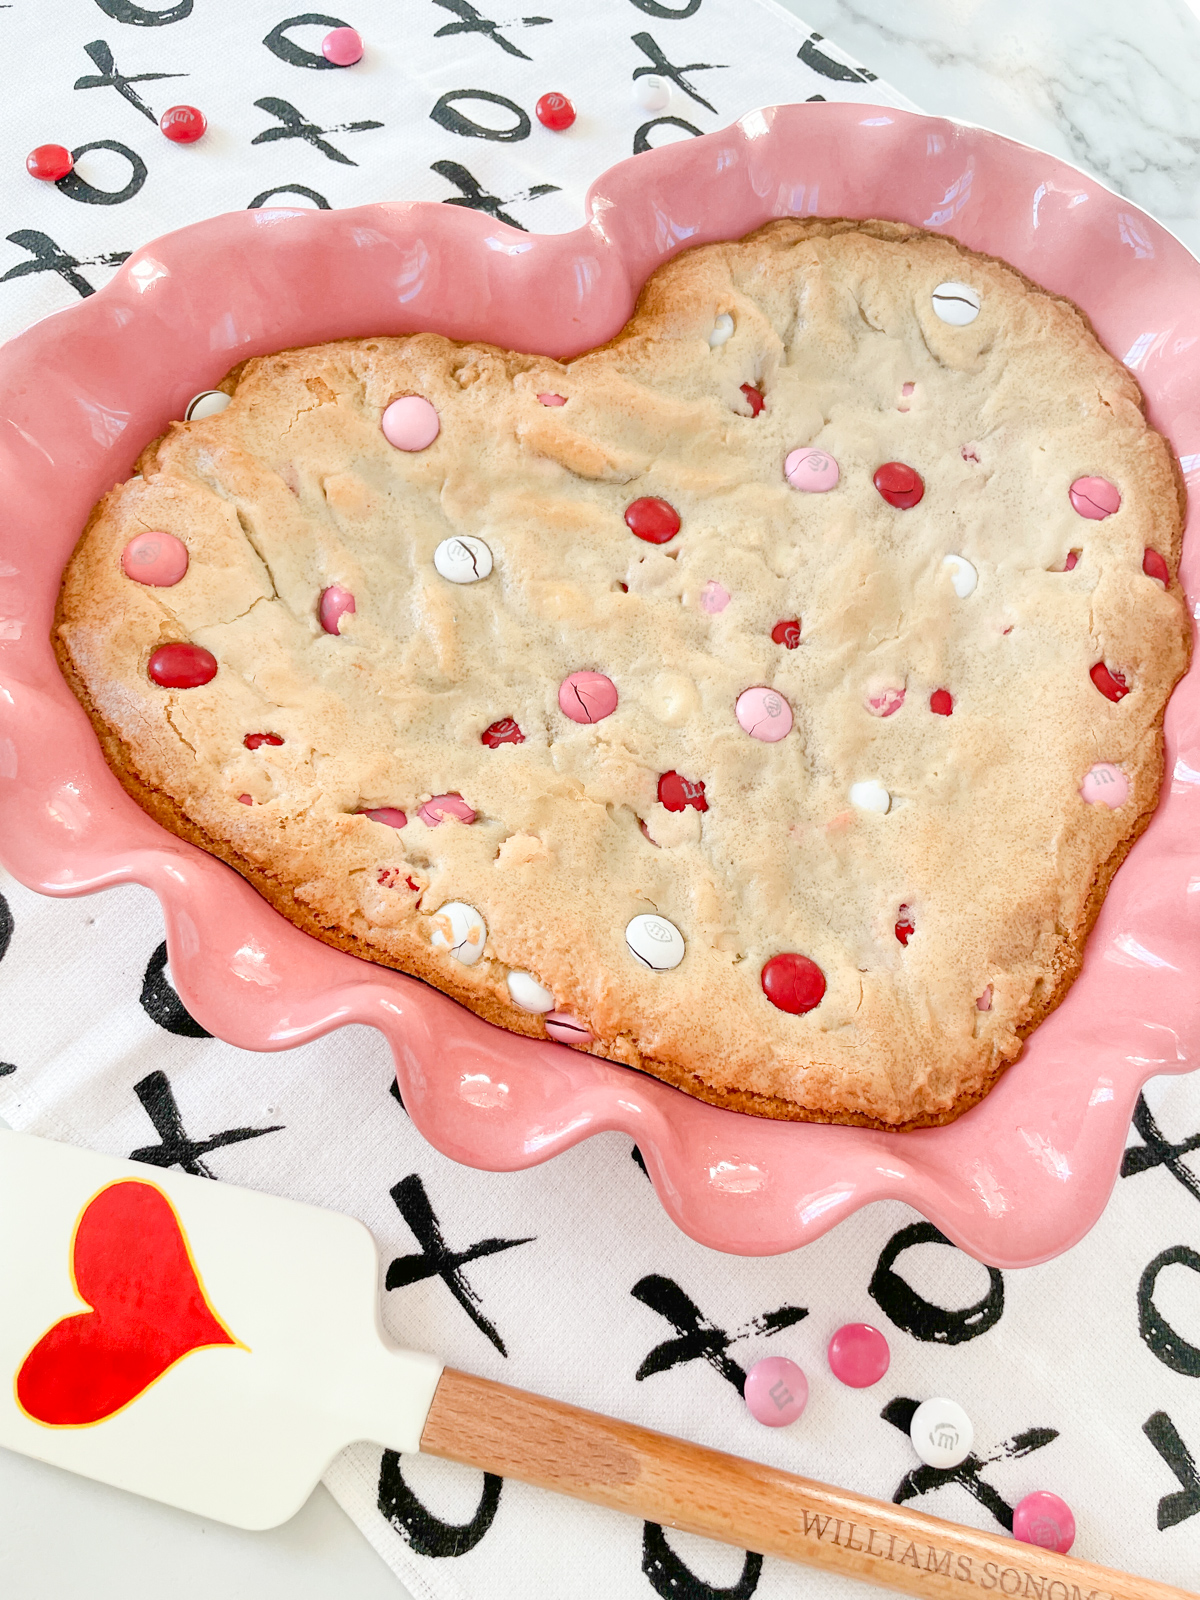
Happy Saturday! It’s 9 days until Valentine’s Day, have you picked out a yummy treat yet? If not this sweetheart M&M cookie cake will surely do! The past few weeks I’ve been tweaking this recipe and I’m proud to say I think we have a winner! It was all inspired by this gorgeous heart shaped pie dish! FACT: I can not resist cute heart shaped bakeware. I even had to buy one for my daughters’ apartment… so cute!
We’ve spent weeks of back breaking work stripping and updating our old 1900 staircase, so I must say cookie cake recipe tasting has kept us going! Haha.. but seriously this cake is perfect for Valentine’s Day or any time really.. it is a big giant cookie after all!
This recipe is baked in a heart shaped pie dish, but if you don’t have one no worries! You can use a regular 9 inch pie dish or even an 8×8 square baking dish. Either way it’s cookie goodness!
Growing up in Texas we used to visit a local bakery, and they would always add a pinch of cinnamon to every recipe. The baked goods didn’t have a heavy cinnamon taste, but just the small amount I could detect gave the desserts a homey, rich quality, especially in the cookies. So I’ve kept up with that tradition and add a pinch of cinnamon. It especially shines in chocolate recipes. Not a lot… just a pinch. If I had to guess a pinch to me is about 1/8 teaspoon, you can definitely eyeball it though!
Make sure you use one egg and one egg yolk, not two eggs. If you use two whole eggs the texture will be more cake like. Even though this is a cookie cake we still want a denser more cookie like texture, and the extra yolk adds richness without adding volume.
Not a fan of M&M’s? No problem, substitute 1 1/2 cups of chocolate chips! Find the printable recipe below.
Greetings from Maine! First off, I can’t believe we moved to Maine! This is the craziest and best decision we’ve ever made! Brian and I are on cloud 9 living here… but I need to back up a bit. Wasn’t I living in Colorado a few months ago?
OUR MOVING STORY
Colorado is such a beautiful state but as much as we loved it it just wasn’t right for us. We lived there a little over a 2 years but within a week of moving I knew we had made a mistake. What do you do when you make a mistake? You suck it up and deal with it. So that’s what I did.
It’s weird how a place we loved to vacation to just didn’t work out as a place to live. The fast remodel of our home was hard on us, along with our steep mountain driveway, plus the wildfires, flash flooding, pipes freezing, the altitude, and not to mention being nearly an hour from major stores. It. Was. Hard. We knew that eventually we would sell the house, we just didn’t know when. Late one night in August I heard the words sell your house now. Brian was asleep so I nudged him and said Brian it’s time to sell the house. “Okay” he says and he falls back asleep.
I’ll be honest I didn’t trust the voice at first. It felt like the wrong time to sell, the busy summer real estate season had just ended and our house wasn’t finished. So for over a month we poured our blood, sweat, and tears into finishing every inch of the house. In order to finish so quickly we had to come up with some creative solutions but we did it. I’m proud to say we were able to put our house on the market at the end of September, it quickly sold for over asking price, the new owners bought 99% of all our furniture, and a month after listing we drove away for the last time with all our remaining possessions in a U-Haul truck.
When we left we didn’t have a solid plan so we didn’t feel comfortable talking about it with anyone. Neighbors and local friends would ask where we were moving too and we would always say “not sure yet” and we were being honest.
Our thought was to take a much needed vacation, dragging along all our stuff in a U-Haul. East is where we felt like going, it felt right. So off we went vacationing along the way. We went from Denver to Nebraska. Then on to Iowa and Chicago. Then up to Cleveland and Buffalo where we crossed into Canada visiting Niagra Falls and Niagra on the Lake.
As much fun as we were having we were also getting antsy and heavily looking at real estate online. Let me just say when you’re looking at real estate without a solid direction as to where you want to live it’s freakin hard!
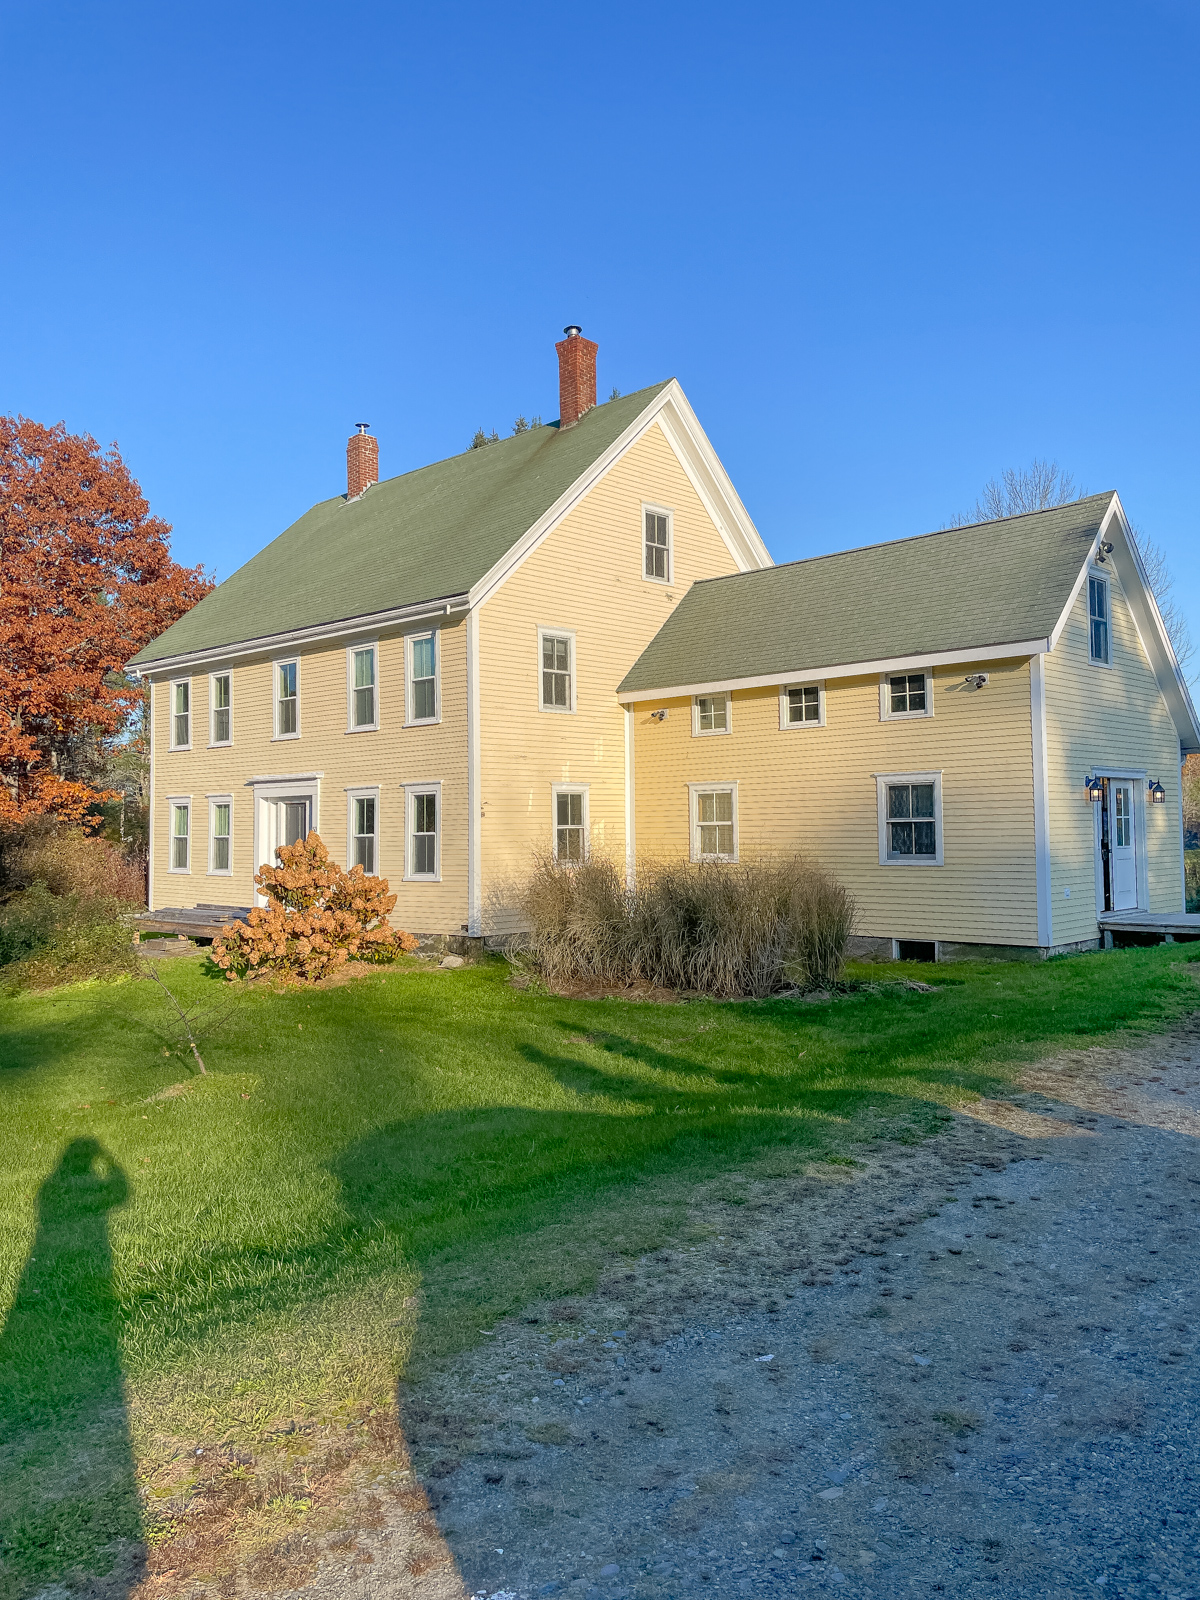
After Canada we ended up in Boston, stashed our stuff in a storage unit and began looking for houses. We decided we wanted a coastal environment but I’m not sure how we ended up in Boston really, it just happened. I found lots of possible homes but they were all flops in person. I was starting to feel defeated and again like we had made a terrible mistake. I told Brian I hated everything on the market and we would just have to suck it up and rent an apartment until we could find a house we loved. Then one day I saw this yellow house… it had just been on the market a few days.
Let me back up again. Brian had mentioned living in Maine and I said no. I said no many times. I even cried, living in Maine sounded awful and that I couldn’t be isolated anymore. “Fine, we won’t live in Maine he said”. Every home we looked at in Massachutes had a deal breaker once I saw it in person. We both had very specific criteria and in this crazy real estate market it only made things more stressful but we refused to settle. So we started branching out looking in surrounding states, like New Hampshire. Out of curiosity I broadened my search to Maine but nothing interested me.
We agreed we both wanted something coastal and something we could pay cash for. Once you get used to not making a house payment you can’t go back. We agreed we loved cold winters and mild summers. Also we wanted a fixer upper because we like to add our own personal touch and enjoy working on our home. I wanted space, something that felt grand with curb appeal. Brian wanted to be on or near the water and he wanted gardens, fruit trees, and plenty of land. We scheduled viewings for 3 homes. Two in New Hampshire and the yellow one in Maine. The Maine house piqued my curiosity but I still wasn’t sold.
Schedule-wise we were able to view the Maine house first and we loved it. We told our realtor we had two more house to view in New Hampshire and that we would get back to her. That night were dining at Lukes Lobster in Portland and we talked non-stop about the Maine house. How we loved the space, the quiet street, the large backyard with fruit trees and acreage. How it felt like a quiet place to live but was minutes away from major shopping with Boston being just two hours from us. Just a few hours after we had left I told Brian I thought this was our house. We were so happy and excited that we texted our realtor we wanted to make an offer the only problem was we were burnt out on hotel living and said we wanted to close before Thanksgiving – 2 weeks away.
Having been on the market just 4 days we were told there were lots of other viewings scheduled to see the house so naturally I was a nervous wreck. But we got it. We moved into our home the day before Thanksgiving. We didn’t even have a mattress, just personal belongings but luckily we found a local mattress store that came through for us. Thanksgiving Day I made dinner in the slow cooker and we slept in our new bed. Unlike Colorado this felt right. I knew we had made the right decision. This was our home.
I think it’s funny when I tell people we moved to Maine and they say but Maine is cold. I’m thinking really? I hadn’t ever heard that before. Is smoking also bad for you? Yeah it gets cold but it’s not Antarctica it’s in South Maine, 2 hours from Boston. The temperature definitely fluctuates so we do have some extremely cold days and other days are sunny mid 40’s with no wind and very pleasant.
We did just have our first Nor’easter which is basically a New England blizzard. We were prepared and our power stayed on so we were toasty warm. The wind was pretty crazy so we didn’t get much snow in the front or side of the house, it all drifted to the back of the house! It was crazy!
We were fully prepared and Brian was able to conquer the snow with his snow blower, this thing is awesome! Like I said this was a winter blizzard so it’s not the winter normal up here.
Ironically we vacationed in Bar Harbor Maine last summer and we loved it. Maine is stunning! I’m really looking forward to summer where I can have the New England garden I’ve always dreamed of! Brian wants to get chickens and I can’t wait to grow our own food and start canning more! We have apple trees, crab apple trees, cherry, and peach trees. We’re surrounded by beautiful tall trees and we’re just minutes away from beaches and ocean access.
It’s absolutely crazy how at the last minute the universe handed us everything we wanted in a house and it was yellow. I’ve always had a thing for yellow houses.
The main farmhouse house was built in 1900, yeah you heard me right! The home has been well taken care of but it still has a fair share of work that needs to be done! The two side additions are much newer, we aren’t positive but they feel within the last 20 years or so, and there is a large attic that we eventually plan to finish out into two bedrooms and a bathroom.
In true Brian and Laura style we like to jump right in to projects and I love starting with stairs! I think the stairs and also the fireplace sets the tone of the home. Our fireplaces will take a while because of tight coding issues, so we started with the stairs! It’s been weeks of work, stripping off layers of paint, we’re replacing the balusters and adding a runner. It’s been very labor intensive, luckily we have a back staircase we can take upstairs so we’re able to take our time and get it right. It’s going to be a dramatic reveal that should be on the blog in a couple of weeks!
I’m not revealing the entire house just yet because it would be overwhelming and too many photos but here is another current peak at another project we’re working on. The future dining room! It was originally the kitchen when the home was built, you can see over to the left where there were pipes for the sink or stove. Currently we’re replacing pieces of the hardwood floor and adding a board and batten wall. There are so many exciting home updates coming up in the future and I’ll be sharing more of the house. I feel like this blog post is so long so I’ll leave it here. Ciao!
Curious about Maine? Thinking you might want to plan a visit? Summer is the perfect time. Be sure to read my previous vacation posts about Maine!
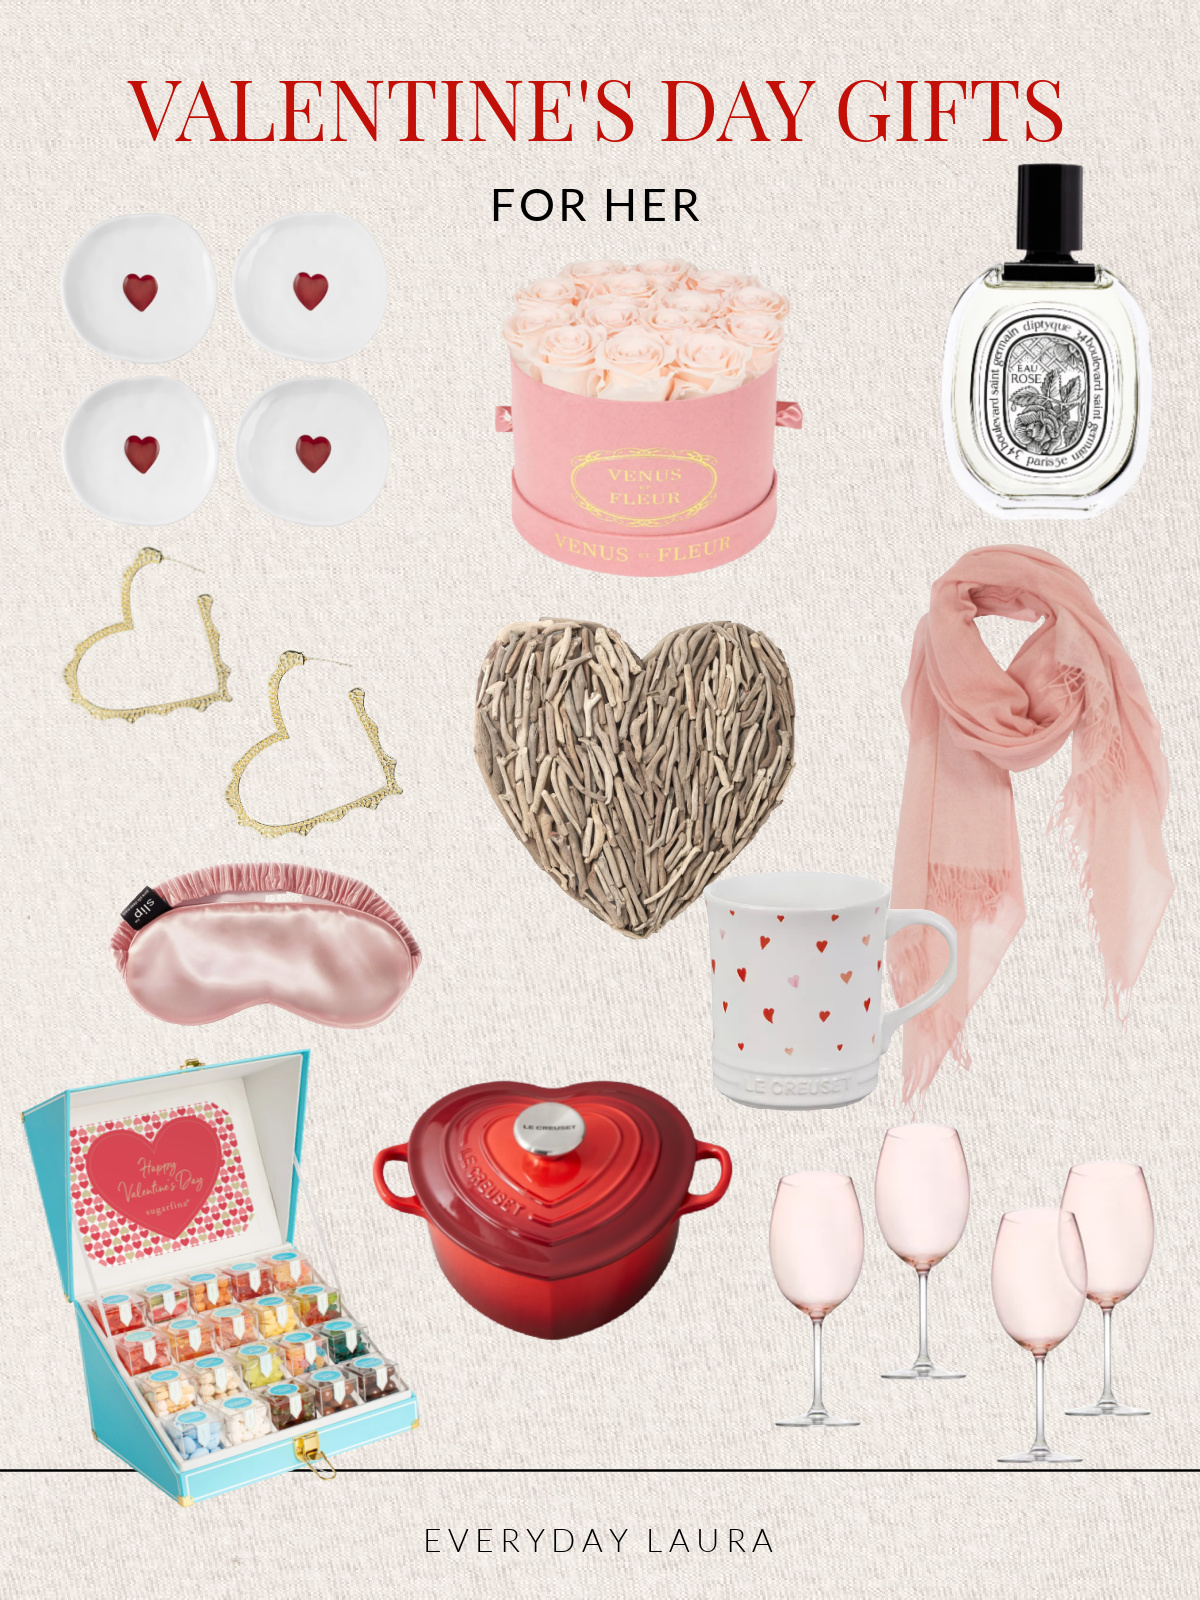
Happy February, it’s the month of love! Valentine’s Day is always one of those holidays that sneaks up so quickly, and being right after Christmas finding the perfect gift can be a bit tricky. So I’ve put together my 2022 Valentine’s Day gift guide for her and him to make things a little bit easier.
Usually, Brian and I keep our Valentine’s Day pretty low key. Maybe a simple dinner we cook together at home, or sometimes we have a lunch or dinner at a nice restaurant and then watch a movie. Last year I remember we special-ordered lobsters from Maine, and I find that especially funny since we now live in Maine! One of the many things I love about living here is having exciting new destinations to explore. So this Valentine’s Day we’re splurging by taking the train down to NYC to watch Phantom of the Opera on Broadway. We’ve been extremely hard at work the last several weeks with home projects (you’ll see updates soon) so I just can’t wait to get away!
Oh… have I mentioned our hotel is free? That’s right we cashed in our hotel rewards which makes our trip even more rewarding. Hotels.com is our favorite way to book rooms when traveling. It’s super convenient, and for every 10 nights you stay you get a free hotel night! I can’t recommend Hotels.com enough!
Ok love bugs are you ready for some Valentine’s Day gift ideas? Shop my gift guide below in the sliding carousel.
SHOP GIFTS FOR HER
SHOP GIFTS FOR HIM
Are you planning on spending a nice evening at home on Valentine’s Day? Why not make things extra festive with these Valentine’s Day kitchen accessories!
Looking for a little more Valentine inspo? Be sure to visit some of my other blog posts!
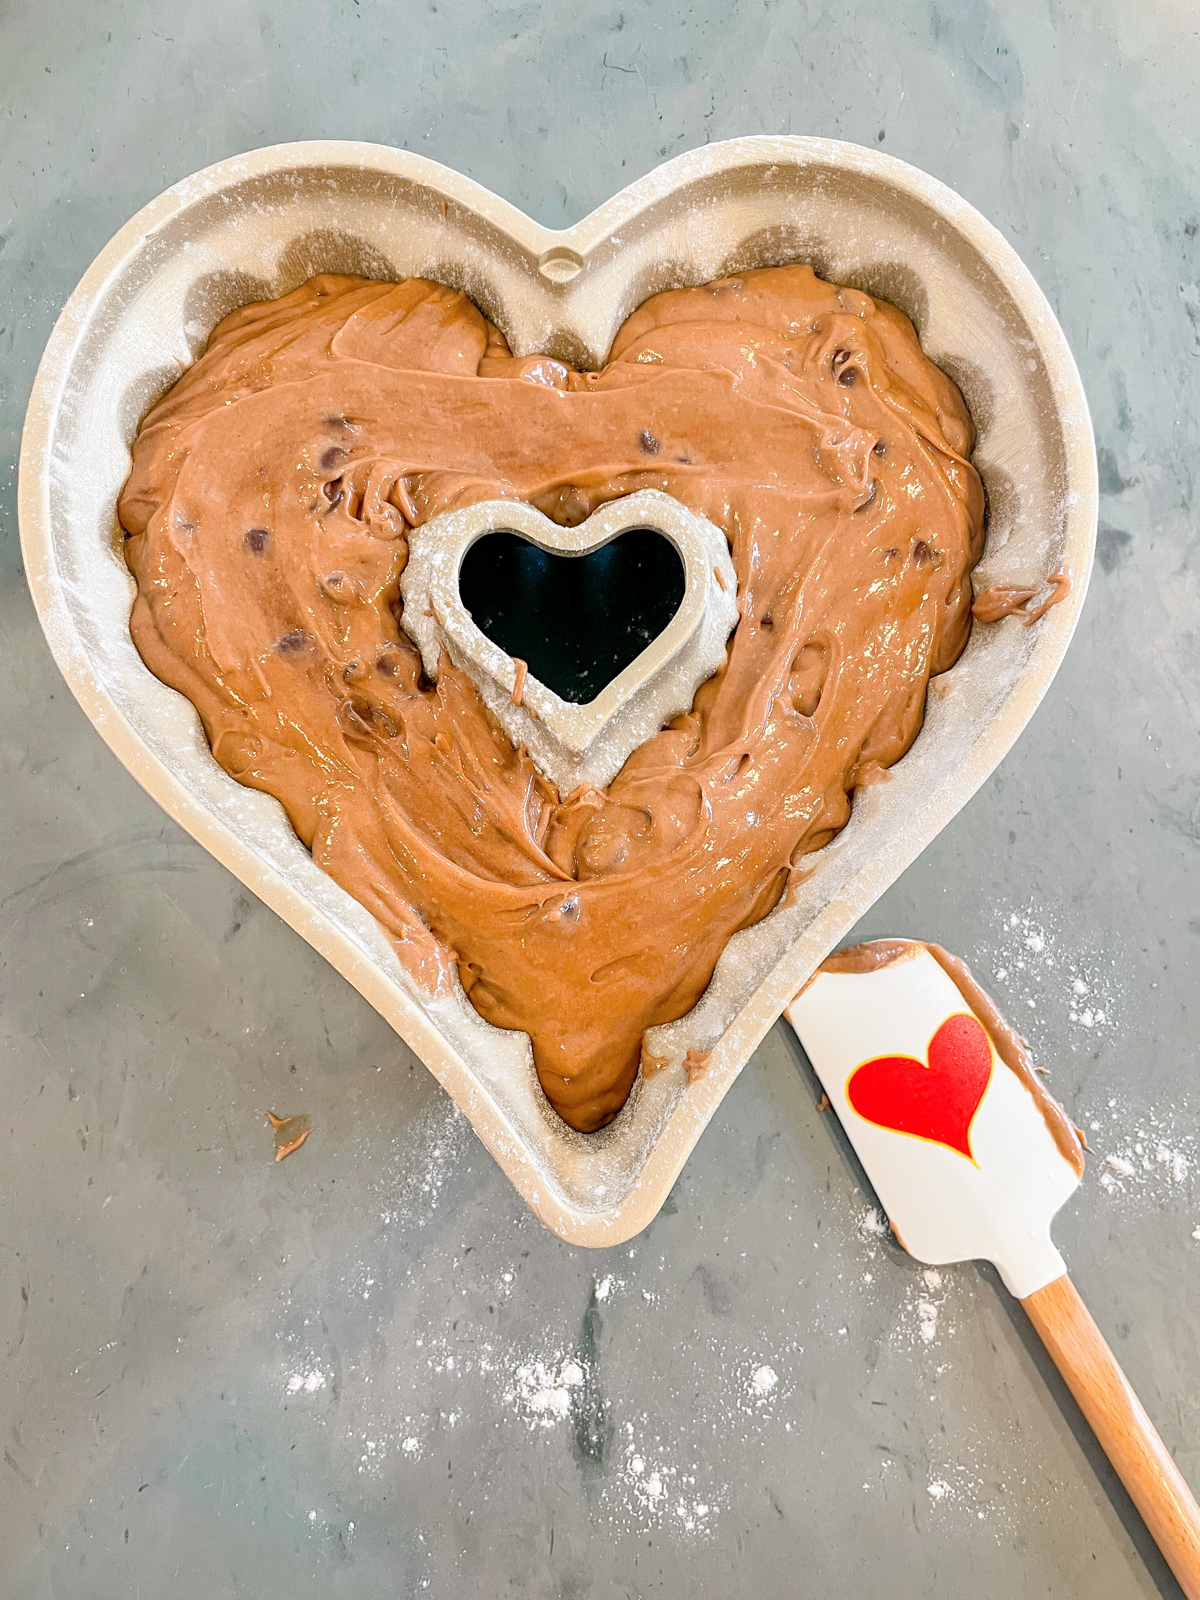
Hey love bugs, it’s less than a month until Valentine’s Day so I think it’s a great time to share my triple chocolate Valentine bundt cake recipe with you! Since Christmas I’ve been on a healthy eating kick (mostly ha) but once I saw this heart shaped bundt pan at Williams Sonoma I knew my fate had been sealed. I had to make a heart shaped cake… I mean I had to! We have a favorite family bundt cake recipe but this time I decided to tweak it a little and poof -my triple chocolate bundt cake was born! For those of you unfamiliar with my original bundt cake you can find the recipe here, along with my most traumatic story about making it!
I’ve always had an obsession with hearts… I just love them. Growing up I’d draw hearts all over my school notebooks. Cut to me today and you’ll find everything from heart shaped dishes to sweaters in my house! I can’t resist the cuteness!
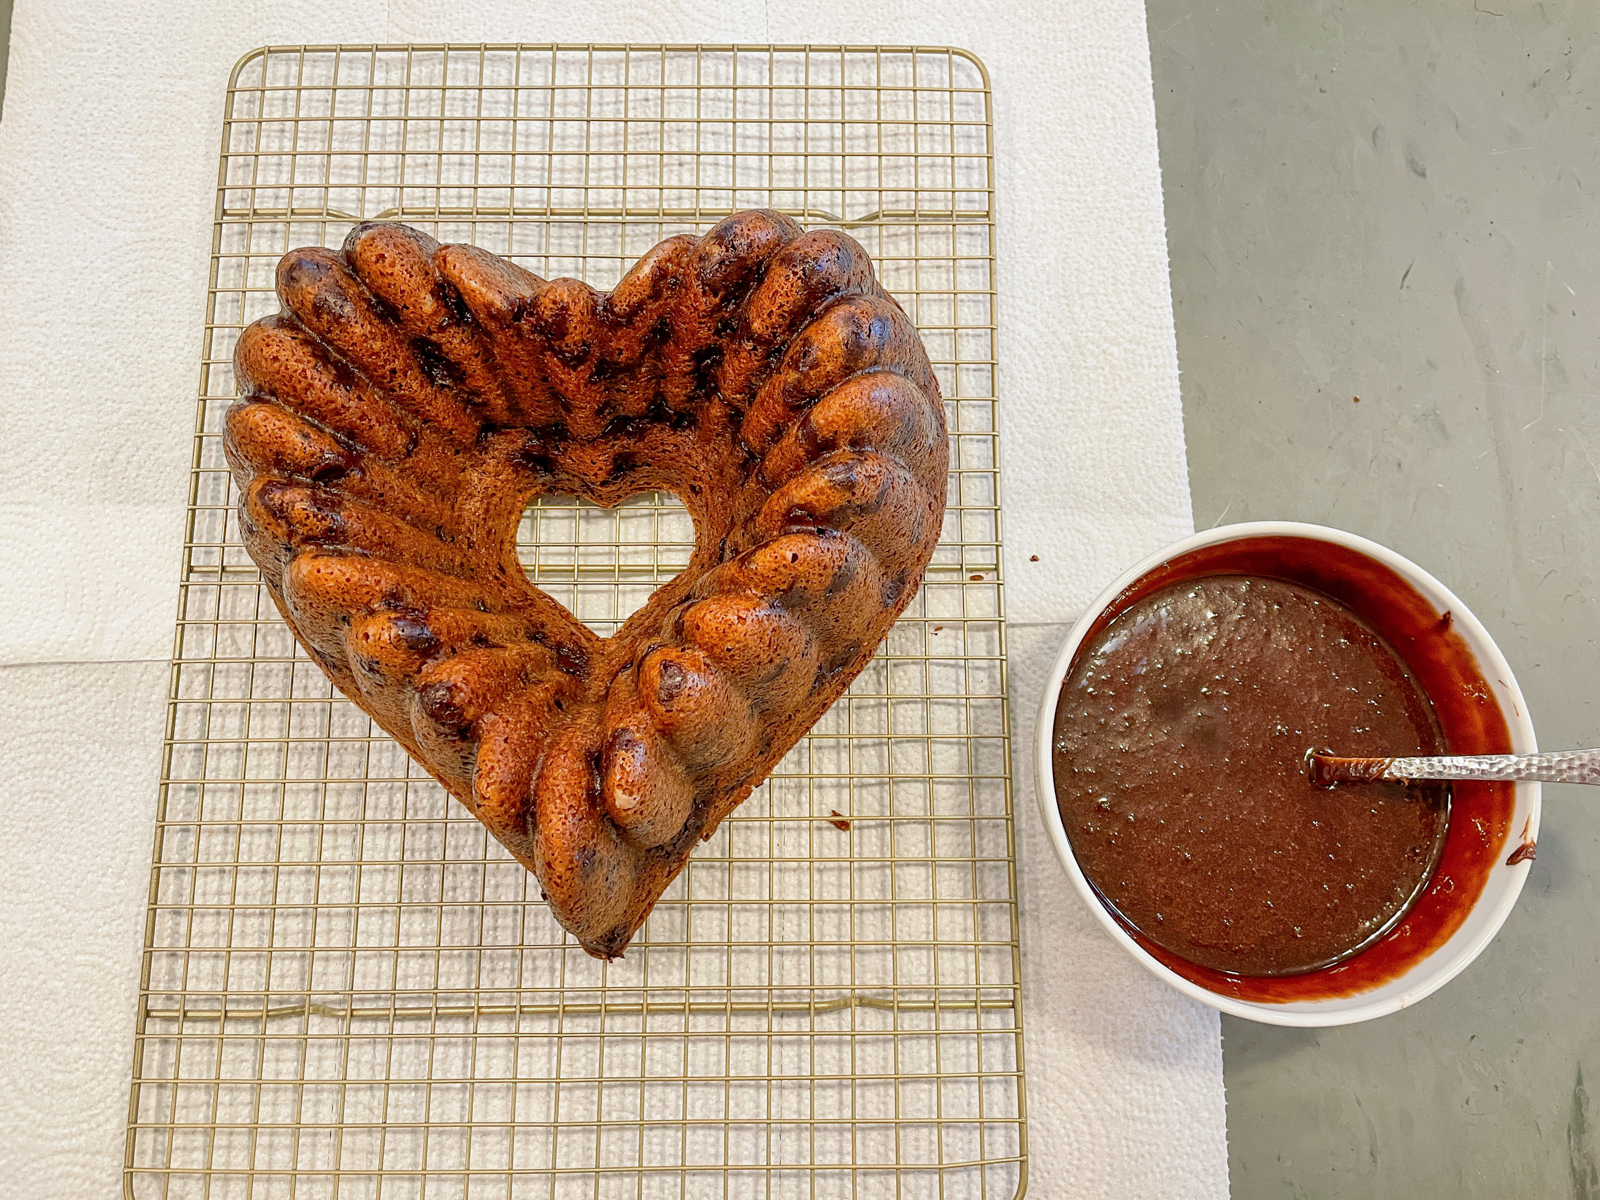
Have you ever melted canned frosting? It’s the perfect cake decorating hack and couldn’t be easier! Just scoop it into a microwave safe bowl, melt, and pour! It leaves a smooth glossy frosted surface that looks so professional! It looks great alone or garnished with sprinkles!
Got questions? I’m feeling sassy so I’ve got answers!
If this is triple chocolate bundt cake why is it made with a yellow cake mix?
I honestly don’t know… it’s my husband’s family recipe so I’ve never asked questions and we all know yellow cake mix tastes freakin good. With the chocolate pudding, chocolate chips, and chocolate frosting it is officially triple chocolate though so don’t hassle me ok?? I’m kidding. Mostly.
I don’t really like sweet things, do I need to use all the frosting?
First of all why are you making a cake then? Second yes!! You can use a little frosting to decorate the cake or do a mother load… I trust you.
Can I use vanilla frosting?
Of course you can and that sounds delish! Unfortunately you’ll need to call it double chocolate not triple chocolate Valentine bundt cake, so make sure you’re up for that challenge.
Can I use milk chocolate chips instead of semi-sweet?
Yes. Because we’re adding a layer of chocolate frosting I decided to reduce the sweetness by eliminating the 1/2 cup sugar and the milk chocolate chips from the original recipe to tone down the sweetness. You can totally go milk chocolate though.
Pouring on melted chocolate frosting is so cool! But doesn’t it waste some frosting?
Yeah it does, and wasting frosting is very very sad. I poured mine over paper towels to reduce the mess and instantly regretted the decision. If you’re wanting a yummy frosting snack definitely use wax paper or parchment so you can scrape it off and eat it!
Why does your original bundt cake recipe have an added 1/2 cup of sugar?
That’s a great question I’ve quietly wondered to myself, but have I mentioned this is a fambily recipe? You don’t question or mess with fambily (said in Rachel Dratch voice).
I don’t have a heart shaped bundt cake can I make it round?
Yes or course! Make it round, make it square, I don’t care… just watch the bake time. I must say Williams Sonoma makes the best bundt pans ever! No more bundt cake trauma in this kitchen!
What is this previous bundt cake trauma you speak of?
You can read about my trauma here. The short story is I was pregnant with my daughter, made it for Christmas Eve, dropped it, and my husband ate it off the floor.
Ok, are you pumped up and ready to make your own cake? You can find the recipe below!
Mix cake mix, pudding mix, and sugar together. Add water, oil, eggs, and sour cream, blend together with an electric mixer. Fold in chocolate chips.
Bake in a greased and floured bundt pan for 55-60 minutes, or until cake is set.
Cool 10 minutes on a wire cooling rack and remove from pan, and cool another 30-45 minutes.
Melt frosting in a microwave safe bowl until completely melted, stirring every 20-30 seconds. The frosting should be a syrup consistency, if it's watery allow it to cool down.
Place parchment paper or wax paper under cooling rack then pour on frosting. Let cool 60 seconds then decorate with sprinkles.
Nom nom… it was delicious and there’s nothing more to say. The end.
Happy New Year! I’m so excited to share this farmer’s harvest salad I created with you. Ugh… I’ve been so behind lately! Between moving, the holidays, lots of travel, and then getting sick it seems like I’ve hardly gotten anything done lately. On our plane ride home from Texas I created an enormous to do list and I was so excited to get stuff done… then BAM! I ended up with a massive sinus infection! Moving and traveling are stressful on their own so I was already aware that my immune system might not be in top form. On top of that I also go way way back with massive allergies and sinus infections in Texas, so maybe it was just inevitable!
While coughing and hacking miserably in bed one night I kept craving a salad that I recently ate at a local restaurant. Literally I couldn’t stop thinking about it, my poor sickly body that had overindulged in naughty holiday food was desperate for some nutrients. So I sent my hubs to the store and poof! My own version of a farmer’s harvest salad was born!
There is just something so insanely satisfying by combining roasted butternut squash with fresh greens, tangy onions, creamy goat cheese, and the satisfying crunch of sliced almonds all tossed in a delicious balsamic dressing! It’s no wonder I healed from my sinus infection in record time, this salad is totally a nutrient powerhouse.
This salad makes the perfect side dish to round out a meal, or by simply adding a protein it can easily become a main meal. Can I just say using the word main is so funny now that I live in Maine? You should see me when were driving down Main Street in Maine… obviously I’m easily entertained! Ok… moving on. If you wanted to turn this salad into a Maine dish (sorry I’ll stop now) it would be incredible with grilled chicken, steak, or salmon. Yum!
When it comes to cooking and baking I’m typically a from-scratch kind of gal, but then again I’ve also been sick. So I gave myself a pass this time. I used pre-cut butternut squash cubes from the produce section and also bottled organic balsamic salad dressing. Now I’m wondering if I should give myself a pass more often because it made making this salad a breeze!
While the butternut squash is roasting use this time to gather and prep the rest of your ingredients to make things super easy!
Place butternut squash in a bowl, drizzle with olive oil, and mix together. Place squash on a baking sheet and sprinkle with salt and pepper. Roast at 400° until tender and lightly browned, about 25-30 minutes.
In a small pan over medium high heat sautée sliced almonds until toasted, about 3-4 minutes. Be careful that they don't burn!
In a large bowl add spinach and arugula mix, onion, and salad dressing.
Top with sliced almonds, roasted butternut squash, and crumbled goat cheese.
If you try this salad let me know what you think! Also if you add any creative additions of your own let me know in the comments below!
Christmas is just around the corner and if you’re still needing to grab a few gifts my Amazon gift guide is here to help! It’s seams there is never enough time during the holidays, right? #helloholidaystress Even when I get an early start to my holiday shopping it never fails, there are always a few gifts I need to grab at the last minute. But have no fear, I’m here to help! I’ve rounded up gifts for everyone that can be delivered quick and easy, right to your door!
Below I’m sharing my favorite picks with easy shoppable links.
Fleece Pajamas – These pajamas come in 5 different colors and patterns and a variety of sizes from petite to plus size.
Michael Kors Watch – This MK watch is the perfect luxury gift for her! It comes in several shades and they’re all stunning!
Premium Plush Bathrobe – Plush bathrobes are such a winter time luxury! This one comes in 10 different colors.
Aromatherapy Shower Steamers – This shower steamer comes with 6 different scents: lavender, watermelon, grapefruit, vanilla, sweet orange, peppermint, and eucalyptus. It’s perfect for a spa night at home.
Gel Polish LED Kit – Gel polish has been one of the best beauty inventions ever! With this kit you can save time and money and get salon quality nails at home.
Memory Foam Faux Fur Slippers – Nothing says holiday gift like a new pair of slippers! With faux fur and memory foam these slippers are oh so comfy!
Rose Quartz Facial Roller Set – Facial rolling has so many benefits! This affordable high quality set comes with 3 different massagers and a storage bag.
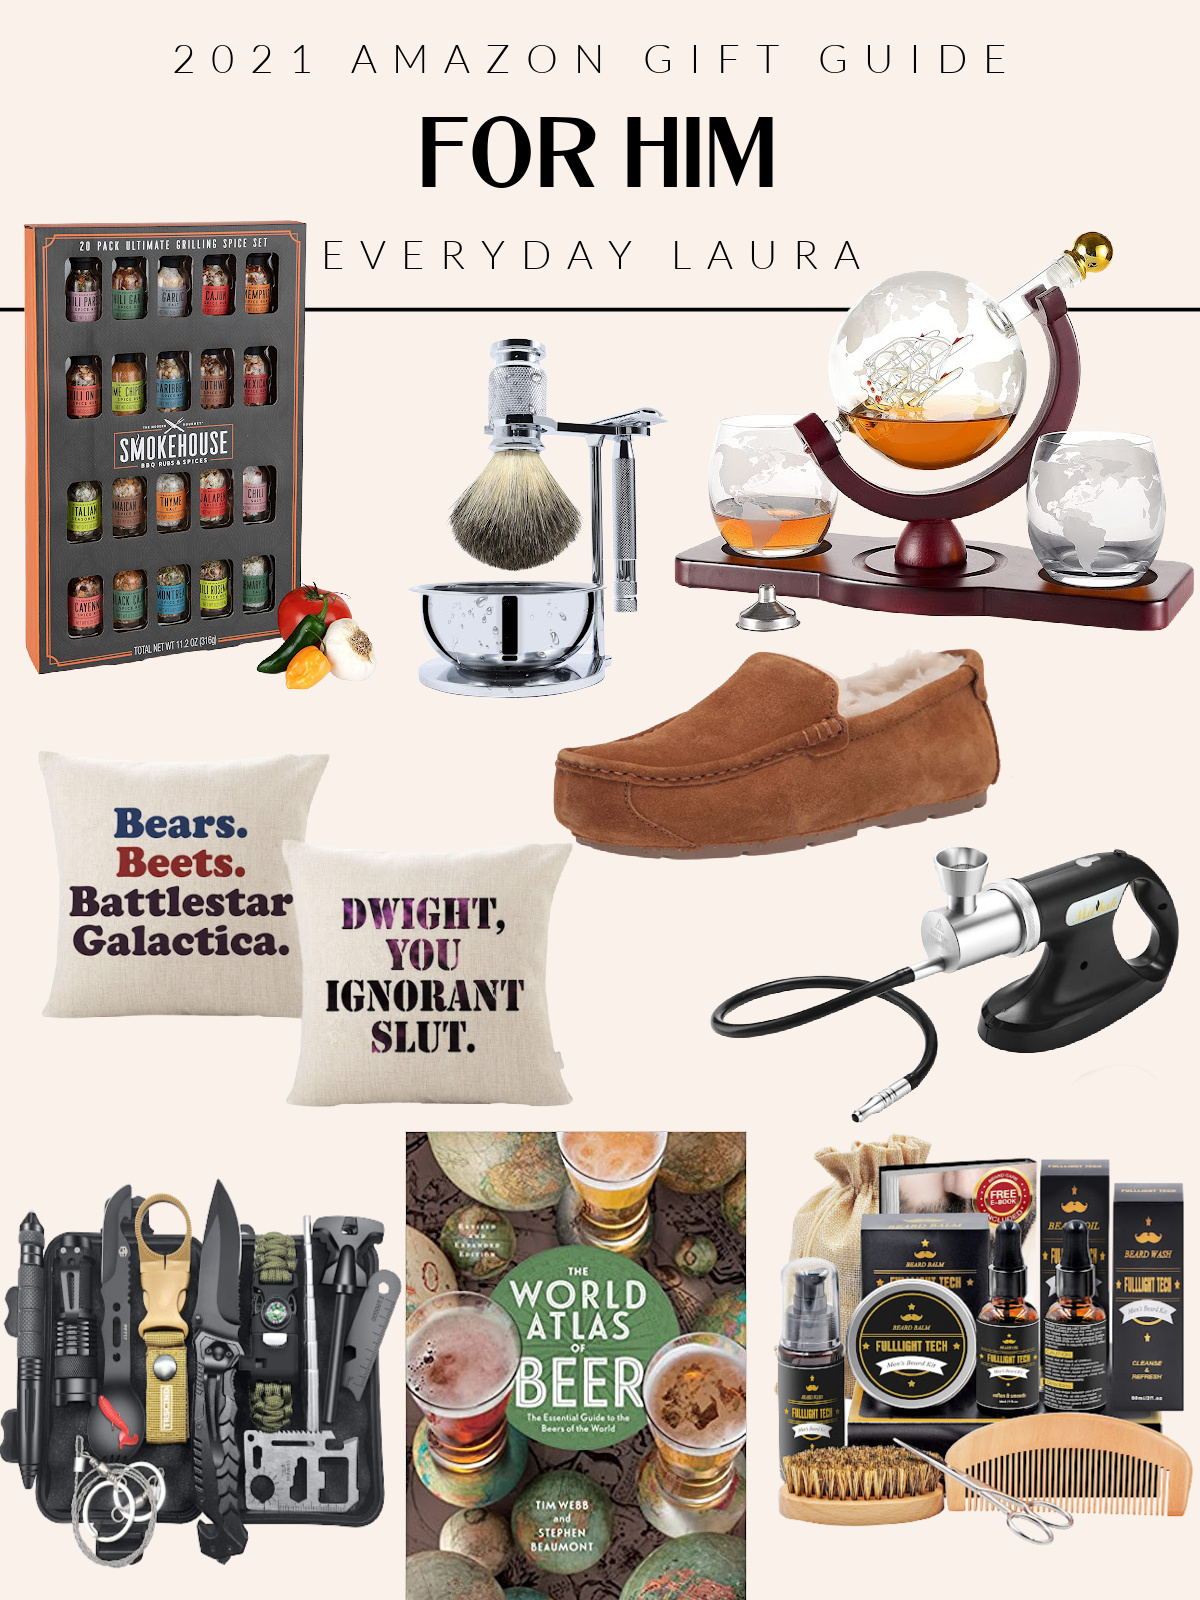
Mens Stainless Steel Shaving Kit – Men can be tough to shop for. Luckily they have lots of hair! Upgrade his razor to this fancy stainless steel set. It looks great enough to stay out on the bathroom counter.
The Office Throw Pillows – Ok, I couldn’t resist this, it’s just so funny! If you know any Office fans these pillows would look great in a man cave or office!
Men’s Slippers – Slippers make the perfect holiday gift for him, and no worries if he already has a pair… they’re probably ready to be thrown out!
Cocktail Smoker with Dome Lid and Wood Chips – Smoked cocktails are all the rage! This cocktail smoker comes with a dome lid and wood chips to make smoking cocktails, cheeses, and other small foods a breeze.
12 in 1 Men’s survival Kit – The guys love their toys, hopefully yours can find something to play with in this survival kit.
The World Atlas of Beer – Not only does this book look like an interesting read it would also make a great coffee table book.
Men’s Beard Grooming Kit – Since we have a razor on the list I thought adding a beard grooming kit would cover all bases. Men are hairy remember?
Night Light Bluetooth Speaker – These bluetooth speakers have a night light with adjustable brightness, rechargeable batteries, and come in lots of fun different colors!
Insulated Picnic Basket – Picnic in style with this adorable insulated picnic basket! It’s complete with everything you need, just add food and beverages and you’re good to go.
8 Pack Aromatherapy Jar Candles – We live in a candle obsessed world and I’m perfectly ok with that! These candles have a nice clean aesthetic look and are strongly scented. There is currently a 10% coupon you can apply.
Luxury Silk Throw Blanket – I love being curled up on the sofa wrapped up in a throw blanket. This luxury blanket is so soft and comes in several other colors too. There is currently a $10 coupon you can add, making this an even better deal.
Large Charcuterie Board Set – Entertaining is made easy with this bamboo expandable charcuterie board set. It comes with dipping bowls and utensils too.
Infuser Water Bottle – We all need to drink more water, and it’s so much easier to drink when you can make your own infused water right in your water bottle.
Indoor Garden LED Grow Light – This LED garden grow light comes with a starter seed pack and has a control panel to tell you when it’s time to add water. Herbs grow 5x faster so you can enjoy fresh herbs all year long.
Small Portable Cooler Bag – This compact cooler bag can hold 3 bottles of wine, 6 bottles of beer, or 10 canned beverages and keep them cold up to 5 hours!
Cheers and happy shopping! Looking for more gift inspo? If you are, be sure to check out my Under $50 gift guide!
Happy December! This Christmas season has certainly been an adventure… but I guess that’s what moving across the country to New England will do to you! I love decorating for Christmas, in fact I look forward to it all year, but this Christmas our home is stuffed with moving boxes. So I’m ignoring the moving boxes and instead trying to find small festive ways to celebrate the season. It’s a Christmas charcuterie board to the rescue!
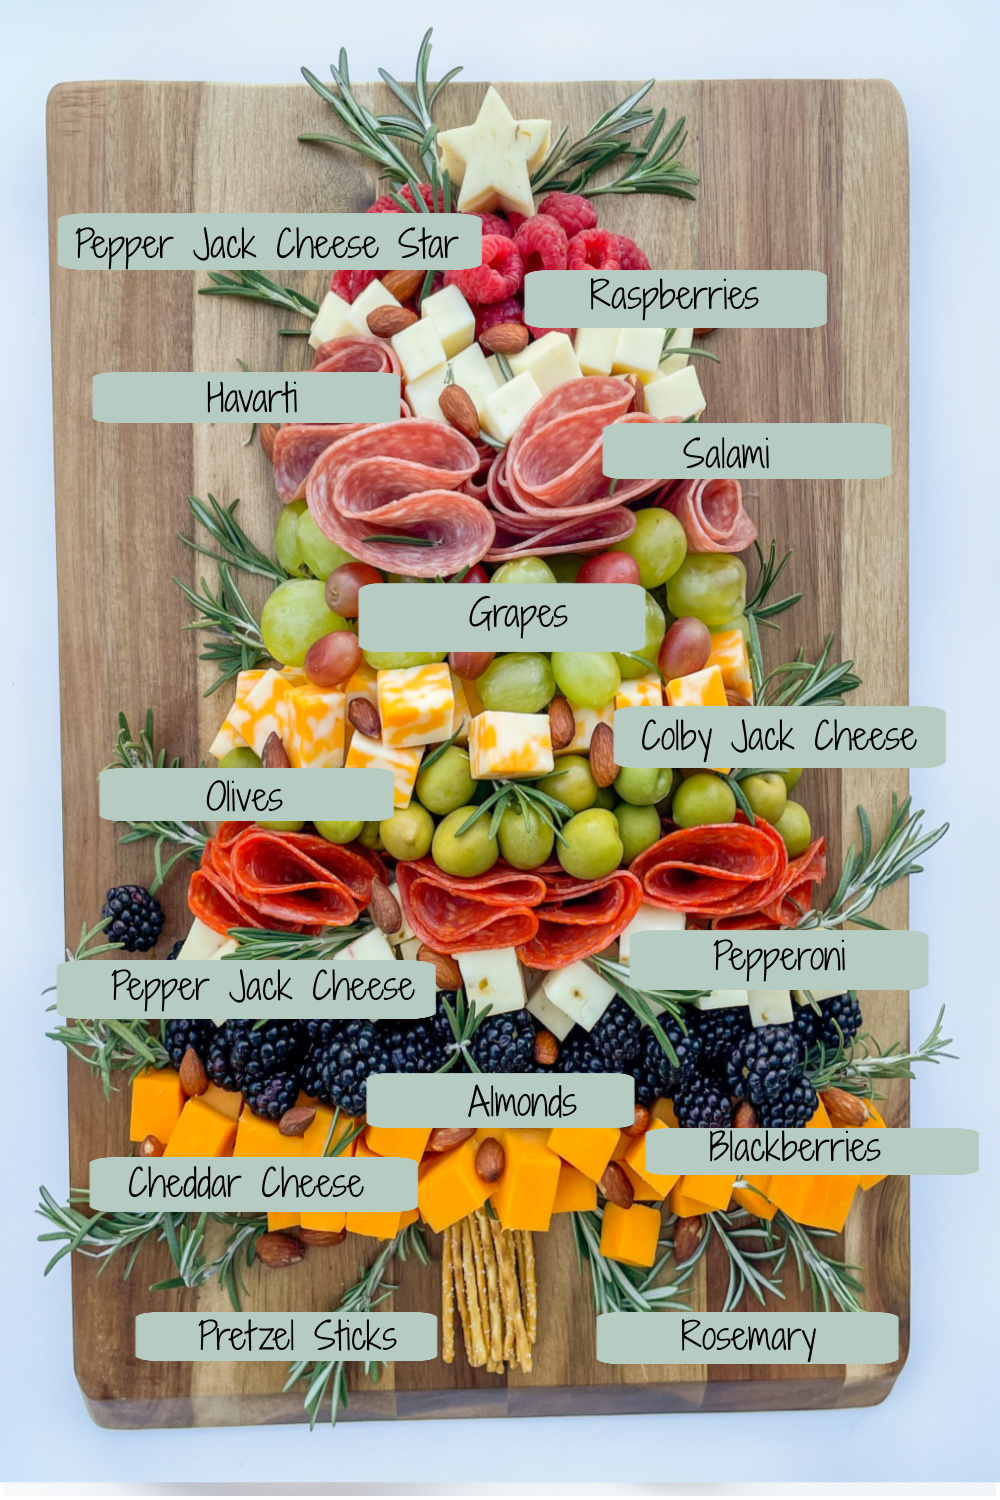
Charcuterie boards are just so fun aren’t they? They’re fun to make and definitely fun to eat! This festive Christmas tree charcuterie board is the perfect way to add holiday cheer, and it couldn’t be easier!
For the basics you’ll need a large rectangle serving board, I used this one here. I love the warmth of a wooden serving board but you can also use a cookie sheet or a large platter. To make the star I used a star shaped cookie cutter, but if you have some wicked knife skills you could cut it by hand. Or skip the star and garnish the top with extra rosemary and treats.
I love the endless possibilities when creating a charcuterie board, it’s perfect for entertaining because it can be assembled in advance. Then just pop open some wine and you’ve got an instant party! To have the most satisfying charcuterie board it’s all about the balance of flavors. Below I’m giving you some food tips for layering your own perfect Christmas tree charcuterie board!
THE LAYERS
MEATS
Pepperoni
Salami
Prosciutto
Summer sausage
Cubed ham
Sliced deli meat
CHEESES
Cheddar cheese
Pepper jack
Colbyjack Cheese
Smoked gouda
Havarti cheese
Parmesian cheese
Brie
Blue cheese
Feta cubes
FRUITS
Blueberries
Strawberries
Raspberries
Blackberries
Grapes
Dried Fruits
CARBS
Pretzels
Pretzel sticks
Bread
Crackers
EXTRAS
Baby gherkins
Olives
Pepper drops
Nuts
Baby carrots
Small cookies
Rosemary and other fresh herbs
Jam
Honey
Mustard
Get creative and have fun, the possibilities are endless! Looking for more Christmas inspo? Check out my holidays category.
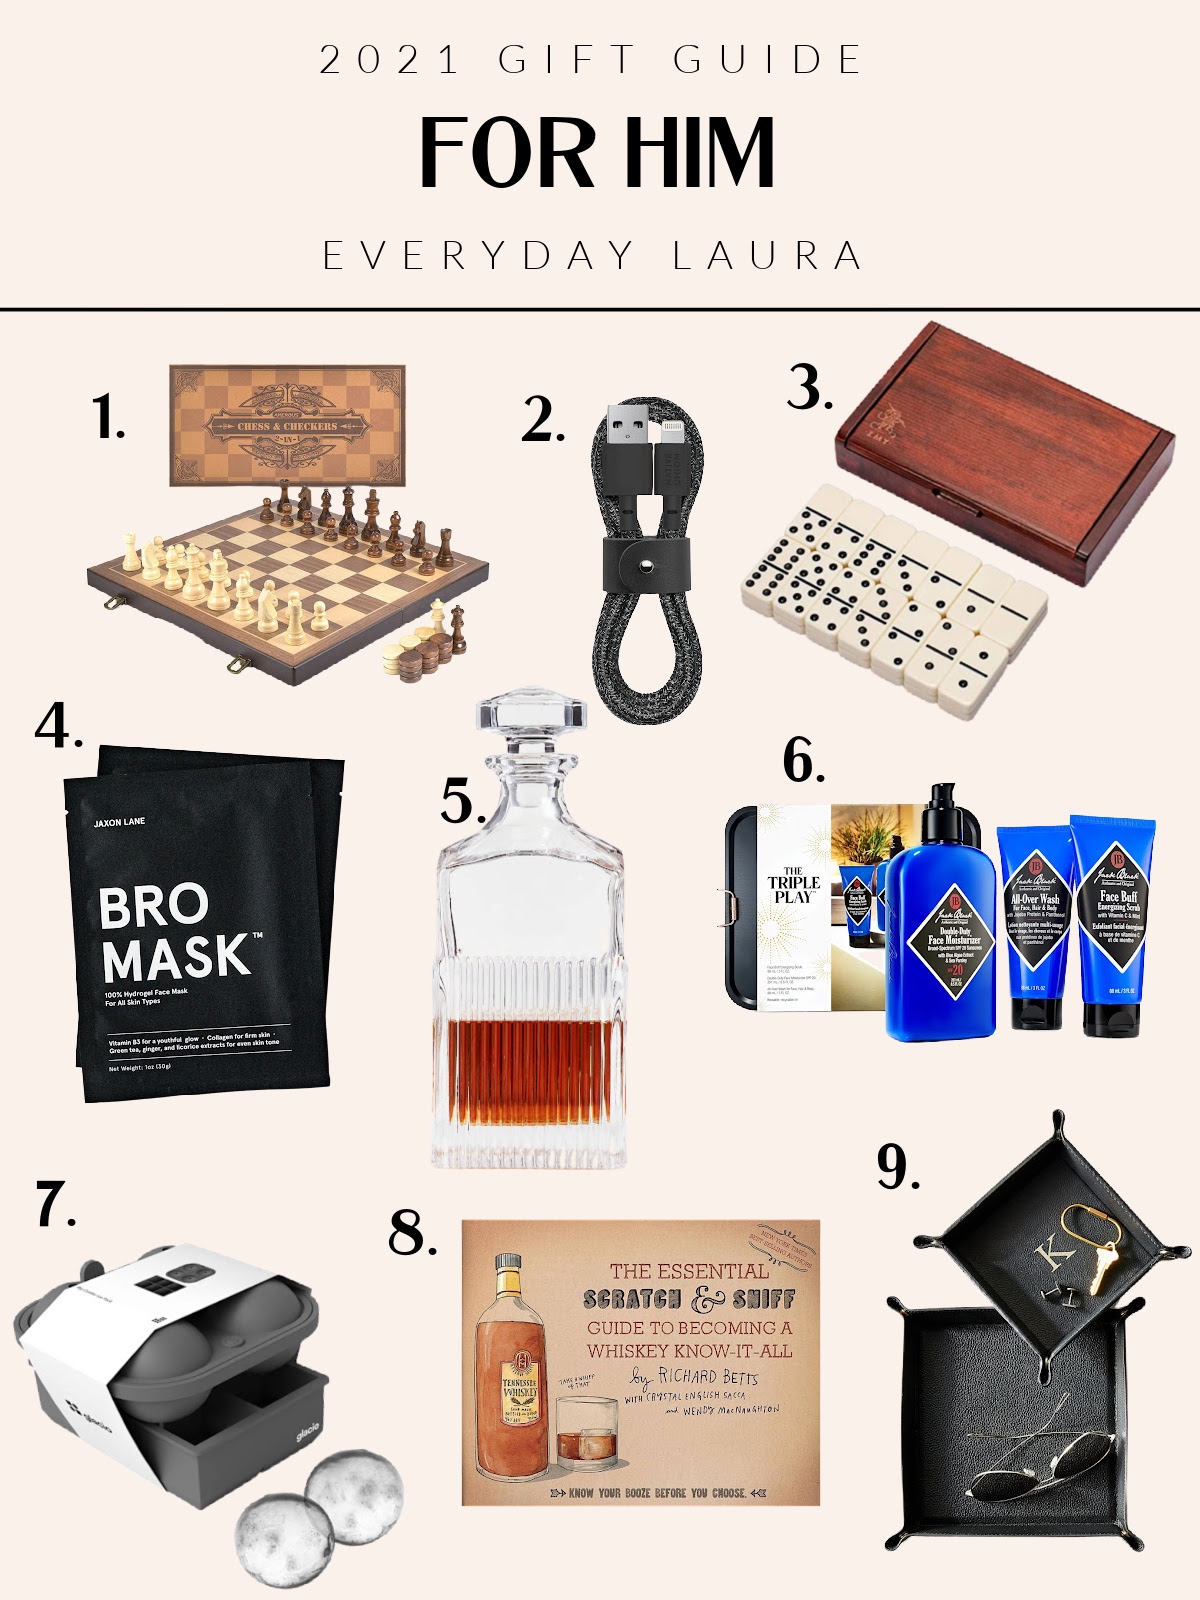
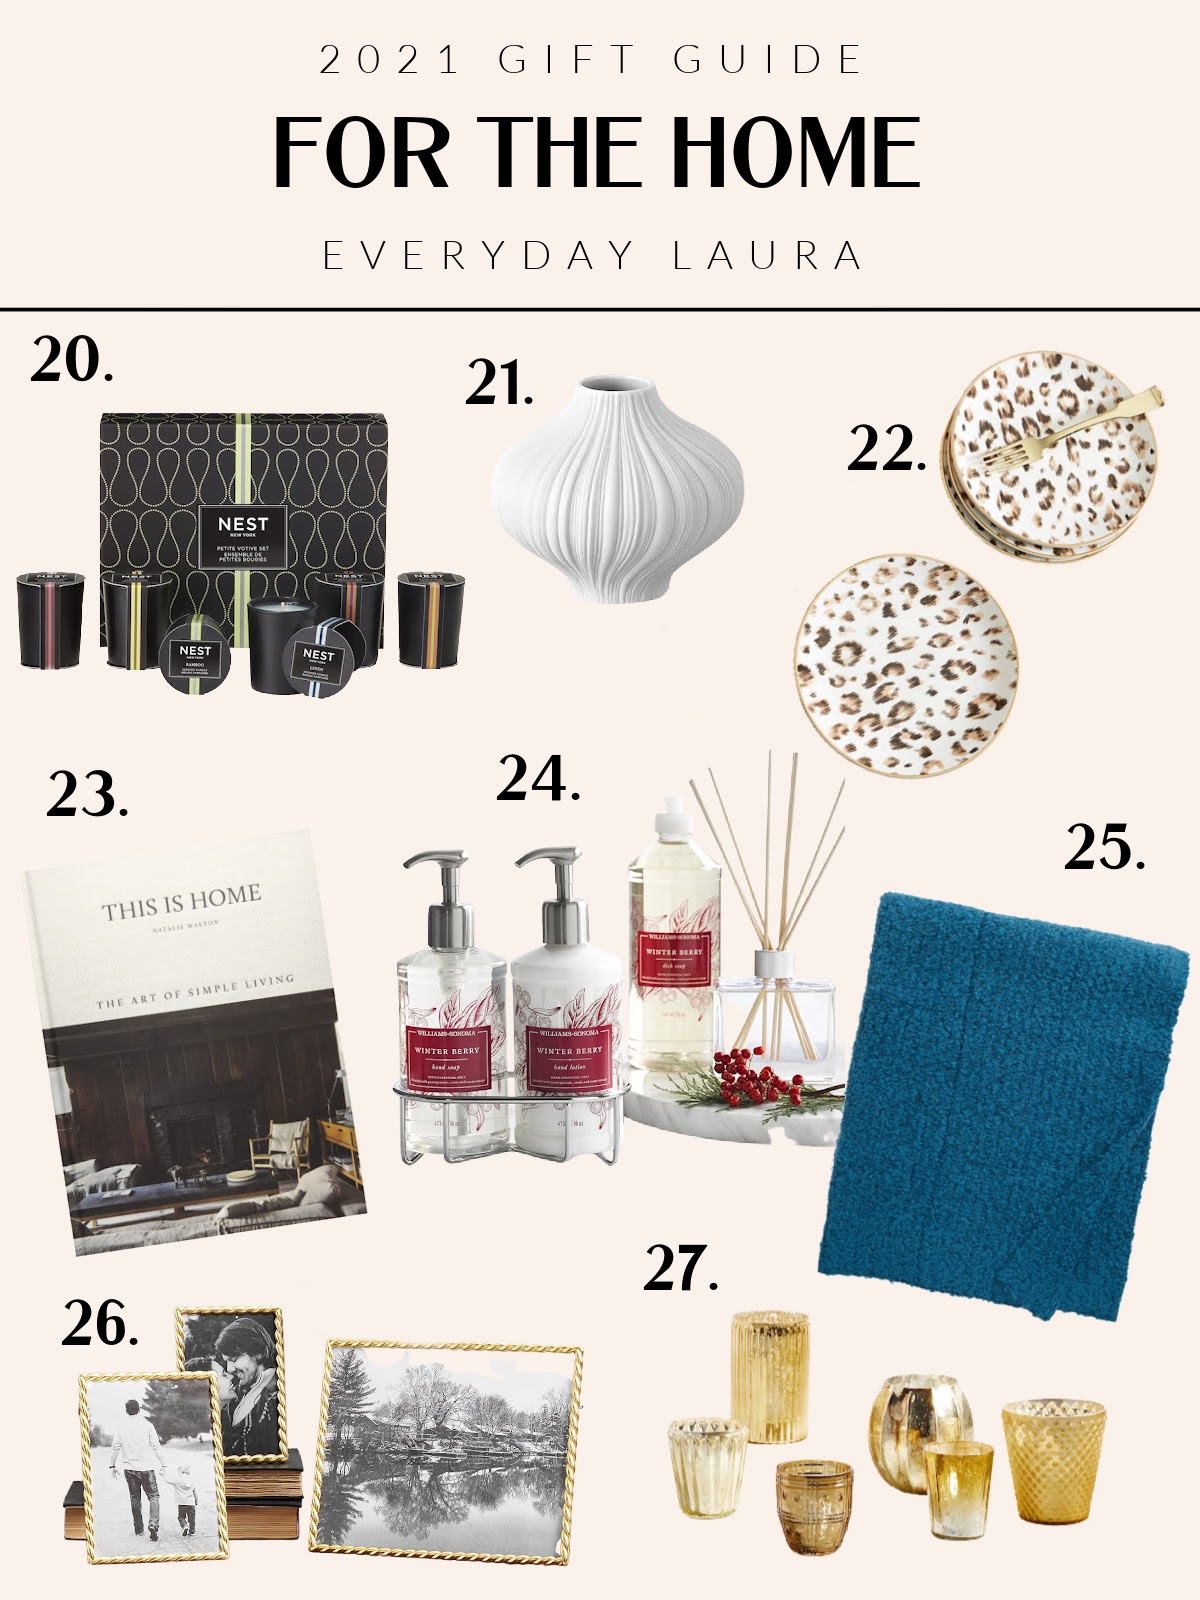
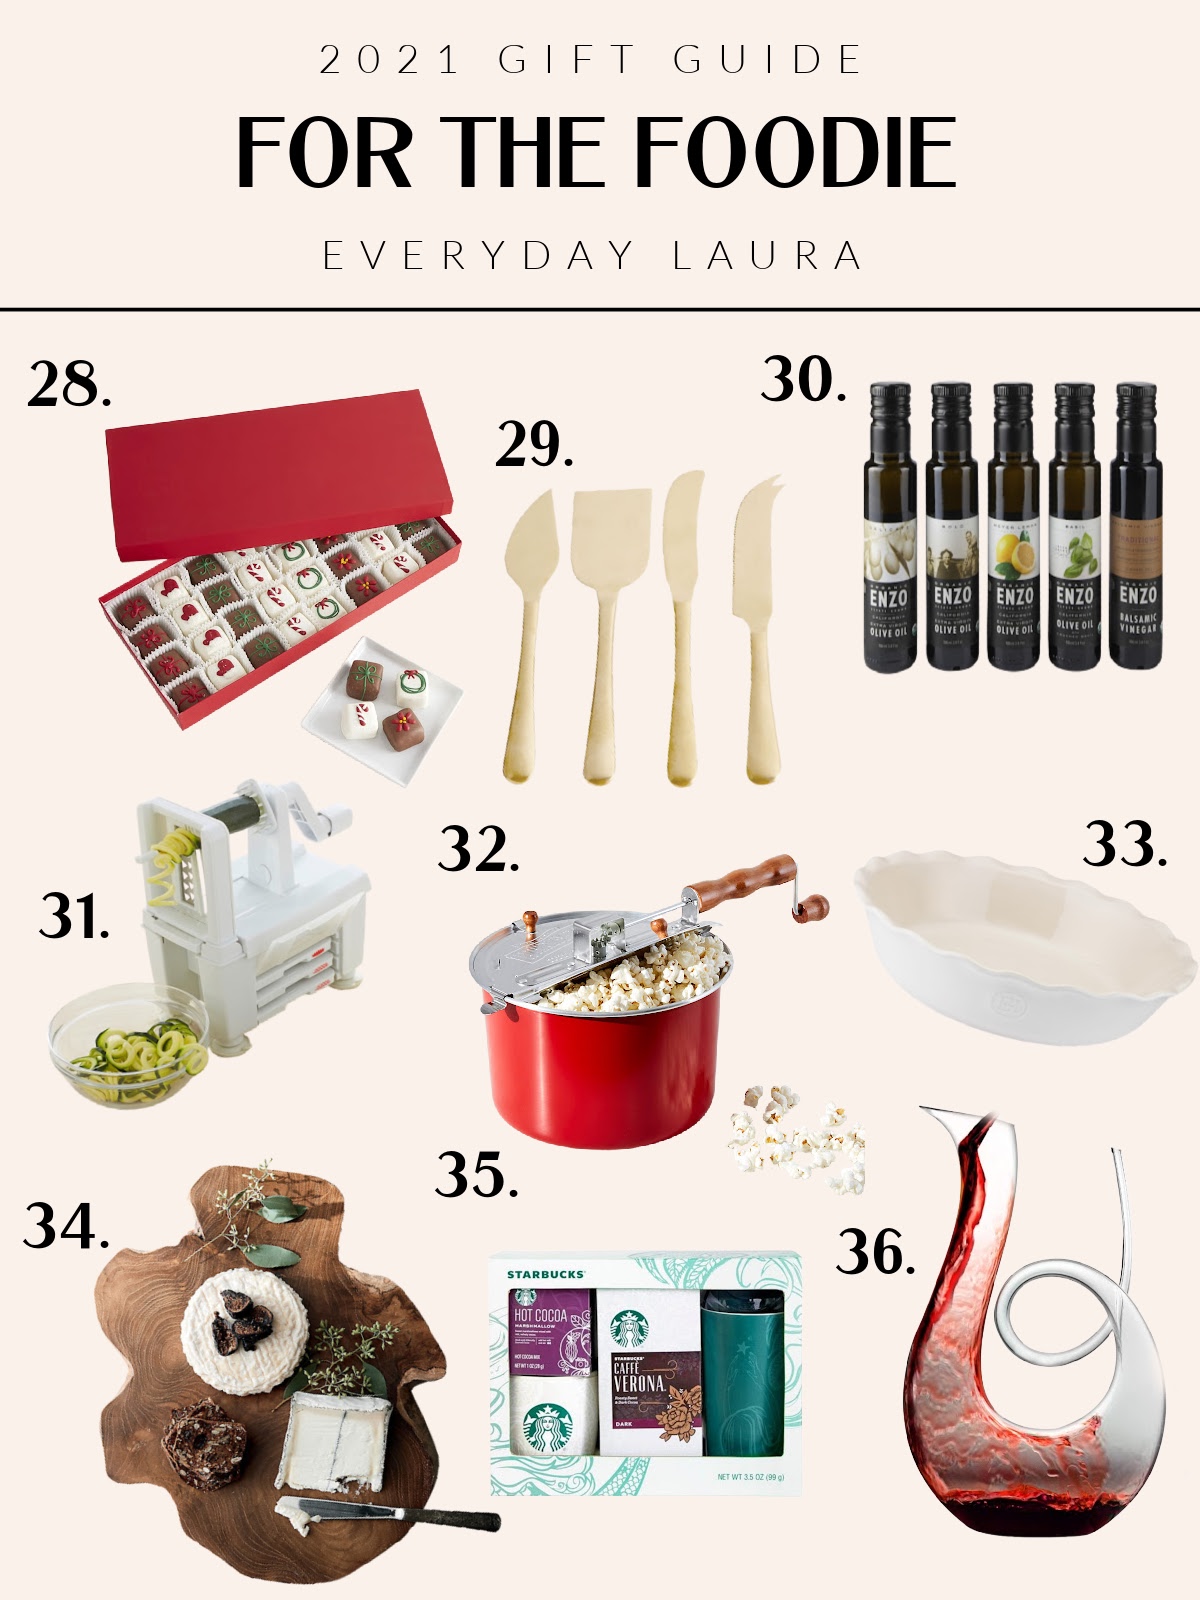
Happy Thanksgiving! Oh how I wish I could have gotten this gift guide to you weeks ago! Time has definitely gotten away from me and I’m constantly feeling behind… but I think that’s what moving will do to you right? There is nothing I love more after a full Thanksgiving belly than curling up on the sofa, listening to Christmas music playing, and doing some online shopping! Like a lot of people online shopping has become an ultimate pleasure in life. So today I decided to put together a 2021 gift guide for ideas under $50, and not only have I shared my $50 ideas for her, but for him too… which is always hard, plus home gifts and gifts for the foodie! So if you’re looking for some ideas I’ve got them for you!
How about sipping a cup of delicious apple cider while you finish your holiday shopping? My slow cooker apple cider recipe is simple and delicious… plus your home will smell divine! Looking for more holiday shopping ideas check out my 2021 Amazon gift guide!
Who’s ready for some holiday decor?? I know I am! This holiday season is bringing big changes! Not only are we moving to a new state and a new house, a new design for the blog is coming soon making it even easier to access your favorite Everyday Laura blog posts plus easier access to shop my favorites! Today I thought I’d share a few holiday home items that are perfect for making a holiday home!
When it’s time to decorate for the holidays I always start with a wreath! This classic pine wreath gives the perfect pop of green whether inside or out, and this mini mistletoe wreath with berries is the perfect way to decorate small windows and furniture. Every Christmas season I love to add a touch of sparkle and these pre-lit crystal trees come in three different sizes to work with, making the possibilities endless!
These stockings have amazing texture and add the perfect pop of red, but if you’re feeling natural they come in cream too! These reindeer sculptures come in 4 different shades, zinc, brass, white, and silver, and in different sizes too.
When it comes to a cozy holiday home don’t forget about the bedroom! Tis’ the season for flannel sheets, and these red striped sheets are so soft and warm but if stripes aren’t your jam they have lots of other great seasonal prints too! Paired with this affordable pillow you’ve got a great cozy holiday bed.
This cozy indoor rug instantly caught my eye and would look perfect along or layered over a larger rug, and what can I say… I have a weakness for holiday mugs. I buy new ones every year! I know many of you like me love Nest home fragrances doing the holiday season, and the birchwood pine is hands down my favorite! This large winter white candle also smells amazing and makes a great home accent.
I saved the best for last! This 12 piece Spode dinnerware set is a black friday special for under $100! I’ve used the Spode Christmas tree collection for years, it’s a true classic and I’ve honestly never seen a set at such a great price!
Laura
Cookie Consent
We use cookies to improve your experience on our site. By using our site, you consent to cookies.
Used to monitor number of Google Analytics server requests when using Google Tag Manager
1 minute
_gid
ID used to identify users for 24 hours after last activity
24 hours
__utmx
Used to determine whether a user is included in an A / B or Multivariate test.
18 months
__utmv
Contains custom information set by the web developer via the _setCustomVar method in Google Analytics. This cookie is updated every time new data is sent to the Google Analytics server.
2 years after last activity
_ga
ID used to identify users
2 years
_ga_
ID used to identify users
2 years
_gali
Used by Google Analytics to determine which links on a page are being clicked
30 seconds
_gac_
Contains information related to marketing campaigns of the user. These are shared with Google AdWords / Google Ads when the Google Ads and Google Analytics accounts are linked together.
90 days
__utmz
Contains information about the traffic source or campaign that directed user to the website. The cookie is set when the GA.js javascript is loaded and updated when data is sent to the Google Anaytics server
6 months after last activity
__utmb
Used to distinguish new sessions and visits. This cookie is set when the GA.js javascript library is loaded and there is no existing __utmb cookie. The cookie is updated every time data is sent to the Google Analytics server.
30 minutes after last activity
__utmc
Used only with old Urchin versions of Google Analytics and not with GA.js. Was used to distinguish between new sessions and visits at the end of a session.
End of session (browser)
__utmt
Used to monitor number of Google Analytics server requests