DECOR

OUR 18 MONTH KITCHEN REMODEL IS FINISHED!

After 18 long months of remodeling, I’m so excited to say our kitchen is officially finished!!  That’s right, you read that right… 18 months.  Ugh, and that didn’t even include all the planning that was spent at the Home Depot cabinet department that we ended up walking away from.  The lady at Home Depot hated all my ideas and I hated all of hers.  She didn’t like any of my appliance choices and was really pushy with wanting me to get gray cabinets.

I could keep going on and on but it was the final estimate of $35,000 just for the cabinets, cabinets for a kitchen layout that really wasn’t working for us, that made us walk away.  So we started over… from scratch.  I did still have the kitchen plans and I studied them long and hard (that’s what she said), and in the end I realized it just wasn’t functional for our needs.

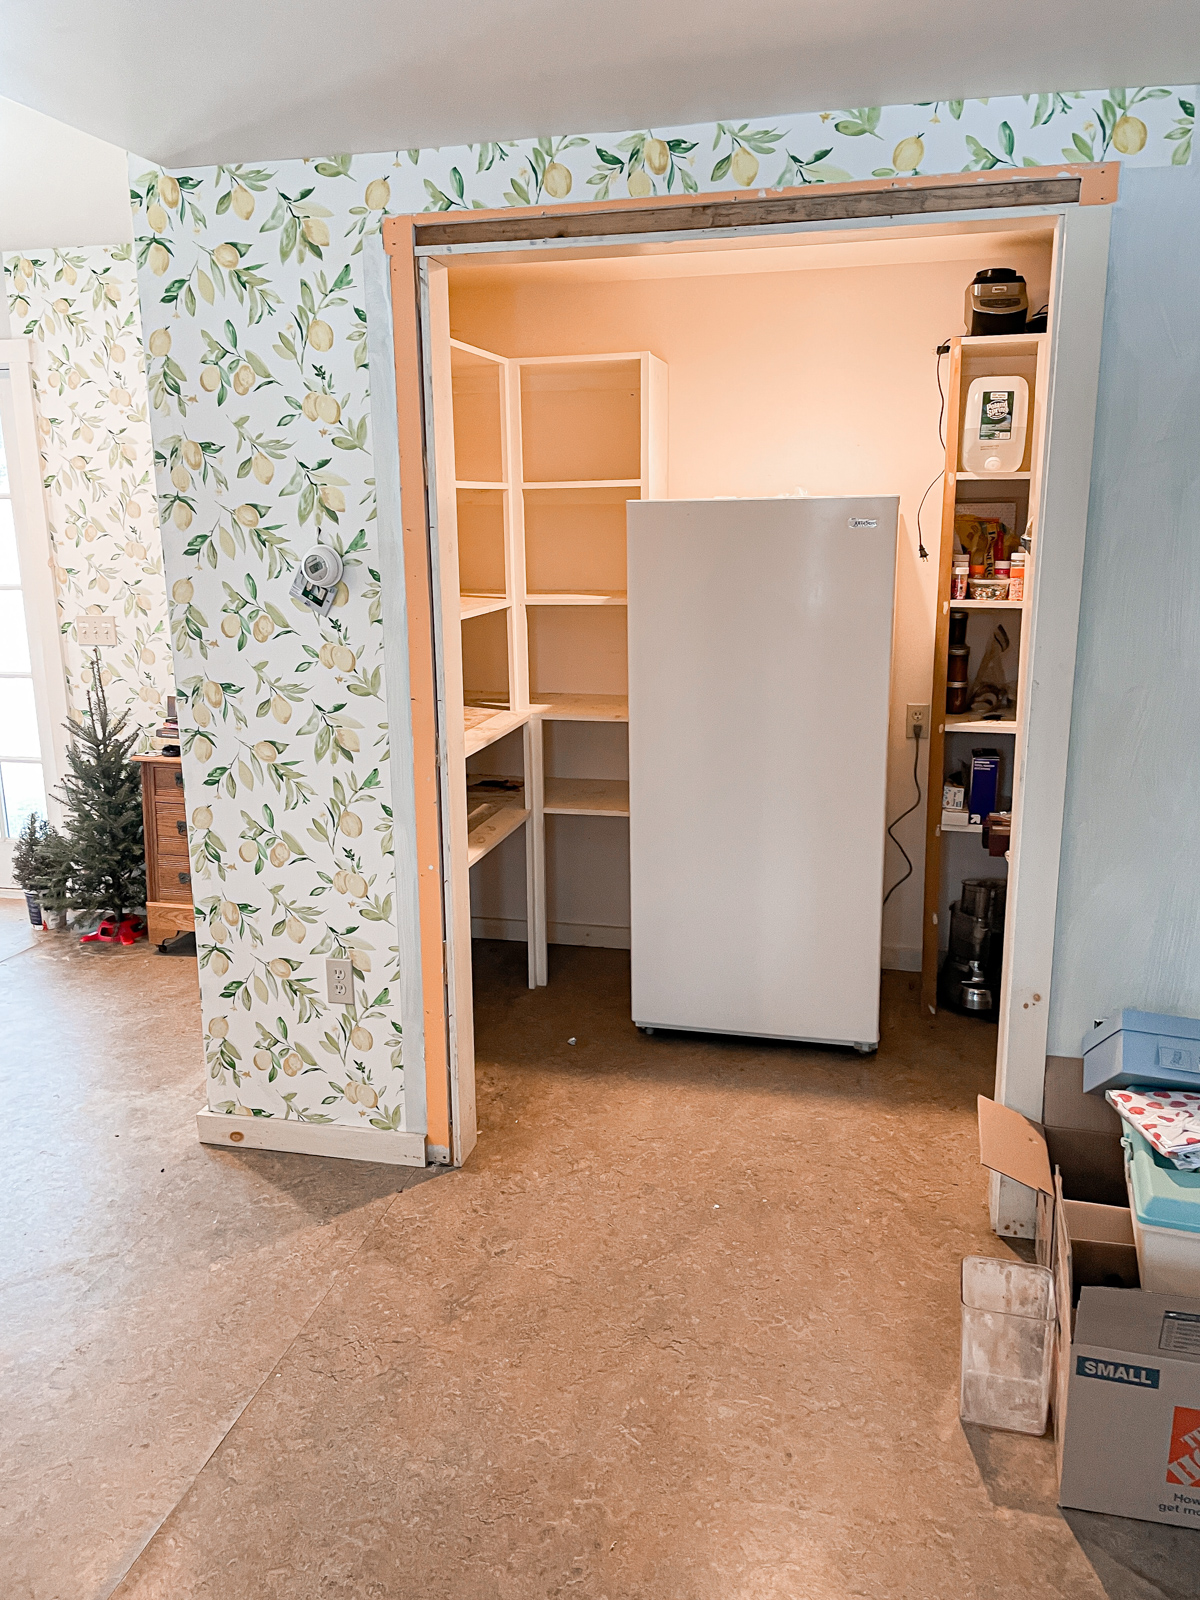
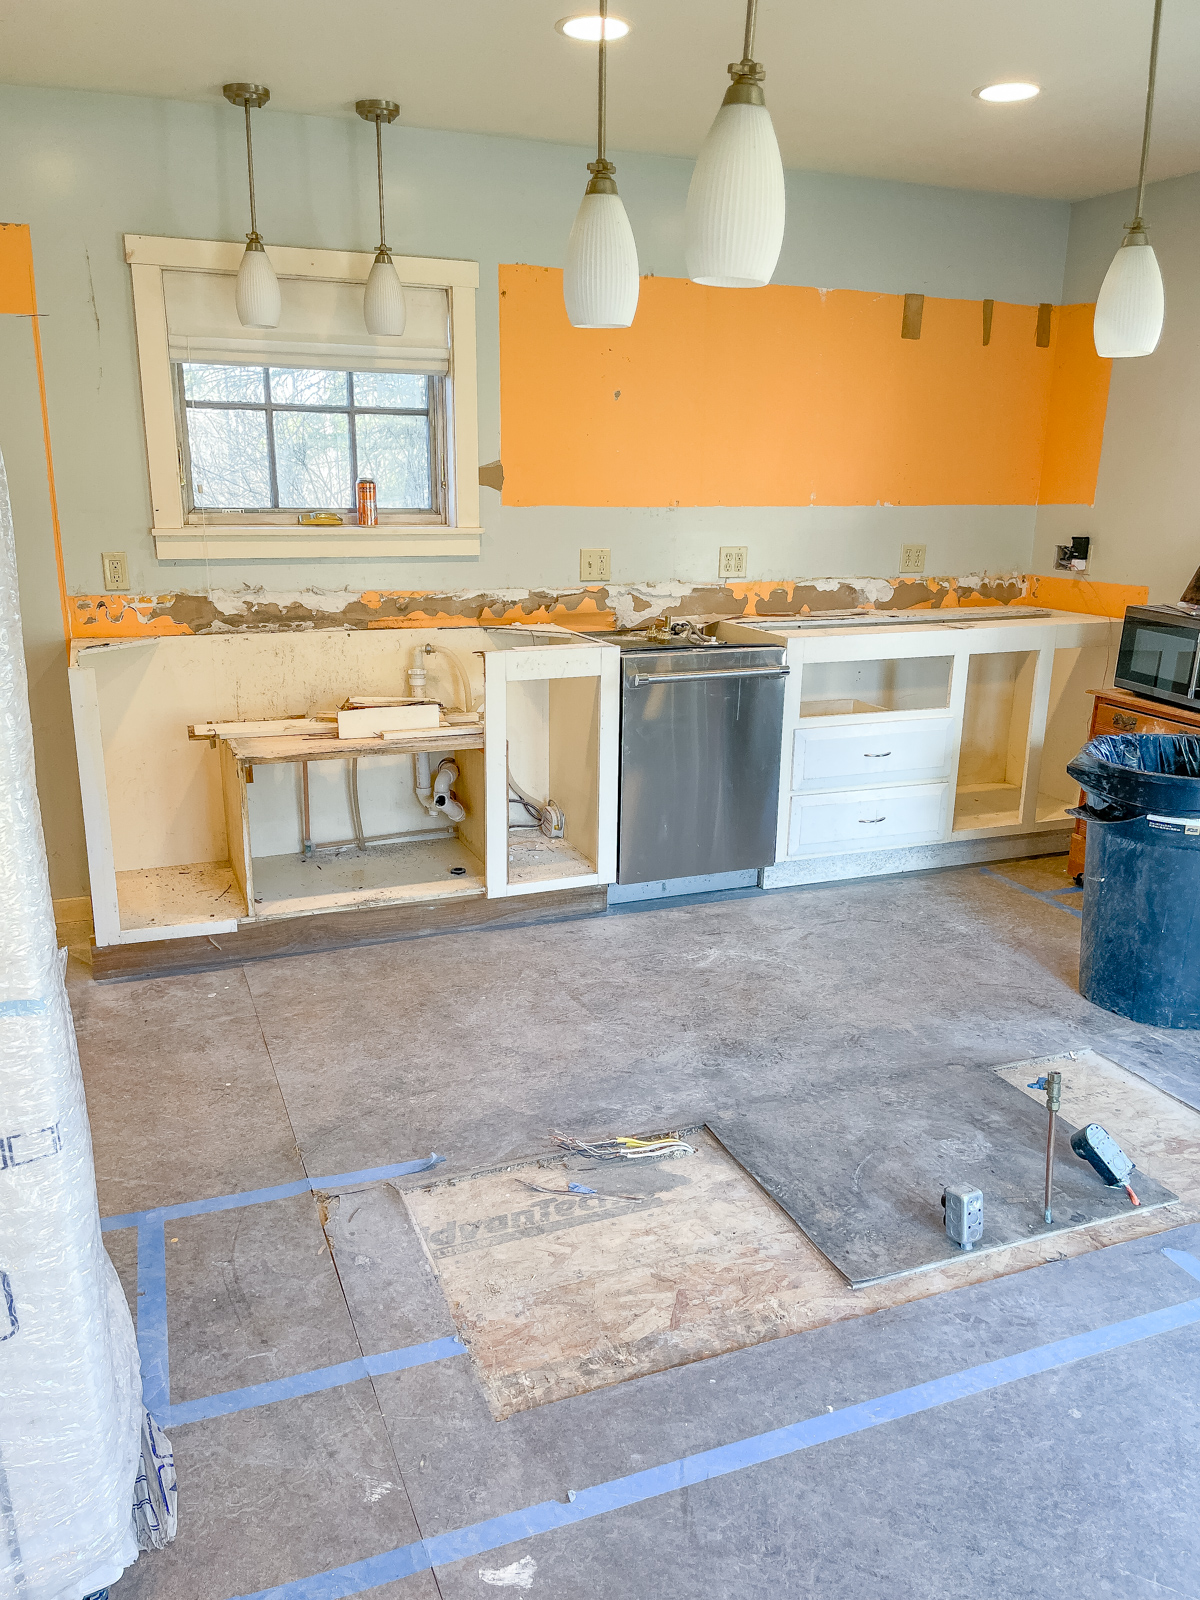
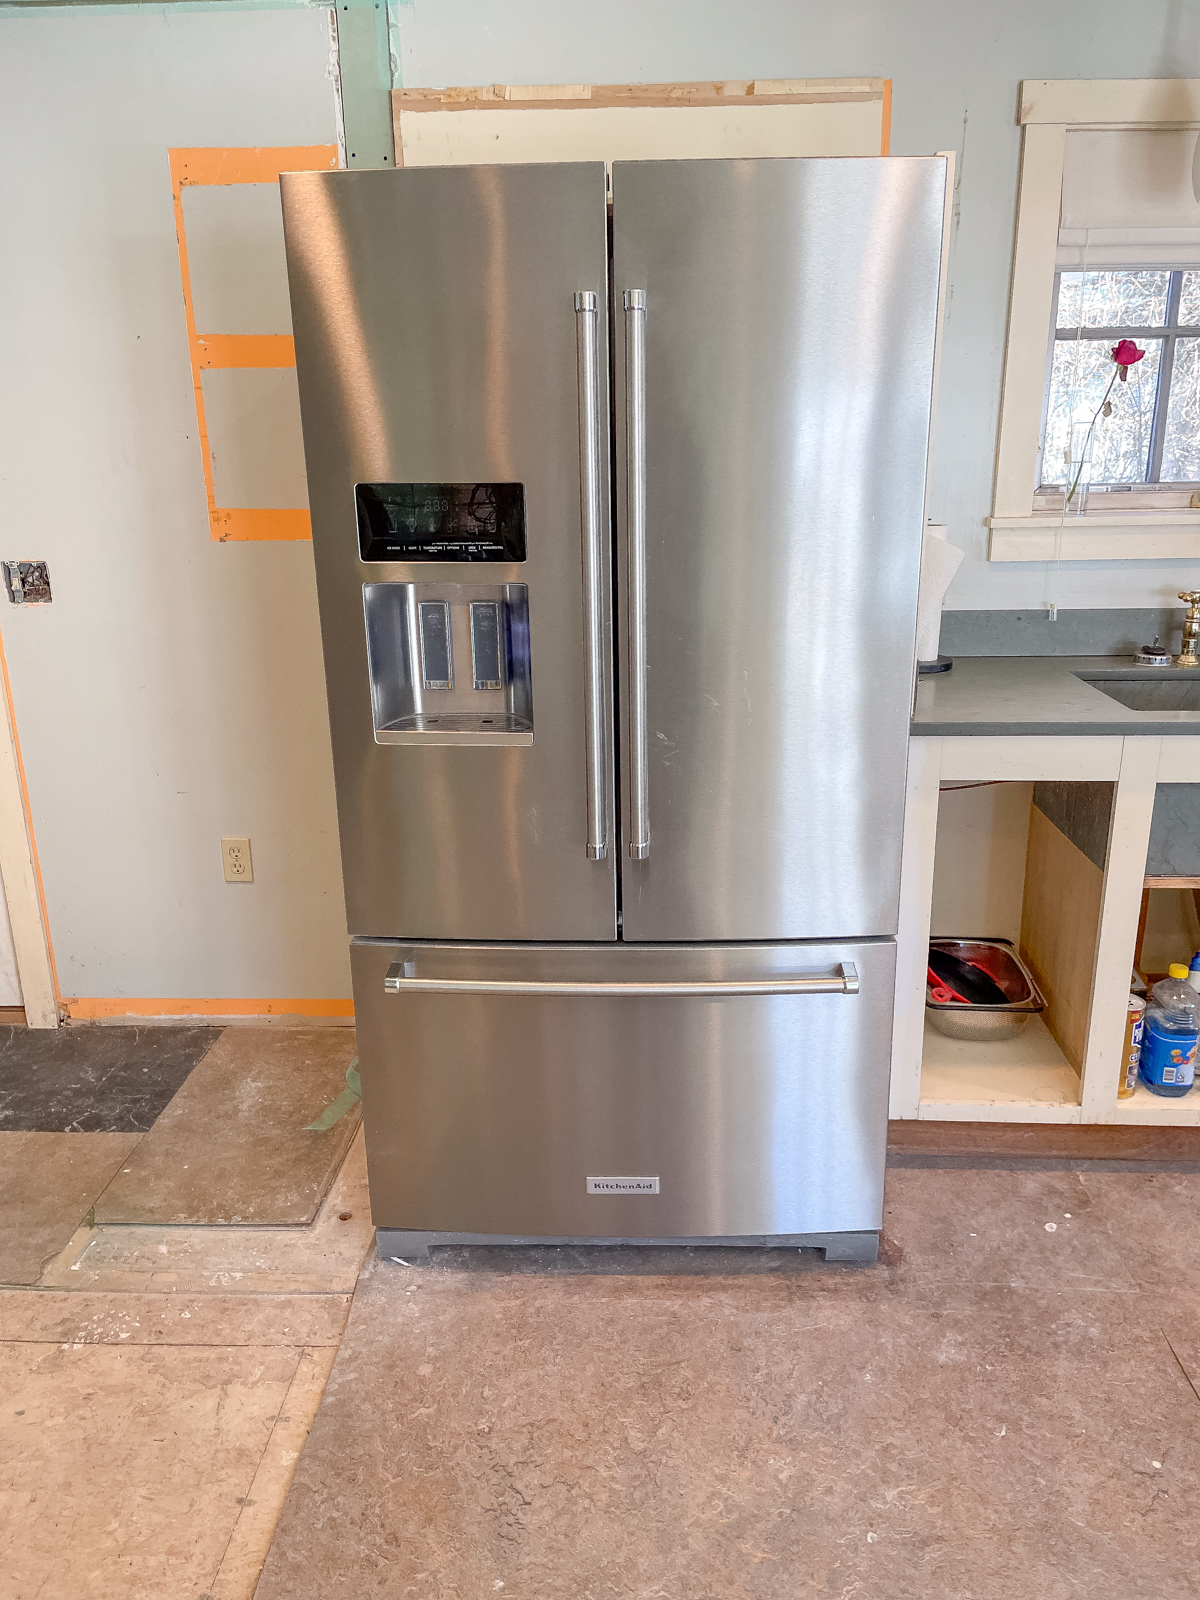
Here’s what the kitchen looked like when we moved in.  I have no idea what happened to the original cabinet doors, I didn’t care.  After viewing the house we closed and moved in 2 weeks later.  It was crazy!

New England kitchen remodel ugly kitchen remodel

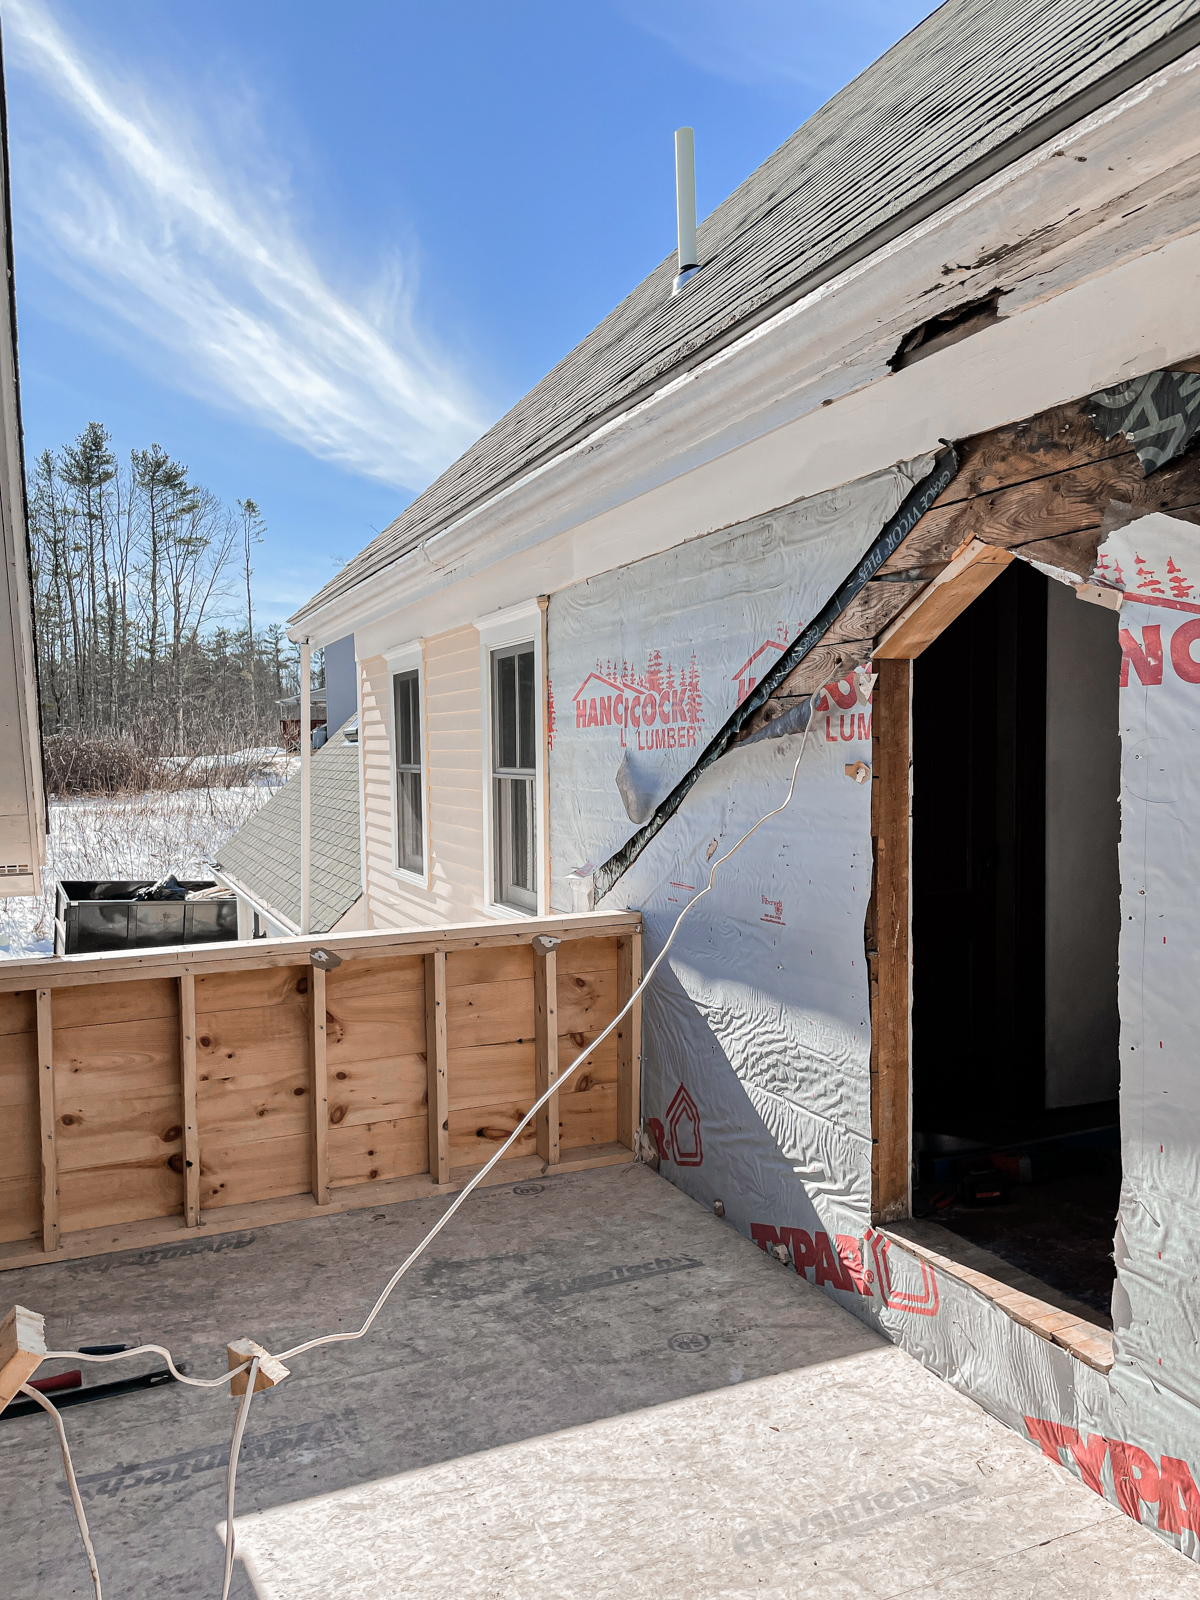
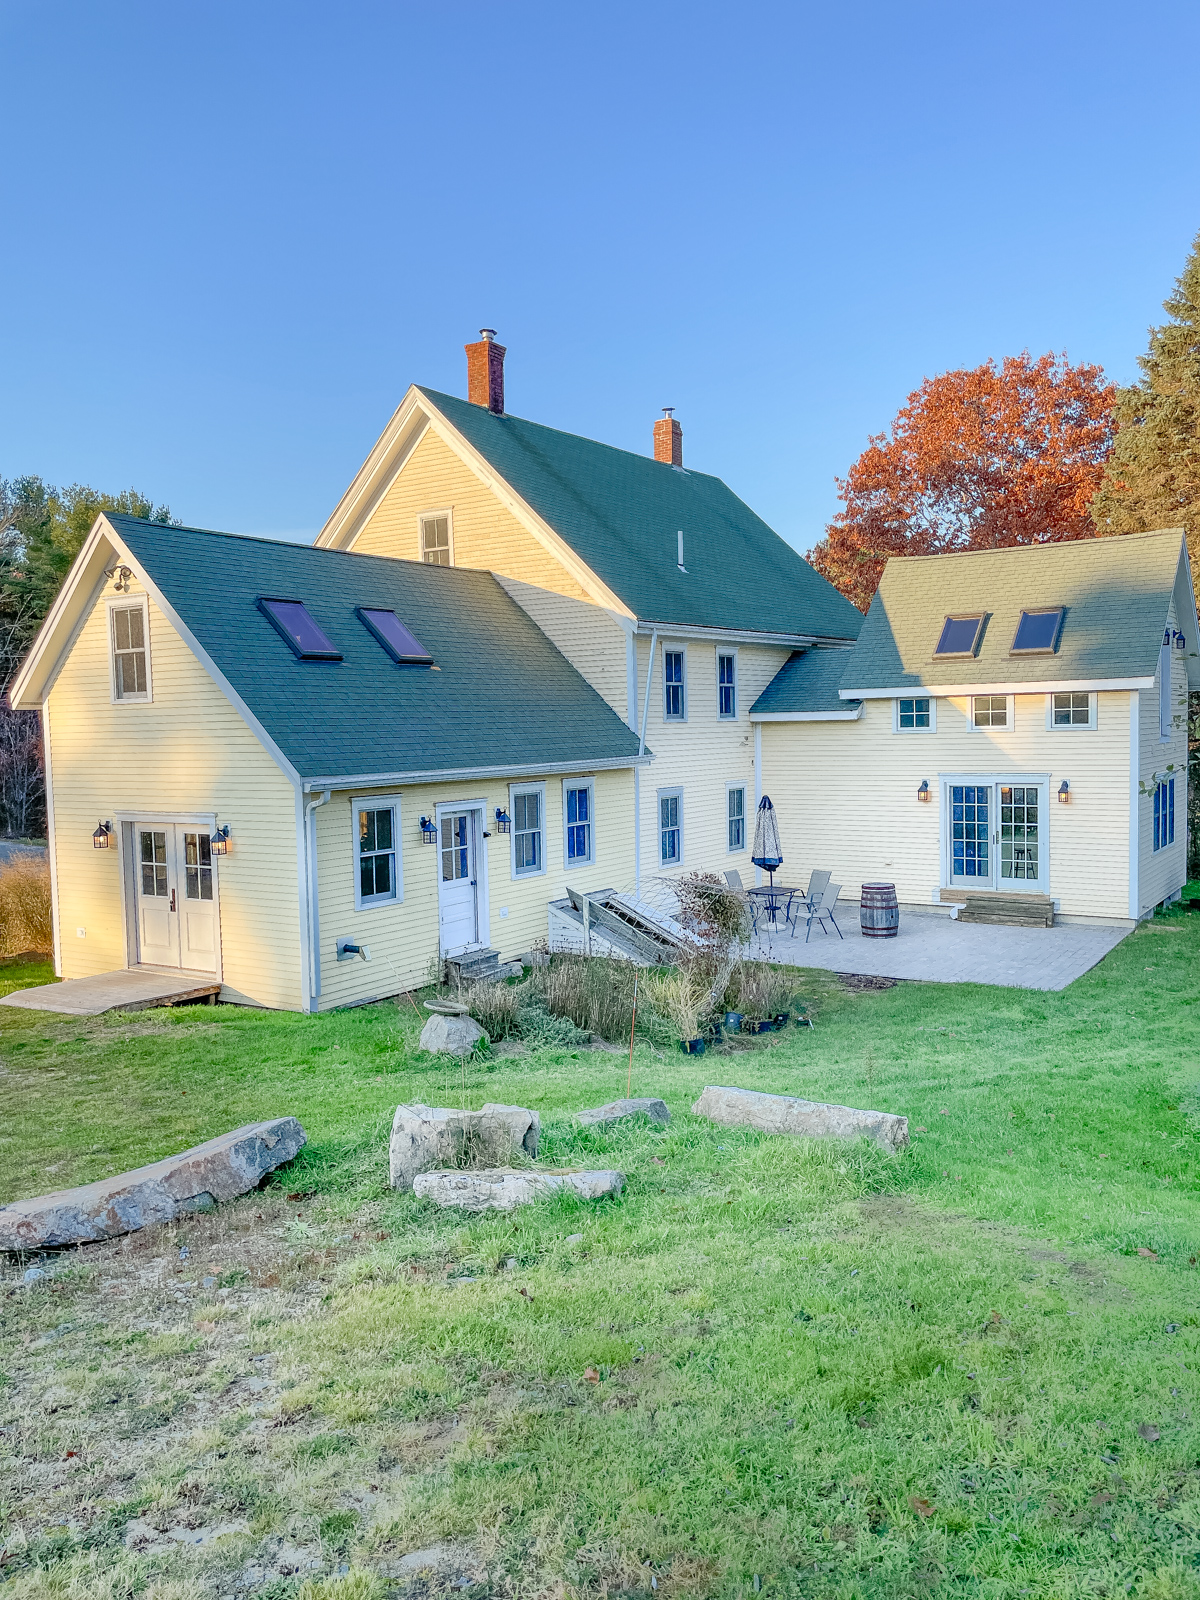
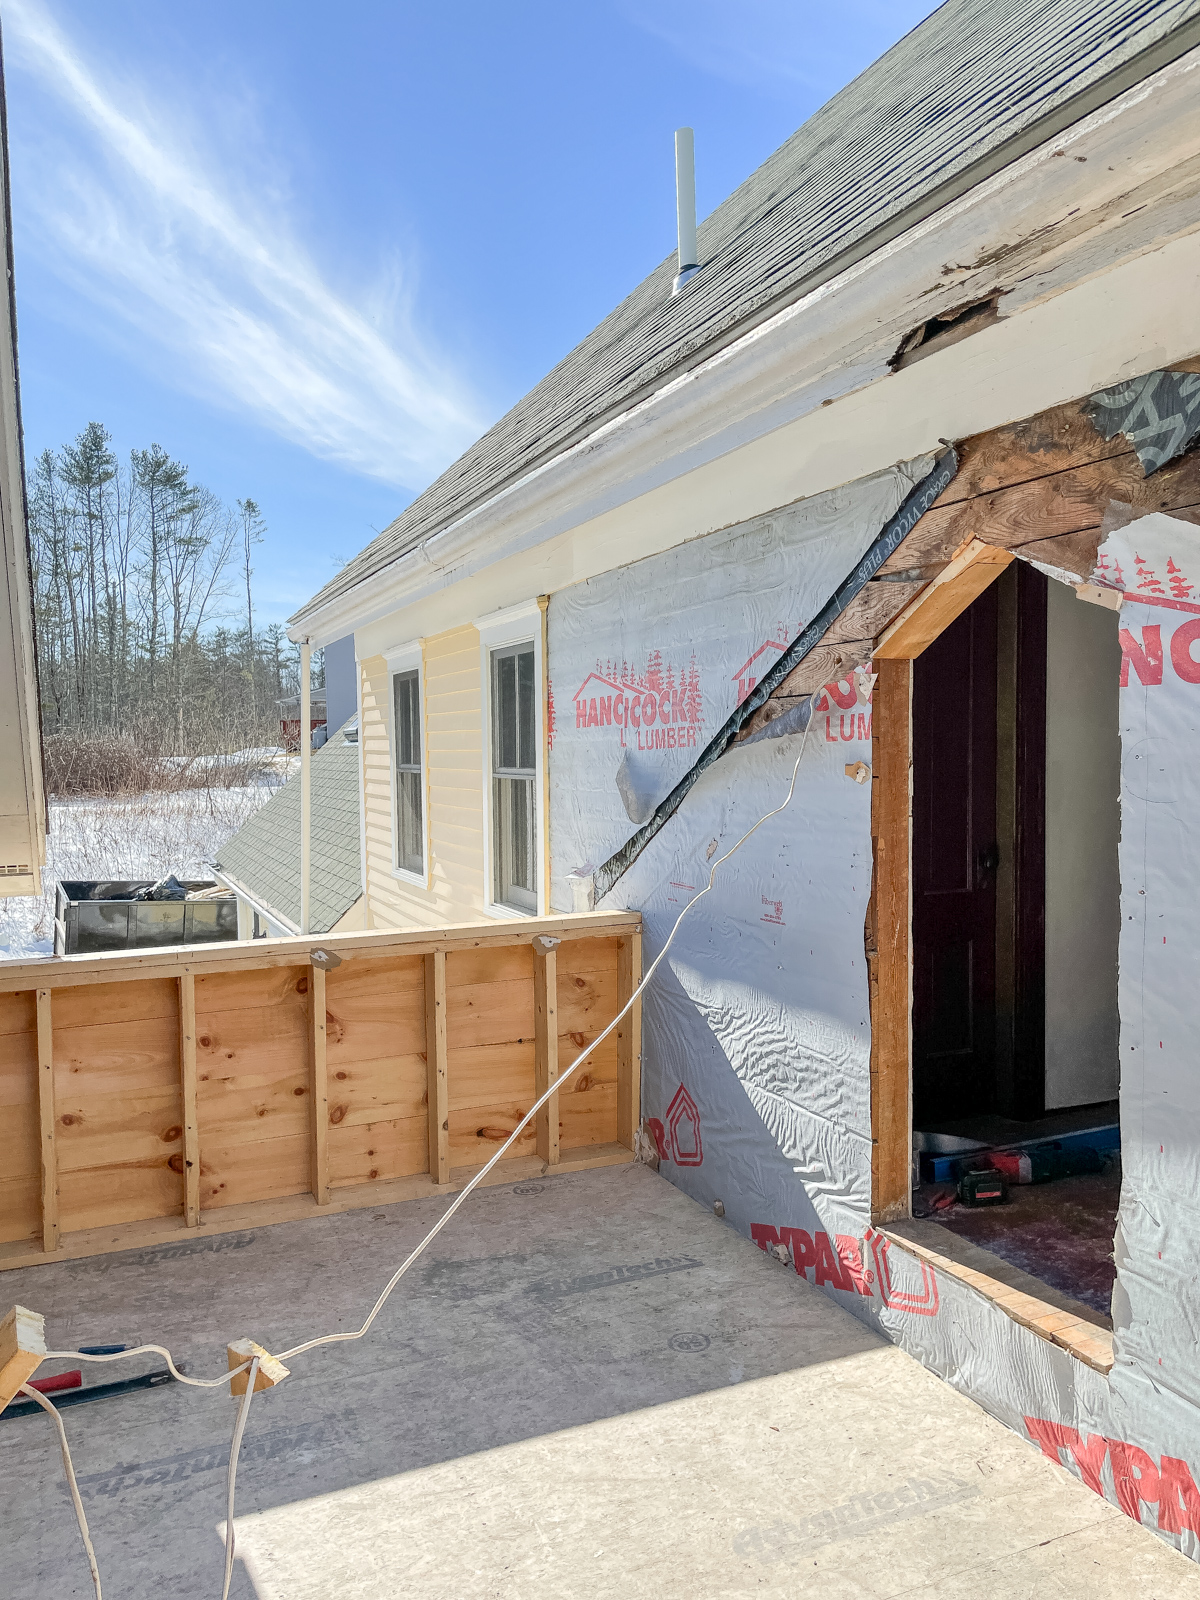
So here’s where the kitchen story gets a little crazy.  I realized to get my dream kitchen we needed to raise our roof line.  Do you see on the bottom left photo below that low spot on the roof?  Yeah that was screwing up my kitchen ceiling and it pained us to spend the money on that but we knew we needed to.

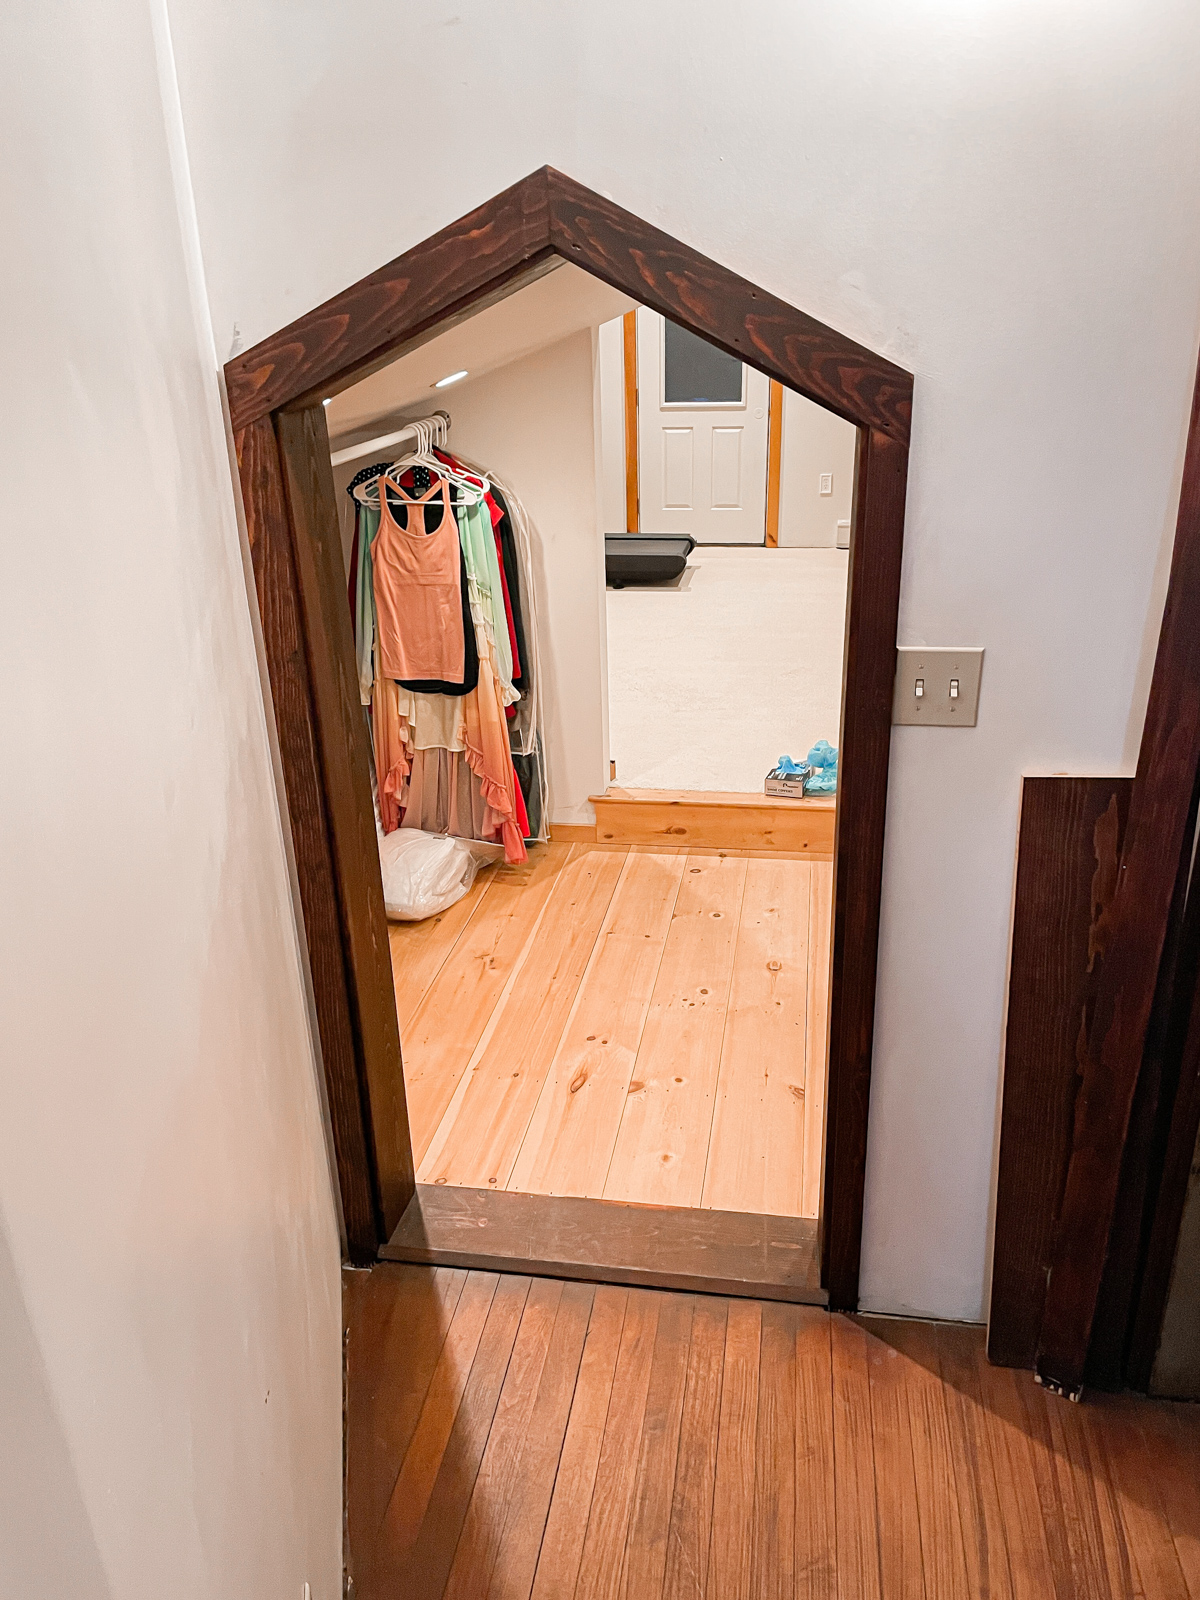
At some point in the early 2000s the kitchen wing was added.  The room upstairs had this funny crooked hallway that connected to the main hallway through a closet, and it even had a step down because the roof line was low so you wouldn’t hit your head.  I think they did this because they didn’t want to cut into the original roof.

Raising a low roofhome addition gone wrong

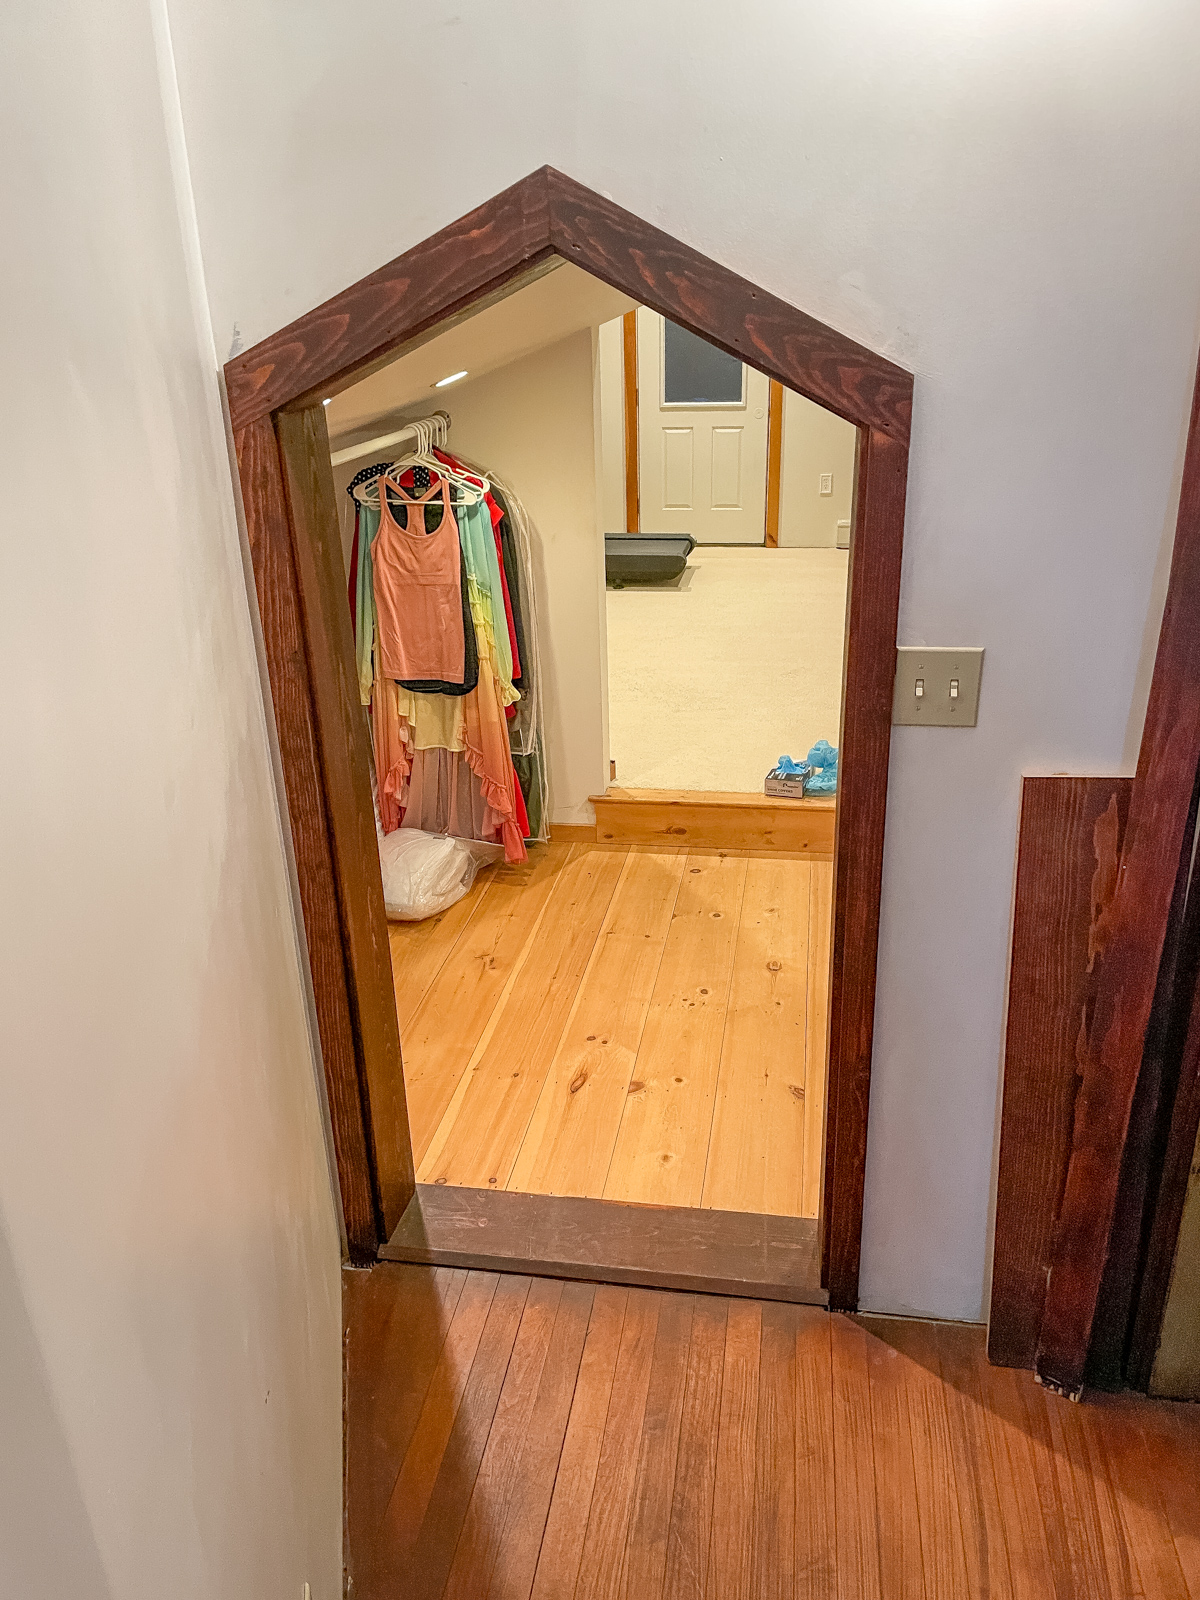
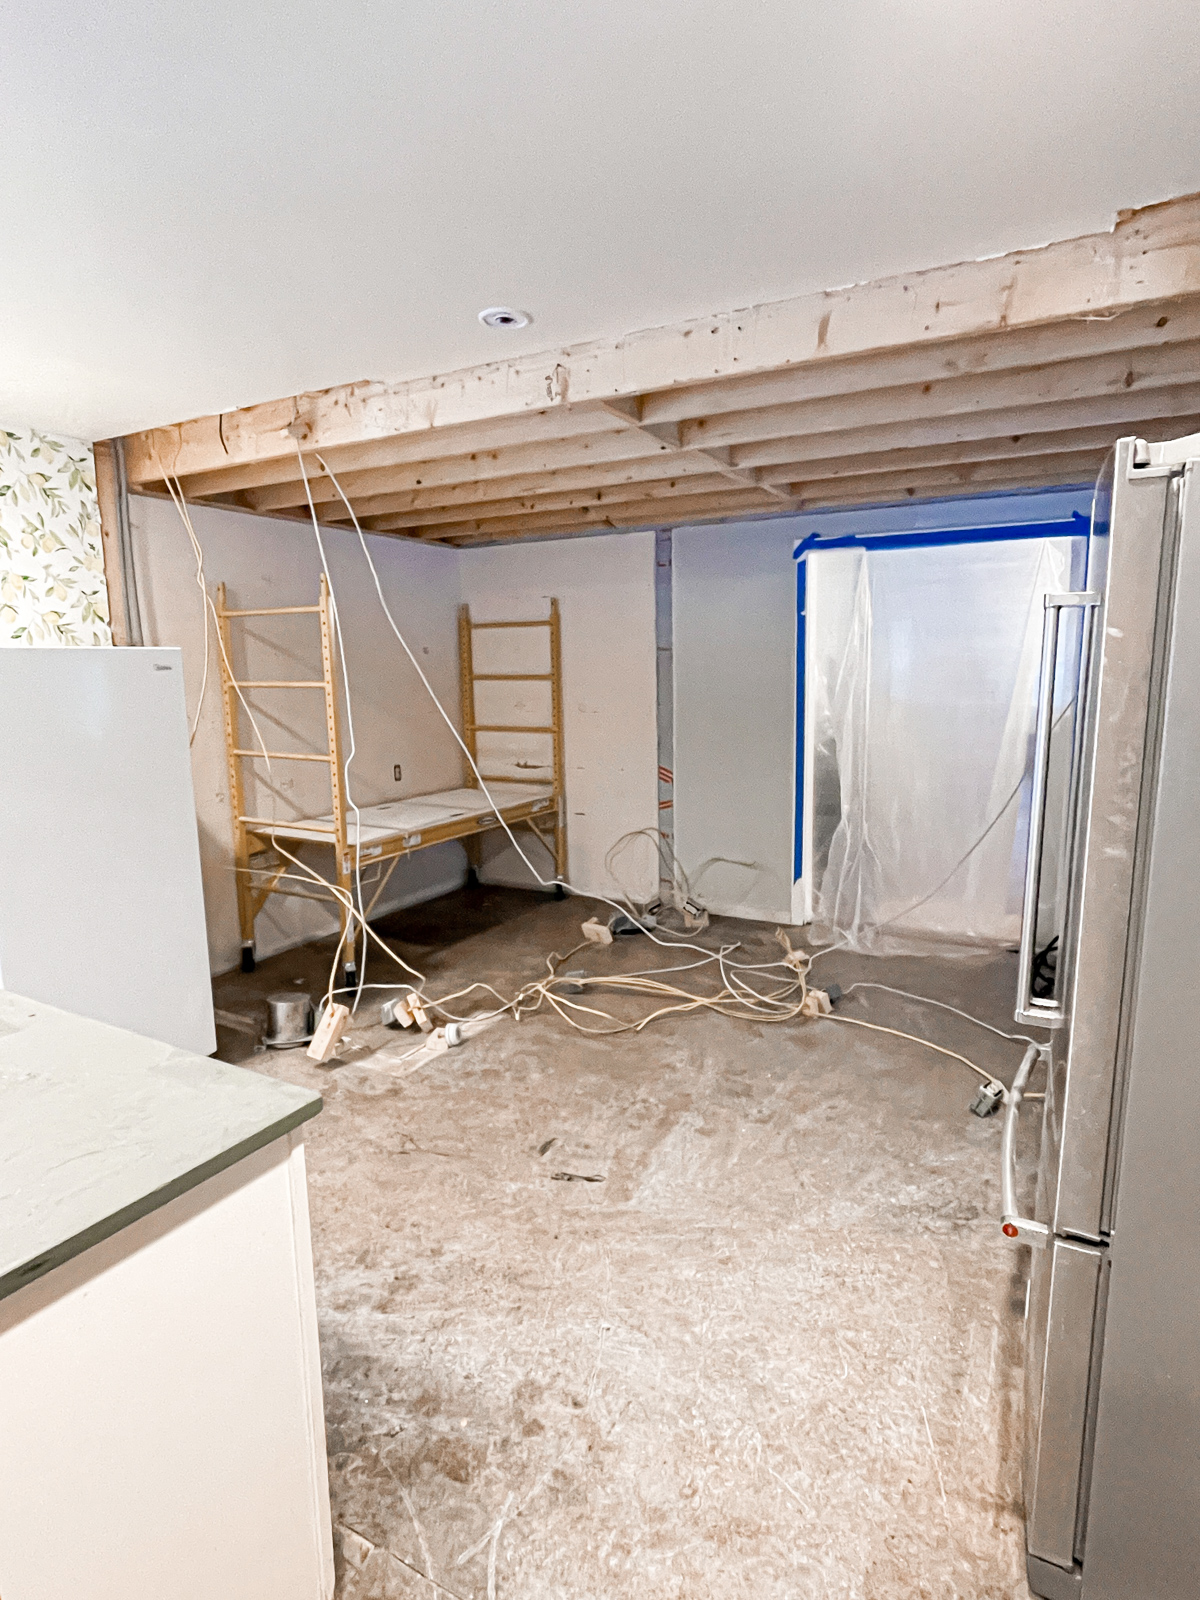
And here you see that funky step down making my kitchen ceiling uneven and giving the room a claustrophobic feel.  We’re big on DIY but this project was out of our league.  So after endless weeks of searching for contractors we decided on one and went for it.

The original pantry was huge, it had a freezer inside it!  It took up way too much kitchen space.

raising a low ceiling

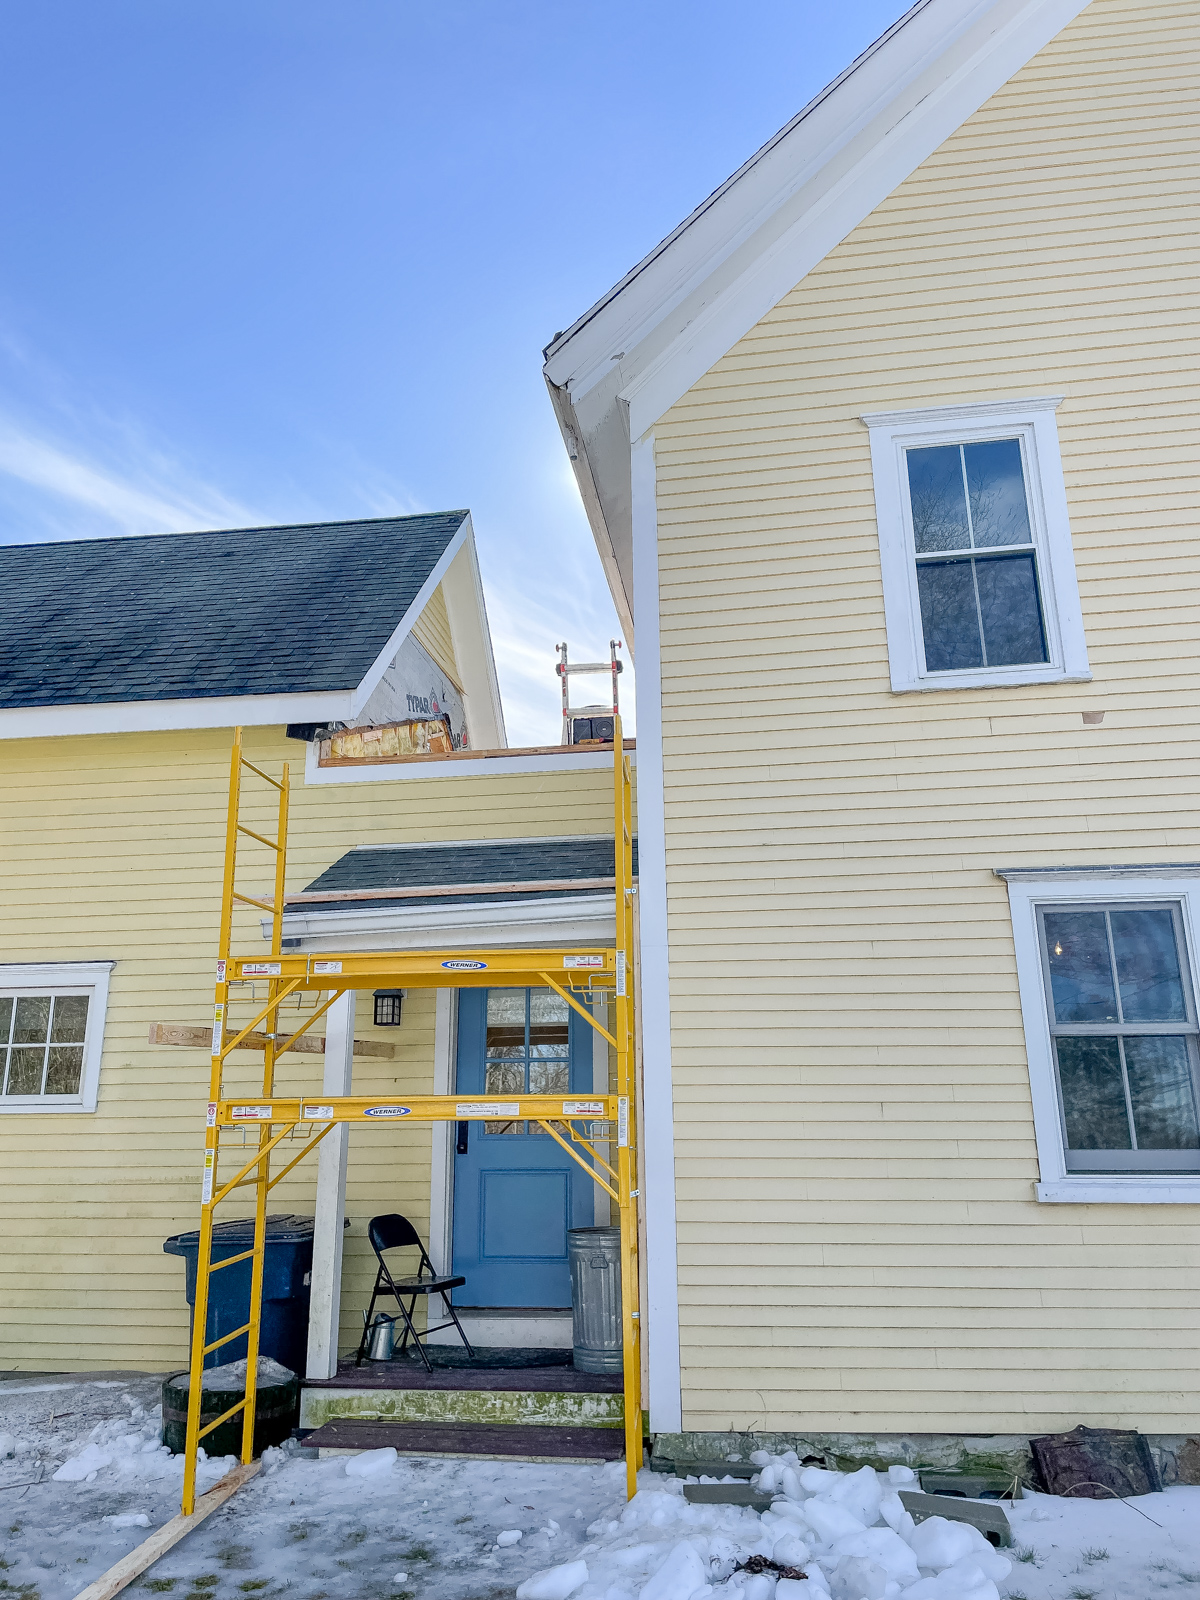
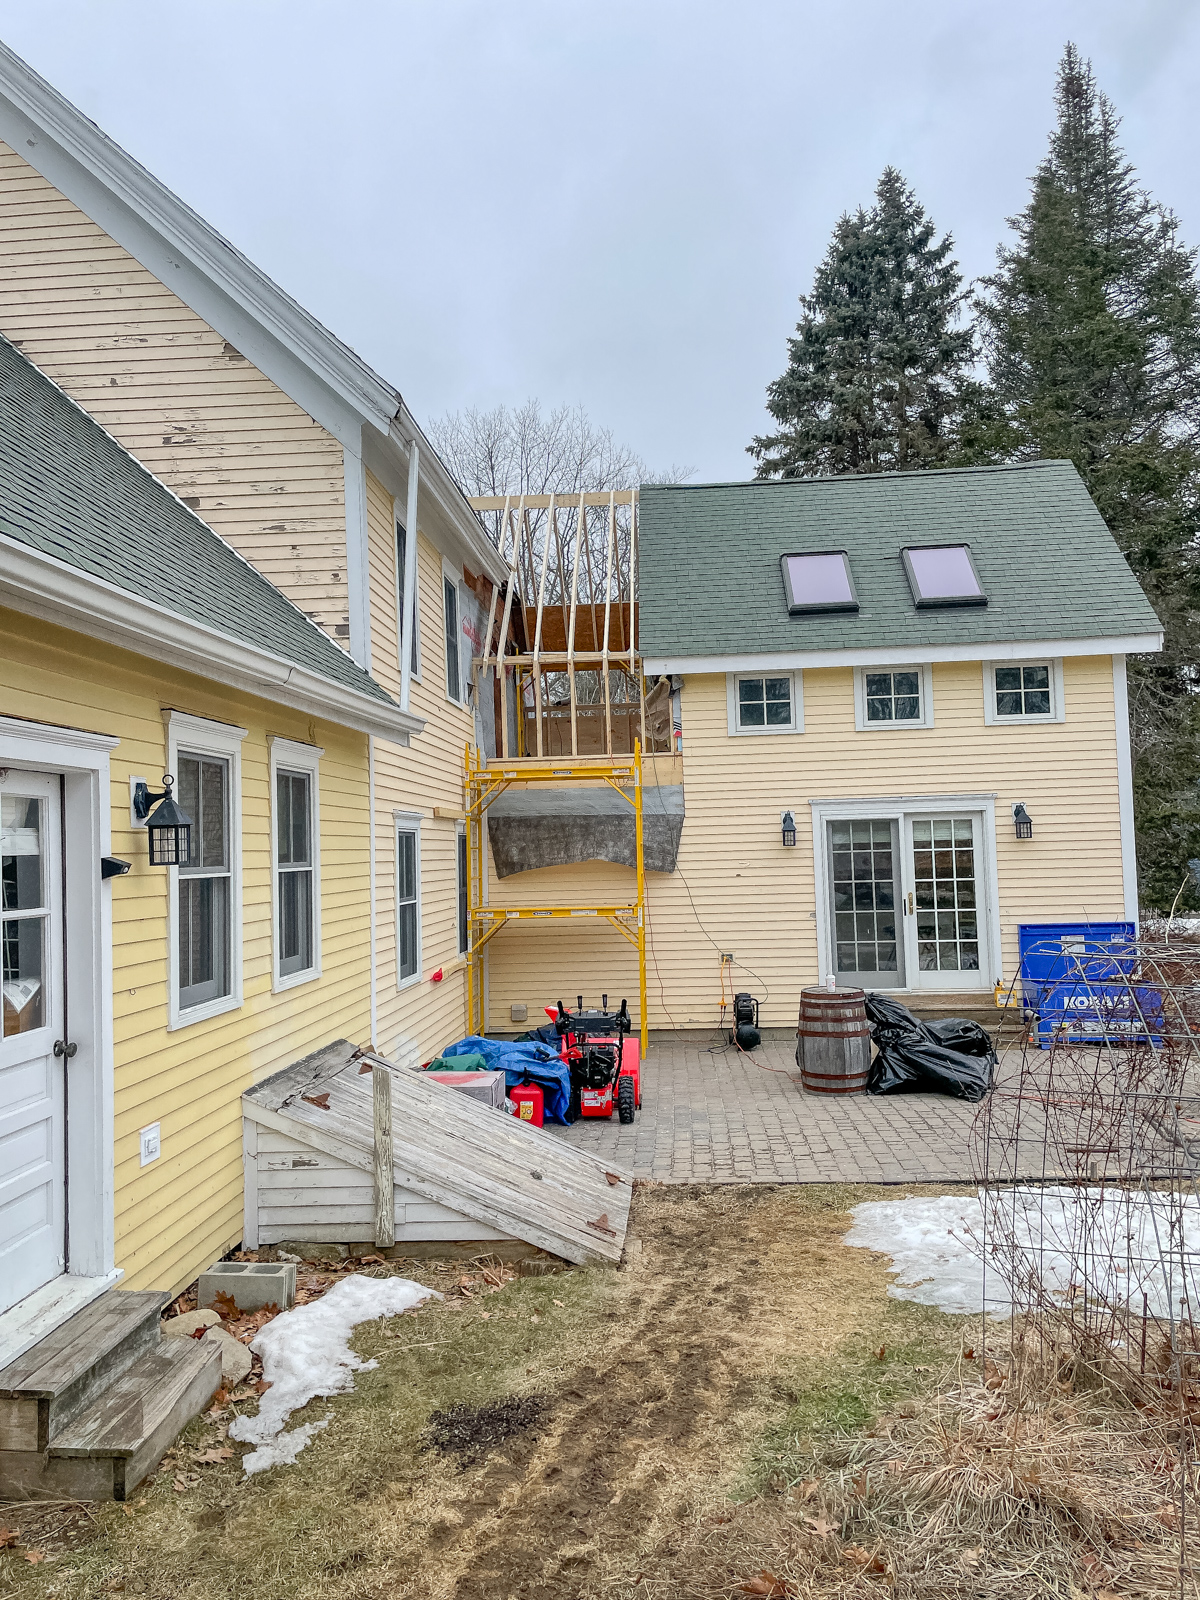
Opening your roof up in Maine during the month of March is definitely risky but what can I say?  We’re risk takers for sure.  Luckily the weather was pretty mild and we didn’t have any snow chances in the forecast.

Roof addition gone wrong raising roof addition

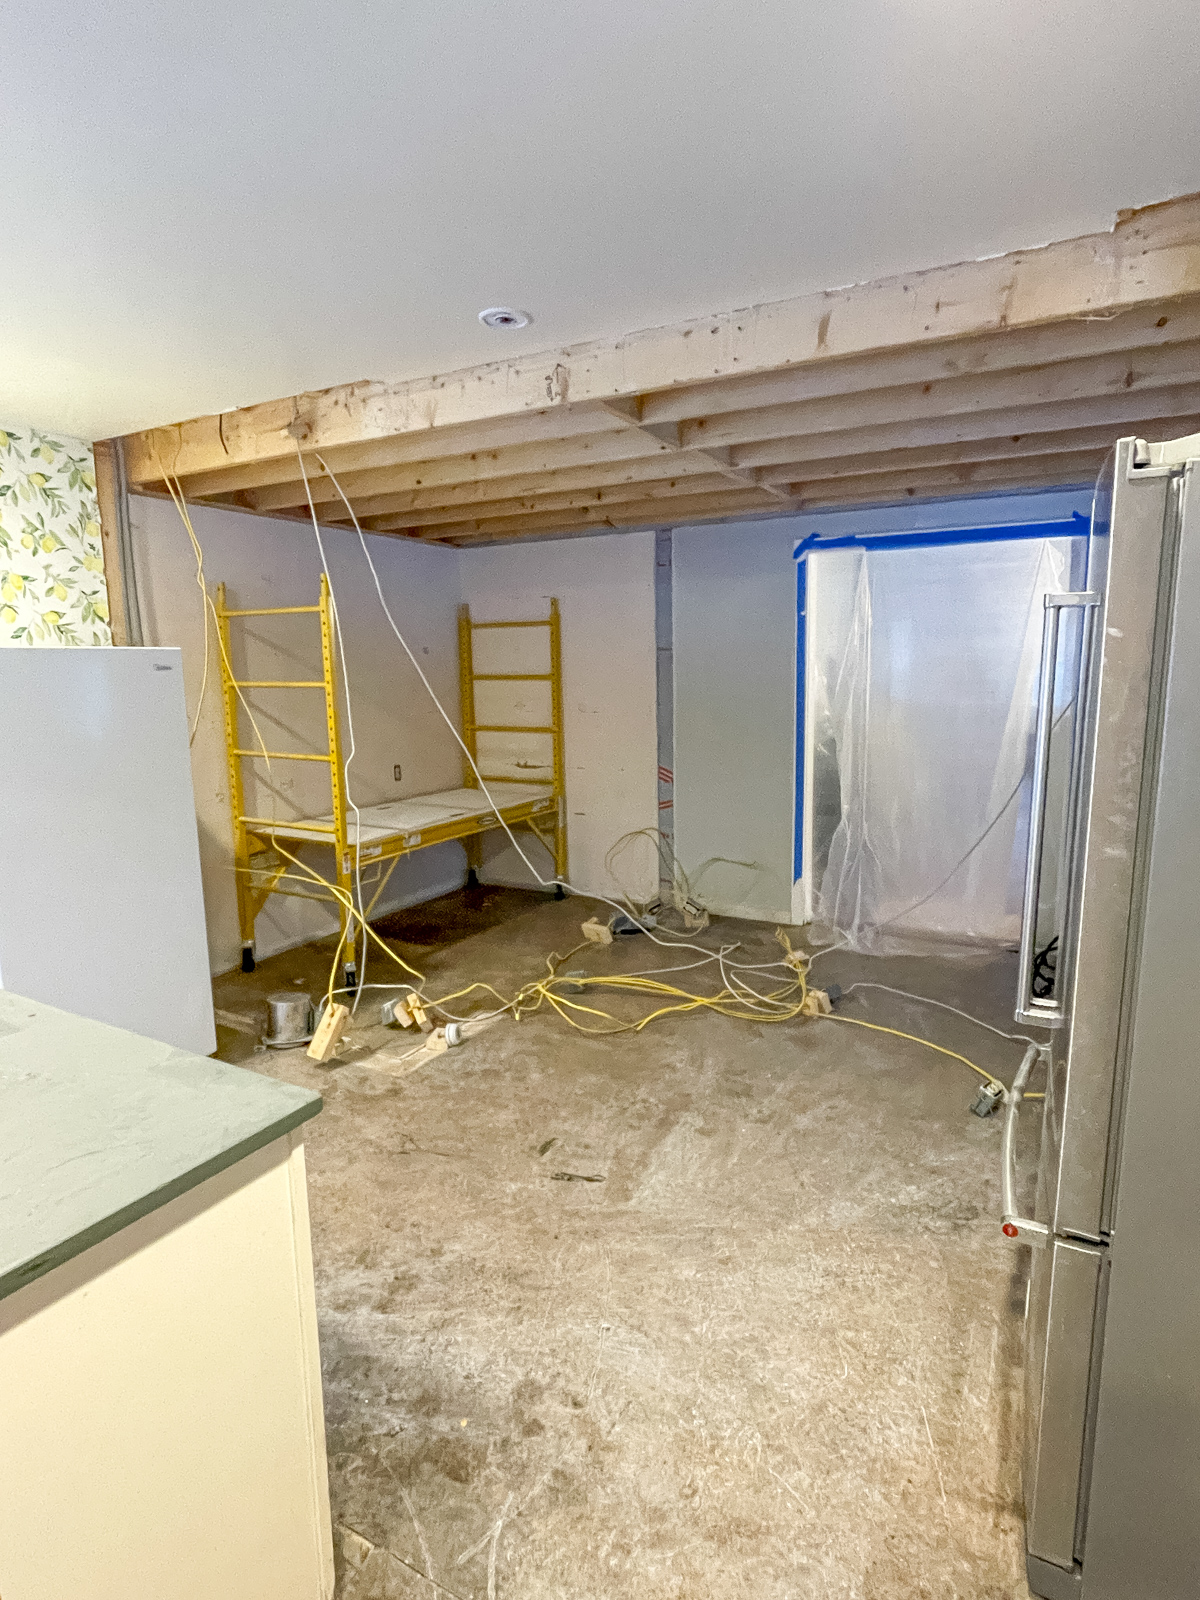
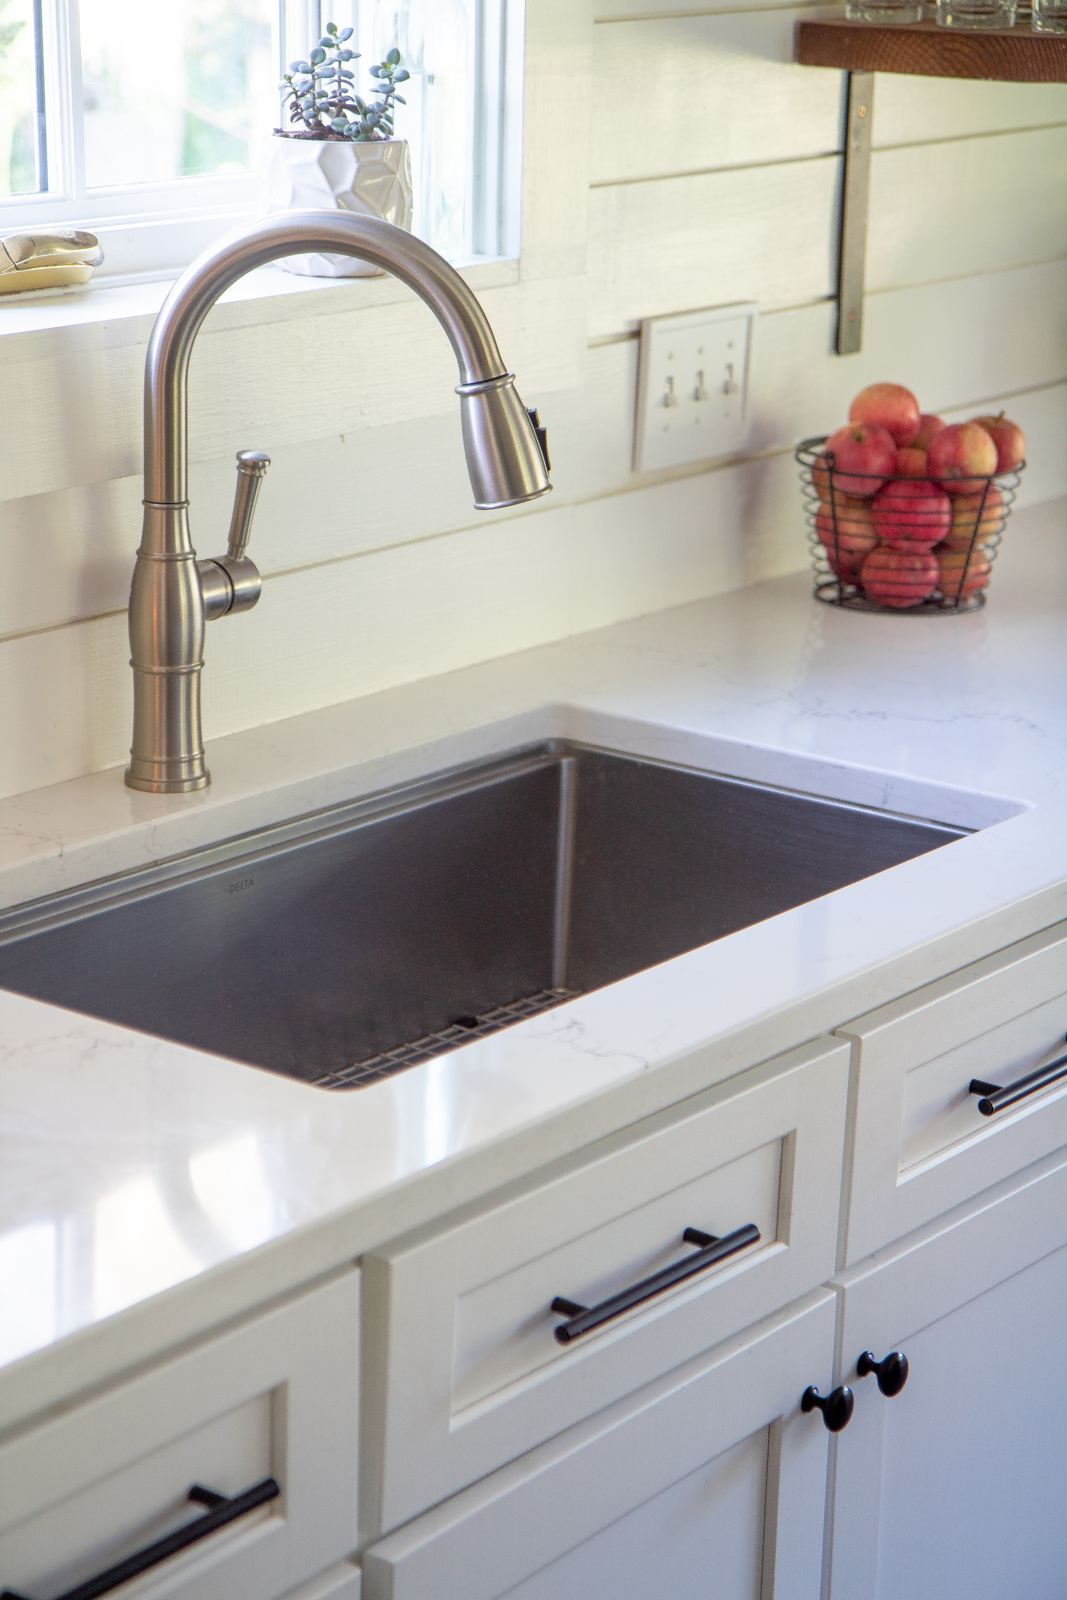
Once the roof and ceiling were finished we did everything else ourselves, well, except the new countertop installation.

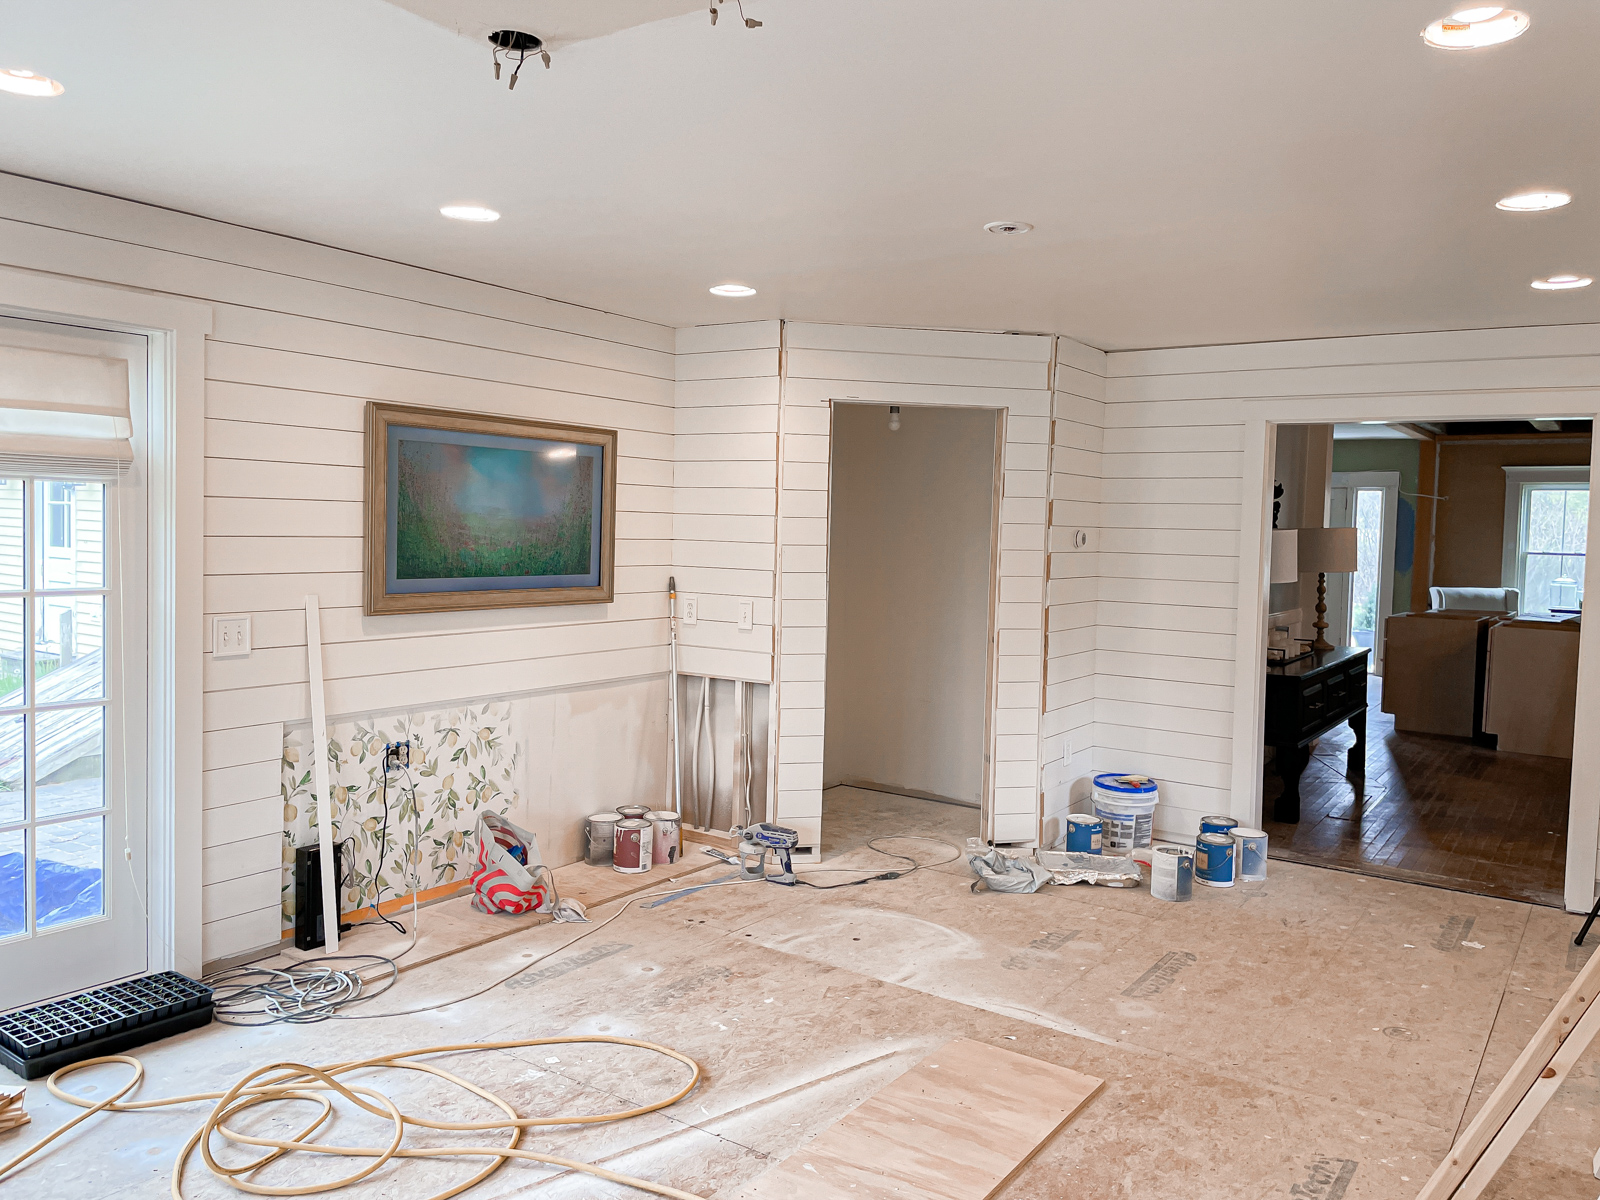
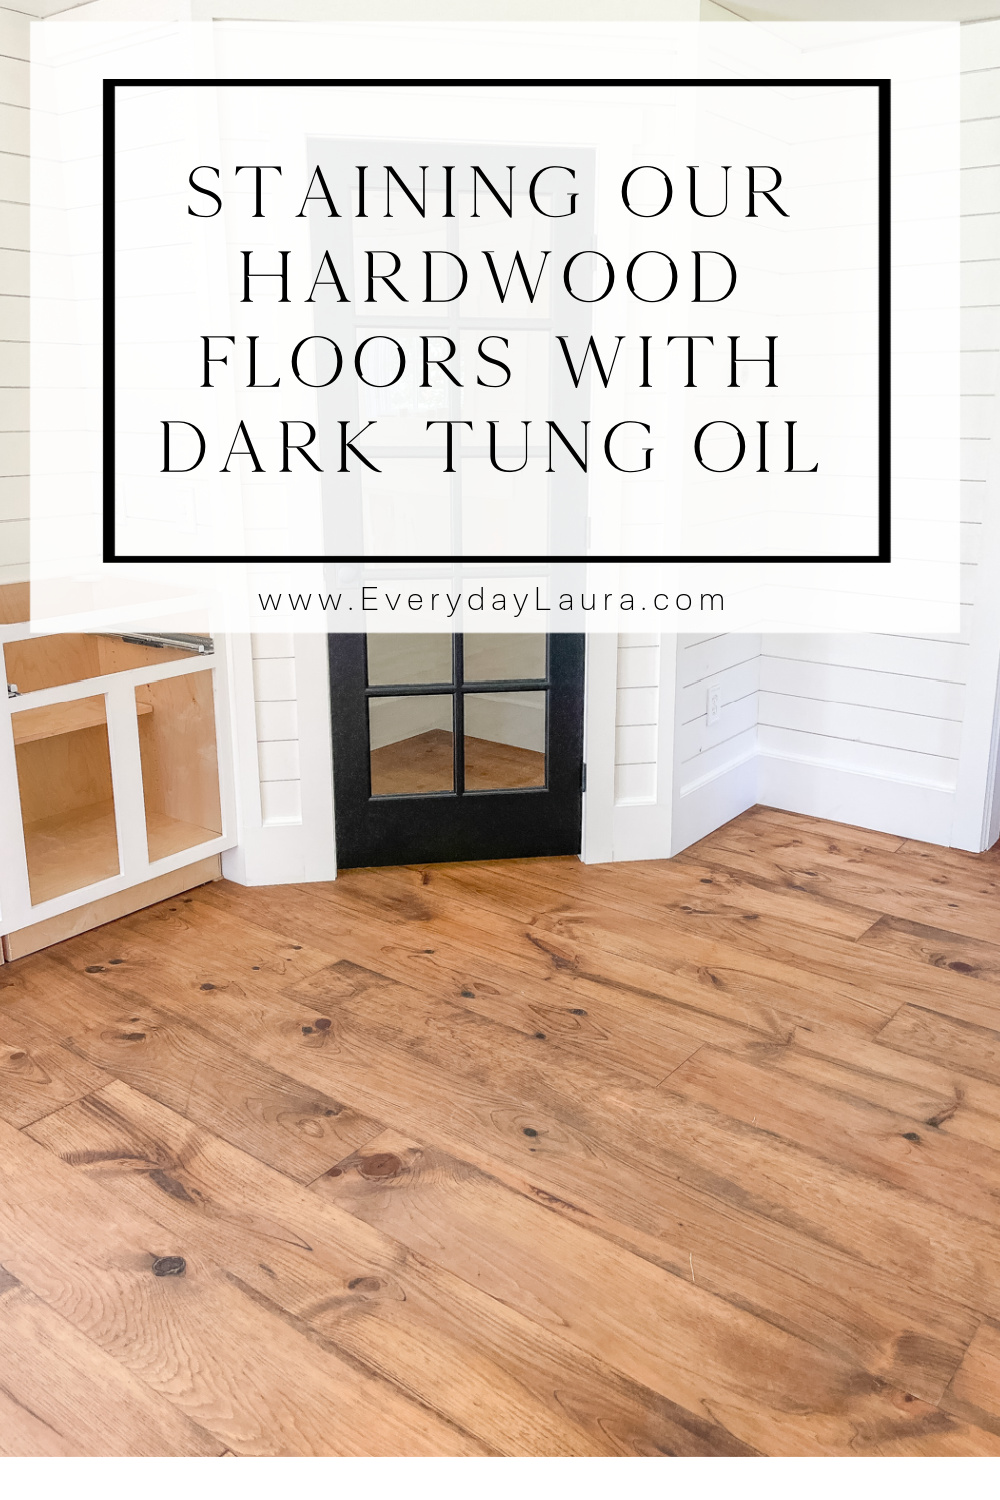
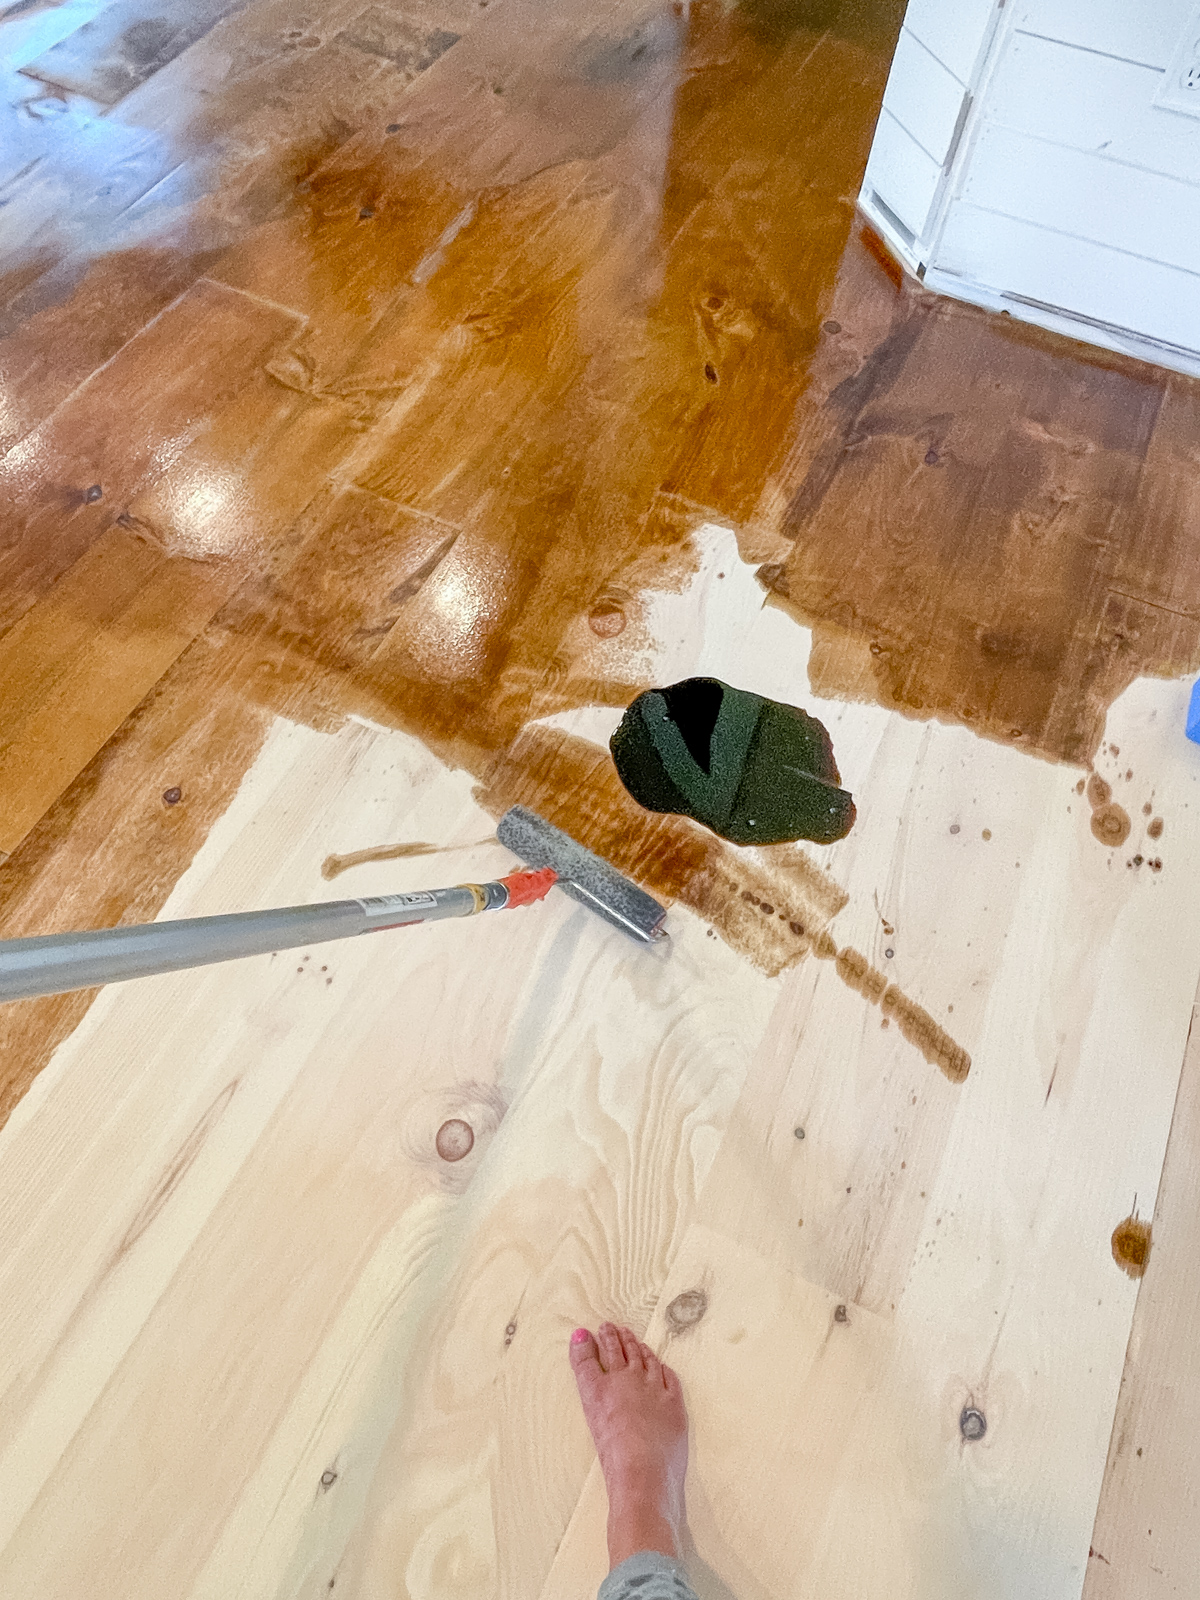
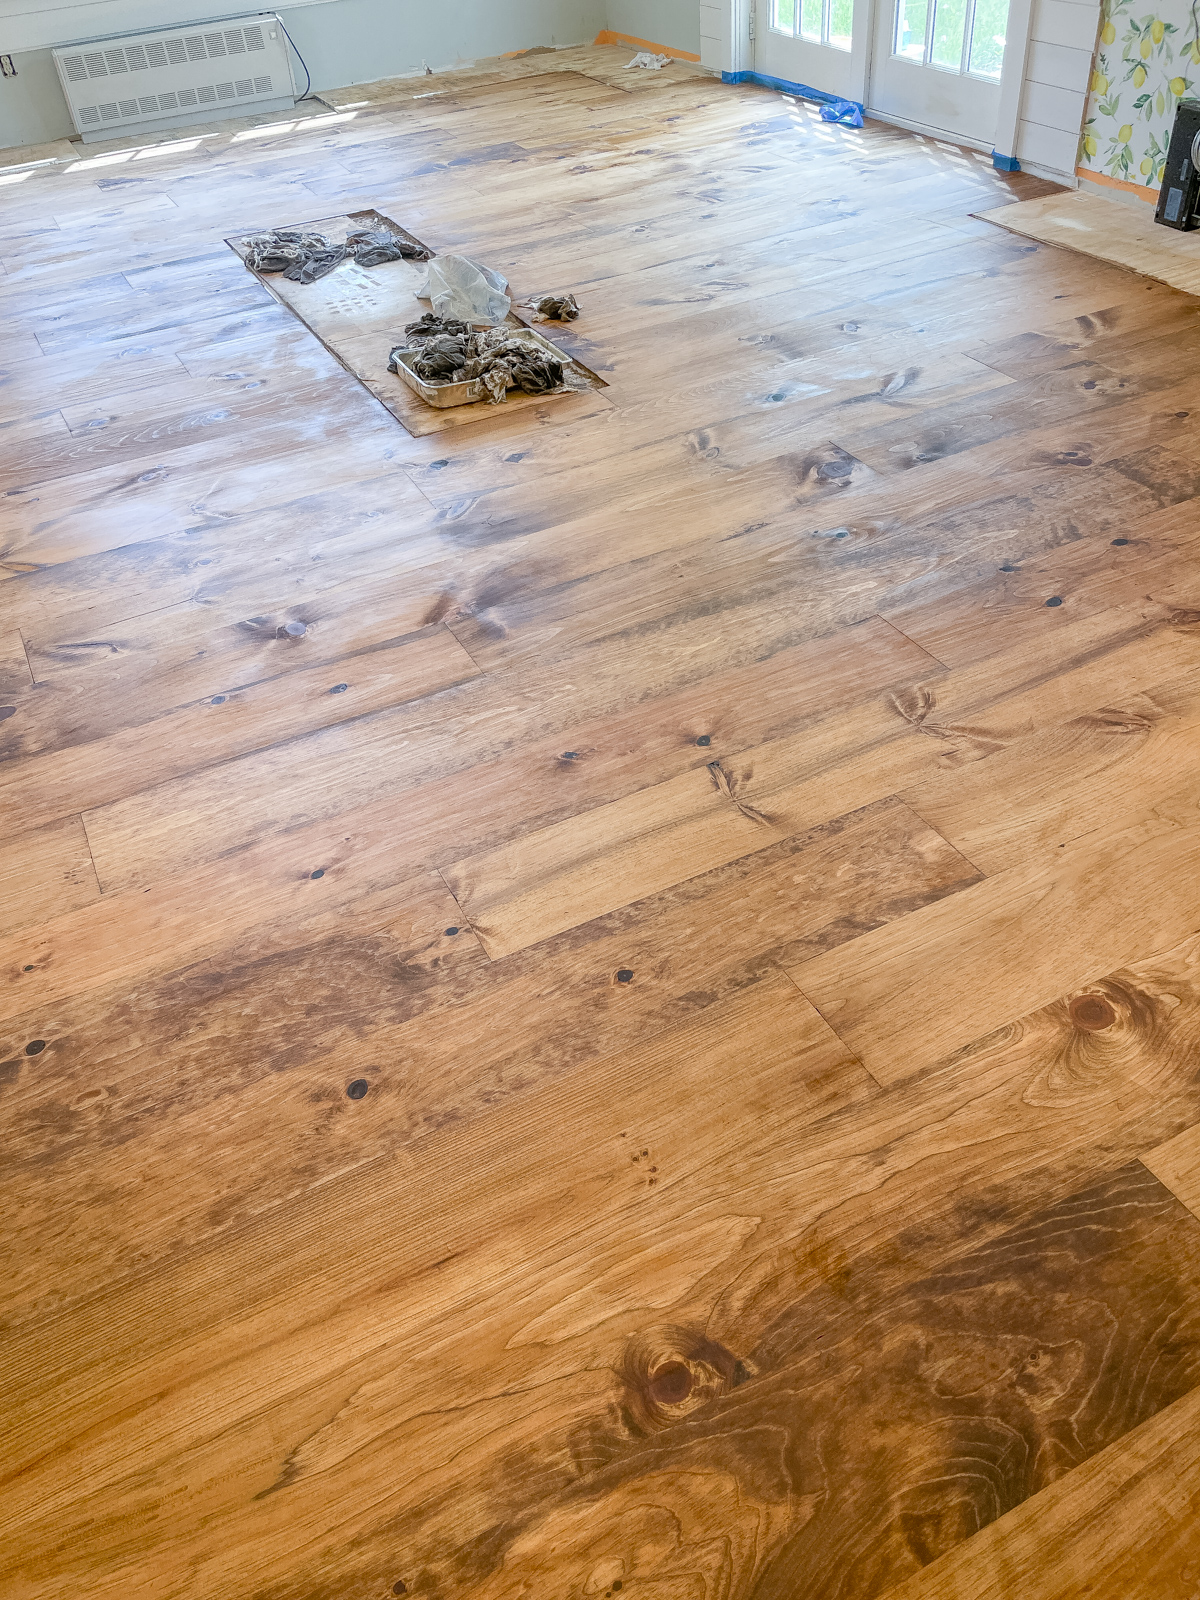
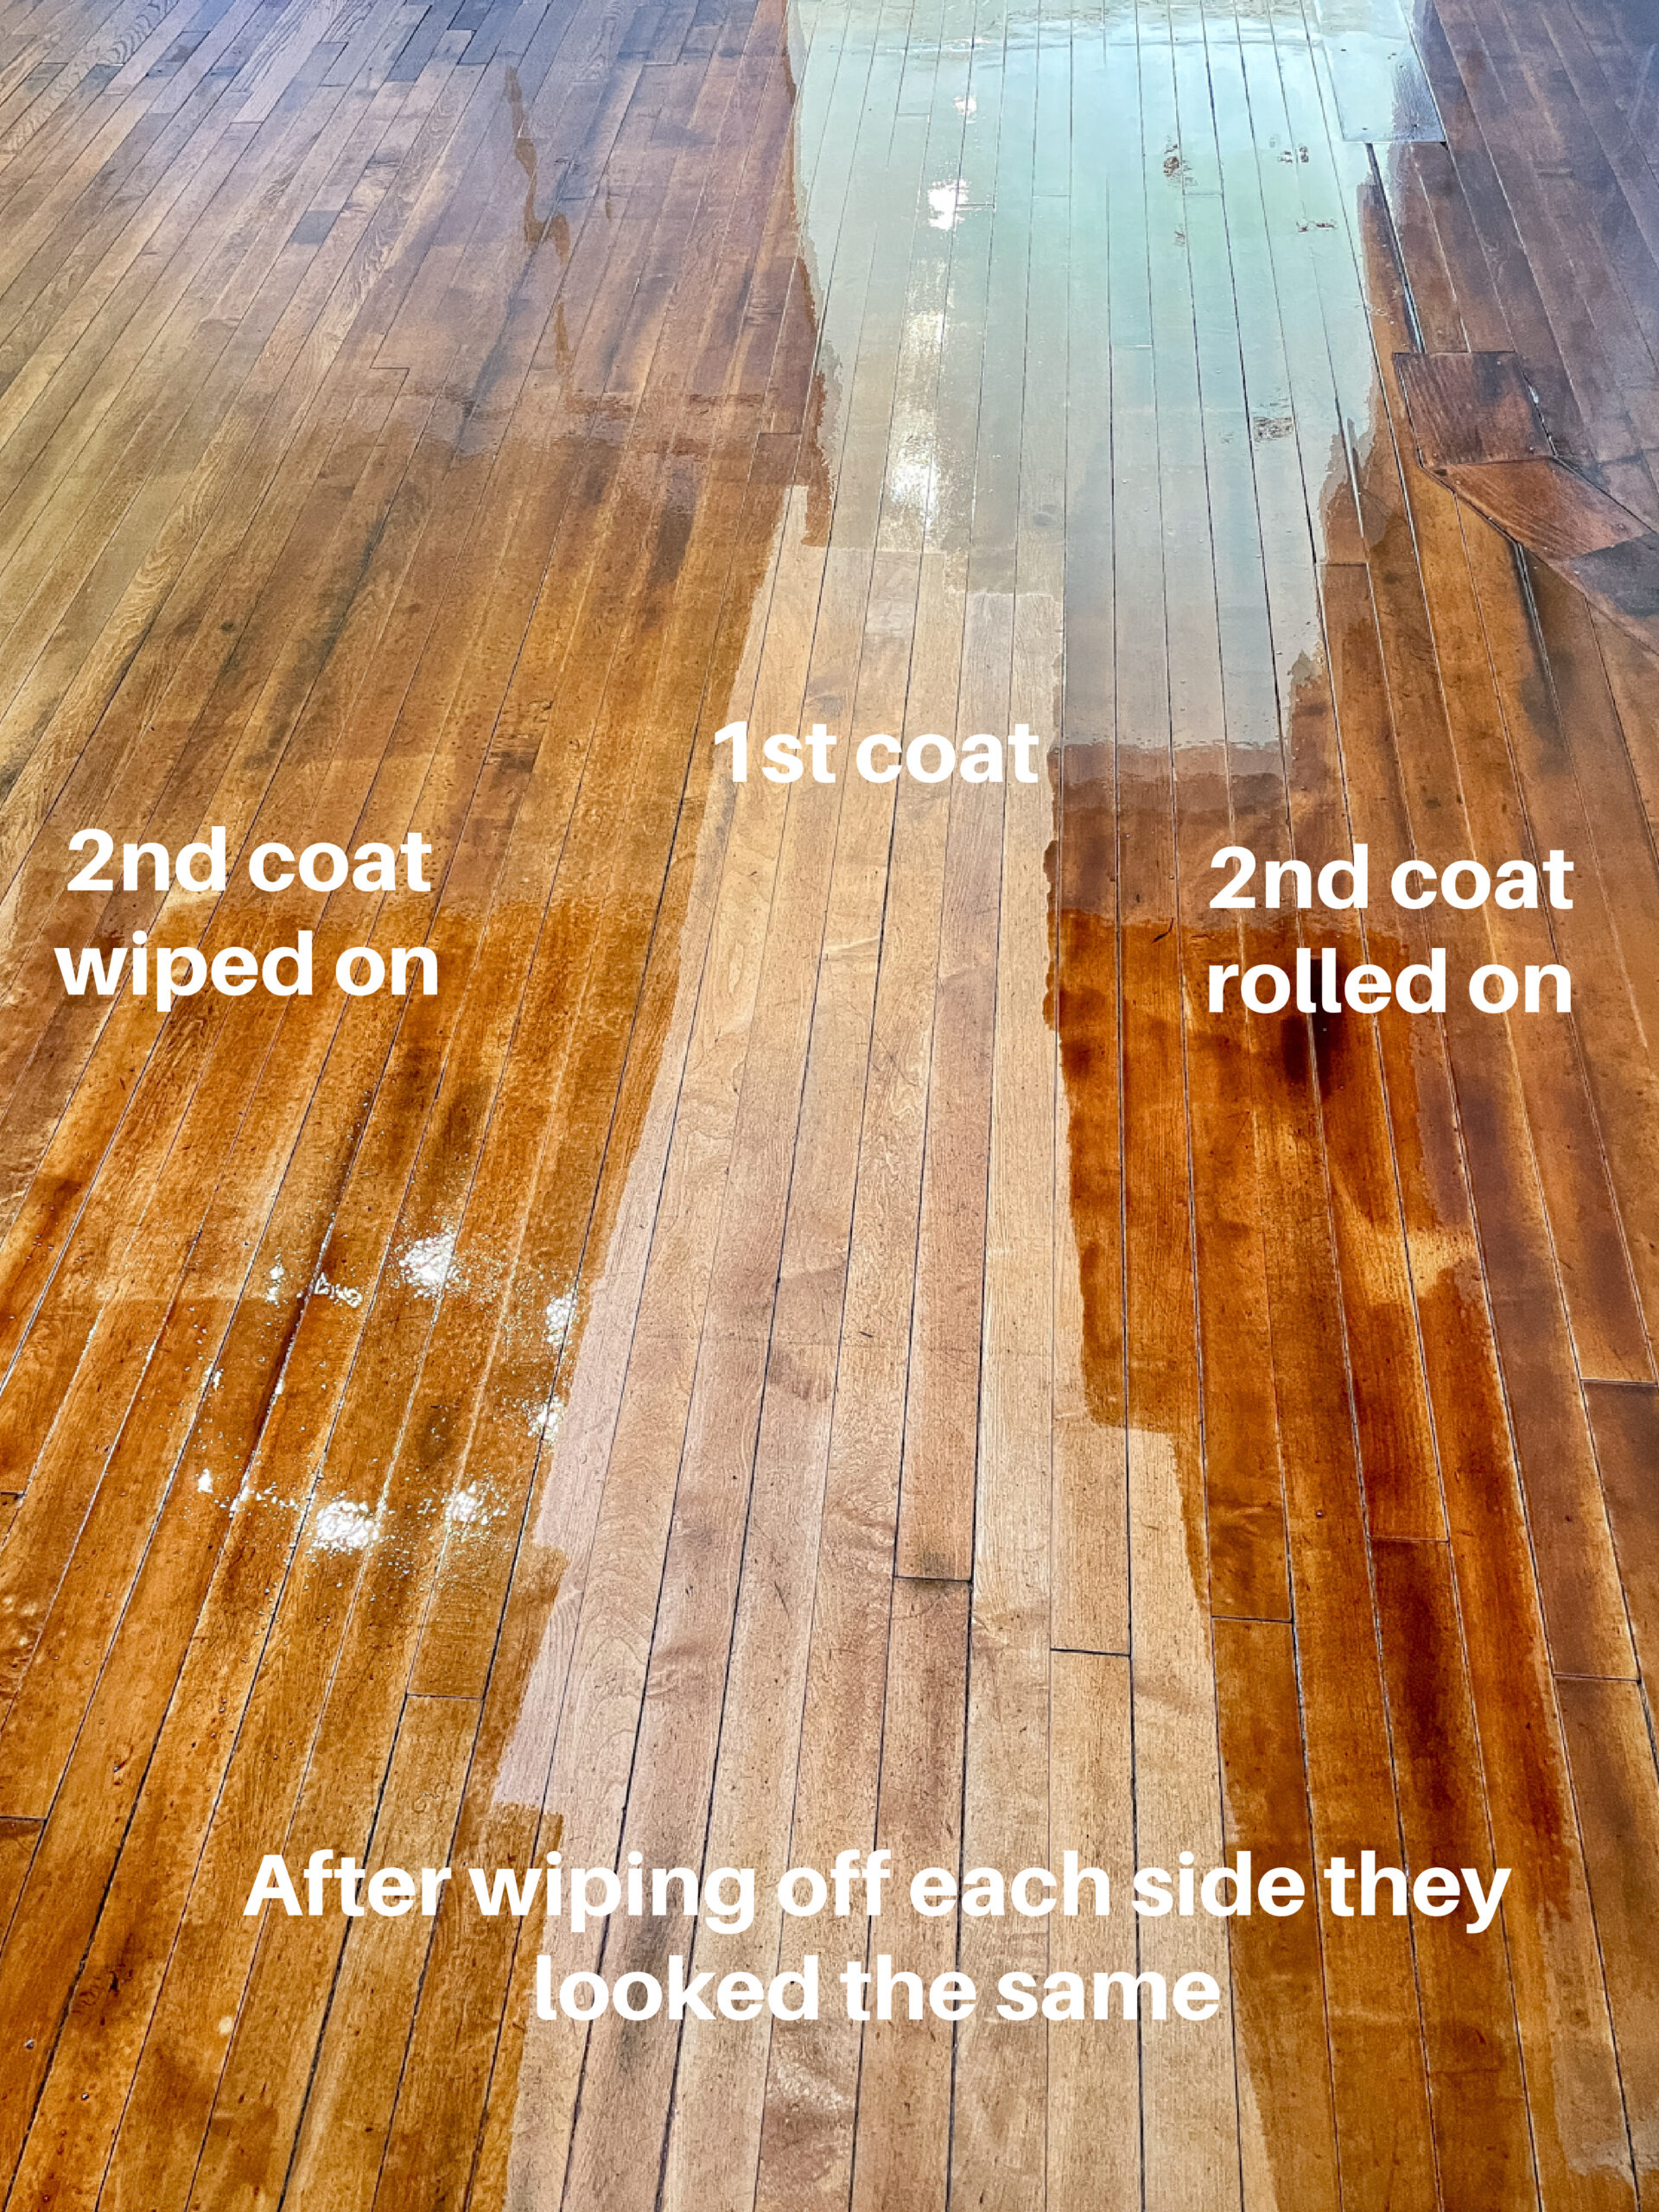
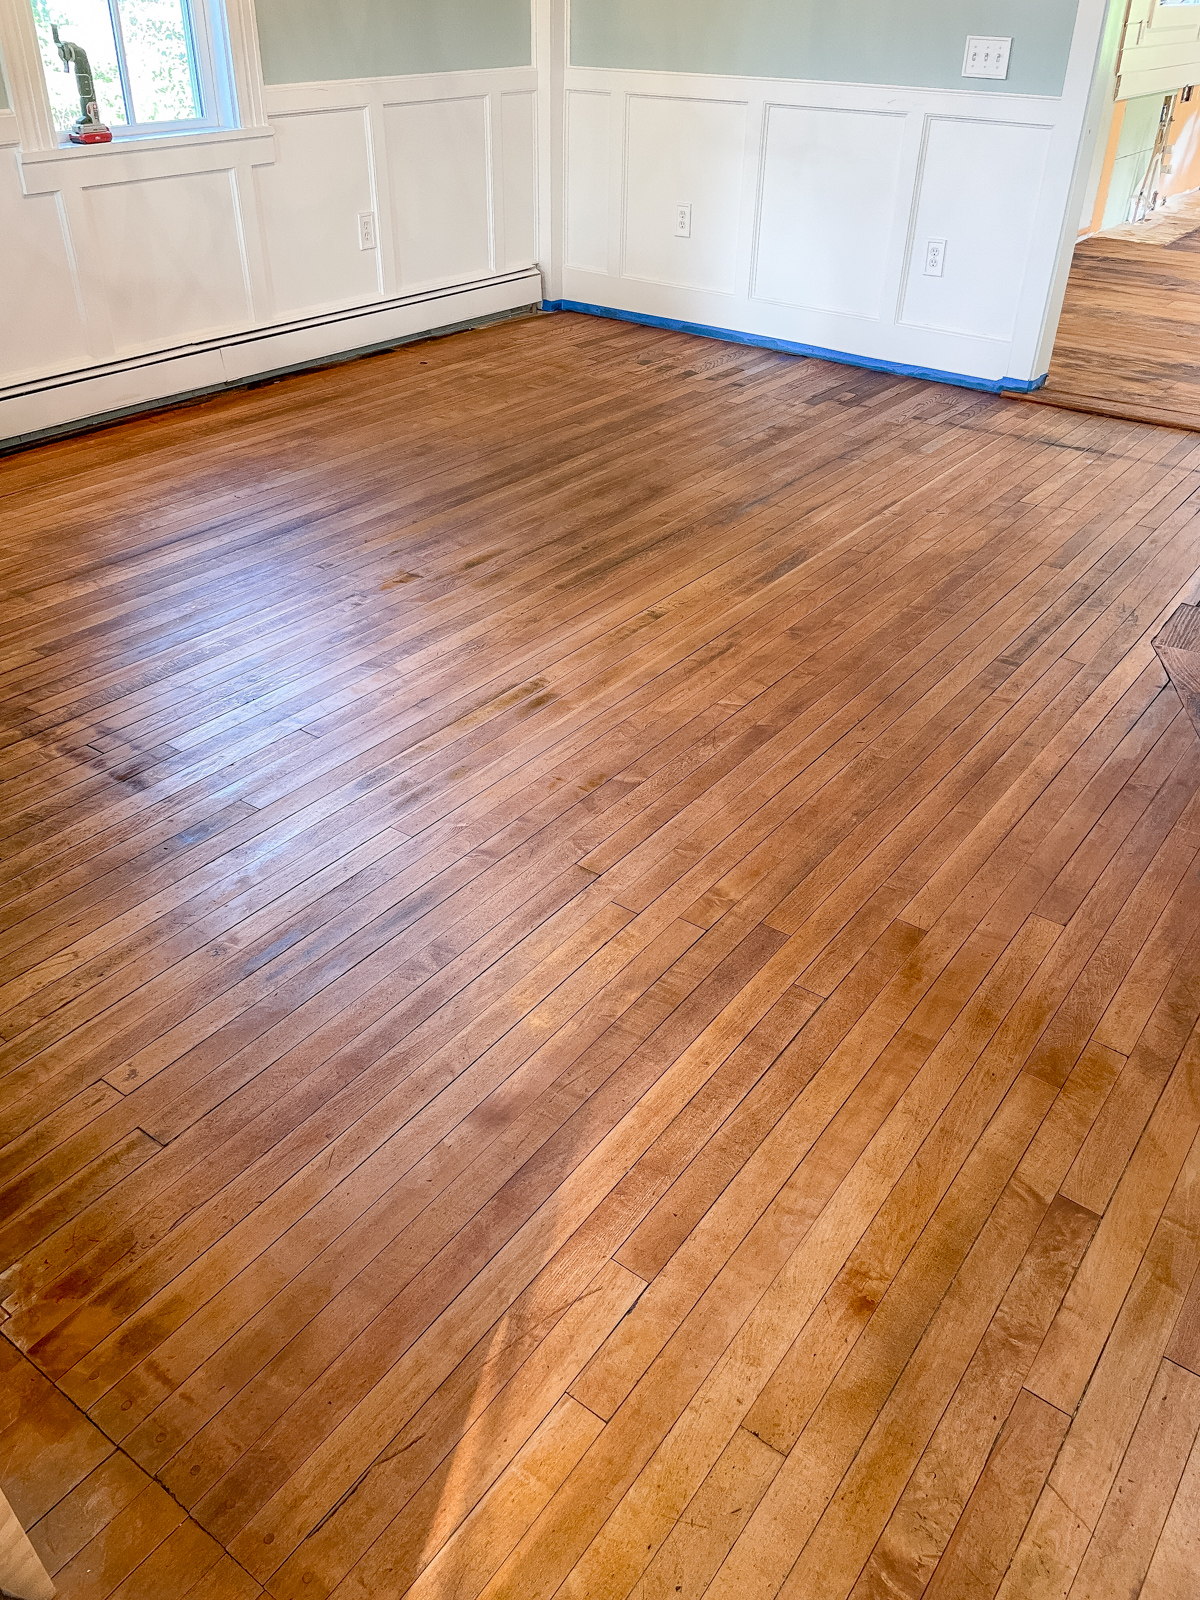
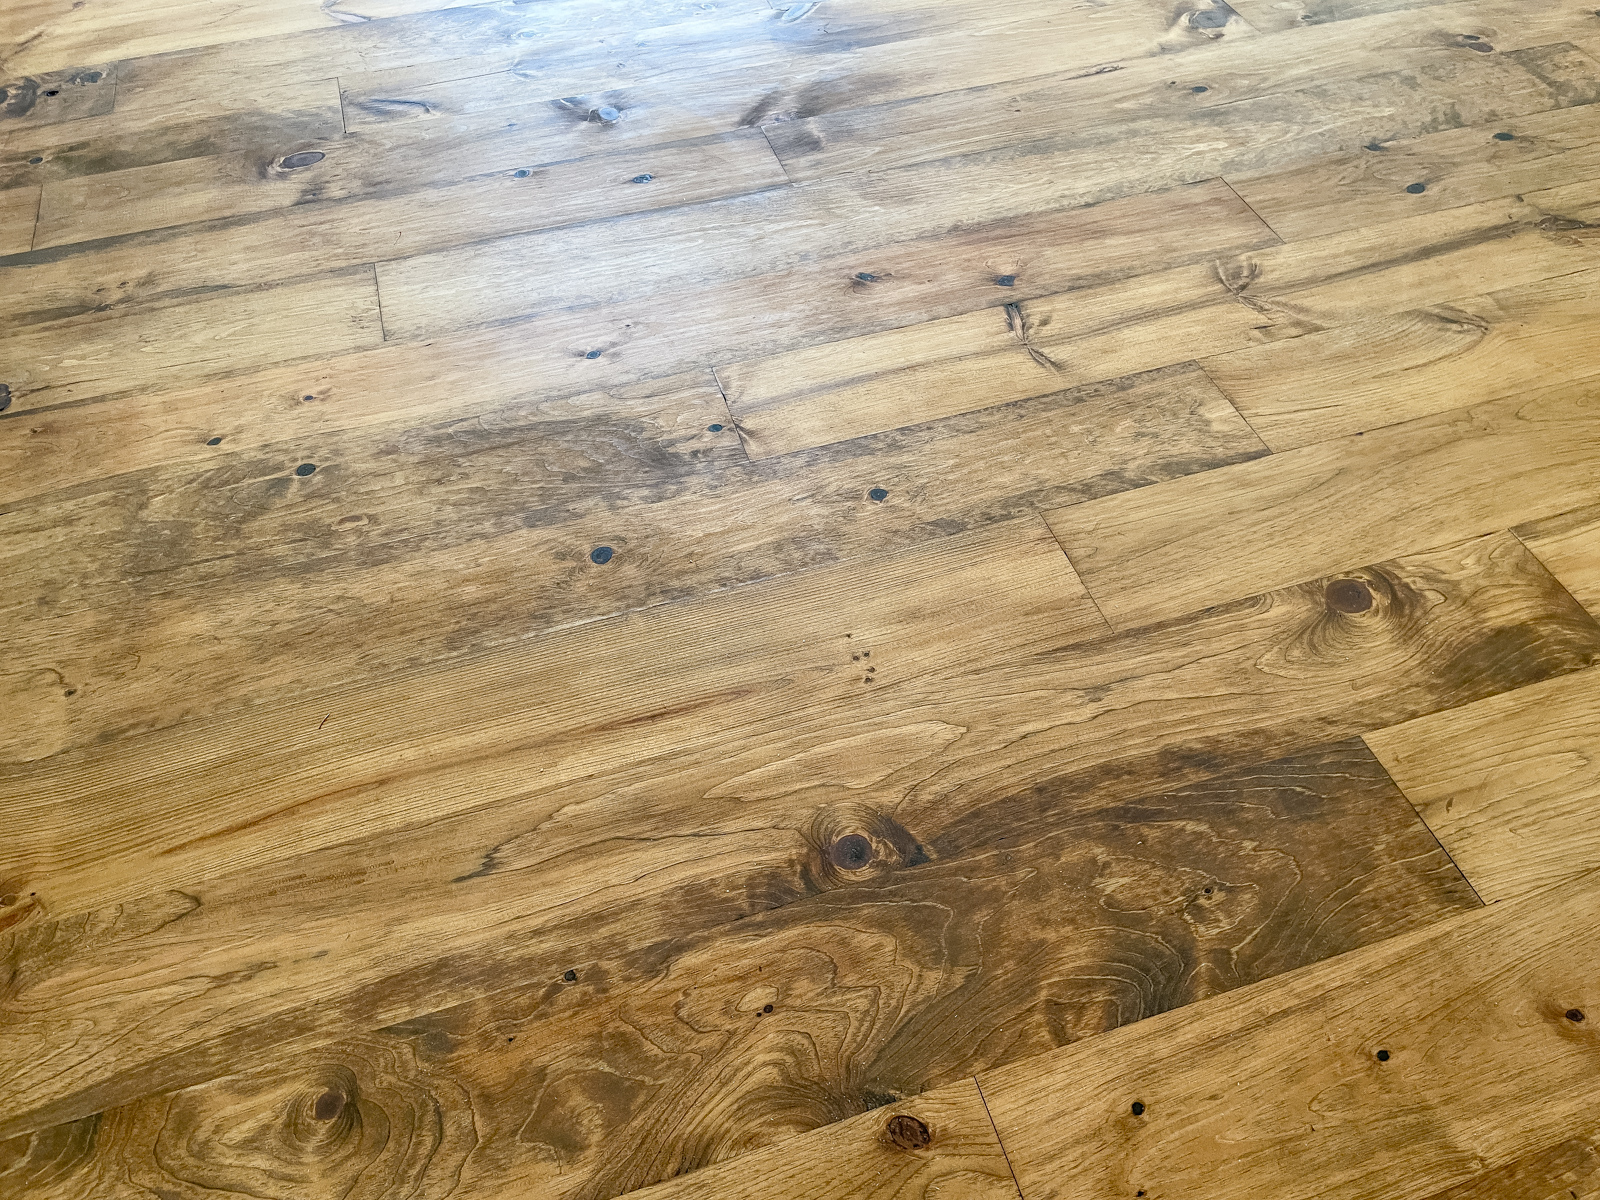
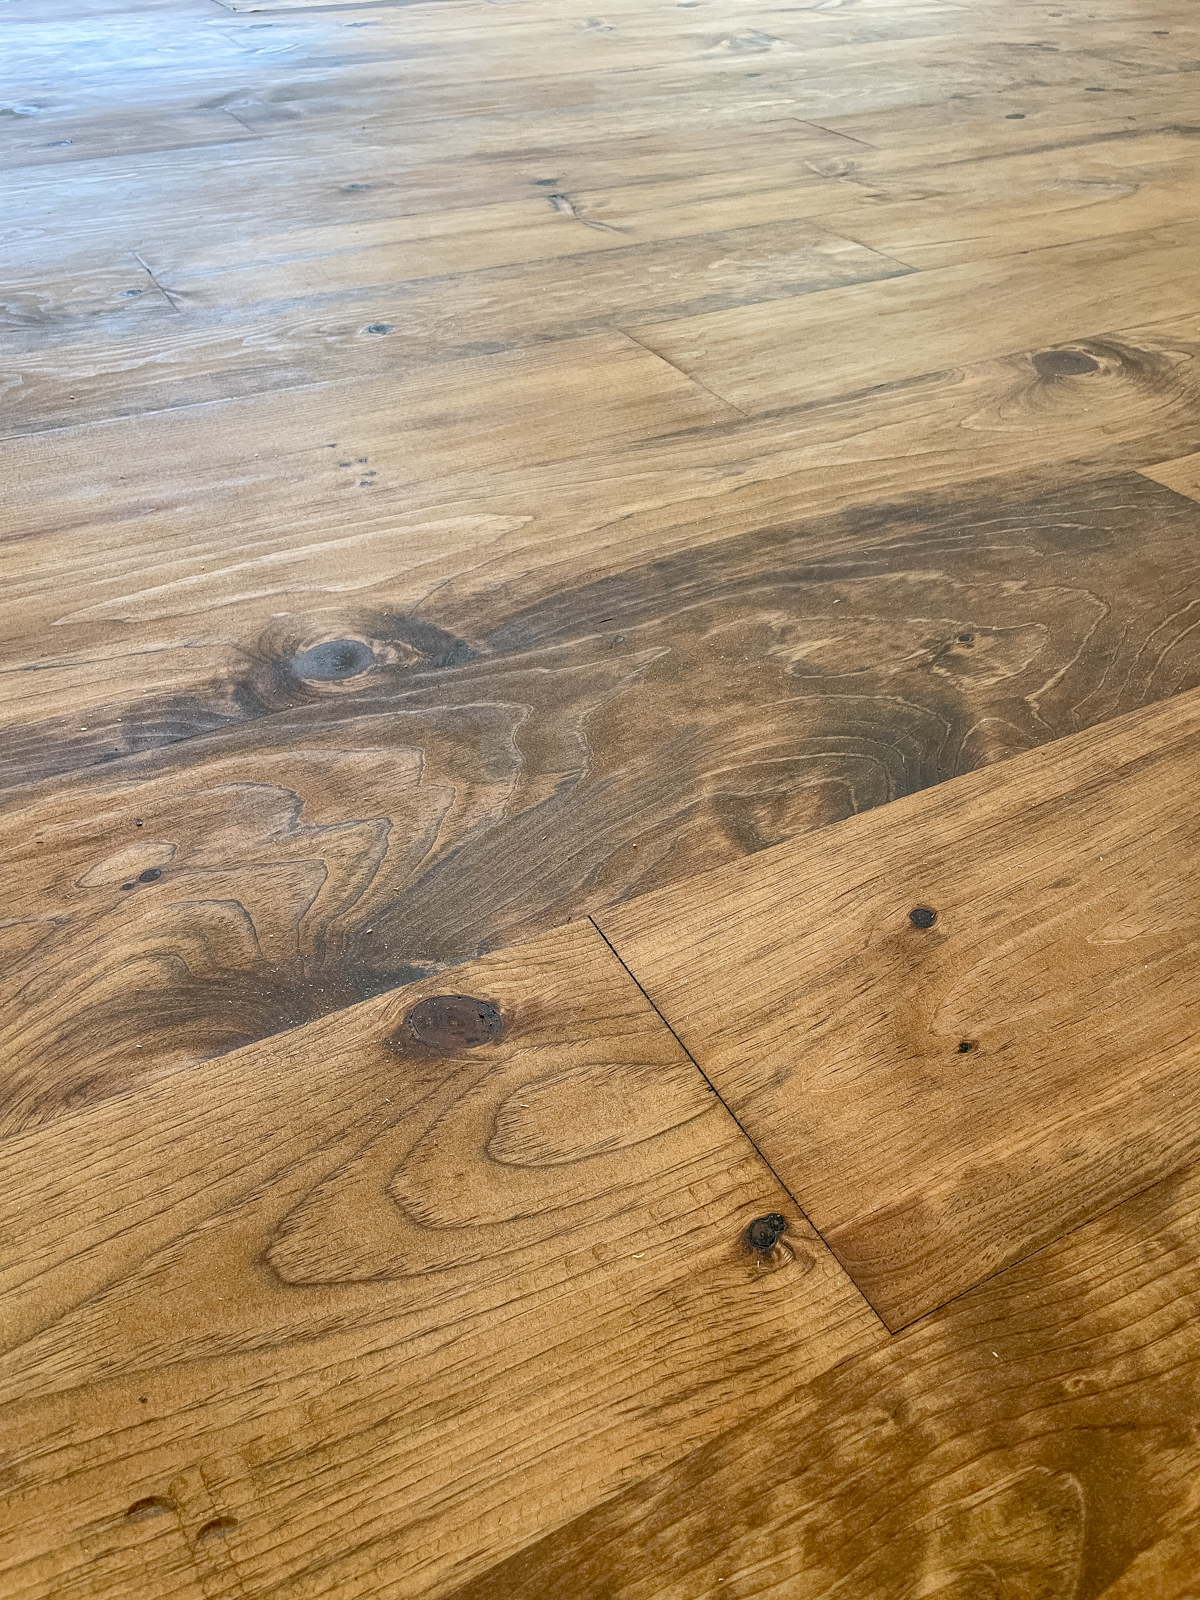
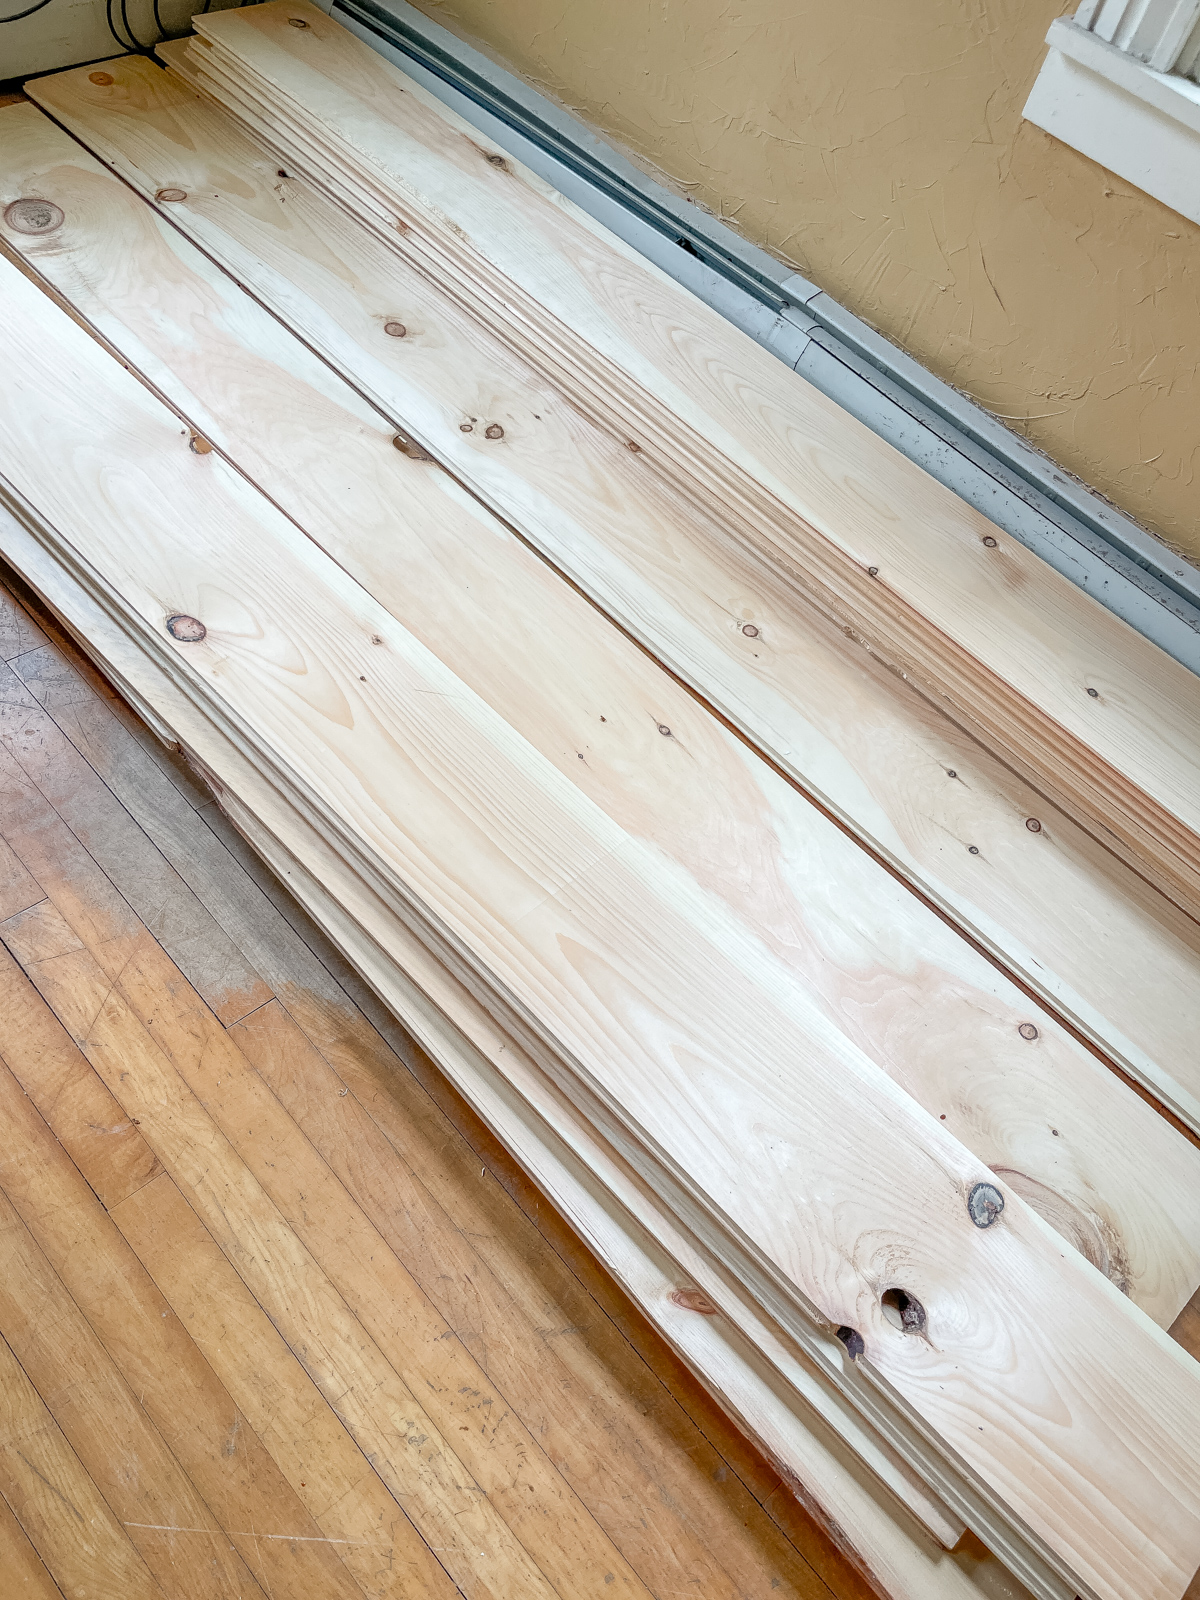
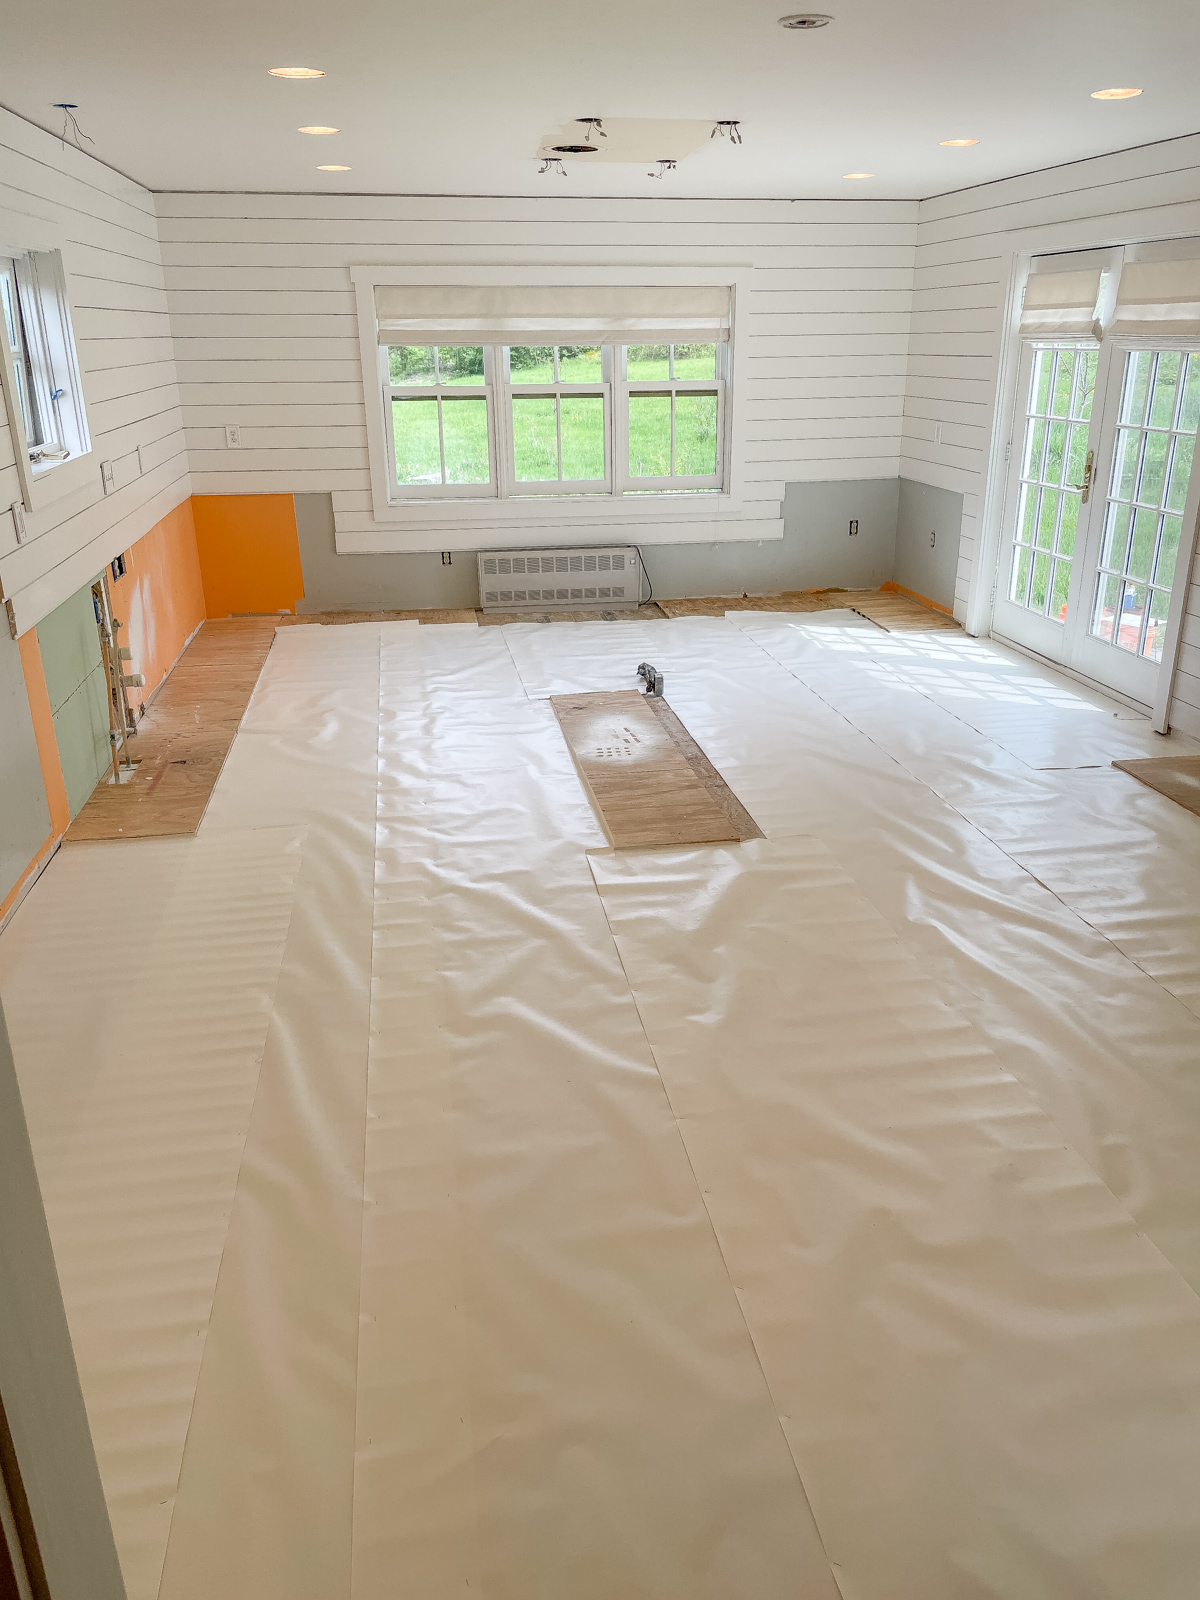
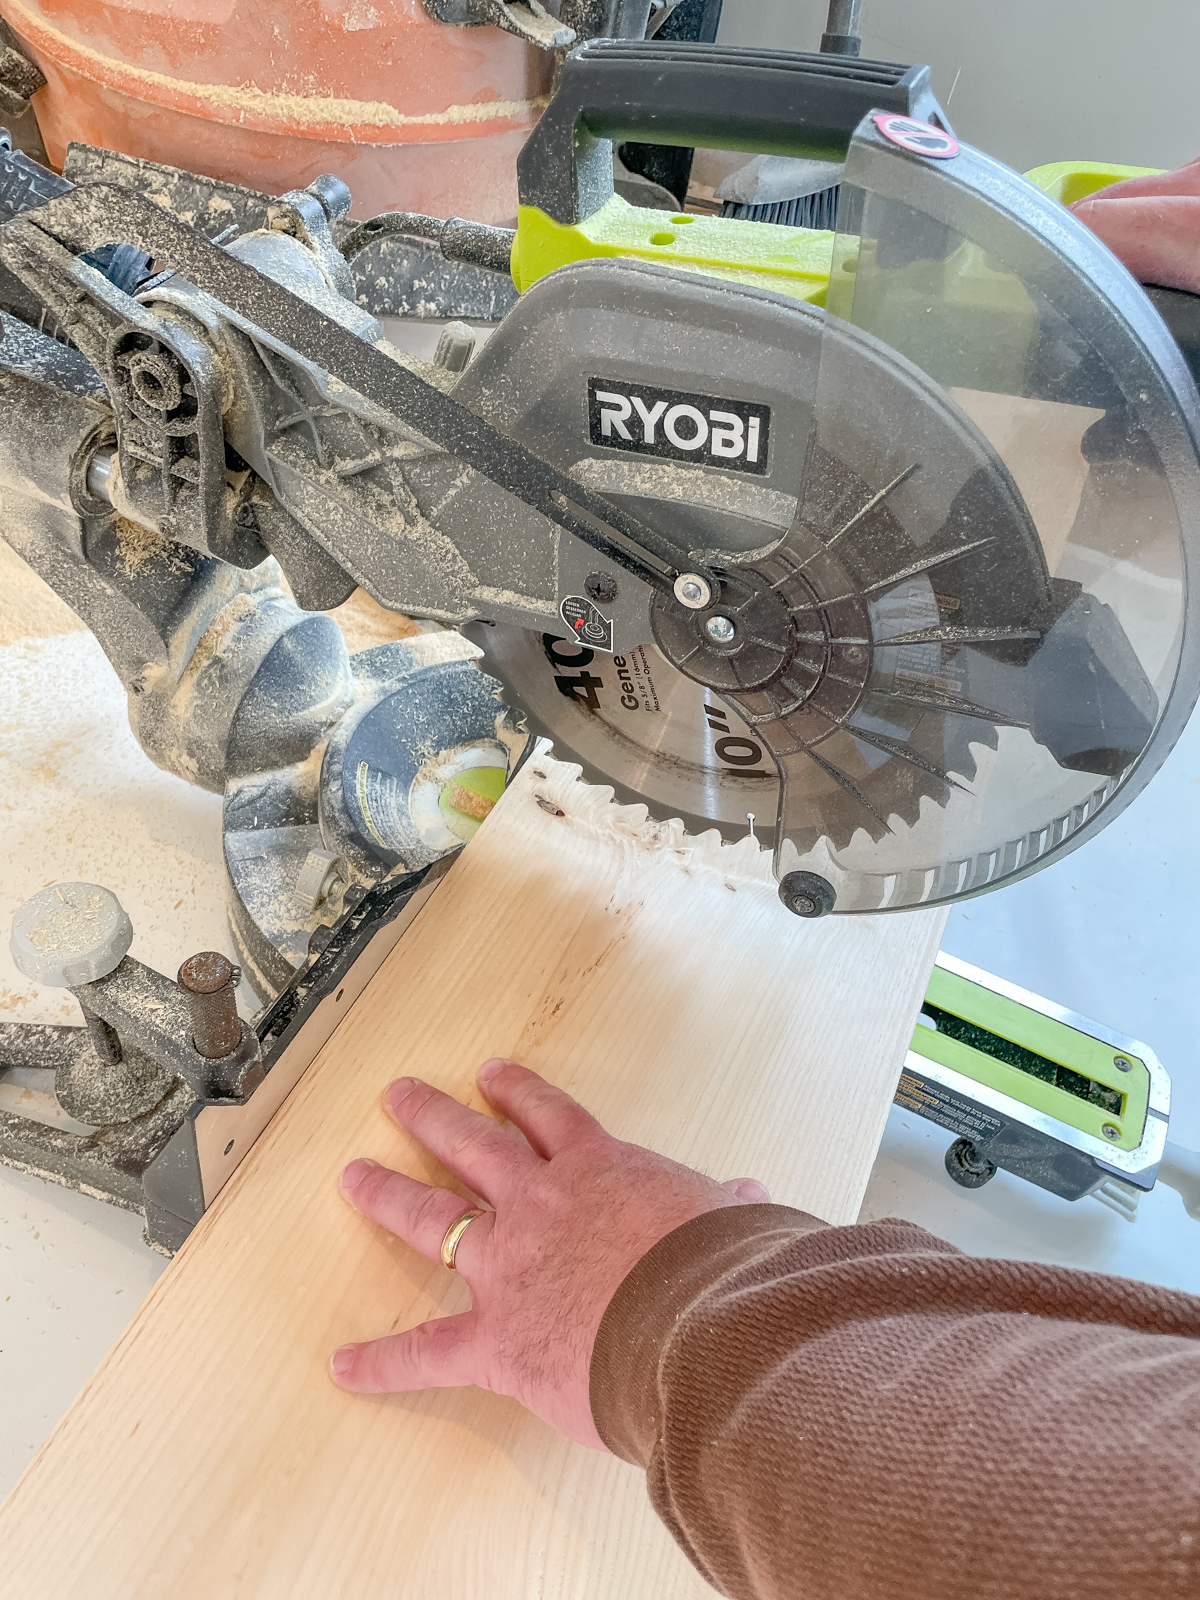
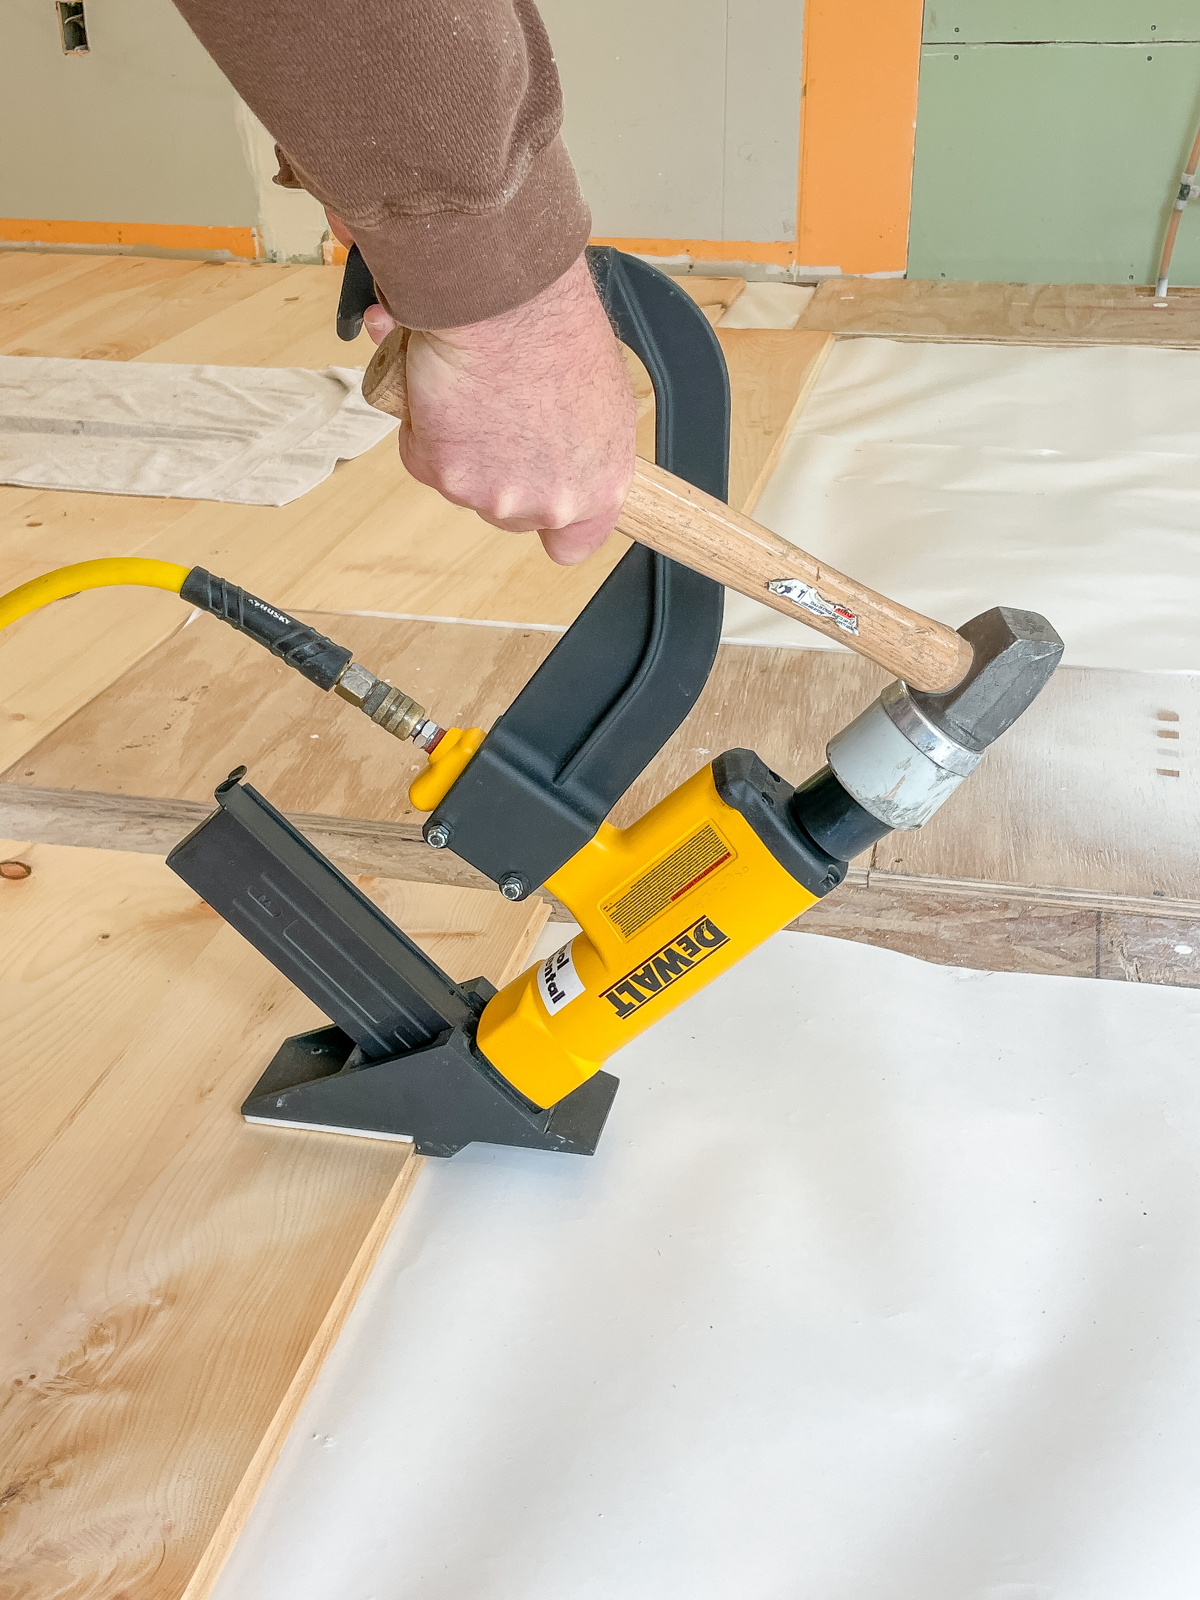
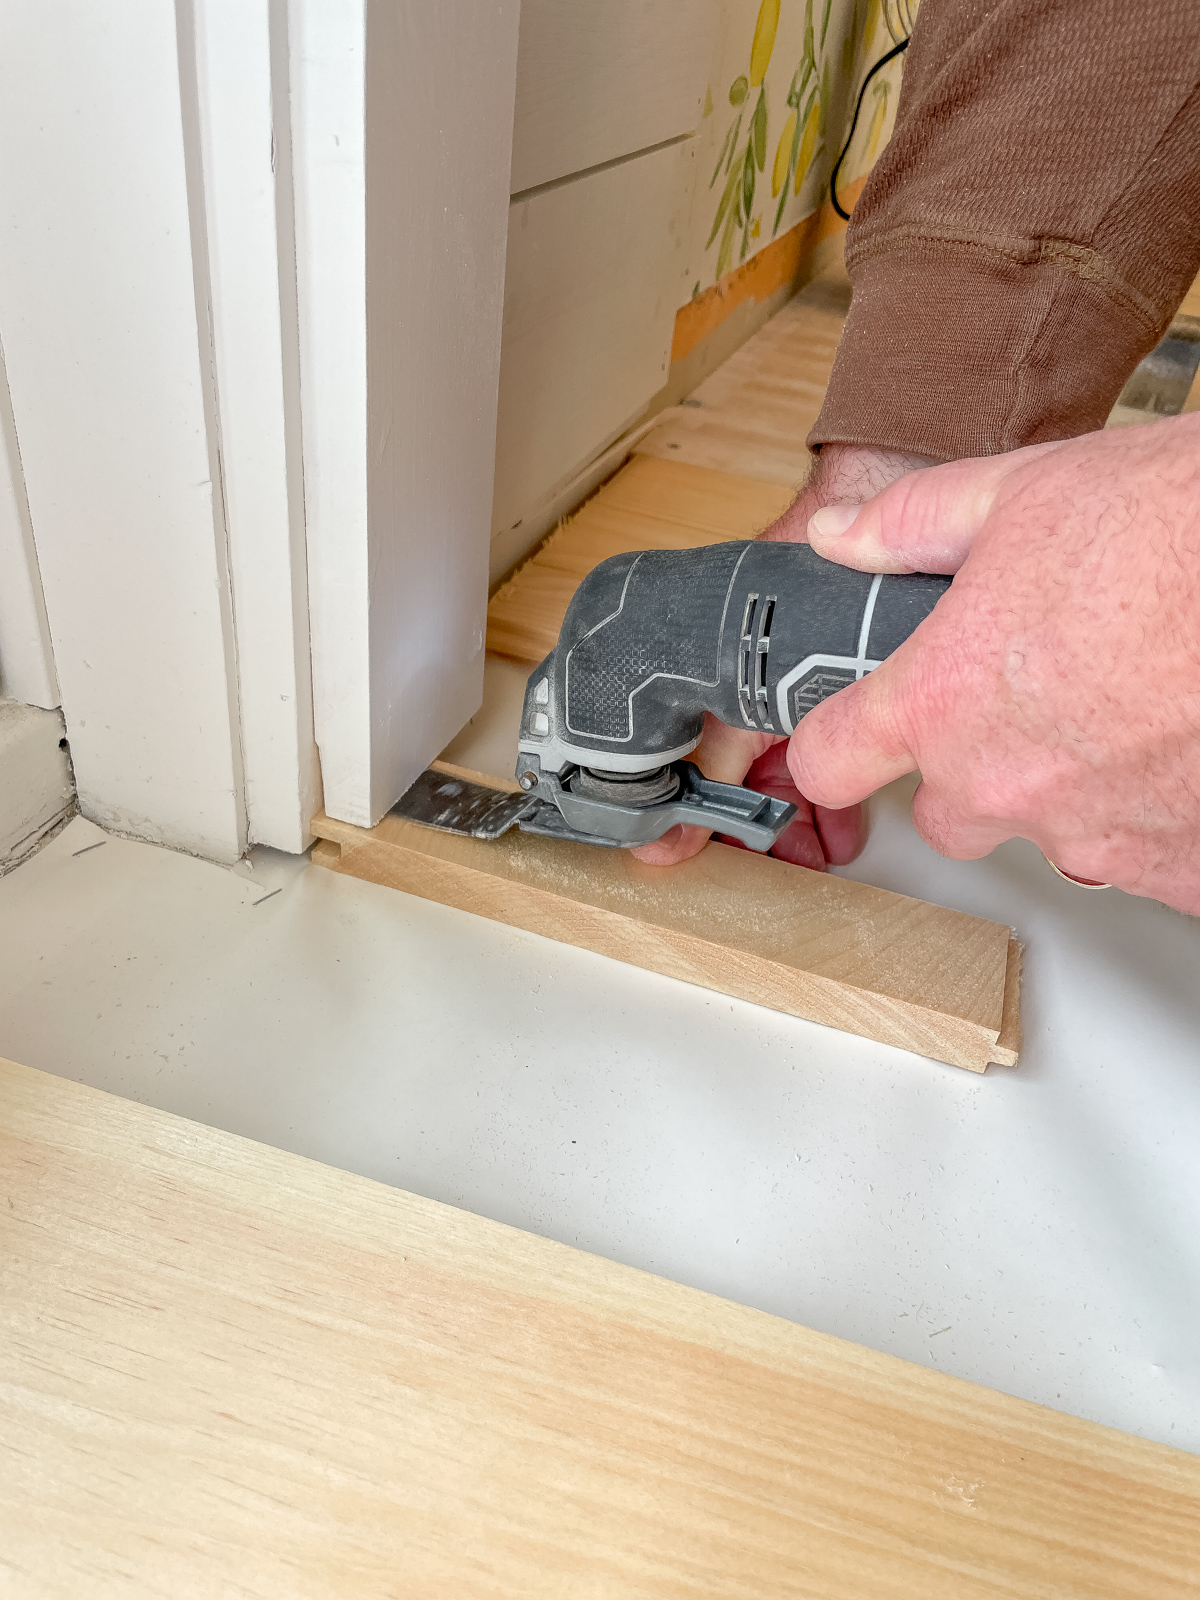
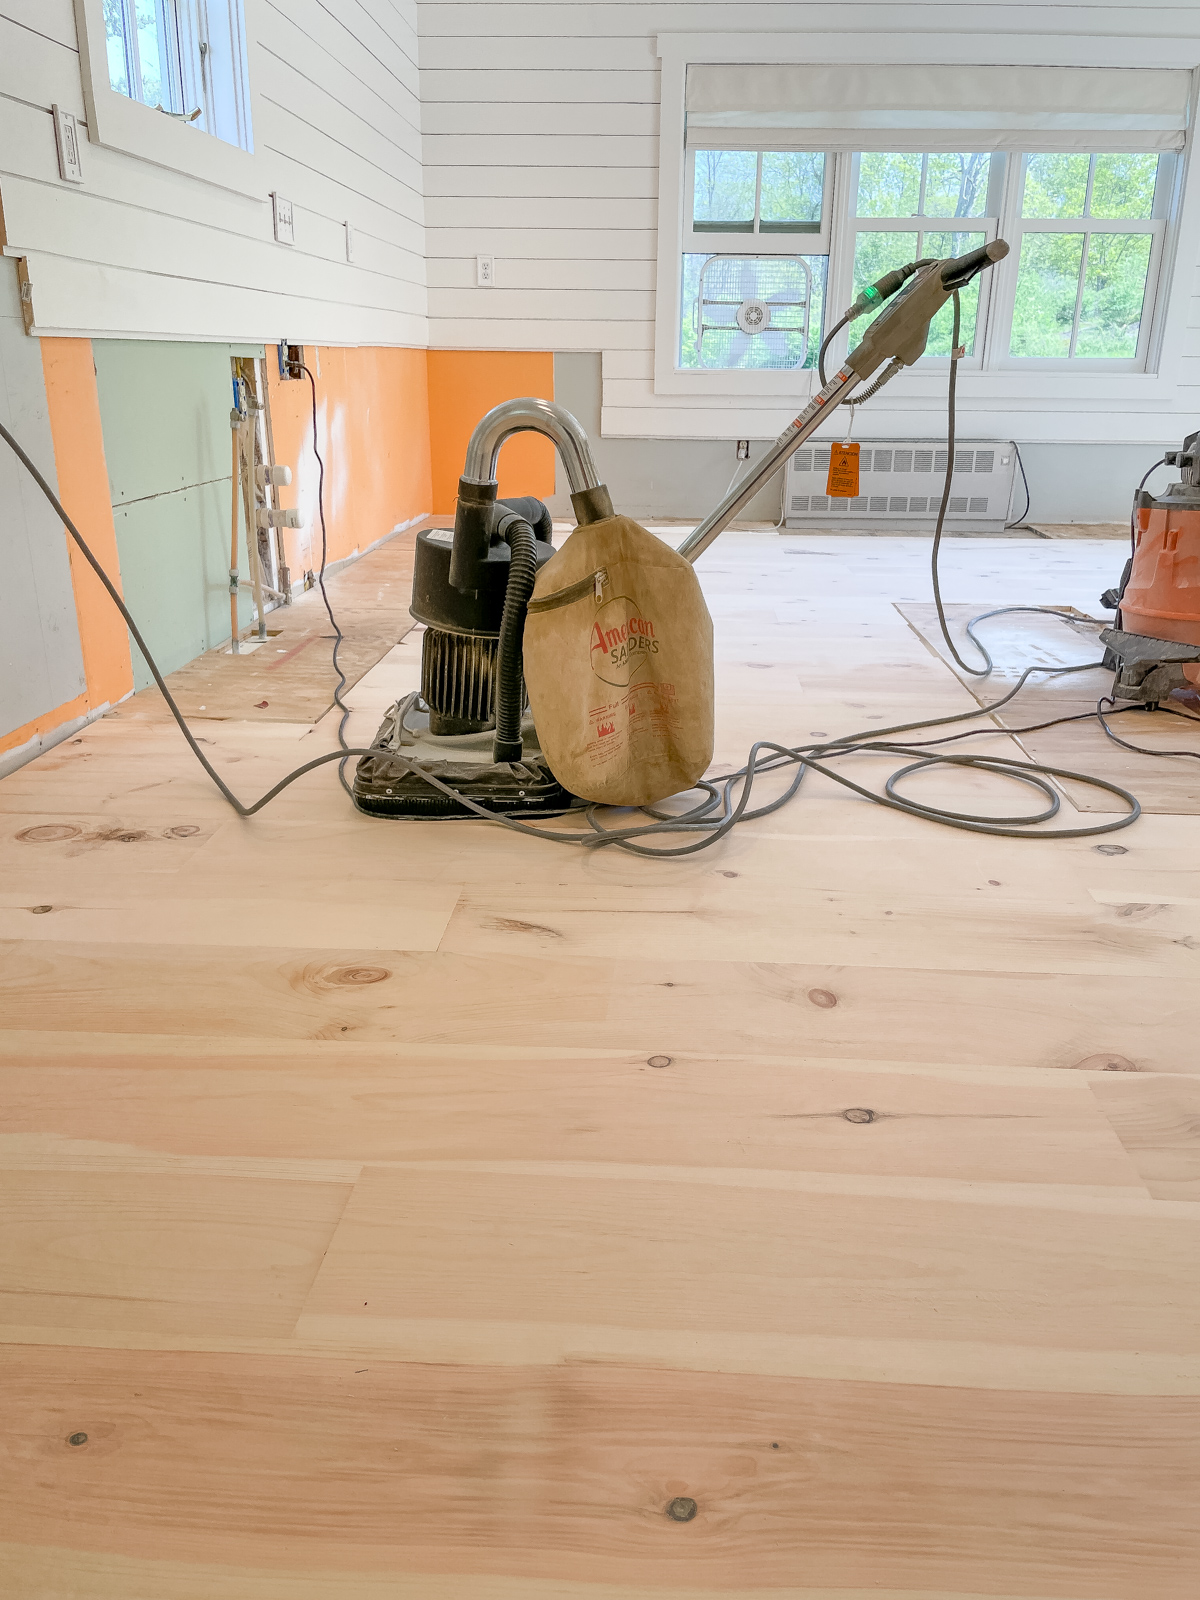
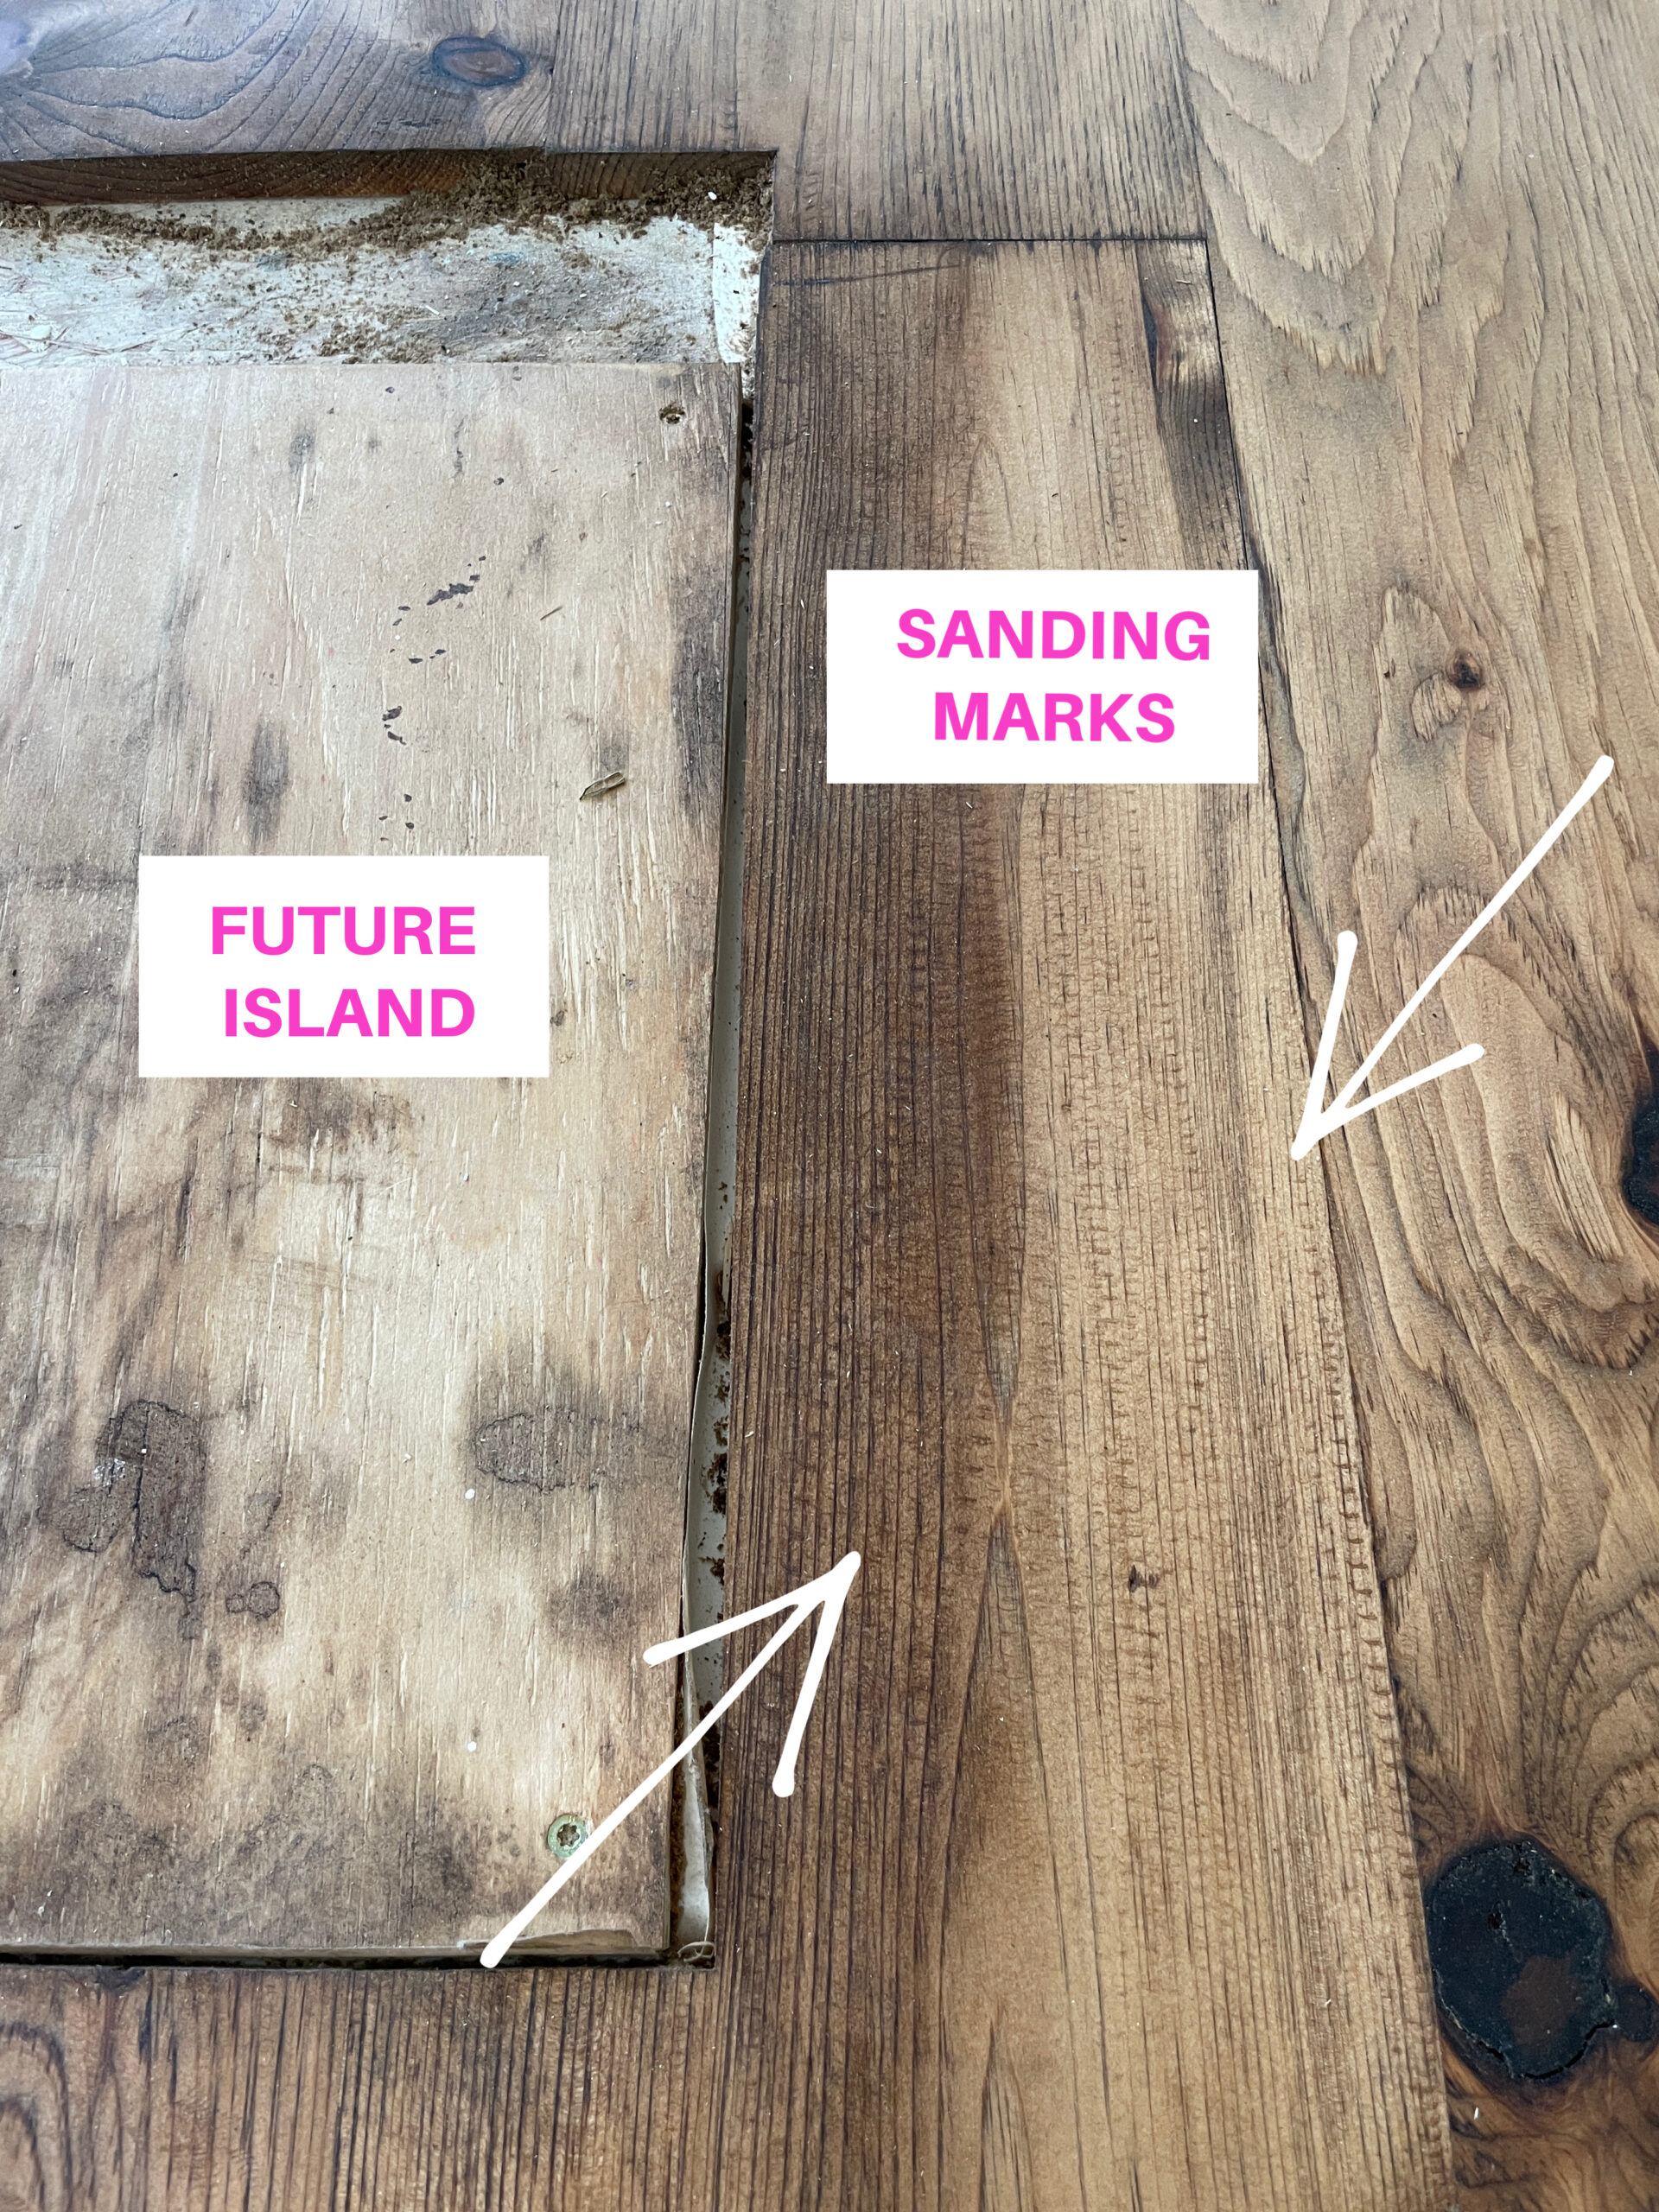
We gutted the entire room, down to the sheetrock and subfloor.  We installed a new pine wood floor and stained it with dark tung oil which you can read more about in those blog posts.

raising kitchen ceilingraising a home roof

I wanted quality kitchen cabinets but I refused to pay Home Depot’s overinflated prices.  So we found a cabinet company in Denver that let us custom order unfinished cabinets to our specs.  We spent a VERY long and stressful time configuring our cabinets.  Brian drew everything on AutoCAD and eventually we got it right.

The cabinets were not cheap but it wasn’t anywhere near Home Depot’s crazy price.  We ordered our cabinets unfinished so for space reasons, we split them up into 3 orders so I could have the space to paint them all.  I set up an indoor painting room with plastic everywhere, got a paint sprayer, took my time, and sprayed each one.  I started with the back of the doors in case I had any issues, which I didn’t.

We used this paint sprayer and it’s so awesome!  I can’t live without it!

new England farmhouse kitchen

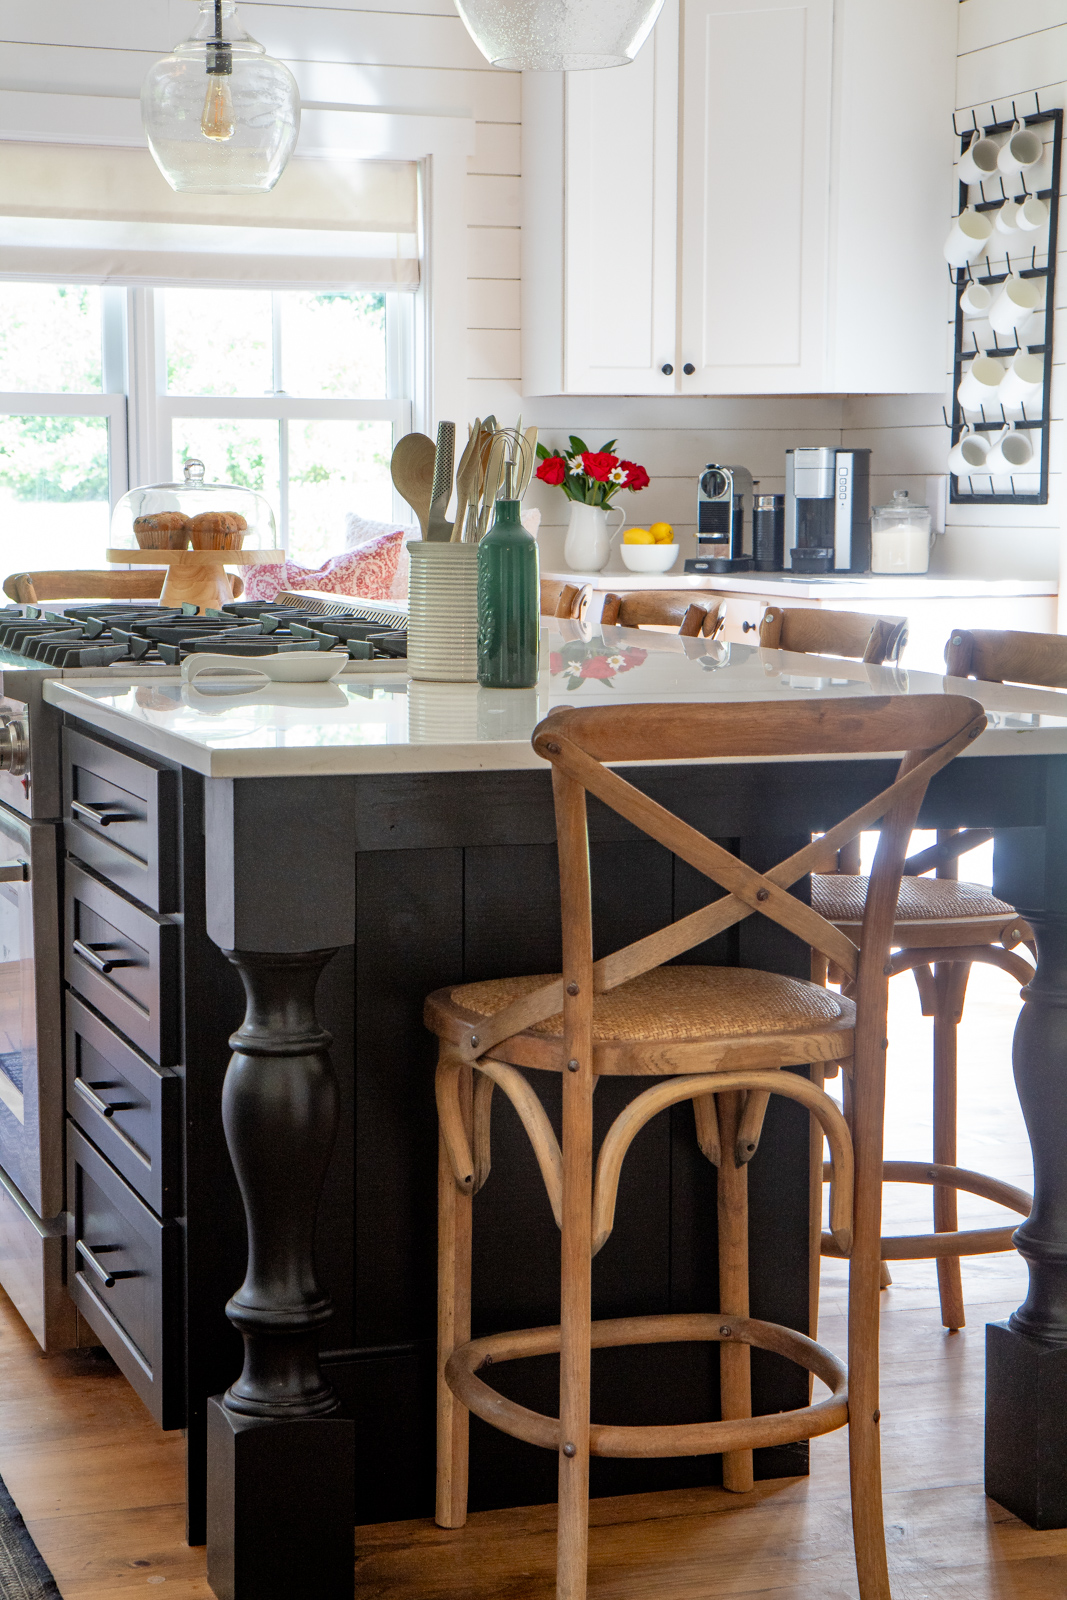
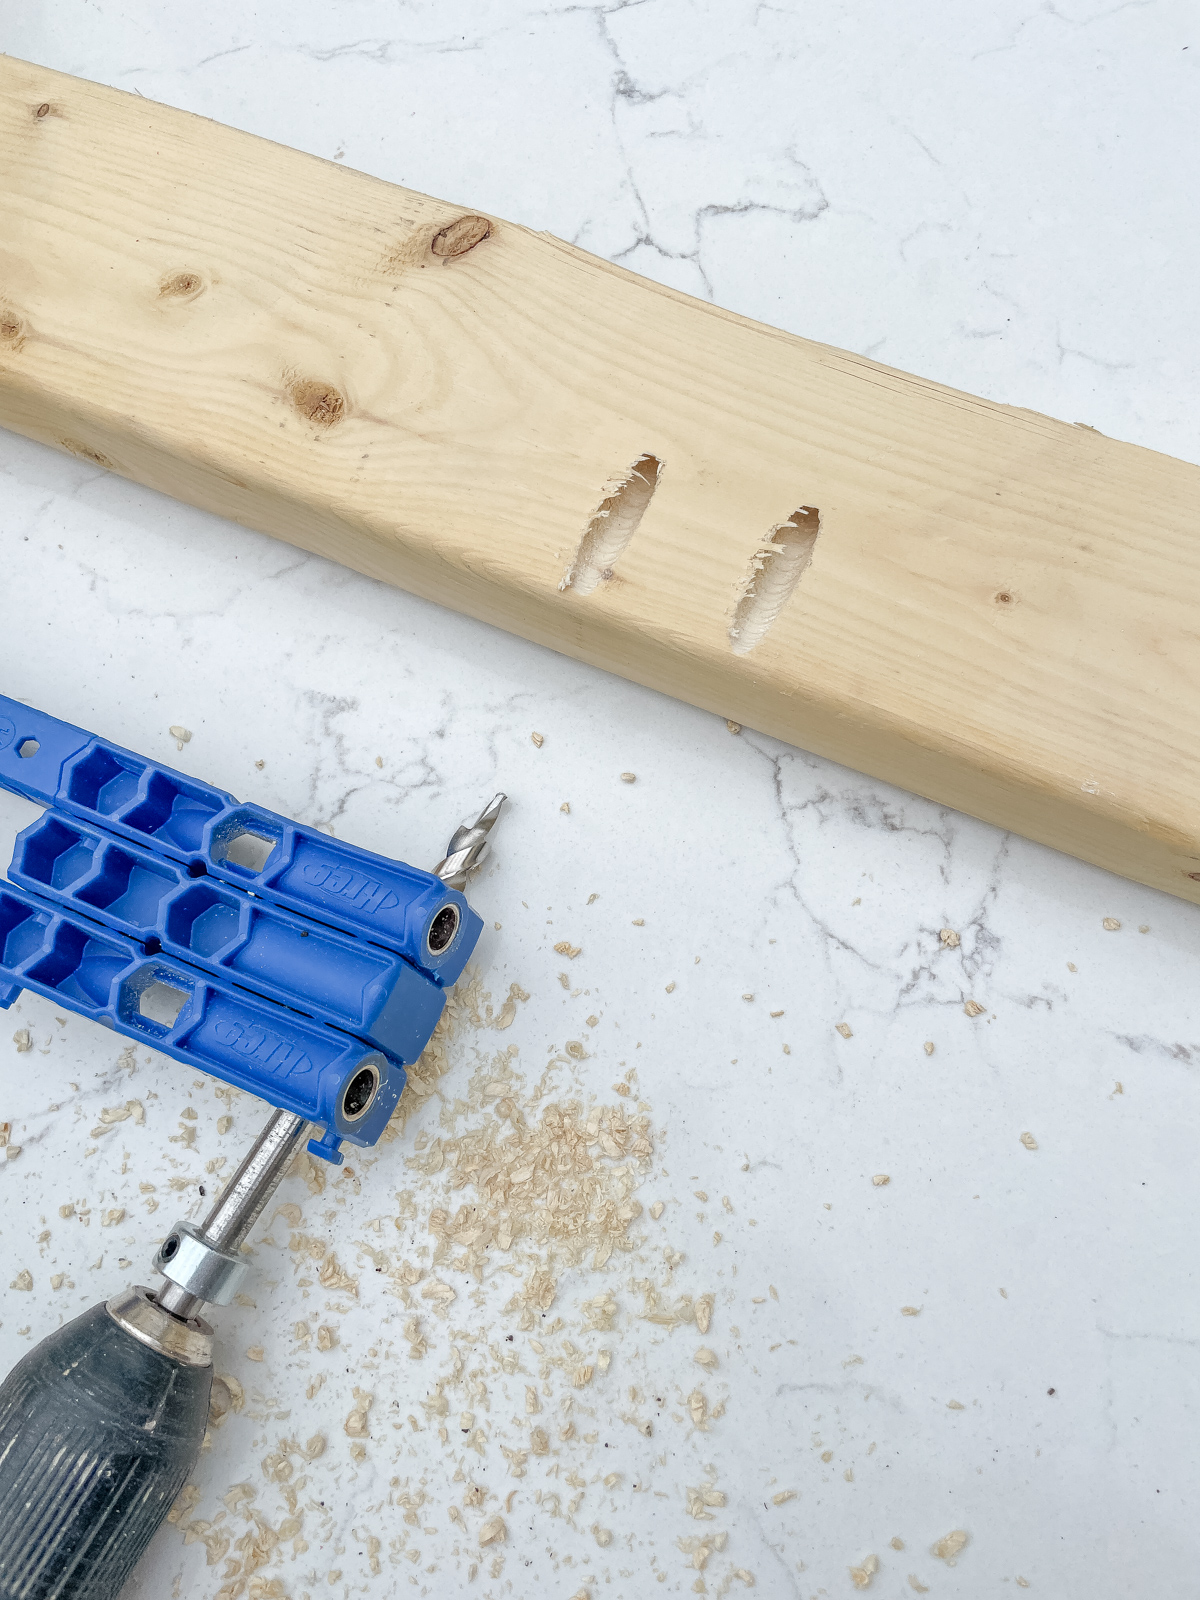
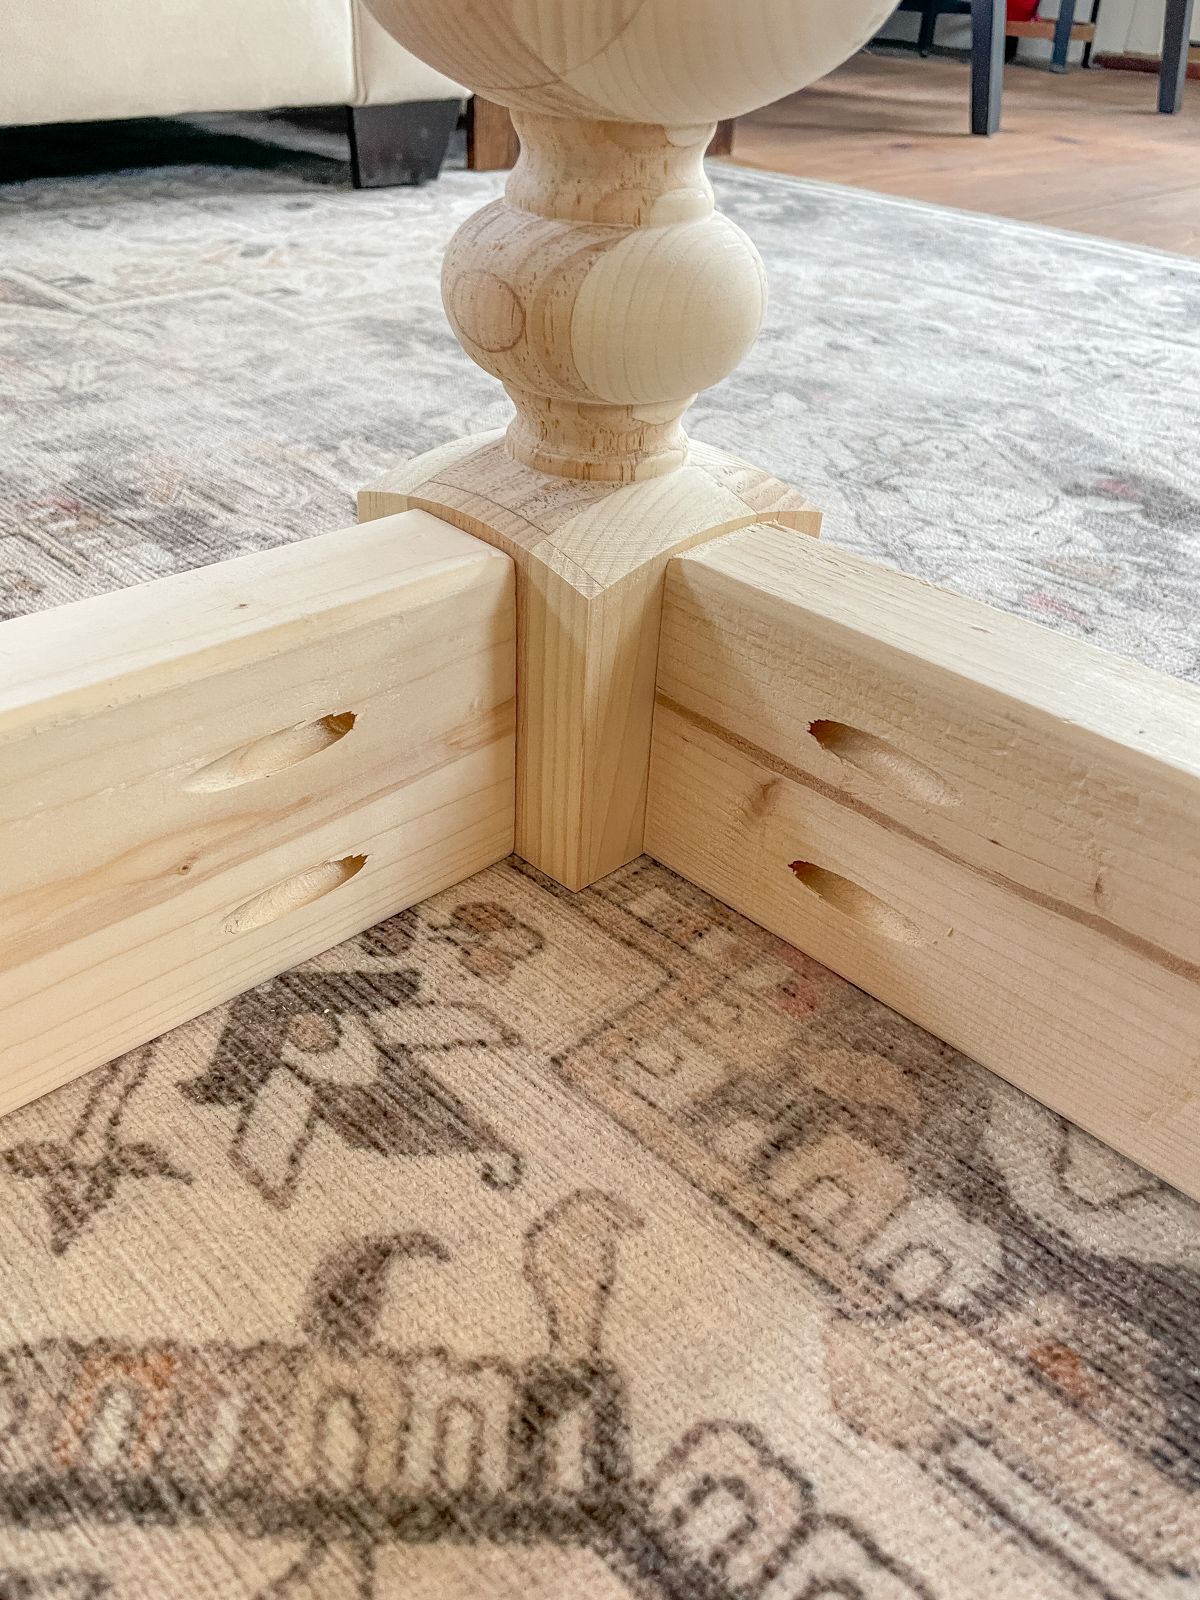
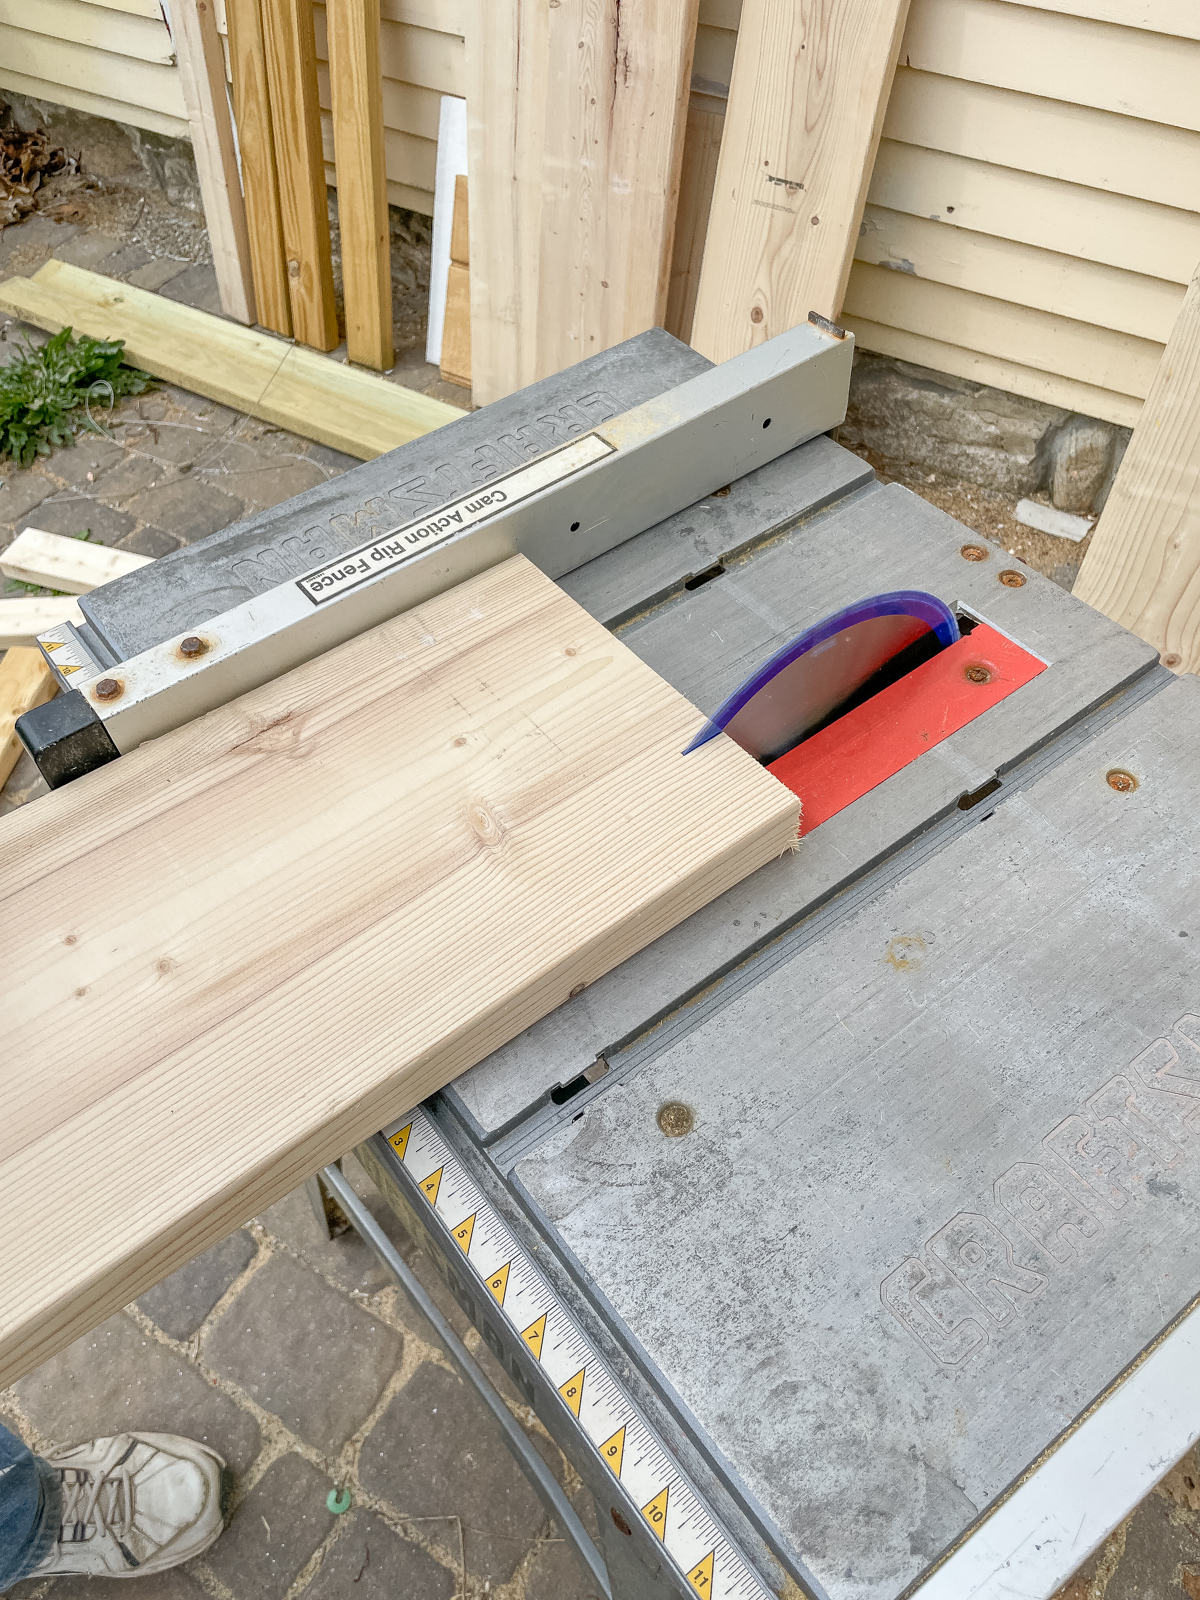
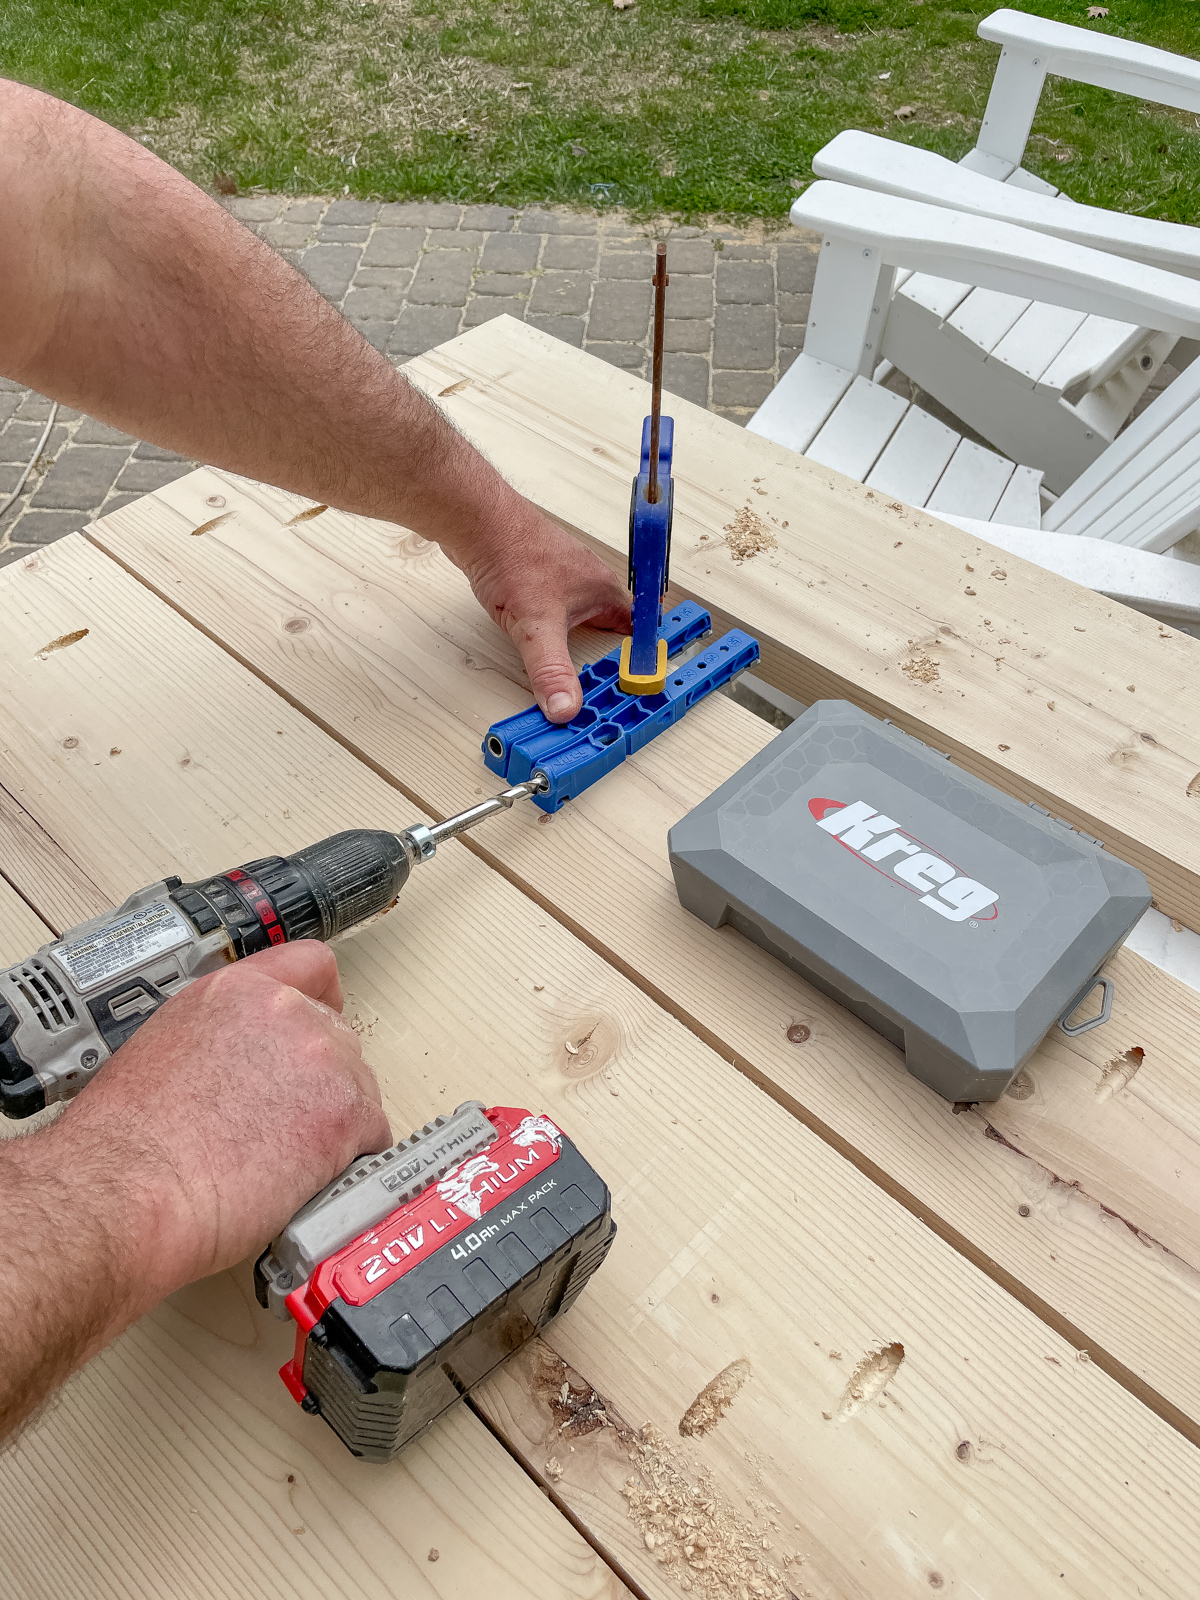
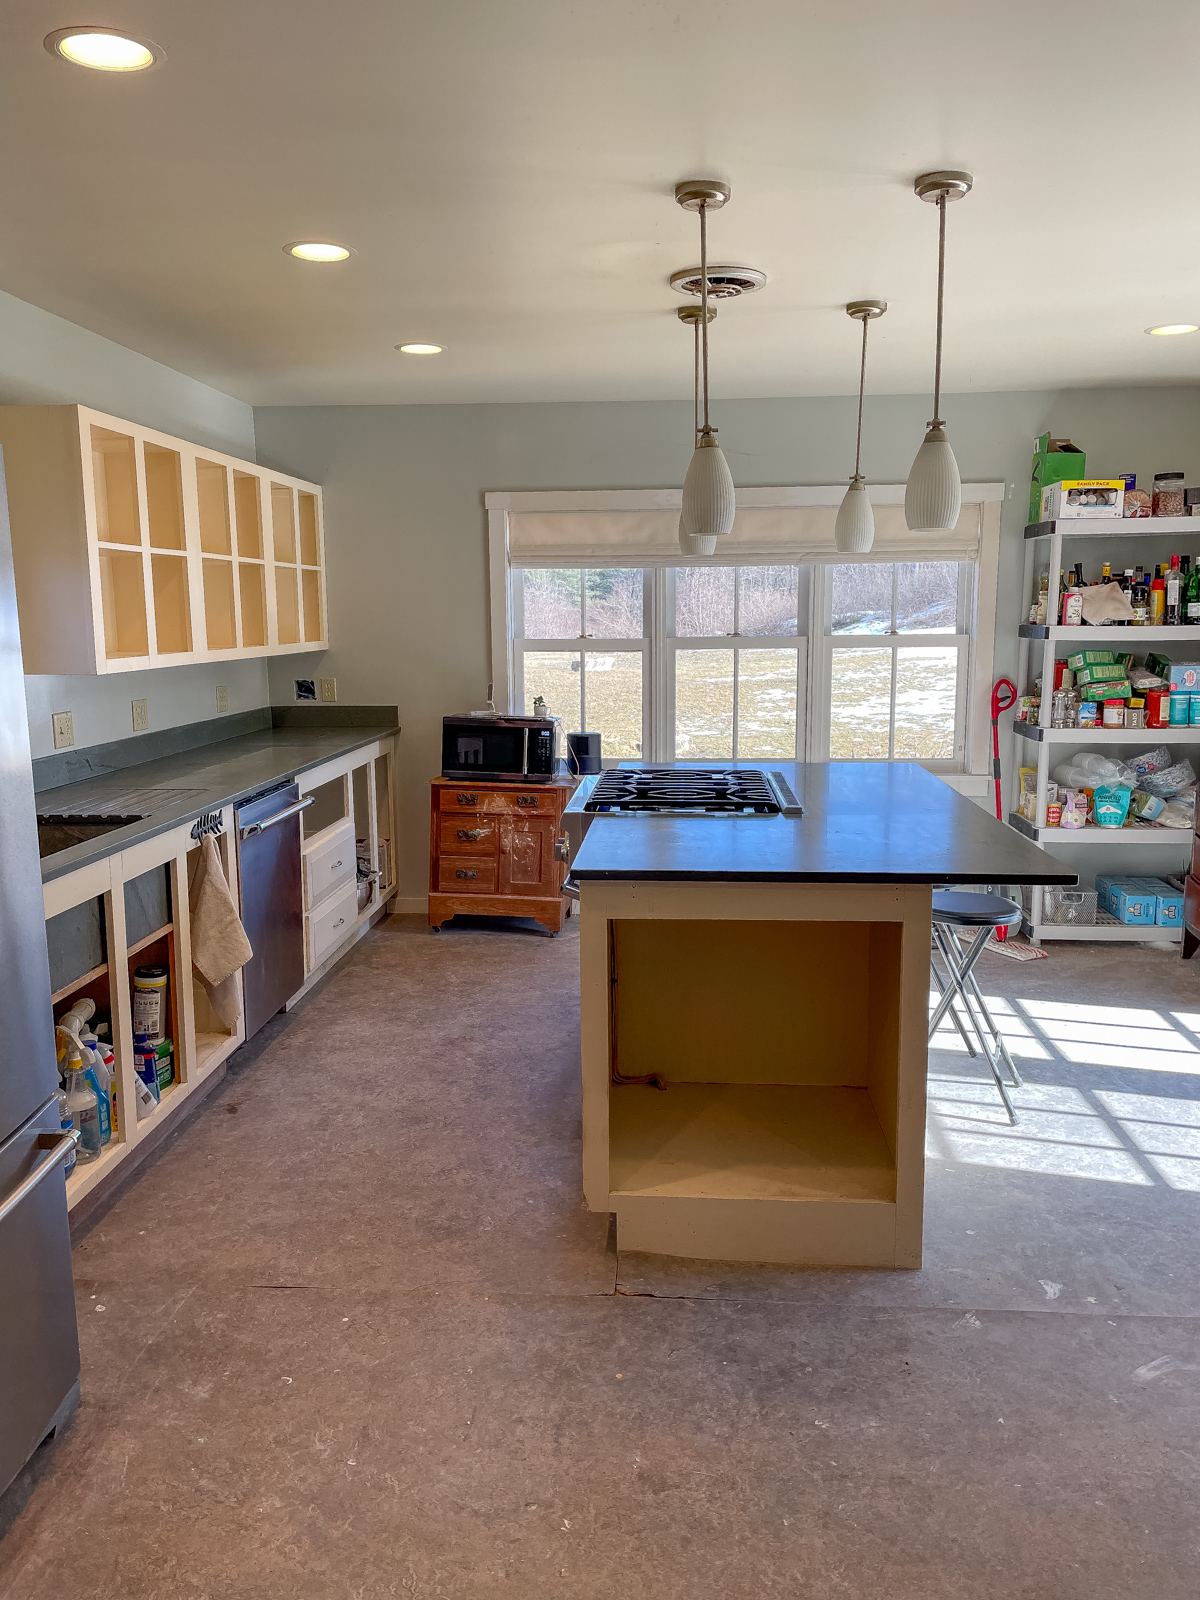
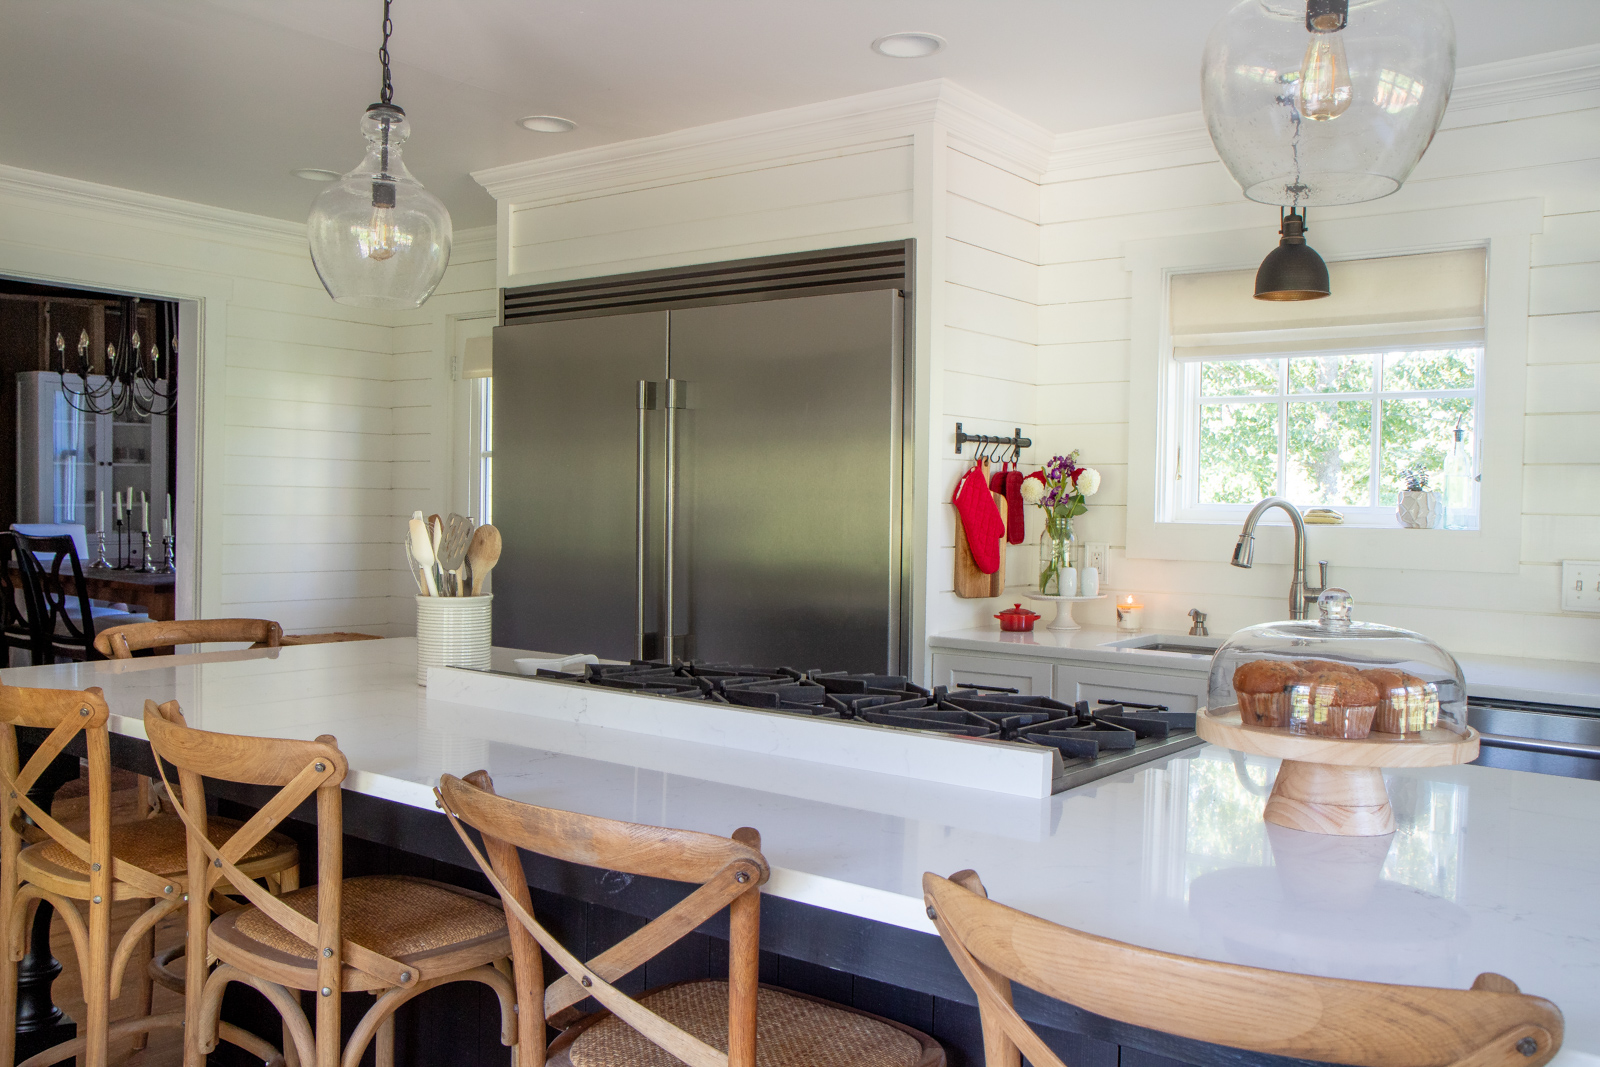
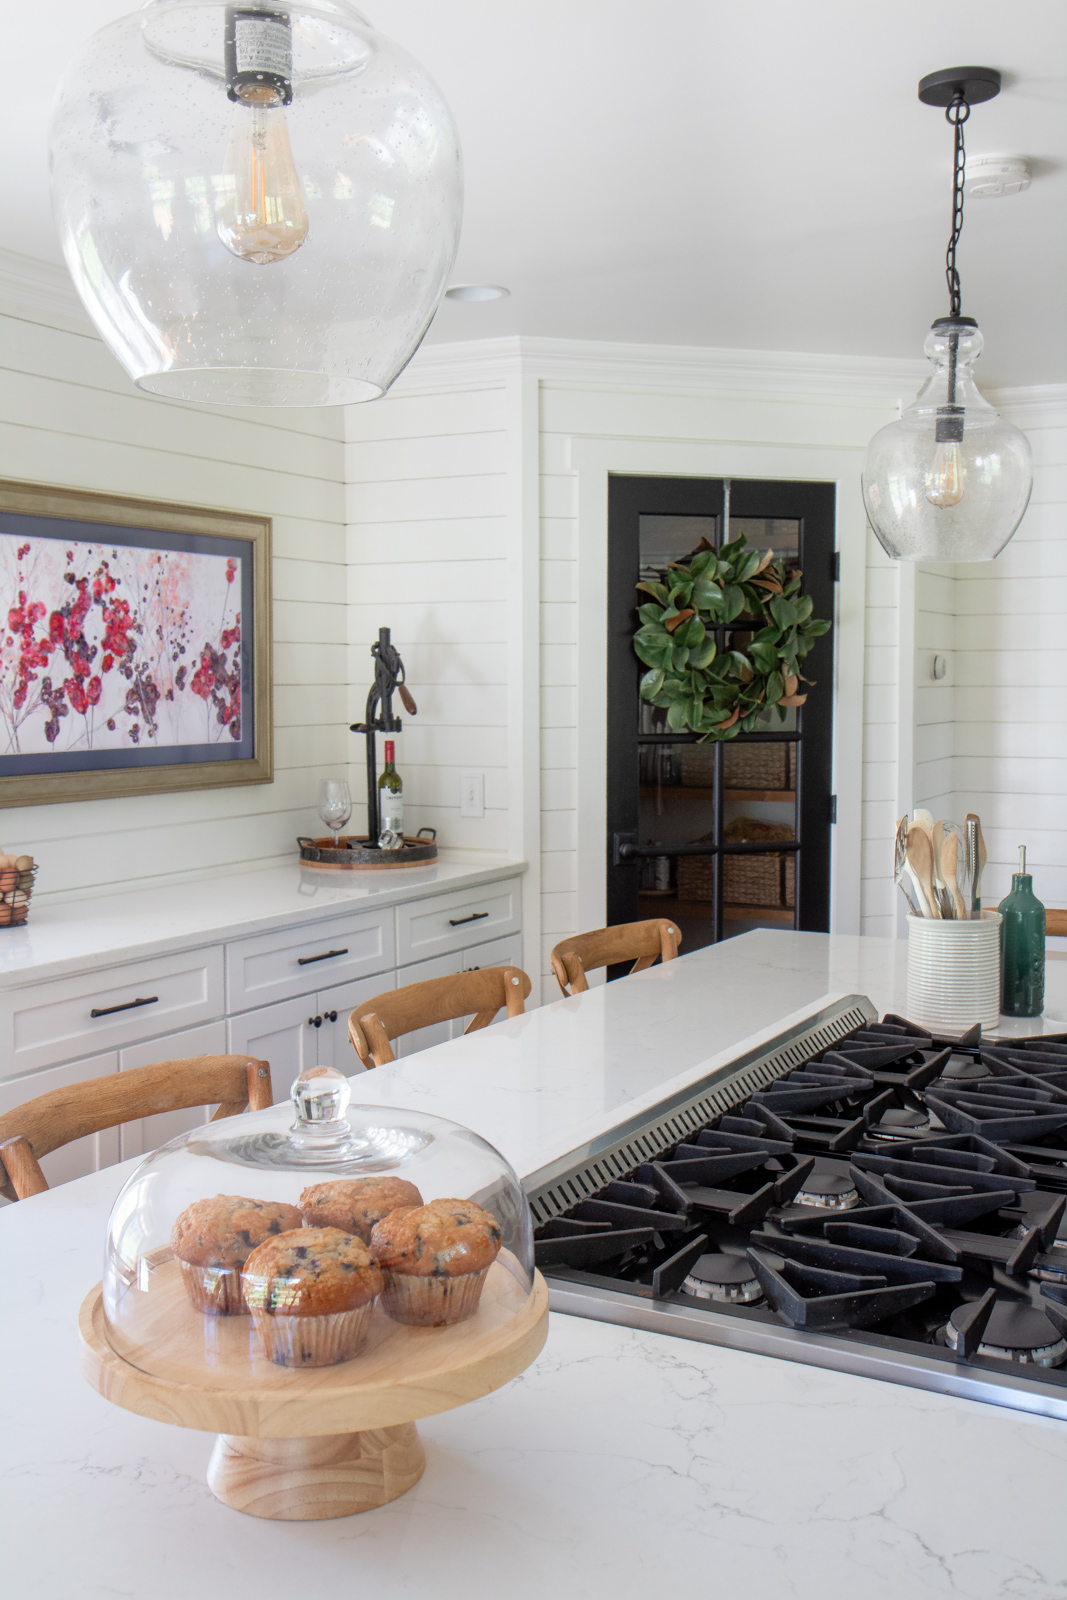
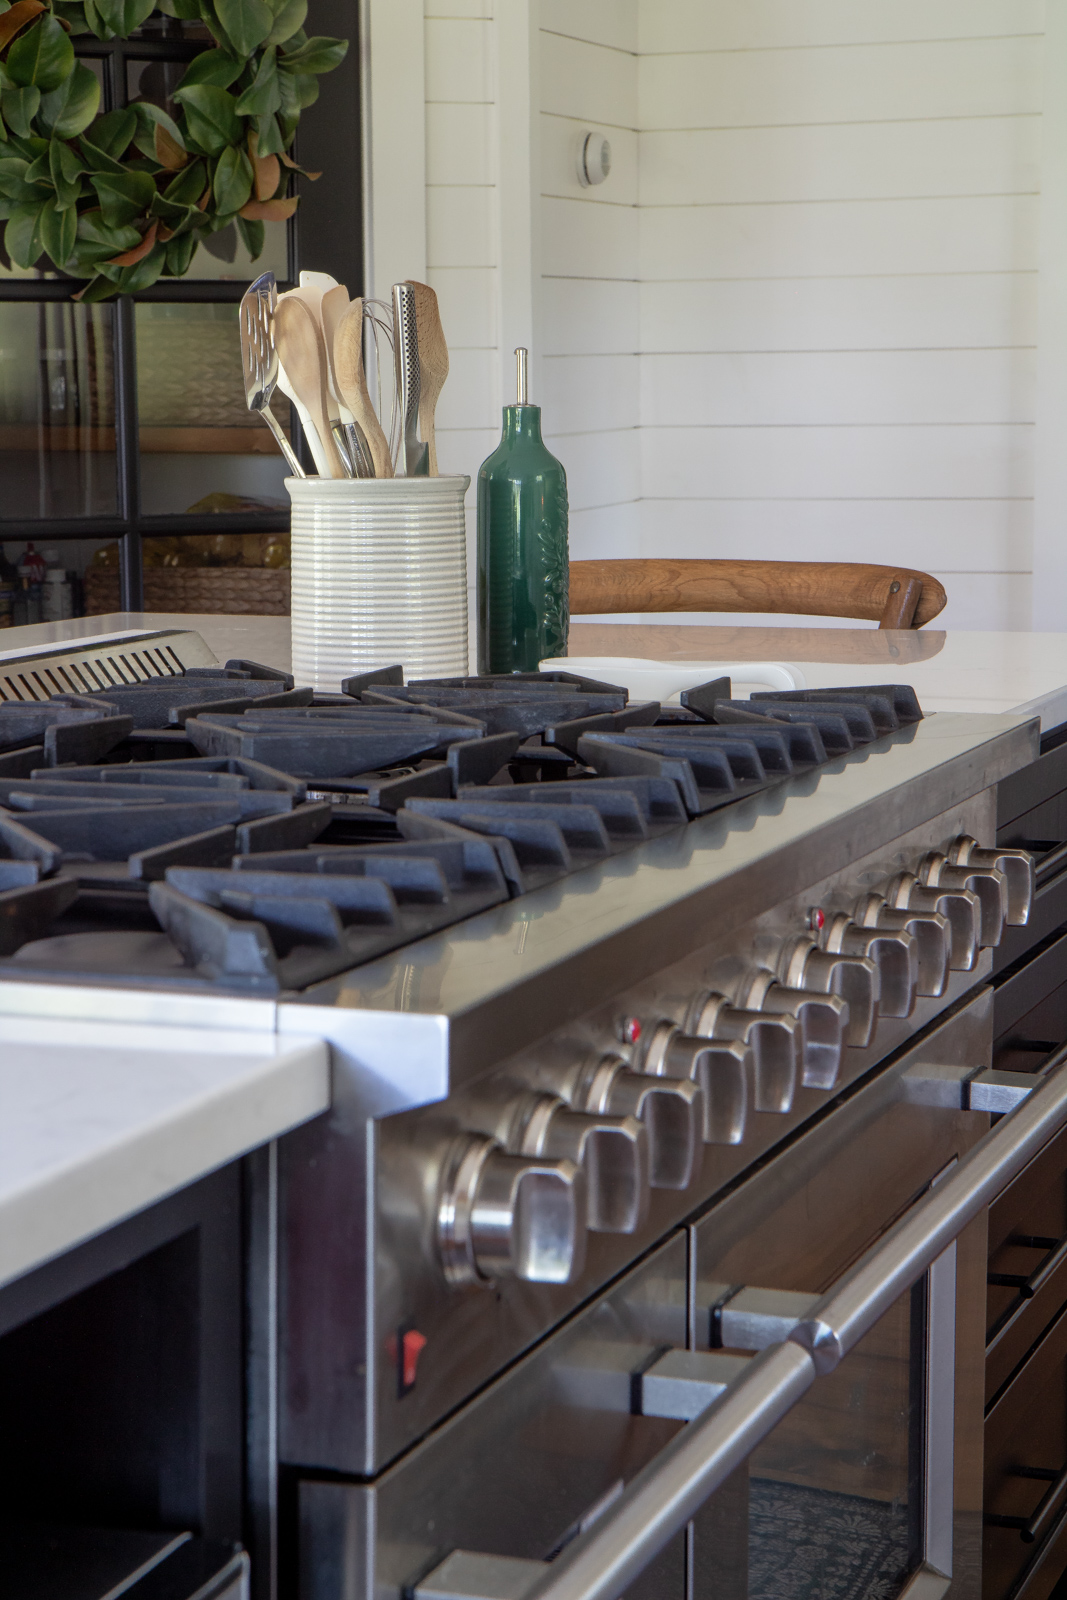
My kitchen vision had a large island with a double-oven, 8-burner, gas range surrounded by chairs so I could easily cook, socialize with others, and eat right there in the kitchen.  The island was built from 2 cabinet bases, then we shiplapped the sides and ordered 4 island legs for extra support.

kitchen wall mug rack

I know a lot of people are over shiplap, but when it’s done appropriately I love it.  I live in a 1900 Colonial farmhouse in Mid-Coast Maine, I think it works.  I knew all the cooking, baking, and preserving chaos that would be going on in the kitchen so I wanted a white kitchen to look clean and keep me calm.

The white shiplap provides some interest and makes the room feel cozy, even though it’s mostly white, and I like that.  Shiplapping the walls meant we could skip a tile backsplash which made things easier on us.

Samsung art tv in kitchen corner pantry

On the wall opposite of the sink we installed a large Samsung Frame TV so I could watch cooking shows and Youtube tutorials.  We also love having cooking date nights in the kitchen while we watch a movie and drink wine.

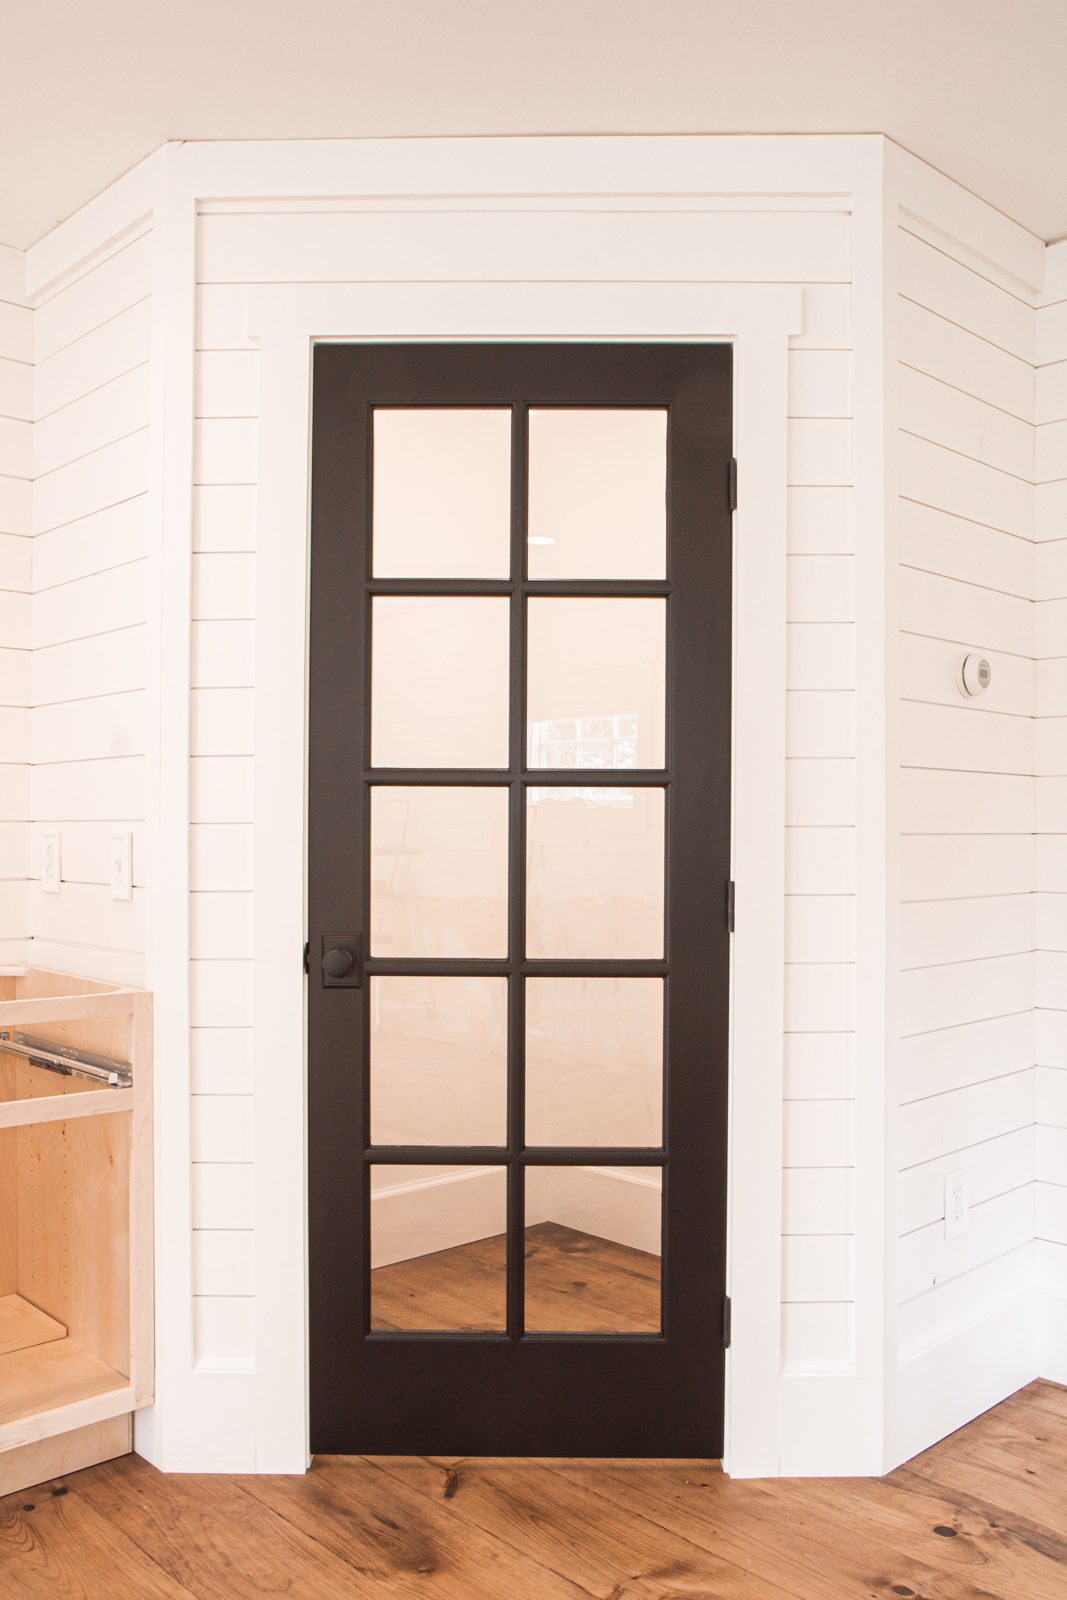
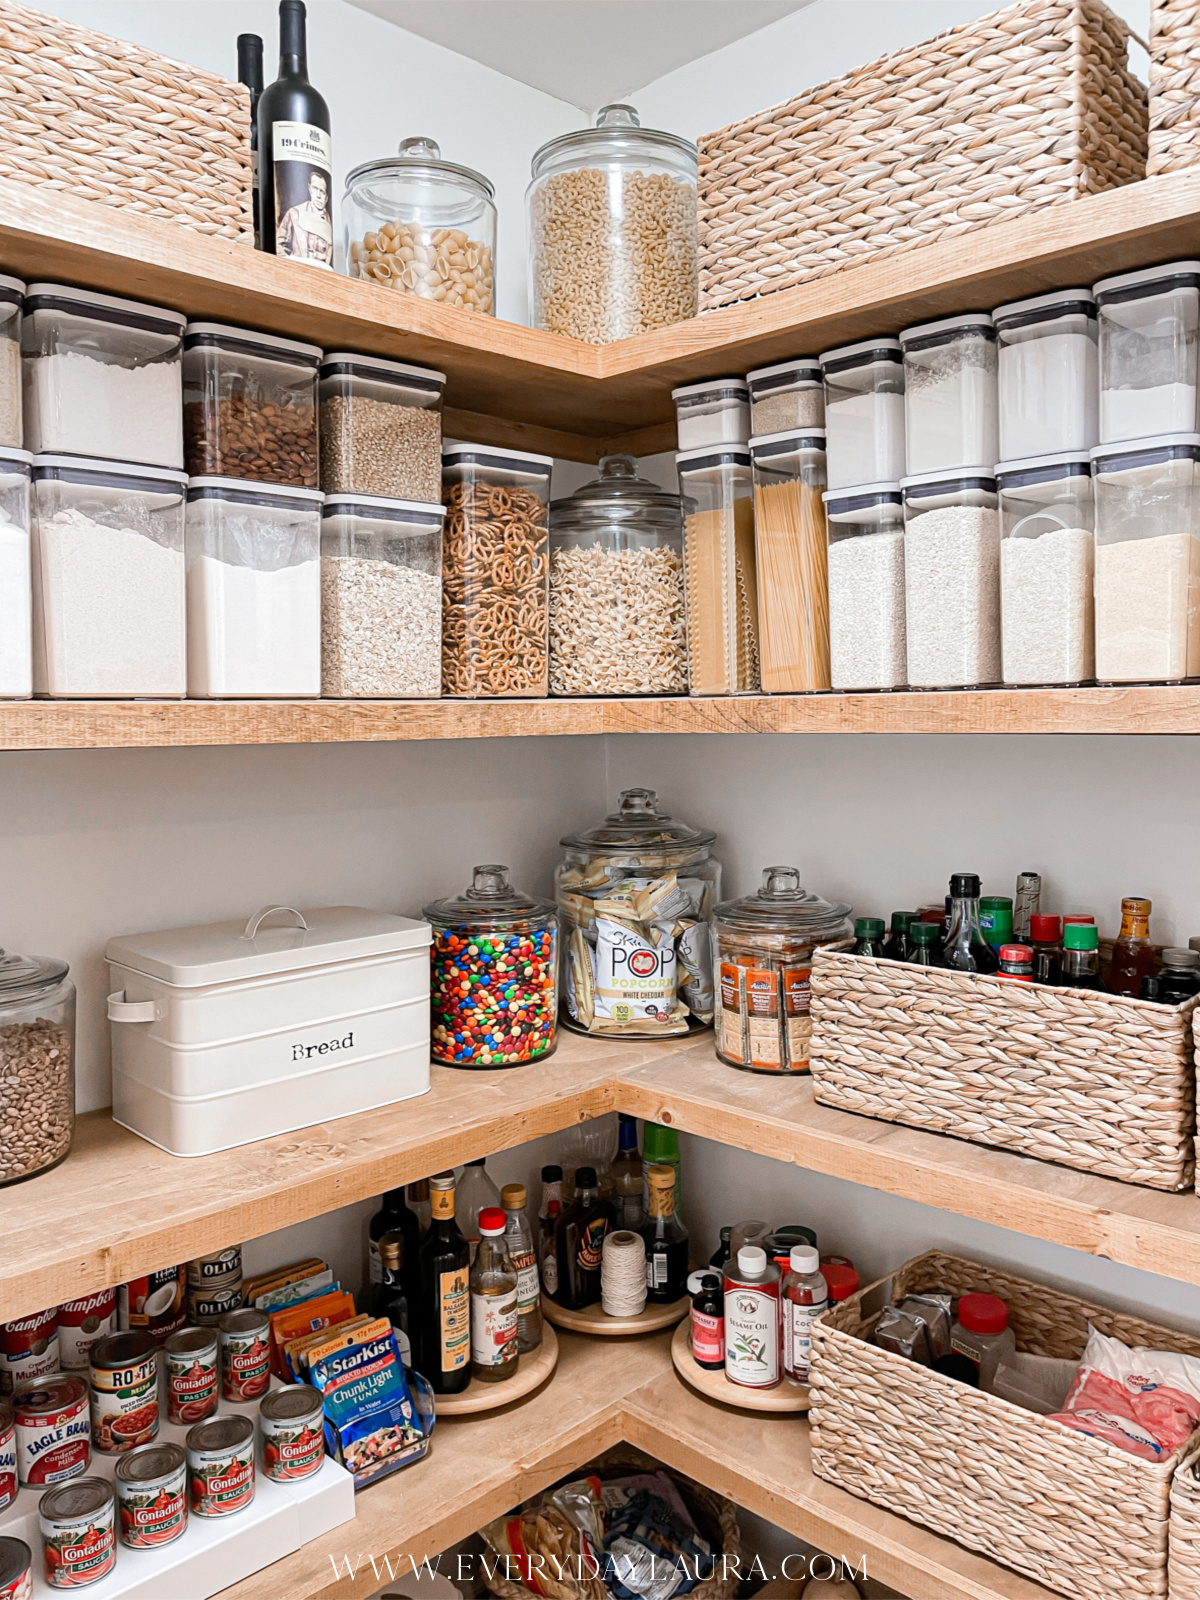
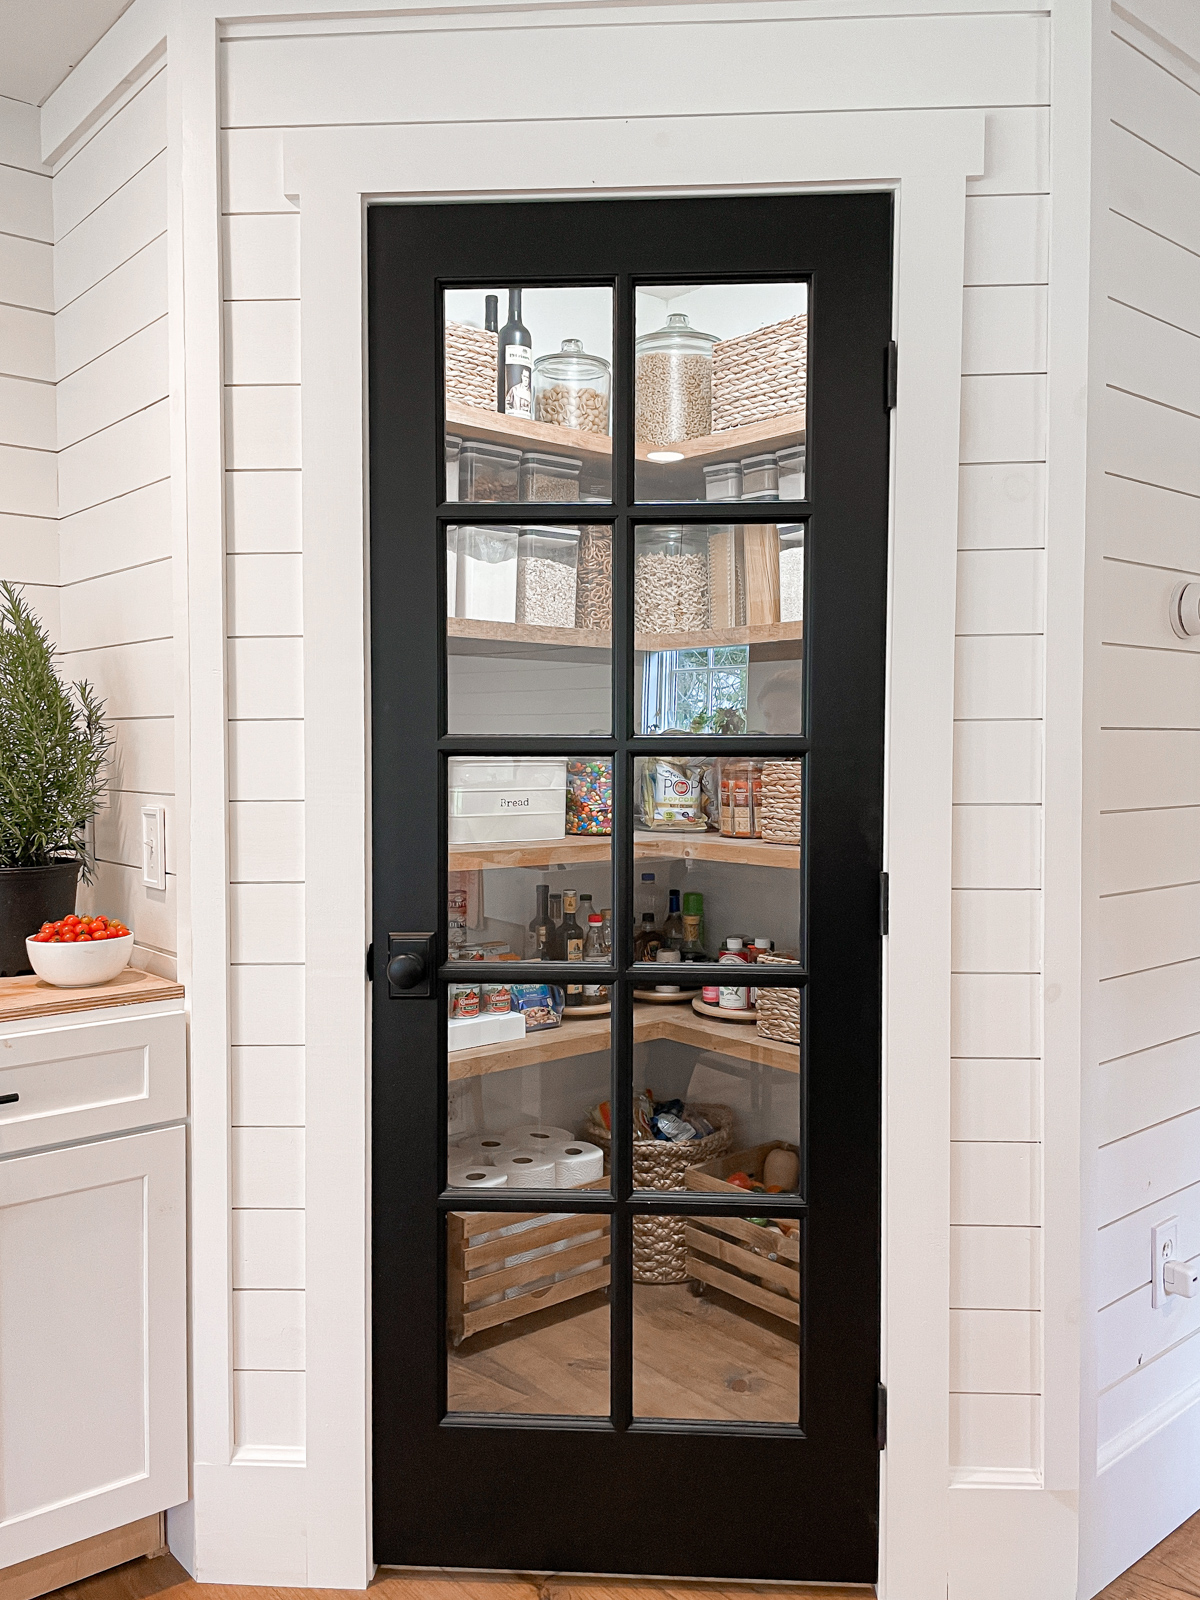
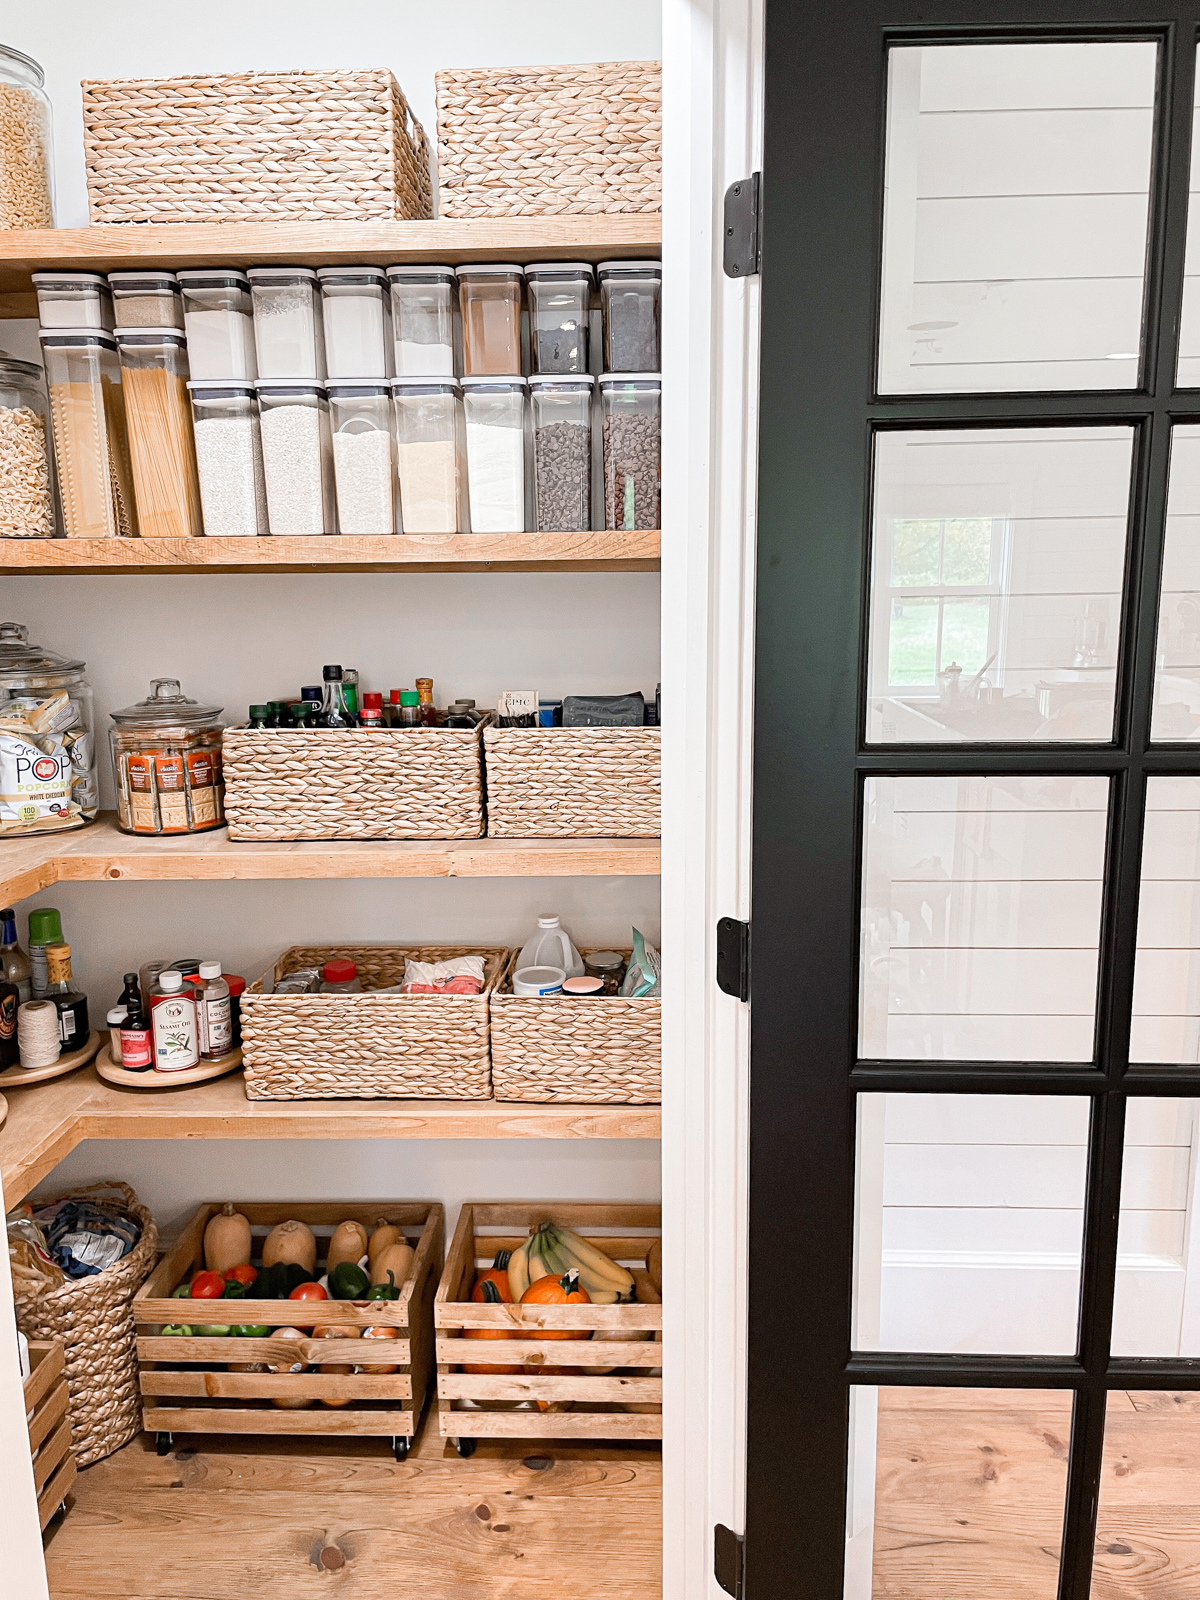
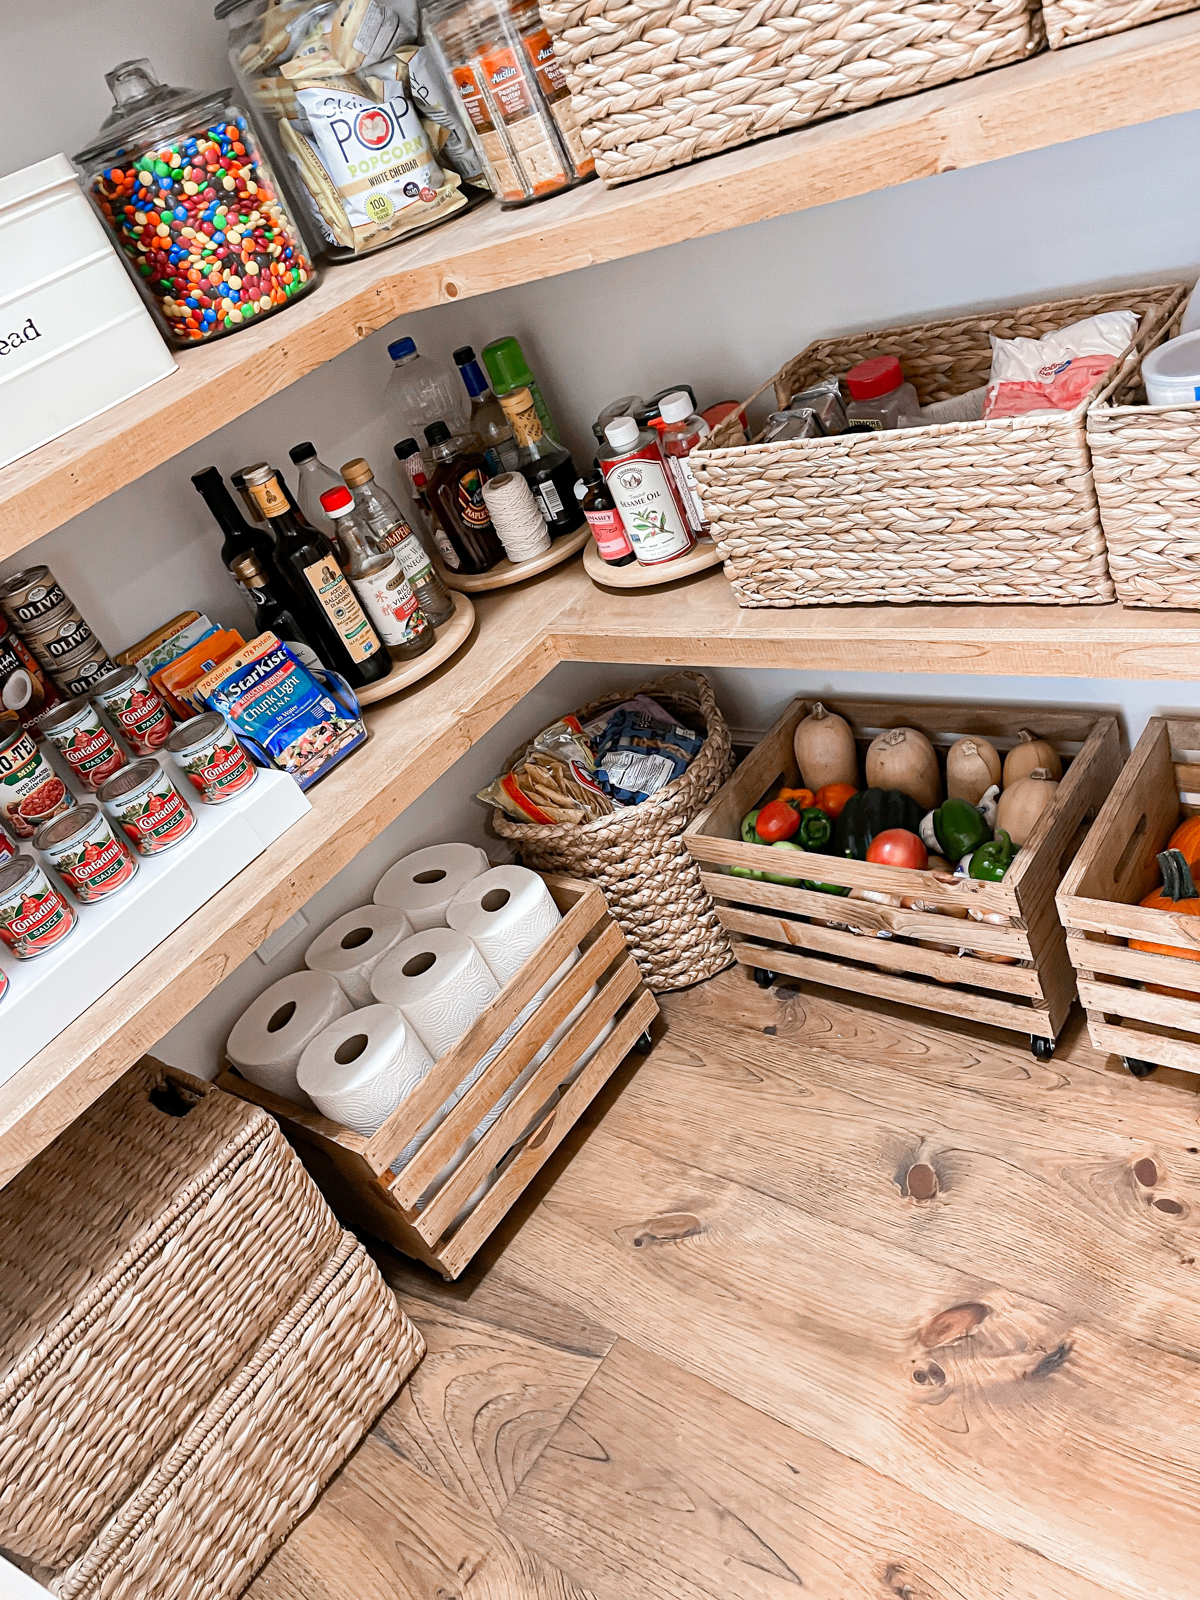
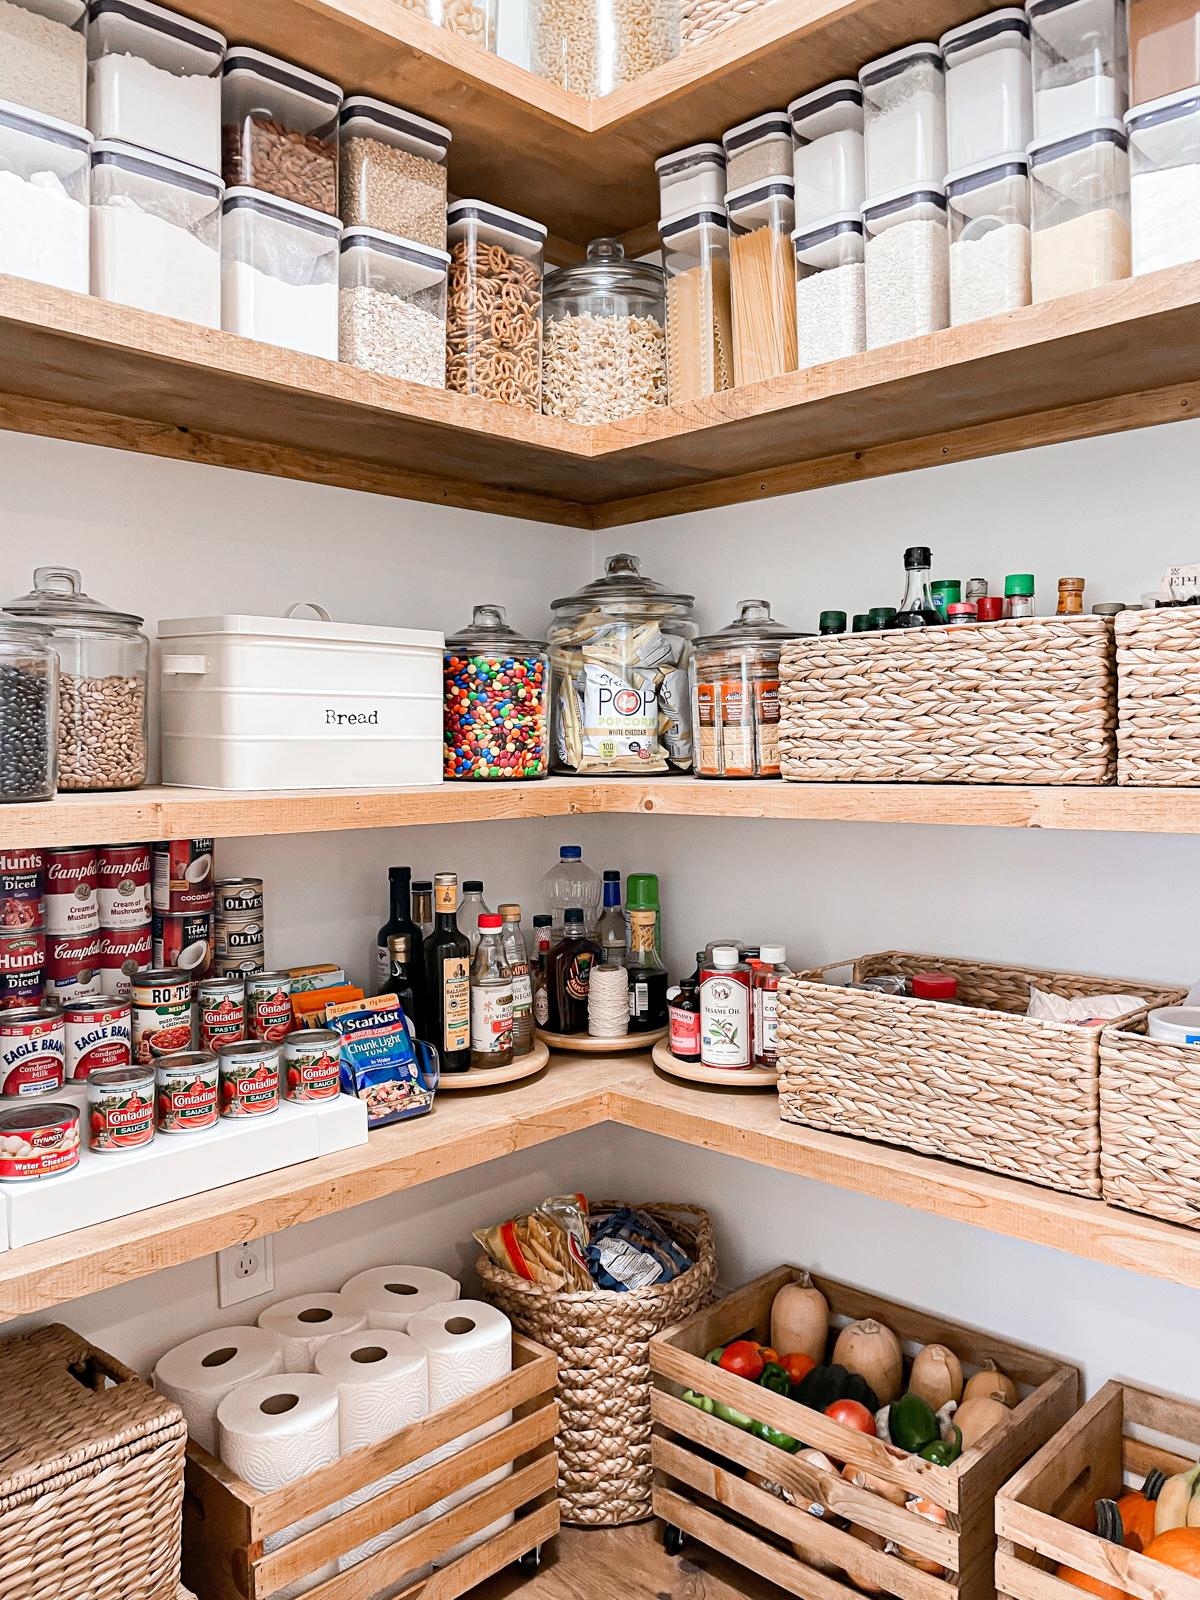
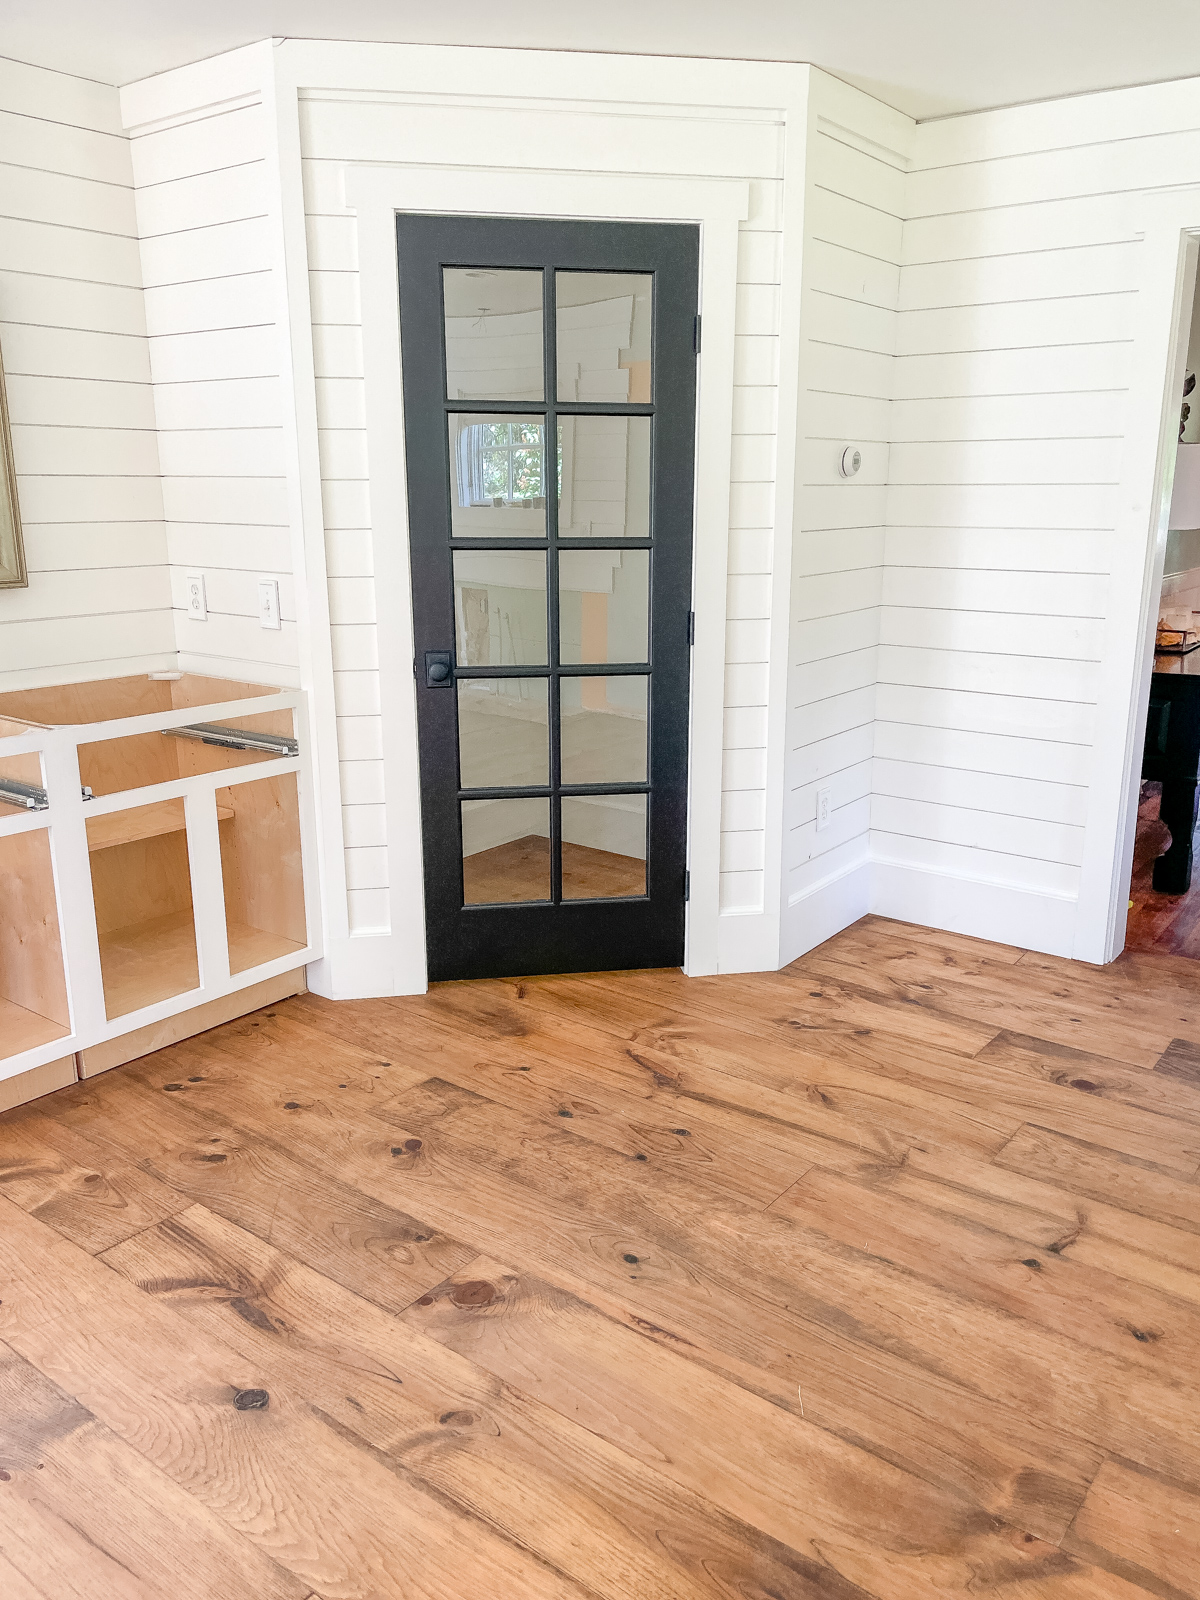
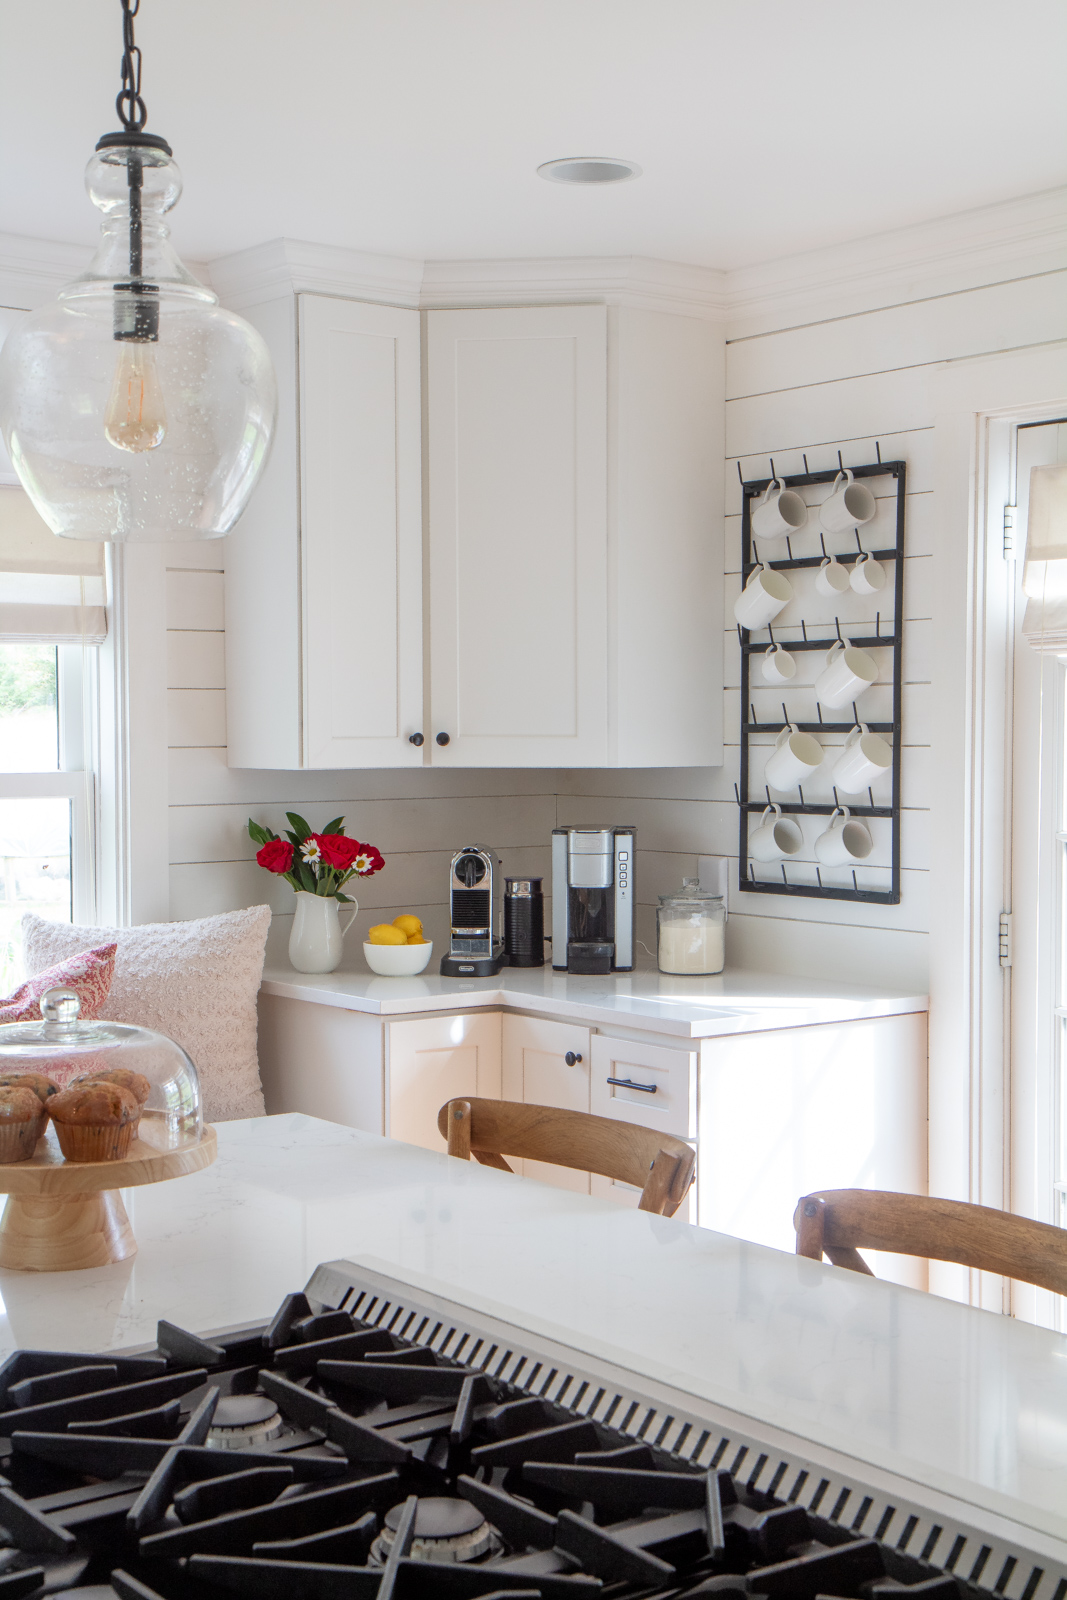
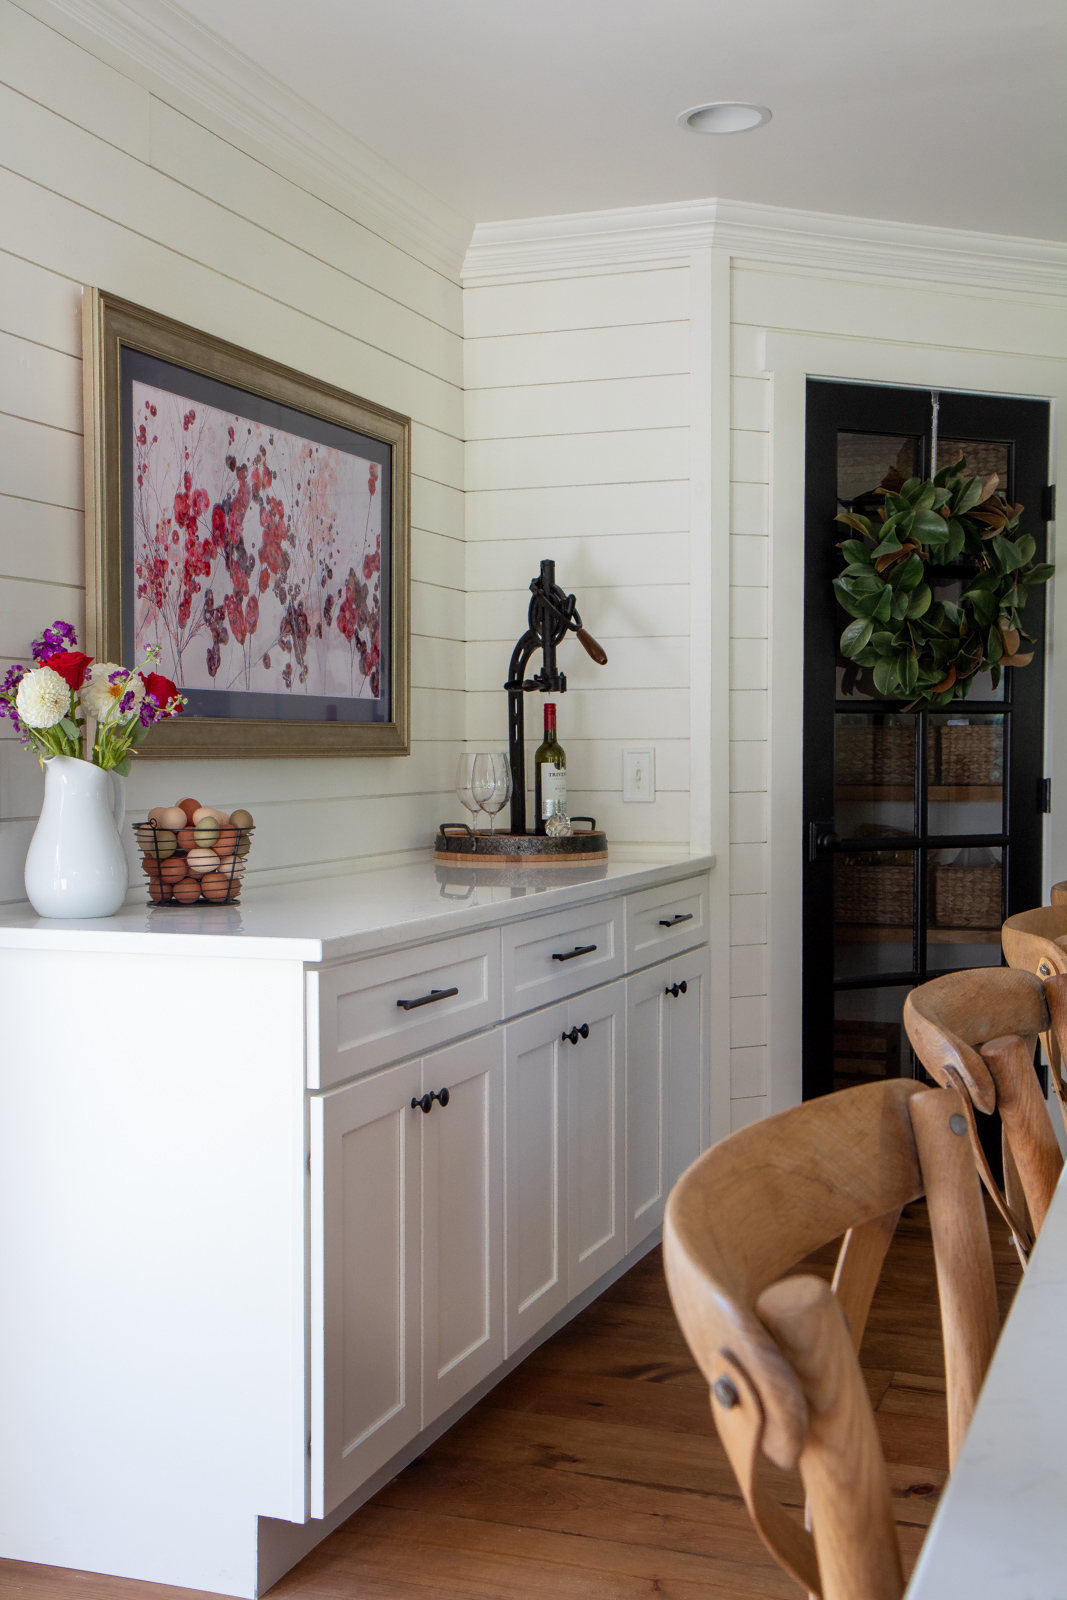
The Home Depot kitchen layout I hated had a series of cabinets as the pantry flat against the wall with floating shelves in the corner.  I didn’t care for it at all, and it looked like a hassle opening multiple cabinet doors looking for ingredients.  I decided a corner pantry was a perfect way to give me the space I fill up that awkward corner.  You can read more about that on my blog post How We Built Our Corner Pantry.  I love the end result, and I love having a glass door having all my foods organized and smiling at me.

8 burner island gas range

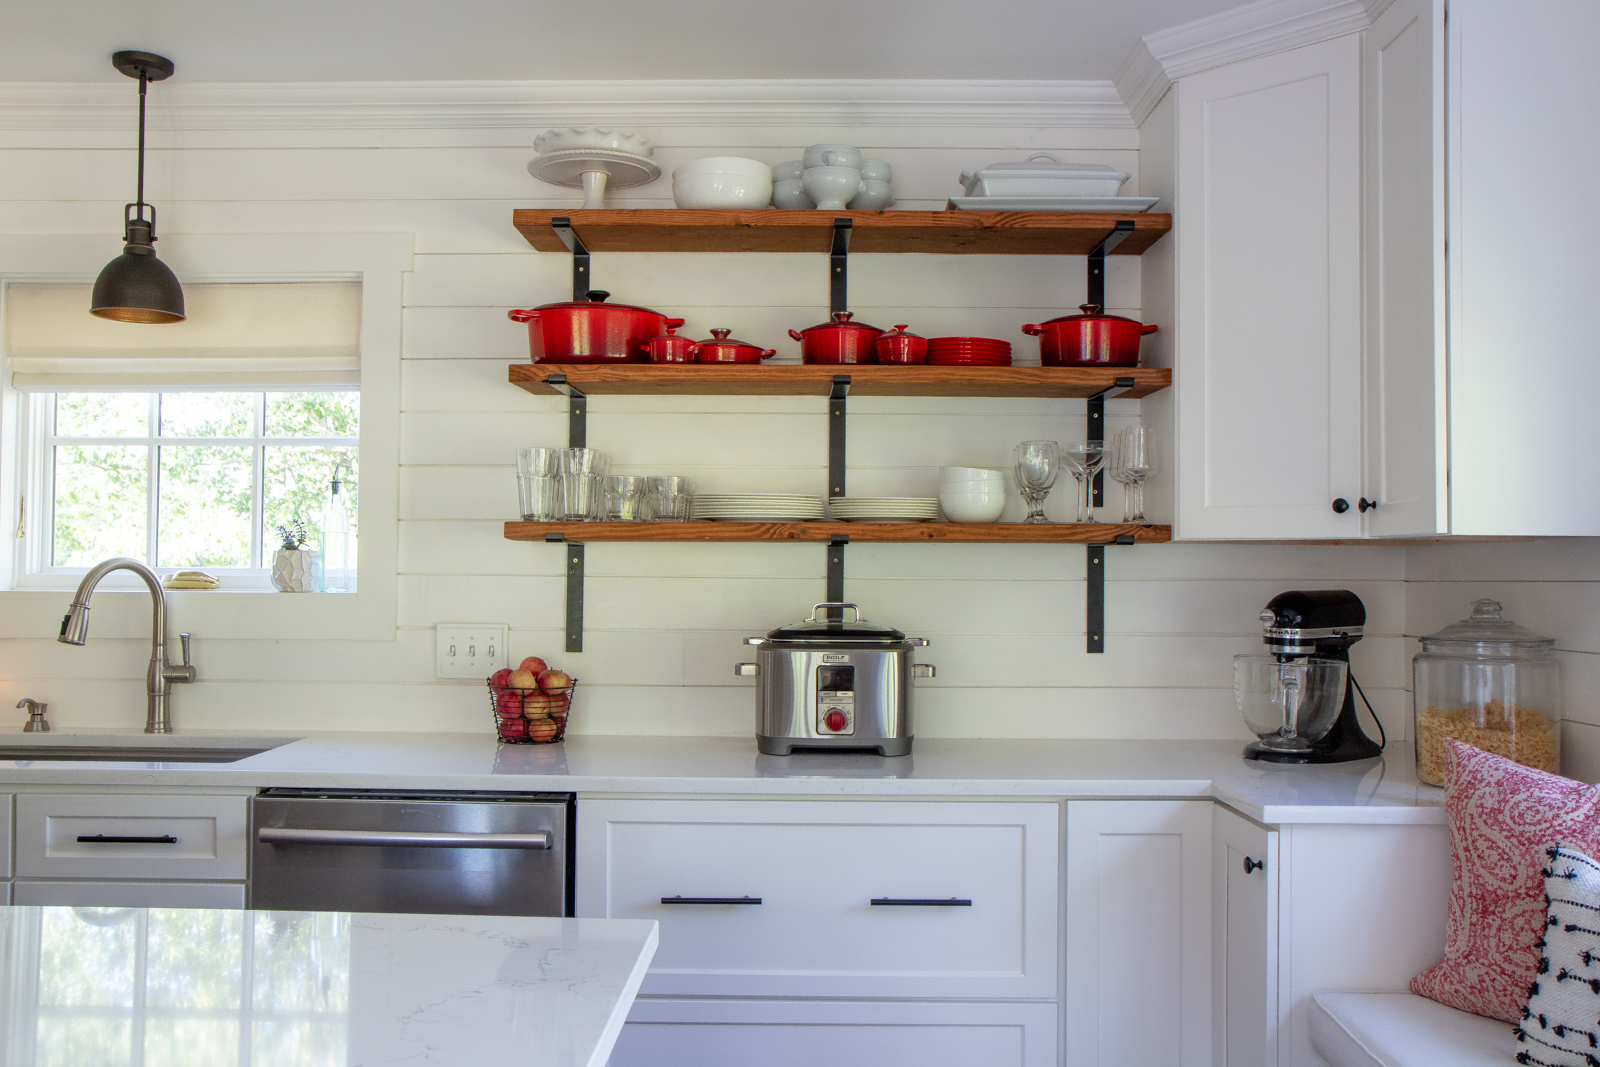
After much debating I decided to add some open shelving and I’m glad I did.  An entire room of open shelving would probably stress me out, but this little area I really like.  I mostly keep everyday essentials on the shelves, so except for the top shelf dust isn’t an issue.  I love unloading the dishwasher and just plopping the dishes right on the shelf.  It’s so easy!

deep kitchen drawers with open shelving

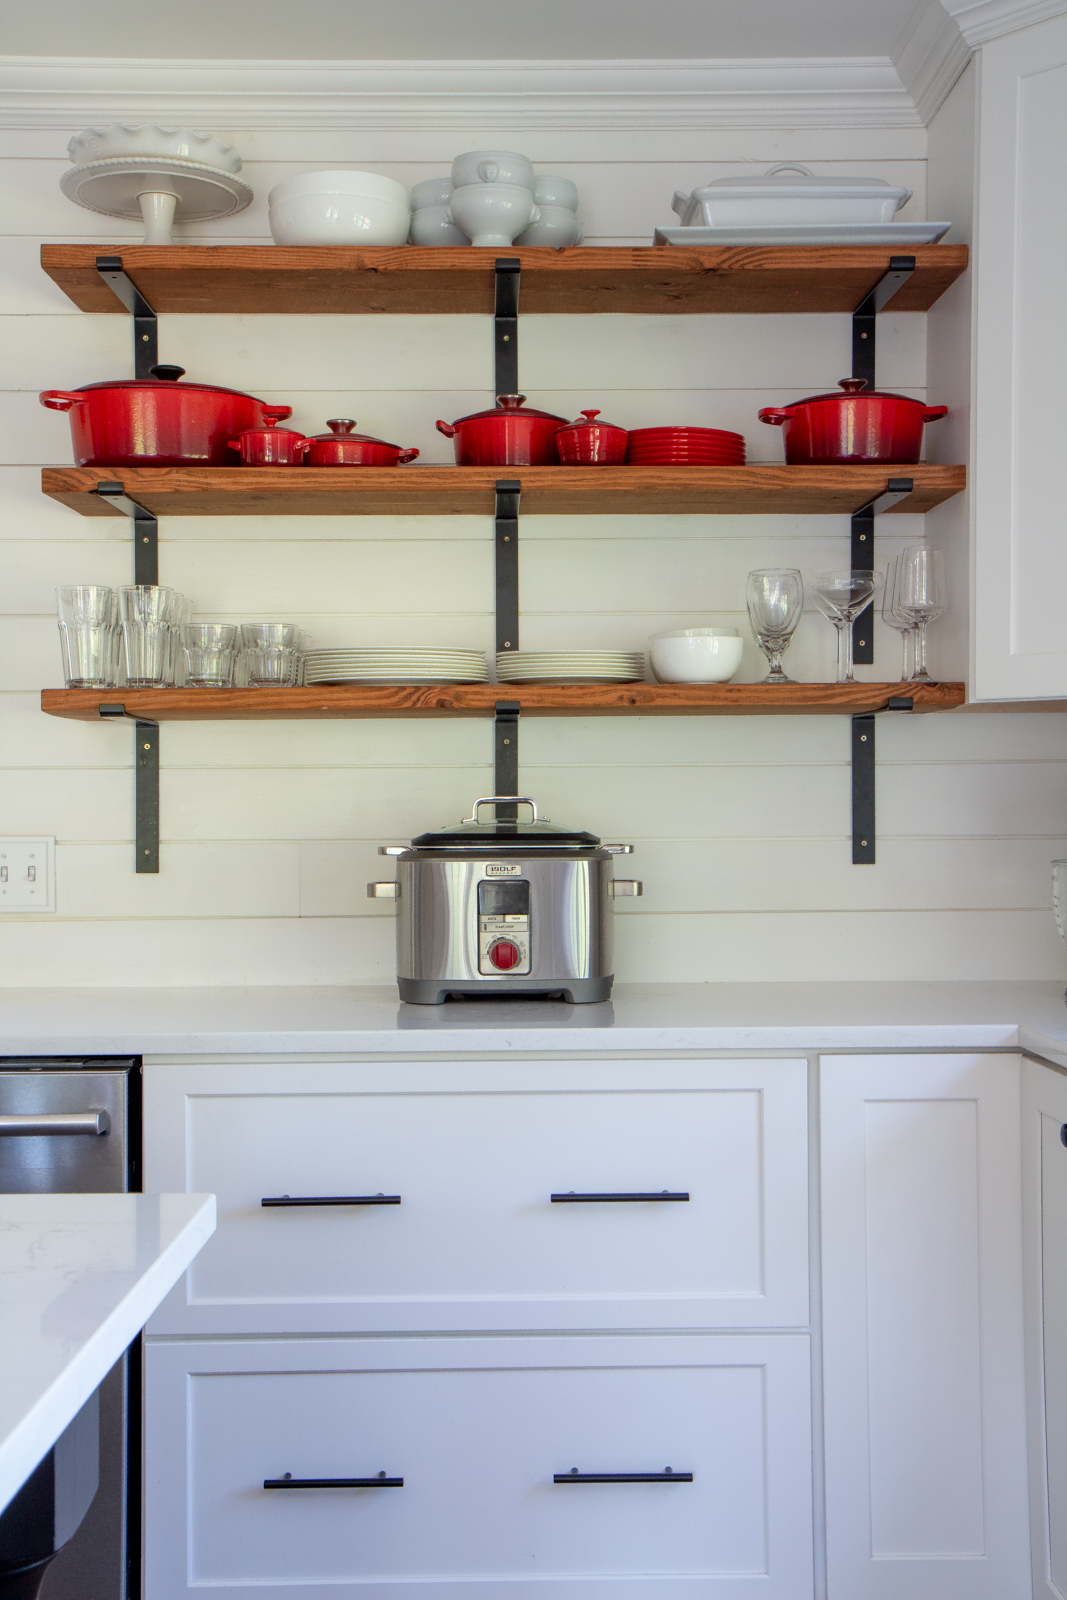
The big drawers hold my cookware and it’s so easy to access everything.  Kitchens need more big drawers I say!

kitchen open shelving

side by side kitchen freezer and refrigerator

We spent all this money raising the ceiling so I didn’t want to have a big range hood hanging down cluttering up the room so we were looking into flush-mount ones.  The problem was we had very little space in the ceiling to vent it.  Then I thought do we even need one?  It was currently summer, the kitchen was unfinished but I’d been cooking on our gas range, baking in the oven, heck I’d even boiled lobsters, and I realized I didn’t miss having a range hood at all.

Maybe it’s the large size of the kitchen, but we haven’t had any issues going without one.  On a rare occasion if something gets smoky I just open the doors or windows.  I love how clean and uncluttered the kitchen looks without without a range hood.  Plus it saved us some money, yay!  I will be posting another blog post soon on all the ways we saved money remodeling our kitchen, when I do I’ll link it here.

Kitchen island with gas range corner pantry

Kitchen window seat with storage

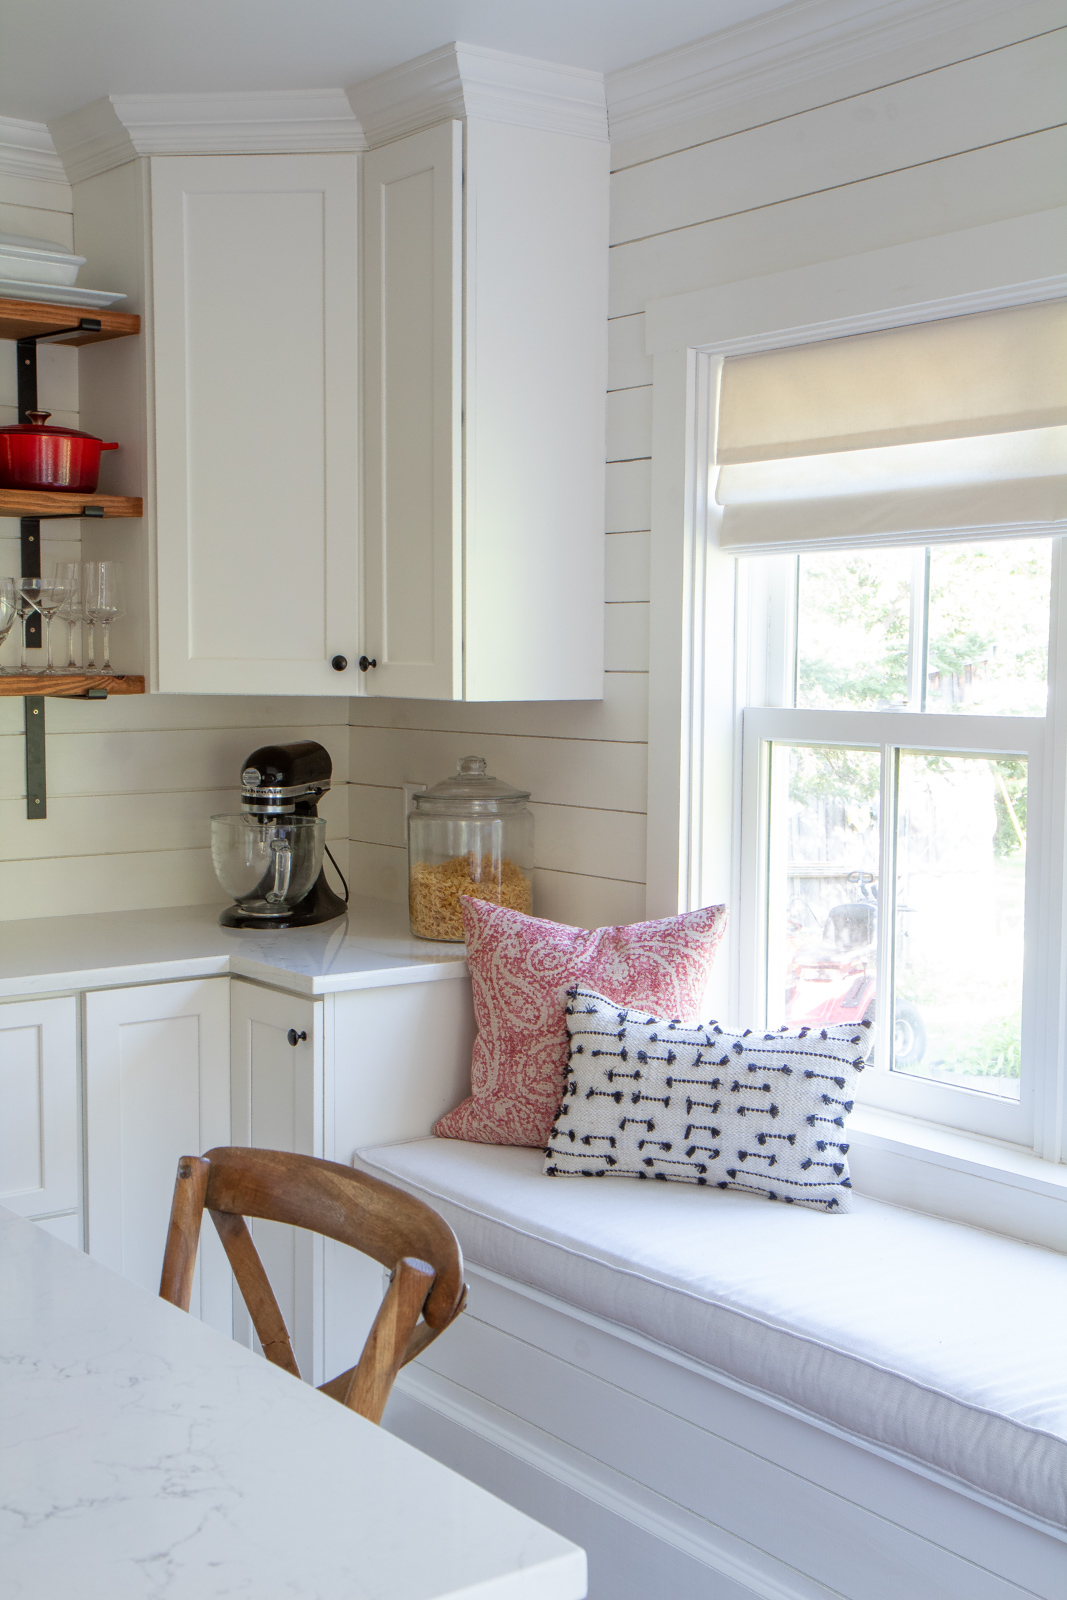
From the very beginning I wanted a window seat under the window and between the two cabinets.  The top opens up for even more additional storage.  I had an extra thick cushion custom made from a person on Etsy.  It’s so comfortable to sit on, and it has a zipper in the back so it’s machine washable.  Score!

You can’t tell from the before photos but originally under the window we had a large heater and it was our only source of heating in the kitchen.  We have a rustic unfinished basement under us so Brian was able to repipe the heating to use toe kick heaters under the island.

Double oven gas range single basin stainless steel kitchen sink
Shiplap kitchen walls with art tv Kitchen glass pendant lights

Ceiling, cabinets, shiplap, and all the trim are painted in Benjamin Moore Simply White.  The island and pantry door is painted in Behr Limousine Leather.

Black shiplap island with gas range

So there you have it, our 18 month long kitchen remodel!  Just looking at these before photos and remembering all the work we did exhausts me!  Find all the source information below.

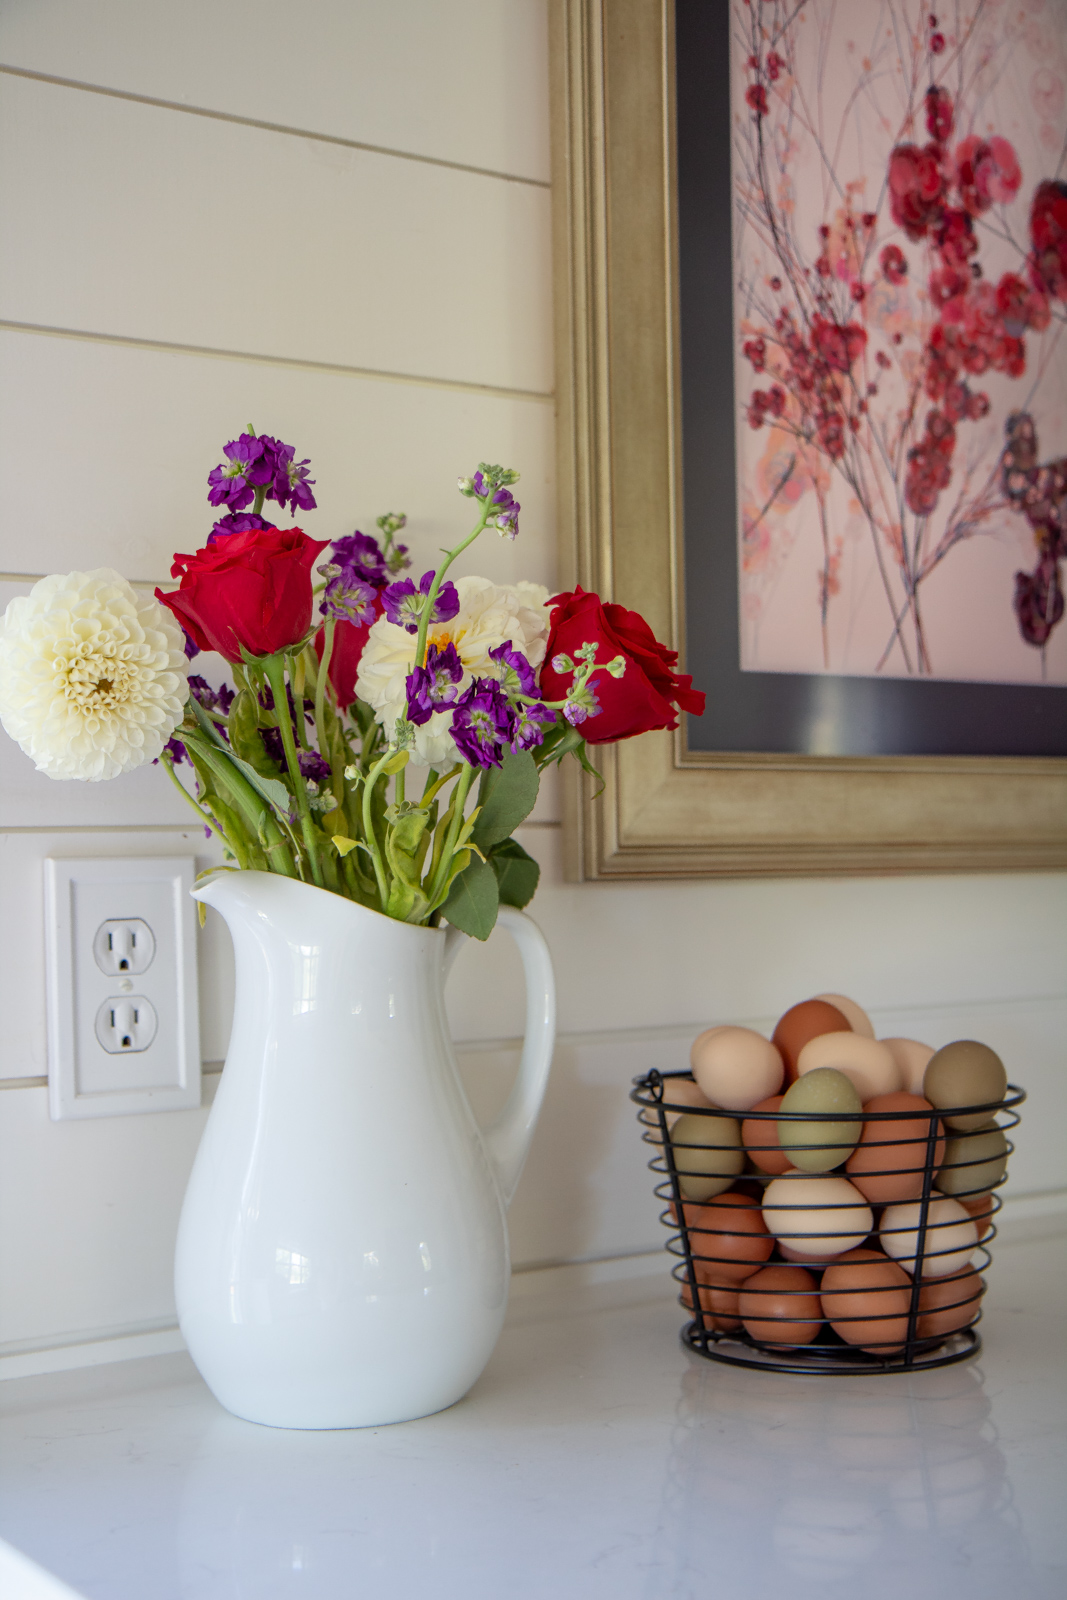
Island Legs | Island Pendant Lights | Sink Pendant Light | Carpet Runner | Knobs | Pulls | Mug Rack | Utensil Holder | Olive Oil Dispenser | Window Seat Cushion – in Sunbrella Bliss Linen | Lumbar Pillow | Bar Stools | Cake Stand | Cake Stand Dome | Shelf Brackets | Kitchen Sink | Faucet | Double Oven Gas Range | Dual Column Freezer & Refrigerator | Dishwasher | Wall Rack Hooks by the Sink | Pantry Door Wreath | Wine Bottle Opener | White Pitcher Vase | Slow Cooker | Frame TV | Pantry Door

Custom Cabinet Company HERE.

Laura

LIFESTYLE

OUR 2023 HOMESTEADING ADVENTURE PART 1

Here I am ready to share our homesteading adventures of 2023.  Wait?  We’re homesteaders now?  Yeah, it all happened so fast and I mean like crazy fast.  Don’t get me wrong, we had always had a small half dried up garden in Texas and talked about having hens for eggs, but it was never right.

In Texas we lived with a small yard with HOA restrictions…craving nature and a simpler life we moved to Colorado.  Living in Colorado we definitely got nature but not the simple life at all -remember all our wind storms, falling trees, power outages, wild fires, evacuations and flooding with our road ripped out?  Not the simple life and having any type of garden or livestock was out of the question because living in the mountains something would eat everything we tried to grow or raise.

After leaving Colorado without a solid plan we just migrated east.  We discussed living in New England and even Maine, we vacationed in Maine the year before and loved it, but I didn’t want to live in Maine at all.  Living in Maine was just too weird.  Well, cut to me now living in Maine and I can’t imagine living anywhere else on the planet.  If living in Maine is weird then I love being weird (this was just my old stupid point of view by the way).

Maine is nothing but pure awesomeness, and living here just makes us want to be better people in every way possible.  Did you know that Maine is the #1 recycling state in the US?  Living here changes you, and it turned us into homesteaders.

It’s our first official year, and like everything we do we go in head first 100 miles an hour.  It’s our thing.

Yellow chicken coop with run

Can’t have eggs without a proper chicken coop, so after researching coop plans to build we finally decided these plans on Etsy would work for our vision.  Then with all the house projects we temporarily forgot about our chicken coop plans.

Brian’s December birthday was coming up, and since men are so hard to shop for I thought what the heck let me buy these coop plans.  After downloading and printing them I bought the windows that fit the coop design.  So for his birthday he opened shed windows and coop plans… it was unexpected and funny!  Sometimes wives need to give their husbands a little nudge to get going.

He was 100% on board though, and from late January to early March he slowly built the coop from scratch, it took so long because we had to work around the winter weather.

We were overwhelmed with what hen varieties to get.  We planned on ordering them online but one day in March my hairstylist said hey Tractor Supply has pullets in stock and that was that.  That evening we were there selecting chicks and googling the different varieties because we had no idea what we were doing.

Long story short, we ended up with 3 Buff Orpingtons, 3 ISA Browns, 2 Pearl Leghorns, and 2 Olive Eggers.  They say to prepare yourself that chicks are fragile and easily die, also that you might end up with a rooster.  Well on Day 2 one of our pearl leghorns died and I was devastated.  Oh… also we ended up with a rooster.

Buff Orphington Rooster Laura with ISA Brown Chicken

Rooster was cute at first but big shocker… he turned out to be an ass.  Honestly he may not be around much longer, he’s mean to the ladies and he won’t ever shut up!  We made sure to purchase our pullets early to have egg production by the end of the summer and we officially have eggs! Brown, cream and green ones.  Now I just need to get a blue laying variety!

Our chickens have been such a joy, even rooster was a joy at first… not so much anymore.  He’s a buff orpington which is dual purpose and his meat is edible.  When he’s yapping all day driving me crazy I start browsing chicken recipes…. don’t be upset.  He’s had a happy life frolicking in the grass and sunshine, eating bugs,  pulling out my hens’ feathers, and waking everyone up at 5 am.

Olive egger eggs, Isa Brown Eggs, Pearl Leghorn eggs

Naturally, after having chickens and building our garden (I’ll get into that later below) we decided that the homesteading life is for us.  We want to live off the land and grow as much of our food as possible organically and respectfully.  We think raising meat is the next step for us.

So after watching YouTube videos on raising your own meat birds (and processing them yourself) we drank a bottle of wine and bought 28 cornish cross chickens online.  I remember Brian looking at me dead serious “We’re really doing this? Let’s push the pay button together.”  We may have woken up in a panic the next morning, but it’s all good now.  Remember head first is how we roll.

Baby cornish cross chick

So did you know you can have baby chicks mailed to you?  It’s so common in Maine where we live that there is a special window at the post office to pick up chicks.  It’s so cute all the chirps you hear behind the desk.  They don’t mess around either.  They call you at 6 am begging you to pick them up ASAP.

Cornish Cross chicks arriving in the mail Cornish Cross in brooder box

All chicks need to stay extremely warm for the first several weeks, so we built a brooder box with a heat lamp.  Many people act like you’re going to burn down your house, barn, land, and maybe even the neighbor’s house using a heat lamp.  For us we’ve followed precautions and it’s been fine, if you’re looking for heating advice please do your own research and do what’s best for you.  We’re not teaching anyone anything at this point, we’re still learning.

DIY Chicken Tractor

Brian then built a chicken tractor for the cornish cross chickens to live in once they were fully feathered.  Cornish cross are meat birds and they put on weight FAST.  They’re ready for processing at about 8 weeks old although some can go longer.  Taking an animals life for nourishment can be a little emotional, you are taking a life after all.  However we feel it’s better than buying factory-farmed meat where animals are living in cruel and unsanitary environments.

Our chicken tractor gets moved to fresh grass 2-3 times per day.  They have fresh feed and water every day and eat fresh grass and bugs each time the tractor is moved.  They experience life the best way possible and feel sunshine and fresh air.  We also give them fruits and vegetables from our garden as treats and let them out for supervised free ranging outside of the tractor when possible.  Raising meat birds is not for everyone but just remember chicken meat from the grocery store was also from a living chicken.  It’s easy to get desensitized about where our food comes from.

We’re planning to do our processing next week, and we have another younger batch in the brooder now.  I’m not exactly looking forward to “harvesting” them, but we’re doing it ourselves and I’ll update you about that in Part 2 of 2023.

Raised garden boxes stained

Now on to the garden!  We went with raised beds for a few reasons.  We think it looks aesthetically pleasing, it’s easier on my poor old back when it comes to planting and weeding, and it helps keep wildlife out (we have no yard fence).  I stained them with dark half, the same all natural food safe stain we used on our DIY coffee table and kitchen floor.

Our plan is to add rocks on the pathways and a picket fence around it for cuteness and to make it even more animal and chicken proof.

This garden photo was taken a few weeks ago and I was too tired to take an updated one.  The garden has grown even more but I’m tired now… we have chickens like everywhere, 68 of them.

Fresh chamomile flowers Dehydrated camomile

I didn’t mean for this blog post to be so long so I’m going to knock this out!  We’re growing chamomile and I’ve been dehydrating it to drink tea for fall and winter.  It smells divine!

Dandelion jam

I’ve honed in on my jam making and water bath canning skills.  This is dandelion jam, it was such a pain to pick all the flowers but it has such a delicate unique flavor that I may talk myself into doing it again next year.

Growing celery Raised bed garden herb box

I started all our seeds indoors, and being our first year it wasn’t cheap at all.  Starting a garden or any homestead isn’t cheap.  Don’t plan on saving money the first few years.  Maybe we’ll break even in year 2 or 3?  Our long-term goal is to eat healthy and save money but you also do it just because you enjoy doing it.

Zucchini, eggplant and jalapeno harvest

Things we’re growing, again everything was started by seed.  I’m hoping year 3 I can have a farm stand. We’ll see.

Butternut squash, zucchini, eggplant, cucumbers, onions, brussles sprouts, lettuce, kale, swiss chard, cabbage, peas, beans, over 70 tomato plants of different varieties, tomatillos, jalapeño peppers, Thai chili peppers, broccoli, bell peppers, potatoes, parsnips, rhubarb, carrots, strawberries, blueberries, celery, and of course all the herb varieties you could ever want.  Not to mention the wild blackberries and raspberries that came with the property.

Baby butternut squash Bell peppers in the garden
Cabbage growing in the garden onions growing in the garden

Lettuce growing in the garden

It’s been an adventure for sure!  We do have fruit trees and are wanting to expand that, and we have started plans for a berry patch.  More on that later…I will update at the end of the summer for sure in Part 2, and you bet we’re going headfirst into 2024 and expanding our homestead with bees!  Possibly raising pigs for meat too.  Remember head first is how we roll.

So far our harvest has had a few hiccups, but it’s overall going wonderful.  Stay tuned for our next homestead update!


Chicken Coop Plans HERE

Chicken Coop paint Color – Hawthorn Yellow & Simply White by Benjamin Moore

Garden Box Stain & Chicken Run Stain HERE

Cornish Cross Poultry Source – Myers Poultry

Chicken Tractor Plans HERE

Laura

DIY

DIY COFFEE TABLE – PLUS LIVING ROOM UPDATE

DIY Coffee table

We’ve been on a major DIY furniture kick lately, first our dining room table, a bench for our entry way, and now our DIY coffee table that I love love love!

When we first moved in I broke one of my big rules when it comes to designing and decorating a room, and that’s go slow.  Designing a room can be very overwhelming, especially when starting from scratch like I was.  So it’s important to go slowly, live with the space, shop around, and get ideas so you don’t make any mistakes.

But did I take my own advice?  No.

When we sold our last house the new owners basically bought all our furniture, down to the mattresses.  When we moved in we had nothing, just a U-Haul truck full of tools, dishes, clothes and other miscellaneous items.  So I got online in a panic and started ordering furniture I liked for various rooms.  That’s how I ended up with this gorgeous Crate and Barrel coffee table.

I’m not sure why I chose this coffee table, we live in a 1900 Colonial Farmhouse in Maine after all.  I loved it at the time, lived with it for about a year, and decided it was a wrong choice for our living room.  I listed it on Craigslist and it instantly sold.  If you are interested in this coffee table it’s a good one, beautiful, heavy, and sturdy.

Lakin Teak Coffee table

Ok, now that I’ve given you the back story, I was browsing Etsy one day when I saw these gorgeous pine coffee table legs and an idea was born.  We successfully built our dining room table, and when I say “we” I mean my husband.  I did sand it and stain it though.  We never took photos so our table building adventure never made it to the blog.

For this DIY coffee table we used the same technique as our dining room table.  Once you have all your tools and materials it can be built in an afternoon -minus sanding and staining.  To stain the coffee table I used Dark Half from The Real Milk Paint Co.  It’s a blend of dark tung oil and citrus solvent that dries to a mat finish and is food safe.  It’s the same stain we used on our kitchen floors and I love it.

Coffee table legs

TOOLS NEEDED

MATERIALS NEEDED

One thing I love our building our own furniture is how we can build it to our needs, and we built this coffee table a little larger than our previous one.  So the first step in building your own coffee table is determining the size.

Our tabletop hangs over the frame about 1-1/4 inches from the legs.  I think it’s a good look but I’d say anywhere from 1-2 inches from the legs.  Any more and it throws the balance off… this happened on our dining room table and “we” rebuilt it.

tools to build your own furniture build your own furniture

DIY coffee table

After determining the size of your table and cutting the 2×4’s to size you’ll use the pocket hole jig tool to drill the pocket holes.  When the table top is ready to go on, attach it with screws at an angle.

making a table top

Now for the tabletop there is some math involved.  We used 2×10 boards and ripped them down to remove the curved edges and create a seamless table top look.  This is optional, you can attach the boards as is, our old dining room table (that we did not build) had the curved edges of the boards.  I prefer the look of cutting the boards but it’s up to you.  If you don’t remove the edges, though, you will be limited on choices of table width because your overall width will have to be an exact multiple of whole boards, get it?

Take the measurements of the tabletop size you want and cut them down to size.  This is the math part.  Our table top is 28×54, working with 2x10x8’s, we cut each board down to 7 inches wide to get the size we wanted.

Then you’ll use the same pocket hole jig tool to make more holes about every 12 inches or so to attach the boards together.  Make holes on both sides of the seams so that you can insert screws in each direction.

Once the coffee table top is one attached piece it’s time to sand.  You can go ahead and attach the top to the base we just found it easier to work with the top separately.

make a DIY coffee table

We like using an orbital sander, it creates a nice smooth surface.  We sanded all the boards that were slightly higher and smoothed the edges off.  I don’t actually remember what sandpaper grit but if you use the same stain we used I have a tip farther down on how to get a baby smooth finish.

Our poor sander has lived a hard life.

Then we attached the coffee table, stained it, and of course forgot to take photos.  2 inch screws were used to join the table top boards and to attach the coffee table top to the frame.  2-1/2 inch screws were used to build the table frame.

I stained the entire table using Dark Half.  I used an old rag to rub it on, and after about 10 minutes I wiped off any excess.  Hours later when the oil stain looked dry I repeated the process one more time.  I was happy with the color, and the wood appeared to not be absorbing anymore oil.

Attaching a coffee table steps

My tip on getting a super baby smooth finish it once the last layer of stain is dry to hand sand with a piece of 320-grit sandpaper.  It gives the wood almost a glass like smoothness that I love.  This is optional.  If you do choose to do this step you may or may not want to apply another light coat of oil stain afterward.

About a week later I rubbed on a very light coat of Dark Half.  So light I didn’t even need to wipe any excess.  That’s all I did, I did not seal the coffee table.  Our kitchen floors were done the same way and are extremely durable.  It dries to a matte finish that is water resistant.  Any scratches or dings can easily be touched up with more oil.

Below you can see the distance of the legs to the edge of the table.  The 2×4’s are about 2 inches in.

DIY coffee table dimensions

I love the results and our grand total was $233.88.  Obviously most of the expense were the legs but so worth it, they’re gorgeous!  We already had the tools and the stain so I didn’t include it in the cost.  Here’s our cost breakdown and for price reference it’s 2023 and we live in Mid-Coast Maine.

Coffee table legs $150

Two 2x4x8’s for the frame at $2.98 each = $5.96

Four 2x10x8’s for the top at $16.98 each = $67.92

etsy coffee table legs

Now on to the living room update, not sure why I’m saying update since I haven’t had this space on the blog before.  It feels like an update to me though.  Honestly this room is always changing because it never feels quite right.  It’s a difficult space to finish because it’s a long rectangular room, it’s where we enter our home so entryway clutter can be an issue.  We also have a back staircase in the corner and need to keep a walkway clear to enter main house.

We did get rid of the orange wood.  The room was so orange in the old coffee table photo!  I painted the trim white, we installed new thick white baseboards to match the rest of the house.  Refinished the floors (same stain as the kitchen and coffee table) and built our brick hearth.

How to build a coffee table

Rug | Roman Shades | Sofa | Pillow | Hall Tree | Baskets

We did find a rug, from Ruggable, it’s washable!  This room definitely needs a washable rug with all the traffic it gets and being right off our gravel driveway.  I haven’t had to wash it yet, it’s going to be a beast because of it’s size!  I have washed other washable rugs before with good results, I just don’t put them in the dryer, I air dry them.

Dark Half tung oil stain on coffee table

Every change this room gets a little more “right” but it’s still not finished.  I’m considering painting this room a warmer color so that may happen soon.  Ok it was while uploading this photo I actually realized my sofa and coffee table aren’t centered.  Old me would have redone this photo, but this is a new me.  I live in Maine now… I collect sea glass and play with my chickens.  I’m a lot more chill.

I’m still trying to get the chair placement and the right corner of the room finished.  It’s a tricky area.

How we built our coffee table

Candle Holders | Lamps | Book | Media Console | Tea Light Holder

Besides painting the room a different shade I’m in the process of sanding and painting the back stairs. We need baseboards along the stairs as you can see from the peek of orange (behind the plant).

flowers on coffee table

Dried preserved hydrangeas

These are my hydrangeas I preserved from last year.  They make me so happy!  Our hydrangea is acting a bit weird this year but hopefully it will get it’s butt in gear and bloom so I can preserve more.

I’m also hoping to do a built-in bench and coat rack in the future for more of a finished look.  One thing I am happy with is our coffee table!  So happy we went the DIY route because it’s exactly what I wanted from the size down to the finish.  Very soon I will have more rooms on the blog.  Our 1 year kitchen in the making is almost complete!

Laura

Maine

THINGS TO DO IN CAPE ELIZABETH, MAINE

I love living in Maine, but if I had one complaint it is that there are way too many cute little towns to visit.  I know that’s a terrible problem to have right?  Located a little over an hour from us and about 15 minutes outside Portland, Cape Elizabeth has definitely become a favorite of ours in the summer.  Last summer we visited there for the first time, and we had such a great time that we went back a few weeks later.  So this year, once the weather warmed up, I started planning our next trip.  We had so much fun that I wanted to repeat the entire day, only this year we squeezed in a few more things, so I thought I’d share some of our favorite things to do in the very beautiful Cape Elizabeth.

Portland Headlight Lighthouse

VISIT CRESCENT BEACH STATE PARK

We love exploring beaches, and we especially love beach walking.  Crescent Beach State Park has a great beach with gentle waves and cute little pebble stones nestled in the sand.  The mile long beach is perfect for strolling, and there is also lots of soft fluffy sand for kids to play in making it a perfect beach for everyone.  Kettle Cove State Park is adjacent and offers a trail with beautiful view around the cove.

Crescent Beach State Park

GO STRAWBERRY PICKING AT MAXWELL’S FARM (JUNE-JULY ONLY)

I must go strawberry picking every summer, and Maxwell’s Farm is a favorite of ours in Cape Elizabeth.  If you’ve never picked your own strawberries you’re in for a big treat.  It’s such an enjoyable way to connect with nature, plus it’s fun to find those quirky looking strawberries… trust me you’ll find some crazy ones!  The biggest reason for me, though, is that farm fresh strawberries just taste better!

After stuffing our bellies full of fresh strawberries we like to go home and make Strawberry Shortcake Poke Cake, Strawberry Infused Vodka, and strawberry jam.  Yeah, we usually pick a TON of berries here.

It is seasonal from June-July depending on the weather.  Before planning a trip be sure to check out their website (maxwellsfarm.com) for picking updates.

Strawberry picking in Cape Elizabeth Maine Maxwells Farm in Cape Elizabeth

VISIT TWO LIGHTS STATE PARK

Two Lights State Park has breathtaking gorgeous views of Maine’s rocky coastline.  Here you can walk along the trails, relax on the benches, soak up the gorgeous views of the Atlantic, and watch the ships sail by.  You can also check out the old military bunker from World War 2 and read up on some cool info.

Just to be clear you can’t see the lighthouses from this state park.  I read some online reviews where people payed to enter the park and were disappointed.   If you want to know where you can easily see the two lighthouses for free keep reading.  Also I want to mention if you pay to enter a state park consider just buying a yearly pass.  If you’re going to visit more than one state park, or live by any other state parks it’s definitely worth it.  We renew our pass every year.

I definitely recommend visiting Two Lights State Park, they have lots of spread out picnic tables, grills, a playground, and have I mentioned the incredibly gorgeous views?

Two lights state park military fort

Two Lights State Park in Cape Elizabeth Maine

EAT AT THE LOBSTER SHACK AT TWO LIGHTS

Just a short drive down the road from Two Lights State Park is the Lobster Shack at Two Lights.  If you’re visiting during bad weather they have indoor dining but outside is where it’s at.  Outside they have picnic tables where you can dine and soak up the gorgeous ocean views.  One thing I want to mention is the Lobster Shack gets busy in the summer, especially on the weekends.

Pro tip: it says they open at 12:00 every day in the summer but they almost always open early.  Like clockwork we arrived at 11:15 and sure enough boom right at 11:30 they opened the doors to order.  We were told by staff that they always open early and after 3 visits I can confirm that’s true.

So if you’re interested in lunch definitely arrive early if you can.  You’ll get the best table with views and avoid a long line to order.

Lobster Shack in Cape Elizabeth Maine Outdoor dining at the Lobster Shack

Unfortunately the day we visited and took photos it was overcast with a bit of fog.  That’s Maine weather for ya.  Definitely unpredictable but regardless it’s always a beautiful view.  At low tide you can walk down the rocks which is fun too.

Um, awkward moment… I don’t recommend the lobster roll here, especially if it’s your first time having a lobster roll ever.  We have two styles of lobster roll here…the hot and buttered style and the cold mayo style, I prefer hot but I can eat a mayo one if it’s done well.  I found the lobster roll here skimpy on meat and even worse came with a plop of mayo on top that I guess I was supposed to mix in myself??  That’s a big no for me.

On the other hand, I do definitely recommend the fish and chips and fried clams.  They also have a ton of other seafood options, non seafood options, and the classic lobster dinner, which you can’t screw up.  I also wanted to mention you aren’t allowed to bring in outside food or drinks but it is BYOB so you can bring your own wine or beer.

Fish and chips and fried clams at the Lobster Shack

Besides the gorgeous views of the Atlantic you’ll see a wonderful view of the Two Lights Lighthouse.  How about that and it was free!  Want more lighthouse views?  Keep reading, I’ve got you.

Two lights Lighthouse from the Lobster Shack

VISIT FORT WILLIAMS PARK

If you do anything in Cape Elizabeth you must visit Fort Williams Park, ok?  Here you’ll get up and close to Maine’s first lighthouse, Portland Head Light.

Best of all it’s free, or ALMOST free.  You do pay for parking.  Parking for 2 hours was $5.  You can enjoy this park in 2 hours unless you want to picnic or have kids that want to play at the beach or playground, otherwise you might pay $10 or $15 but it’s totally worth it I promise!  If you can find a way to avoid parking it is a terrific free activity though.

Portland Headlight in Cape Elizabeth

There are several parking lots to park at and we chose the one by the old mansion.  This parking lot is right by the playground and beach.  By the way if you enjoy the beach, like most in Maine, you want to go at low tide or there won’t be much sand.  Mid tide is probably okay too, just avoid high tide or it will be all rocks.  You can find a tide schedule here: NOAA Tide Forecast.

Fort Williams Park beach The cliff walk inside Fort Williams Park

The cliff walk is accessible from several spots in the park and such a treat to walk.  It’s such a gorgeous walk, from the very beginning you’ll be stopping every few minutes to take photos, and the closer you get to the lighthouse the views just keep getting better!  Along the way to the Portland Head Light you’ll see Ram Island Ledge Lighthouse across the bay.  It wasn’t a very clear day but you could still see it well.

There is also a lighthouse tour that leaves from Portland so you can see several lighthouses in the area from the water.  You can easily see Ram Island Ledge Lighthouse from the beach and cliff trail though.

Ram Island Ledge Light

Portland Headlight in Fort Williams Park

Portland Headlight in Maine

This lighthouse does not disappoint!  It definitely makes my list of the top lighthouses in Maine.  If you’re in the Portland or Cape Elizabeth area it’s a must see!

Portland Headlight up close

Another fun thing about this park is the food trucks!  You can easily picnic in some of the many spots or you can grab some delicious lobster right in the park.  Cousins Maine Lobster is located near the lighthouse, along with a gelato food truck.  Up the hill a bit you’ll find more delicious food options at Bite into Maine.

Cousins Maine Lobster food truck Cousins Maine Lobster food menu

Besides ocean and lighthouse views, you’ll find many old structures to check out like the Goddard Mansion that was completed in 1858 by a local Portland architect.

Goddard Mansion in Fort Williams Park

Ocean views in Fort Williams Park

Cape Elizabeth is such a beautiful and enjoyable place to visit.  You can easily spend a full day, or more exploring the area.  If you’re staying in Portland it’s just a short drive, and if you’re wanting to stay in Cape Elizabeth, Inn By the Sea is the perfect place to stay!  Each time we visit Cape Elizabeth we find more and more of its beauty and charm!

Laura

Cocktails & Drinks

HOW TO MAKE STRAWBERRY INFUSED VODKA

How to Make Strawberry Infused Vodka

I’m so excited to share with you how to make strawberry infused vodka.  Not only is it super delicious but it’s also so easy to make!  It all started last summer when we went to a strawberry picking farm for the first time.  Berry picking was a first for us, and we had so much fun that we picked for hours and came home with a ton of strawberries.

Once we came home I sort of went into panic mode.  I mean what was I going to do with all these strawberries?  We ate some fresh and I started portioning them out for jams and other recipes, and then I remembered an infusion recipe book I bought years ago.  It didn’t have a strawberry infused vodka recipe but after reading through the book I knew it would be pretty easy to come up with a version of my own, and it was definitely a success.

Once again it’s strawberry season in Maine and as soon as we came home with all our berries Brian asked if I was going to make my strawberry vodka again.  You bet I was going to make it again, and this time I decided I needed to share it with you.  It makes a perfect cocktail on a hot summer day.

Strawberry infused vodka

SUPPLIES NEEDED


Knife

Cutting board

Jar with a lid

Funnel

Fine mesh strainer

Bottle, carafe, or other clean jar

The best strawberry vodka recipe Strawberry Vodka cocktail

We start with sliced strawberries and two tablespoons of sugar.  I’m not a fan of super sweet cocktails but in this case I find adding sugar really brings out the strawberry flavor.  If you’re drinking the strawberry vodka over ice then yes it will probably taste pretty sweet, but I like to dilute mine with soda water so it’s really just a hint of sweetness.

You can definitely reduce the sugar or leave it out all together but I’d recommend making it with the full amount the first time to see what you like.

After adding the sugar, you add the vodka, pop the lid on, and give it a good swirl to mix.  Now comes the hard part.  The waiting to drink it part.

Strawberry drink recipes

I leave mine on the counter (giving it a good daily swirl) for about 3-5 days.  The first day the strawberries will be bright red in the mixture and as they infuse they will slowly lose color.  I find 4 days to be the perfect amount of time to infuse, just make sure all the strawberries are pale in color before you strain them out.  If you feel more comfortable infusing this mixture in the refrigerator you can, it just may take longer.

Once the mixture is ready, give it a strain through a fine mesh strainer into a jar or bottle (this is the one I’m using) and refrigerate.

I also wanted to note that I doubled my recipe so if you use the same bottle as me if won’t be quite as full.

How to make strawberry vodka

Look at that gorgeous red color all from the strawberries!

My favorite way to serve this strawberry vodka is mixed with sparkling water and lime juice.  It’s the perfect combination of sweet with a hint of tartness, and the citrus really enhances the flavor of the strawberries.  Once my basil plant grows a little bit more I think I’ll muddle the leaves and do a strawberry basil cocktail with sparkling water.

Really the sky’s the limit with this delicious vodka.  If you come up with any creative cocktails of your own let me know in the comments.  Cheers!

Strawberry Infused Vodka

Ingredients

  • 750 mL Vodka
  • 1 pint Strawberries (see notes below)
  • 2 tbsp sugar

Instructions

  • Wash strawberries, trim tops, and thickly slice.
  • Add the strawberries to a jar large enough to hold the berries and vodka.
  • Add sugar and vodka to the jar. Add the lid, shake, and swirl to combine and dissolve the sugar.
  • Store the mixture on the counter out of sunlight and swirl the mixture every day for 3-5 days or until all the strawberries are pale and no longer red.
  • Strain the vodka mixture through a fine mesh strainer into another clean jar or bottle using a funnel if needed. Discard the strawberries.
  • Store in the refrigerator.

Notes

One pint of strawberries is about 16 ounces, which is roughly 12 large strawberries or 24 smaller ones.  Don't worry too much about the exact measurements a little more or a little less works just fine in this recipe.  
The strawberries can be thickly sliced or quartered, depending on preference and size, both methods work just fine.

SUMMER KITCHEN FAVORITES


Laura

TRAVEL

OUR FIRST TRIP TO QUEBEC CITY

Our first trip to Quebec City

Hi friends!  It’s been a while since I’ve updated… things have been crazy busy for us but I’m back and ready to get my blog going again.  So I thought I would update you on our trip last week to Quebec City!

Unfortunately we didn’t get to stay very long, we have close to 40 young chickens plus a lot of newly planted plants in the garden so I felt a little nervous spending more than 1 night away.  Luckily we live just under 5 hours from Quebec City so I’m certain we’ll be visiting a lot more!

We drove up early Saturday and returned home late Sunday, and since our trip was a short one we made sure to relax and not stress out if we didn’t get to see and do everything.  After all, we’ll be back, and from what I hear every season is amazing in Quebec City.  I’m especially excited to visit during Christmas!

Summer flowers in Quebec City The streets of Quebec City

The city truly has that charming European city feel to it which was especially appreciated since we didn’t need to travel overseas.  There were so many beautiful buildings, churches, fountains, and cobblestone streets, and the window boxes were spectacular!

Church in upper Quebec City

Dining on the patio at Chic Shack in Quebec City

Our first evening in Quebec City we had dinner at Chic Shack, which is known for it’s burgers and poutine.  We dined on the patio with a perfect view of the Le Chateau Frontenac.

Our dinner was certainly delicious and a good value for the food we had, I’m not sure I’m a fan of poutine though.  Poutine is a dish popular in the Quebec region that consists of french fries or diced potatoes with cheese curds and gravy.  There were many different varieties available at Chic Shack, one being a spicy version with curry.

I’m not sure if it was the texture of the curds (they were squeaky) or just having a heavy dish on such a warm day but I’m willing to try it again in the future.

Chic Shack Classic Poutine Chic Shack poutine with curry

We stayed at the Le Manor d’Auteuil and we loved it!  It was very charming, spacious, and had a strong A/C game.  Yeah, Quebec City in June can be quite warm and humid so air conditioning is essential.  The old historic part of Quebec City is divided into an upper and lower portion.  Our hotel was on the upper part of the city, and not knowing much about the city we found it to be in a great location.

The entire Old Quebec area is very walkable, just park your car at the beginning of your stay and you can pretty much walk the area by foot.  We did a ton of walking but we were so fascinated by the city we didn’t even notice.

Upper Quebec City after a rain

Place d'Armes in Quebec City

The Place d’Armes fountain next to the Le Chateau Frontenac in the upper portion of the city was beautiful.  It’s surrounded by many restaurants, including the Chic Shack, and it overlooks the lower portion of Old Town.

One thing I want to stress is that Quebec City is a popular destination and people are usually everywhere.  Living in Maine we’ve turned into those early bird East Coast risers.  We took many of our photos between 7-10 am so just know that midday and evening gets crowded.  Just be prepared for that.

The next morning we had an early breakfast at Cafe La Maison Smith. Taking many flights of stairs down it was in the lower portion of the city and we enjoyed every second of that walk.  It was absolutely gorgeous!

The food at Cafe La Maison Smith looked incredible and it was hard to decide on just one thing, so we grabbed several items and agreed to share them.  We shared the quiche, croque monsieur, a chocolate pistachio cream filled donut, and 2 pistachio macarons.  I love anything pistachio!  We didn’t have coffee because our hotel had free and very delicious coffee, but I’ve heard they have a seriously amazing pistachio latte here so that’s definitely on my list to try next time.

We enjoyed every bite of our breakfast, it was a big highlight of our trip and the cost was $30 Canadian dollars, which is very reasonable for the items we got in such a tourist spot.  There is indoor seating and outdoor seating that overlooks the gorgeous Royal Place courtyard.

After much more walking and sight seeing we ended up at a sweet shop I was especially looking forward to, La Petite Cabana a sucre de Quebec.  Here you can try maple syrup that’s been poured over crushed ice, frozen, and rolled up into a delicious goopy maple syrup lollipop that the locals call maple taffy.  It was so delicious, my only disappointment was not eating more than one.  If you love maple syrup be sure to add this to your list!

After our taffy snack we decided to walk back up all the many flights of stairs and blocks to our car and drive around to do some exploring.  Our second day, the Canadian wildfires were bringing in some smoke around the town, it wasn’t too bad in old town but once we ventured out on the freeway it was a little worse.  I love a good waterfall and was excited to see Montmornecy Falls that are just outside Quebec City.  You can actually see the falls right off the freeway, but to actually view the falls up close (upper or lower) you pay a fee, and since the skies were so smoky I didn’t want that to be my first experience.  I want to be wowed by the beauty of the falls and the river.  So I’m saving that experience for a future trip, what I did see was very pretty, though.

After our smoky waterfall excursion we parked back at our hotel parking lot and casually walked through town making it down to the lower area of Old Town again.  Can I just say, when we’re on vacation we love to eat?  I mean is that wrong?  We’re in this amazing new country and we want to sample everything!  We ended up at Lapin Saute, which means the sautéed rabbit.

We’ve never eaten rabbit (when the kids were little we raised rabbits, the cute fluffy kind not the edible kind) but I was feeling brave and made Brian come along with me for the ride.  We sampled a Quebec sampler appetizer for sharing that included rabbit among other samplings.  Rabbit meat is very delicious tasting, but I can’t say I want to eat it a lot of it because I think of them as pets.  I’m sure I could eat it again in the future though.

Stairs, just so many stairs in Quebec City.  When you just can’t do it anymore you can ride the Funiculare du Vieux-Quebec.  It’s a ride that’s just a few short minutes, but when you just can’t do the stairs anymore it’s worth it.  I recommend walking down the stairs and taking the Funiculare up, but that’s up to you.  It’s cash only, and the carts aren’t private.  At least ours wasn’t, we had several other people with us on our way up.  Our legs were fried so this trip up was worth the $10 Canadian dollars for us.

So that was our short little trip to Quebec City, and soon we will have many more to share.  We enjoyed popping into many shops and enjoyed the local food, but there is so much more for us to see and do in the future, and we’re excited to share those trips with you too!

Have you ever visited Quebec City yourself?  If so let me know in the comments what the favorite part of your trip was!

Laura

Maine Home

CORNER PANTRY REVEAL

shiplap corner pantry

I’m so excited to share our new pantry and how we organized it with you!  First of all, let me say I feel guilty I haven’t been updating my blog enough, blogger guilt is a very real thing… sigh.  Long story short, I’ve been overwhelmed, happy, and up to my eyeballs in home projects.  I’m a virgo and I honestly think that explains everything… so I’ll just move along.

This is our 7th house that we’ve purchased and I’ve never had a pantry I was happy with.  Our last pantry in Colorado was a happy upgrade for me because we were able to build and design it from scratch, but because our kitchen was so small I was forced to put the microwave in the pantry and it was still lacking in space.  I think the microwave in the pantry was a great idea for our miniature sized kitchen but I had to sacrifice storage.  So when it came to building this pantry I was determined to get it right.  The new kitchen in Maine had a ton of space, it had so many possibilities which made it even more overwhelming for me.  When you’re designing a kitchen from scratch, especially a large kitchen, deciding on the pantry size is very scary!

Let’s start with the original pantry.  It was absurdly huge, big enough to fit a freezer inside, and it made the shape and feel of the kitchen extremely awkward.

Here’s where things got a bit crazy in the remodel.  We had to raise our ceiling to remodel the pantry, or maybe I should say for my kitchen vision.  It appears the previous owners built out the giant pantry because a large section of the ceiling was lower than the rest.

The kitchen ceiling drops down because the above room has a step down (into the kitchen ceiling) because the roof wasn’t built at full height.  So basically the dropped ceiling was so you wouldn’t hit your head walking in the upstairs hallway.  I don’t know about you but stuff like this drives my insane… remember I’m a virgo.  So like a bunch of nuts we hire professionals to raise our ceiling and cut our roof open and rebuild it in Maine during one coldest months of the year!

What can I say, we’re risk takers.  Luckily we didn’t have any snow or rain while the roof was exposed but we did have a pipe freeze.  No worries, my husband loves fixing pipes, they’re his toys.

Drumroll please….. I got my nice, flush, even ceiling that I so desperately craved!  Once the ceiling was raised we spent a good while determining the size.  I decided a corner pantry was the way to go.  The pantry space we decided on was large enough to walk in and to have plenty of storage but not awkwardly large like the last pantry.

DIY corner pantry

FYI our full kitchen remodel is slowly coming to an end.  We’re just finalizing the island, pendant lights, and countertop and then we’ll have a full kitchen reveal up.  During this time we also installed and stained our pine hardwood floors that you can read about HERE.

Pantry with black glass door

Our future island will be black so I decided on a black door, and I wanted a glass door so I could always see my food and be disciplined to keep my pantry organized.  We stained our floors with dark tung oil and I decided to do the same with our pantry shelves.

Pantry organization

My overall goal was to have a clean pantry design that was easy to access, be functional, and be visually pleasing.  We mostly eat from scratch, and I love to cook so I wanted all my ingredients conveniently displayed in front of me.  We’re also tall people and have no problem accessing the shelves.  It might not be a design that works for everyone but it works well for us.

shiplap corner pantry black door

I love using the Pop storage containers from The Container Store.  They keep ingredients fresh for a very long time and stack well.  For items that don’t need to stay airtight I used glass canisters, the round shape works well in the corner pantry.  Love my baskets too, they hide the ugly back stock and mismatched things.

Pantry with stained shelves

When it comes to bottle storage such as oils and vinegars, lazy susans are the way to go, it’s so easy to find everything!

For storage on the bottom I purchased unfinished crates from Home depot, stained them in food safe dark tung oil and my hubby added casters.  It’s so handy having them on wheels, I just pull them out with my foot, grab what I need and slide them back in.

Corner pantry organization


Pantry storage with crates and baskets

We love our new pantry!  Everything was perfectly organized and it made my Thanksgiving cooking much easier!  I’ve linked my favorite pantry products below for purchase.  Thanks for reading!  Can’t wait to update more home stuff soon.

SHOP THE BLOG

Bread Box | Round Glass Containers | Pop Storage Containers | Floor Baskets with Lid | Wood Crates | Round Floor Basket | Tiered Can Organizer | Packet Holder | Lazy Susan | Shelf Baskets | Dark Tung Oil

Laura

DIY

OUR DIY BRICK HEARTH WITH GERMAN SCHMEAR

Fall stove fireplace hearth

I’m so excited to share our DIY brick hearth we just built in our den along with a bit of our fall decor!  Recently we decided to refinish the hardwood floors, and after that I thought it was time to finally get going on our brick hearth.  It was a project we talked about for a good 6 months and I decided enough was enough, we were getting it done in time for the holidays!

In our den I really wanted a gas fireplace stove but that meant adding an ugly vent to the front of the house.  I thought about it, but in the end I just couldn’t do it, so we went with an electric fireplace.  Because of strict fireplace codes in Maine our only alternatives have been electric ones.  I plan on eventually doing a blog review on them but overall we’ve been really happy with them.

The only issue is how sad and lost our electric fireplace stove looked in the corner, and wouldn’t you know it I forgot to take a before photo.  I did manage to find a photo from when I was painting the door, so you can get an idea of our electric fireplace stove in its sad little corner.

den before photo with electric fireplace

How to build a brick hearth

We started by removing the baseboards and installing dura rock on the floor and walls.  The hardest part was trying to figure out the footprint and size, but we taped it off a few times and eventually got it right.  I’ve always loved German Schmear, and knew I wanted to try it on our brick hearth so I wasn’t too concerned with what kind of brick we used.  We used the cheapest we could find at Lowe’s.  We played around with the brick pattern a bit, Brian watched a few how-to brick videos on Youtube and then he was off.

We should have done a better job taping off the plastic drop cloth but we managed to get any excess mortar off the floor in the end.

DIY brick hearth

Bricking the hearth was definitely messy and it took longer than expected.  One thing we didn’t do was wipe the excess mortar off enough before it dried.  Once it dries you can try scraping it off some but it’s pretty much stuck on.  I really wasn’t worried about this because of the German Schmear.  If we ever brick something in the future we’ll get it 100% clean!

DIY Corner brick fireplace hearth

Brick fireplace faux finish

Brian thought it looked good as it was, it obviously had that bit of faux finish look I was after, but it was uneven and I wanted my schmear!

How to mix mortar

For the German Schmear I used white thinset mortar, a bucket, water, and a mixing arm attached to the drill.  You can mix the mortar by hand but it will take you a while, and the mixing arm was pretty cheap.  I mixed my mortar to about a peanut butter consistency and then added it to a mortar bag.  A mortar bag looks like a giant frosting bag and it was really helpful for applying the mortar in between the grooves of the brick.

How to do German schmear

I watched a lot of German Schmear videos on Youtube, and many of them had different methods for applying it.  Some looked like paint which wasn’t the look I was after.  I wanted more texture.  I started in the back corner of the brick and wasn’t happy with the look at all, that was when I was using a paint brush and wet sponge.

Then a found a metal scraper, experimented (again in spot that would be hidden) and finally found my technique.  If you’re doing this project you’ll definitely want to play around and find the exact look you like.

Here’s exactly what I did.  Using the mortar bag I filled in around the brick.  Then using a metal scrapper I pushed the mortar up and down to force it into the grooves between the brick.  Then I took the scraper and scrapped across and had a bucket nearby to offload the excess mortar.  I touched up a few bricks here and there using the same motions if they looked like they needed more white, and if it was too white I used an old dry rag to dab it off.  I found the wet sponge smeared the mortar around creating a hazy look which didn’t appeal to me.

DIY German Schmear How to do a German schmear

And that was it, just repeat, repeat, repeat.

German schmear on brick

SUPPLIES I USED

Painters tape, drop clothes, or old towels to protect the walls & floor

White thinset mortar

Mortar bag

Bucket

Drill with mixing arm attachment

Trowel or scraper (I liked the scraper best)

Old rags or a sponge to wipe up messes and touch up spots

DIY corner brick hearth with german schmear

For the wood mantle we used a 6×6 piece of pine.  I sanded it and stained it with my favorite The Real Milk Paint Company Dark Half.  It’s a blend of dark tung oil thinned out with citrus solvent.  I love it and I’ve used it on so many things, our floors, dining room table, and our shelves in the kitchen.

Corner stove fireplace with german schmear

We’re all done, and decorated for fall.  Just look at that happy little electric stove fireplace… it has a hearth home!  My original plan was to install a faux tube to the ceiling but I decided I like it just the way it is.  If you are interested in this fireplace it does come with a faux tube that connects to the wall.  It’s a neat look but obviously wouldn’t work with our space.

Electric fireplace review

Another thing I love about this fireplace is the storage below to add your own wood, it gives it even more charm!  There’s also a remote control with several different flame settings, and also this baby puts out some heat!  It’s been a great purchase for us and it’s currently on sale as an early black friday deal!


Laura

Maine

FORT POPHAM IN PHIPPSBURG, MAINE

Fort Popham Maine at low tide

Yesterday I had a chance to visit Fort Popham in Phippsburg, Maine, and it was so cool that I decided to whip out my phone and take photos so I could share it with you!  First of all, I love spending time at the beaches all around us here in Mid-Coast Maine, one being Popham Beach.  I’ve always known that there is an old military fort in the area, I’ve seen signs and we’ve even accidentally driven by it once looking for the beach, but I honestly never cared to stop.

Well, cut to my grown son deciding to move from Texas to Maine with us and 5 days later I’m suddenly in a fort!  Funny how life does that to you.  With the girls gone I am officially outnumbered, and I guess I’m back to doing boy things.

The tunnels in Fort Popham Maine

Boy stuff aside, Fort Popham was really cool.  In 1861 construction began on this Civil War-era coastal defense fortification that sits at the mouth of the Kennebec River where it meets the ocean.  Now retired, this historic site is open to the public, and the best part of all?  It’s free!

Visiting in late October, it was drizzling and the fog was heavy which gave a great spooky vibe.

Water view at Fort Popham


Old Fort Popham
Stairs in Fort Popham

We had a lot of fun exploring the levels and taking the stairs, we even found a few dark spooky corners where we needed to use the flashlights on our phones to see.

Water seeps through some areas of the fort creating stalagmites on the ceiling and walls like you would see inside a cave, it was really cool!

Stalagmite growing on the ceiling

Free places in Maine to explore

I don’t know if it was the old stone or the gray misty skies overlooking the water, but being here gave me flashbacks to our trip to Scotland.  It felt magical like I was some place far far away.

Old military fort in maine

You’ll find beautiful water views all around the property.  We visited during low tide so the water level was low around the fort, but the upside to this is all the beautiful beach area that becomes available to explore.  Seals are often spotted in the area so you may even get lucky and see some playing in the water.

Kennebec River in Phippsburg Maine Beach rocks and driftwood in Maine


Fort Popham Maine

Things to Know About Fort Popham

The hours are 9 am to sunset.

Camping is not allowed.

There are picnic tables but no restrooms or grills.

Wear layers!  Even in the summer the weather is unpredictable and it’s always colder near the water.

Popham Beach State Park is a short drive, admission is charged to enter the park but during low tide it is possible to walk to Popham Beach from Fort Popham and avoid the fee.

Restrooms are available during summer hours a few minutes away at Popham Beach State Park.

Spinney’s Restaurant is the only restaurant nearby and is only open during tourist season.

Parking is limited so keep that in mind if you’re visiting on the weekend or during tourist season.

Fort Popham Beach Phippsburg Maine near Fort Popham

Fort Popham in Phippsburg Maine

Living in Maine the last year has been such a dream.  If you’re ever in Mid-Coast Maine I highly recommend visiting Fort Popham in Phippsburg, everyone will love it!

Laura

DIY

STAINING OUR FLOORS WITH DARK TUNG OIL

How to stain hardwood floors with tung oil

Say hello to my new kitchen floor… we’re best friends!  Recently I shared how we installed our new pine hardwood floor, and now I’m back to share how we stained our floor using dark tung oil.  I have to say I’m in love but I think you probably picked up on that!  I’m always looking for environmentally friendly products to use when remodeling our home and this dark tung oil is a winner.

Now I will say it might not be for everyone, but I absolutely love the results.  I’ll go through the steps to achieve this look as well as some pros and cons.

WHAT IS PURE TUNG OIL?

Pure Tung Oil comes from the seed of a tung tree and is a finishing product that provides a tough, flexible, and highly water-resistant coating for a great wood finish when staining wood.  It’s an all-natural way to finish your floors that’s completely food safe.  I purchased my dark tung oil from the Real Milk Paint Company, they provide non-toxic, environmentally friendly products, and in the past I’ve had great success with their products.  So naturally I was excited to try it on my floors.

Pure tung oil is thick, making it difficult to penetrate wood on it’s own so it’s best to thin it out.  The Real Milk Paint Company provides citrus solvent that is meant to be used at a 50/50 ratio to thin tung oil making it easier to use.  You can buy regular or dark tung oil and mix it with citrus solvent on your own or you can buy it already pre-mixed which is what I did.  I used Dark Half on our floors which was conveniently mixed and ready to use at 50% dark tung oil and 50% citrus solvent.

After sanding of course, staining our floors was such a simple and easy process, and bonus our house smelled like oranges for days which is much better than strong chemicals!

HOW DO YOU APPLY IT?

We stained our newly installed pine floor as well as our original 120 year old floor, we aren’t positive what wood species the original floors are but both floors had great results.  The most commonly recommended method is to use a paint roller with an extension and roll it on.  I used a paint tray at first but after a bit I just poured it directly on the floor and rolled it, just be careful it can splash!  I rolled it on thickly, let the oil sit and penetrate 20-40 minutes, and with lots of rags wiped off the excess oil.  I repeated these steps 3 times, but it can vary, you may need more coats.  I was staining two large rooms and it did get a little tedious so I experimented a bit.

Dark tung oil on floors How to stain with dark tung oil

After heavily rolling my first coat with a paint roller I decided to apply the second coat by hand.  It applied a bit thinner and deepened the color, and after 40 minutes I had much less product to wipe off.  I liked this because it felt like I was wasting less product.  In our dining room I used a roller on half the room and the rag method on the other half to compare.  After the final wipe the results were pretty much the same.  However all floors and climates are different so if your refinishing your floors definitely experiment for yourself!

Dark tung oil stain applications

I did a total of 3 coats for the new kitchen floor and the old dining room floor.  You’ll know when your floors are done because the wood stops absorbing the oil.  The directions state to let it stand 20-40 minutes before wiping off excess.  I wanted to see if my floors would get darker so I left it on for about an hour before wiping it off.  I want to stress that you need to wipe the oil off or it will dry sticky and you’ll need to sand again.  Whatever you do don’t leave it on overnight!!

Easy DIY hardwood floor refinishing

The tung oil definitely dried lighter in color and cooler in tone, it does change with the light.  The kitchen is brighter so it looks different than in the dining room.

I love how even after sanding our dining room floors the dark tung oil still highlighted deeper scratches and wear.  I think it makes for a beautifully authentic floor and can’t wait until our kitchen floor ages too!

Another benefit of using tung oil is when new scratches occur you can simply wipe on more tung oil!  It’s really that simple!

Tung oil floor results

IS TUNG OIL A GOOD CHOICE FOR EVERYONE?

Honestly I think so but I realize everyone has different goals so here are my pros and cons!

     PROS

It’s FDA approved for food contact and environmentally friendly.

The finish does not blister, peel, or mold.

When properly applied, tung oil is shown to be more water and moisture resistant than shellac.

It’s incredibly easy to stain a floor with.  I found it pretty much error proof.

No chemical smell after application.

It’s great for kids and dogs who spend time on the floor, or adults who walk around bare-foot (hello that’s me).

Any scratches can be wiped with more oil.  I like to keep a jar of oil for easy touch ups.

Once the newly applied stain looks dry you can walk on the floor in clean socks or roll wax paper along the floor to walk on.

     CONS

It’s a matte surface so if you’re looking for a gloss finish this is not for you.  Just keep in mind shiny surfaces with a top coat show scratches!

You need to re-oil as needed, most likely every few years or when it looks dull.  I’m planning to wipe future coats on by hand.

You can’t use harsh floor cleaning products.  A bucket of water with a splash of vinegar or dish soap to dry mop with is recommended.  Plain water is good for light floor cleaning.

It’s more expensive than regular floor stain.

How to stain a pine hardwood floor

CAN DARK TUNG OIL BE DARKER THAN YOUR RESULTS?

This is a tough one, yes, maybe.  We went to a farther Home Depot to rent our floor sander and grabbed sand paper there.  When we realized we needed more sandpaper we went to a closer location.  Each sales associate told us conflicting information.  The first told us to sand up to 180 grit.  The second said he specialized in furniture making and said we should sand to 220 grit.

I’m not really sure what to think about this.  It is a fact the higher grit in sandpaper you use the less stain will absorb, this is because the wood pores are closed up more.  We did finish with a 220, and I can’t say I have any regrets because it made our floors baby bottom smooth.  If we finished with a lower grit I think the floors would be just a bit darker… but I love the baby bottom under my bare feet so when we add hardwood to our future rooms we’ll probably do exactly the same.

The best natural floor stains

If you’re thinking of installing new hardwood floors or refinishing your own in dark tung oil I definitely think you should go for it!  I hope this helped you, and if you have any questions let me know and I’ll try to answer them the best I know!

Laura

DIY

HOW WE INSTALLED OUR NEW PINE HARDWOOD FLOOR

How to install a pine hardwood floor

I’m back and so excited to share how we recently installed our new wide plank pine hardwood floor in our kitchen!  In the history of all our DIY home projects hands down this has been our favorite, it was also surprisingly easy.   Sometimes I find myself just staring at the floor, yes it’s that good.

Our house is a mix of narrow and wide plank hardwood floors, both are beautiful, but I have to say I’m drawn to our wide plank pine floors the most.  Pine as you probably know is a soft wood so over time it does scratch and dent but it adds character, and in my opinion makes it even better!

Lumbar Liquidators wide pine hardwood floor

We ordered unfinished New England White Pine from Lumber Liquidators, and with all hardwood flooring you want to let the wood acclimate to your environment.  Generally 2 weeks is all you need but life happens, and ours ended up acclimating for nearly 3 months because gutting the kitchen and the existing floors took way longer than we thought it would.  We also last minute decided to shiplap the walls.

Before I go any further, how about a kitchen before photo?  I love sharing ugly before photos!  The linoleum floor was curling up and had a lovely smell similar to wet dog.  Watching Brian rip it out gave me so much joy!

Ugly kitchen remodel

From start to finish our floors took us 3 days, including staining which I’ll get into in the next blog post.  Once our floor space was clean and prepped we put down silicone vapor paper to protect against moisture.  After that we sorted through our wood, not every piece was desirable so we saved flawed boards for areas that would be hidden or cut down to size.  It’s recommended to always order 10% extra flooring, but we wished we had ordered 20% extra.  Maybe we were too picky selecting boards but we barely had enough wood to finish.

Hardwood floor silicone vapor barrier

To cut the floor Brian used a miter saw, and he installed it with a hammer floor thingy that he called a pneumatic floor nailer.  We didn’t use a specific pattern we just staggered the wood randomly to look the most natural.  We used an oscillating tool to cut the bottom of the existing door trim so that the new floor boards would fit snugly underneath.  It’s also important to leave a gap of 1/4″ to 1/2″ around the perimeter to account for slight expansion and contraction of the wood.  Don’t worry, though, the gap will be covered with baseboards.  Another tip I can share is that we installed plain plywood boards, under the areas that are going to be cabinets.  There’s no need to use the expensive white pine under the cabinets where they will never be seen.  We made sure to get plywood that was also 3/4″ which to match the thickness of the white pine.

do it yourself hardwood floor DIY pine hardwood floor

Installing hardwood flooring

Once the floor was installed I filled any major knot holes with with DAP Plastic Wood-X.  This was the wood filler that was recommended to us that would accept stain the best.  I did not add wood filler between the boards because we were able to get everything nice and flush.

Next we rented a floor sander from Home Depot.  They have several types of sanders to pick from.  We were warned to stay away from the professional drum sander, that it takes a lot of control, and if you’re inexperienced you can easily create waves in your floor.  The circular floor sander we were told also had complaints leaving large circular marks.  So we were sent home with this square one because it was the most user friendly.  It is an orbital sander so it takes a large rectangular sheet of sandpaper and vibrates it.  This has benefits and drawbacks.  It’s always recommended to sand with the grain of the wood, but you don’t always have to with this machine.  The major drawback, though is that if you don’t sand with the grain and you get debris as small as a grain of sand then you could end up with noticeable spiral trails, also known as pig tails, cris-crossing your nice new floor.  I’ll go more into that later.  All in all we ended up with an extremely smooth floor that we were happy with.

the best floor sanders for refinishing

Here’s another tip…when sanding it is very important that you don’t skip grits.  We sanded the floors using 80, 120, 180, and 240 grit.  The sanding grit was a little confusing, one Home Depot location said to stop at 180, and when we visited a different location to get more sand paper they told us to go higher.

HOW TO AVOID SANDING MARKS AKA PIGTAILS

Of course problems can arise with first time projects so I’m here to tell you what not to do!  I can’t stress enough how important it is to sand your floors slowly and in the same direction as the grain if possible, otherwise you’ll end up with these tiny squiggly pigtails.  The next crucial step is to not skip more than one number up on the sand paper grit scale!  We watched several YouTube videos that explained the importance.

hardwood floor sanding mistakes


The thing about pigtails is that they don’t show up until after you’ve started staining and it’s so frustrating!  We did end up with a few but luckily they’re in hidden areas of the floor such as under the refrigerator or where the island will extend out over these boards and it won’t be seen.

If you end up with pigtails you’ve got a few options.

  • Learn to live with it.
  • Sand the floors again, correcting your mistakes by going slower without skipping high grit numbers.
  • Wait it out.  If you used a pine wood, the floor will naturally destress and a majority of those marks will probably be hidden.


How to install white pine wood flooring

Even with the few sanding mistakes we made we are still extremely happy with our new pine floors!  In my next blog post I’ll talk about using dark tung oil to stain our floors, along with the pros and cons so you can decide if this staining method is right for you.

Laura

Crafts

HOW TO MAKE A SUMMER ICE BUCKET

Summer Ice bucket for entertaining

I know it’s not officially summer yet, my adorable husband likes to remind me that there is an official date, but temps have been really warm up here in New England (with some days just plain hot) so I’m just going with it!  I made my own summer ice bucket, and I want to share how you can make one too.

It was super easy and fun to make, and it’s just so pretty look at!  You can use it indoors or outdoors, and if you don’t let it completely melt you can save it in the freezer and use it again and again!

make an ice bucket

It’s super complicated so take notes… haha I’m kidding.  Are you ready for it?  Grab 2 buckets that fit inside each other leaving some side space, mine are from the Dollar Tree.  Next you’ll need something to partially weigh the bucket down once it’s filled with water.  Once again Dollar Tree hooked me up with a bag of small rocks.  You can use anything really that’s freezer proof, perhaps even water to weigh it down, just make sure it’s heavy but not too heavy.  There needs to be a good inch or two between the bottoms of the buckets.

Fun summer outdoor crafts Dollar Tree craft ideas

Once you’ve got your buckets ready to go and a weight, fill the large bucket with water about 75% full.  The top bucket needs to float up a bit leaving room for the bottom to form ice along with the sides.  If the small bucket doesn’t float up then you need to reduce the weight.

make a fruit flower ice bucket

Now it’s time for the fun part!  Unfortunately our summer flowers were not in bloom yet so I went with cut flowers, but you can really use anything floral from your yard.  I went with a mix of flowers in different colors, shapes, and sizes from the grocery store, and just for fun I threw in some sliced lemons.

Before adding the flowers the pink bucket drifted around a bit, but once I filled the space it seemed stable.  Just to be clear I added a lot of flowers, it wasn’t just a few buds floating around it was pretty solid packed in there so the bucket stayed in place.  You may need to adjust and use your fingers to arrange everything nice and pretty.  Now it’s time for the freezer!

Ice crafts make your own ice bucket

You’ll want to freeze the buckets until solid, most likely overnight.  I had some flowers sticking out above the waterline but as the water froze it rose and covered the flowers.  Any remaining stems sticking out can be snipped off after it’s frozen.  Honestly I had a photo of my frozen ice bucket in the freezer but it vanished.  I think an evil elf deleted it… then deleted my deleted photos folder… I’m still looking into that.

Once frozen solid, to remove you can leave it on the counter until the buckets loosen or if you’re in a hurry like me just run a little warm water over the larger bucket until it loosens.  If the top has any uneven edges that arent’ desirable just run cool water over it until it melts.

You can watch my summer ice bucket tutorial here on Instagram.

DIY Summer Ice Bucket

I absolutely love how it turned out!  If you’re using your ice bucket indoors I recommend setting a dish underneath it to catch melting water such as a pie plate.  We used ours outdoors in the shade for a good hour or so until we decided to save it for another day in our freezer.  So yes, you can save it for hopefully several uses!

There are so many creative combinations of flowers, plants and fruits you can use!  Have fun!

Laura