TRAVEL

EXPLORING THE ICE CAVES IN RIFLE MOUNTAIN PARK, COLORADO

Ice Caves in Rifle Mountain Park Colorado

Winter is one of my favorite times to travel and explore Colorado.  I love the crisp, cold air and the beautiful snowy mountains and trees, it’s a frozen winter paradise!  After 2020 ended I was determined 2021 would be an amazing year full of fun and adventure.  I know we’re still dealing with Covid and everyone needs to be careful so a road trip to explore the Rifle Mountain Park was perfect for us, and I was able to check off another Colorado bucket list item, exploring ice caves!

The ice caves are formed after several cycles of freezing and thawing and typically take their shape from December to February.  Each ice cave is uniquely beautiful with hues of aqua throughout the ice.  It’s a true winter gem.

Ice Caves in Rifle Mountain Park Colorado

Rifle Mountain Park is located just north of the town of Rifle, about an hour from Glenwood Springs (another favorite place of ours).  Some people opt to park by the entrance sign and walk in, while others prefer to drive closer to the caves.  The park road follows the East Rifle Creek through the canyon, and on the other side of the creek is Koper’s Trail.  There are small parking areas along the way, with bridges to cross the creek to allow cave access.  You can also park at the Koper’s Trail trailhead and hike along the creek to all the caves.

Admission to the park is $5 per vehicle.  You pay at a kiosk just past the entrance sign.

Ice Caves in Rifle Mountain Park Colorado

The drive into the park is nothing short of stunning.  The road parallels the trail and creek so if snow or terrain is ever too difficult you can cross over a bridge and walk on the road.  In the summer rock climbing is popular in Rifle Mountain Park, and in the winter you may spot some ice climbers as well.

Ice Caves in Rifle Mountain Park Colorado

Ice Caves in Rifle Mountain Park Colorado

The trail is a mixture of snow, ice, and dirt.  Inside the caves the ground is solid uneven ice.  It’s crucial to wear microspikes – or even better crampons – to avoid falling.  Poles are helpful when navigating around rocks and terrain on the trail, but poles alone will not help you in the cave.  If you don’t have a solid traction device on your feet please don’t enter the cave.  Also it’s winter in Colorado so remember to wear a warm synthetic or wool base layer, possibly a mid layer (I usually don’t need one if I’m active), waterproof pants, a jacket, gloves, hat, and waterproof snow boots.  Don’t forget to pack some water and snacks too!

Ice Caves in Rifle Mountain Park Colorado

Ice Caves in Rifle Mountain Park Colorado

The first cave is a a short hike from the beginning of the Koper’s Trail.  Upon entering I was in awe of this beautiful icy fantasy land, it’s like walking behind a blue frozen waterfall.  Inside, the ground was a frozen thick sheet of ice with icicles hanging from the ceiling.  You could hear and see water trickling beneath the ice in some areas but the icy ground was solid.

The caves are large enough to walk around in, and although they can be dim in certain areas you do not need a flashlight to see inside.

Ice Caves in Rifle Mountain Park Colorado

Ice Caves in Rifle Mountain Park Colorado

Ice Caves in Rifle Mountain Park Colorado

Ice Caves in Rifle Mountain Park Colorado

Ice Caves in Rifle Mountain Park Colorado

Someone on Instagram mentioned how cute it was that I matched the ice caves.  Haha… it was unplanned I promise!

Ice Caves in Rifle Mountain Park Colorado

The second cave is a little farther down the trail, with a little elevation but nothing extreme.  Poles can be helpful here, remember you can always exit and walk along the road where it’s easier.

Ice Caves in Rifle Mountain Park Colorado

Ice Caves in Rifle Mountain Park Colorado

The second cave is a bit larger, with a narrow opening on one side and a larger one on the other end.

Ice Caves in Rifle Mountain Park Colorado

Ice Caves in Rifle Mountain Park Colorado

Ice Caves in Rifle Mountain Park Colorado

Below is one of the bridges connecting the road/parking lot to the Koper’s Trail that leads to the caves.  The creek is warmed by the groundwater with beautiful green aquatic plants growing inside it, even in January.

Ice Caves in Rifle Mountain Park Colorado

We had heard that there are more ice caves farther up the trail, but by the time we exited the second cave it had started snowing really hard so we decided to head back.  Based on our research, though, we heard that the first two caves were the best.

Ice Caves in Rifle Mountain Park Colorado

Crampons | Poles | Base-layer | Hat (so many fun colors!) | Down Jacket (runs small so order a size up)

I think everyone should explore this beautiful frozen trail, and especially the ice caves.  After exploring the caves we went back to Glenwood Springs for a nice quiet hot spring soak which was fantastic, and then the next day we ventured a little farther to Ouray, Colorado, where we had more frozen fun.  I’ll be sharing our Ouray trip on the blog soon.  Happy winter!


Laura

HOLIDAYS

SIMPLE & EASY DIY NEW YEARS EVE DECORATIONS

Easy to make New Year's Eve Decorations

If there’s ever a year to celebrate ending it’s this one!  Goodbye 2020… we won’t miss ya, but your departure certainly calls for a celebration!  I always go big when it comes to Christmas so afterwards I’m pretty tired and need things simple, but that doesn’t mean we can’t still have a little fun.

This year I decided to create a festive table centerpiece as well as some drink swizzle sticks that everyone can enjoy, and these simple and easy New Years Eve decorations can be thrown together at a moment’s notice.  It’s a fun way to add some extra cheer while ringing in the New Year at home.  I was able to recycle some of my Christmas items into our centerpiece so hopefully you have some extra stuff hanging around too.

Easy to make New Year's Eve Decorations

Easy to make New Year's Eve Decorations

SUPPLIES NEEDED

Easy to make New Year's Eve Decorations

  • Metallic shred or tinsel
  • Beaded necklaces or garland
  • Party crackers
  • Ornament balls
  • Curly ribbon
  • Wood Skewers (I used 8 inch ones from the craft baking aisle)
  • Pom poms
  • A bowl or platter for the centerpiece
  • Festive glassware

Easy to make New Year's Eve Decorations

INSTRUTIONS

For the centerpiece start by placing a layer of metallic shred and then add the rest of the decorations.  Use any leftover metallic shreds as need to fill in gaps or add height.

For the drink swizzle sticks simply push each pom pom through the pointy end of the wood skewer, and adjust as needed.  No glue is necessary.

Easy to make New Year's Eve Decorations

So fun, so festive, and so easy am I right?

Easy to make New Year's Eve Decorations

Easy to make New Year's Eve Decorations

Easy to make New Year's Eve Decorations

Let the celebration begin!  We’ve got this… just a few more days and we all get a fresh start.  Happy New Year my friends, 2021 is going to be a much better year for all of us.  Stay safe, healthy, and happy.


Laura

HOLIDAYS

HOW TO MAKE A GIFT BAG OUT OF WRAPPING PAPER

Make a gift bag out of wrapping paper

I want to share with you my favorite gift wrapping hack, how to make a gift bag out of wrapping paper.  So you might be thinking, isn’t it easier to just buy a gift bag?  Well… maybe… but we’ve all had those moments where we run out of gift bags, or they’re the wrong size, or you just want to save money.   Maybe you just want all your presents to match and coordinate – Virgo here!!

Seriously, this trick is life changing and couldn’t be easier.  Once you make your first bag you’ll be whipping these out at warp speed.  It’s also lots of fun to customize each bag, and you can even add a handle if desired.  Below I’ll show you how easy it is to make a gift bag out of wrapping paper, and be sure to read my helpful tips.

Make a gift bag out of wrapping paper

SUPPLIES

  • Wrapping paper
  • Tape
  • Scissors
  • Stapler – optional
  • Ribbon for decorating – optional
  • Tulle ribbon to create a handle – optional

INSTRUCTIONS

Measure wrapping paper to the size of the object, as if you were wrapping the present without a box, leaving extra room at the top and cut.

Make a gift bag out of wrapping paper

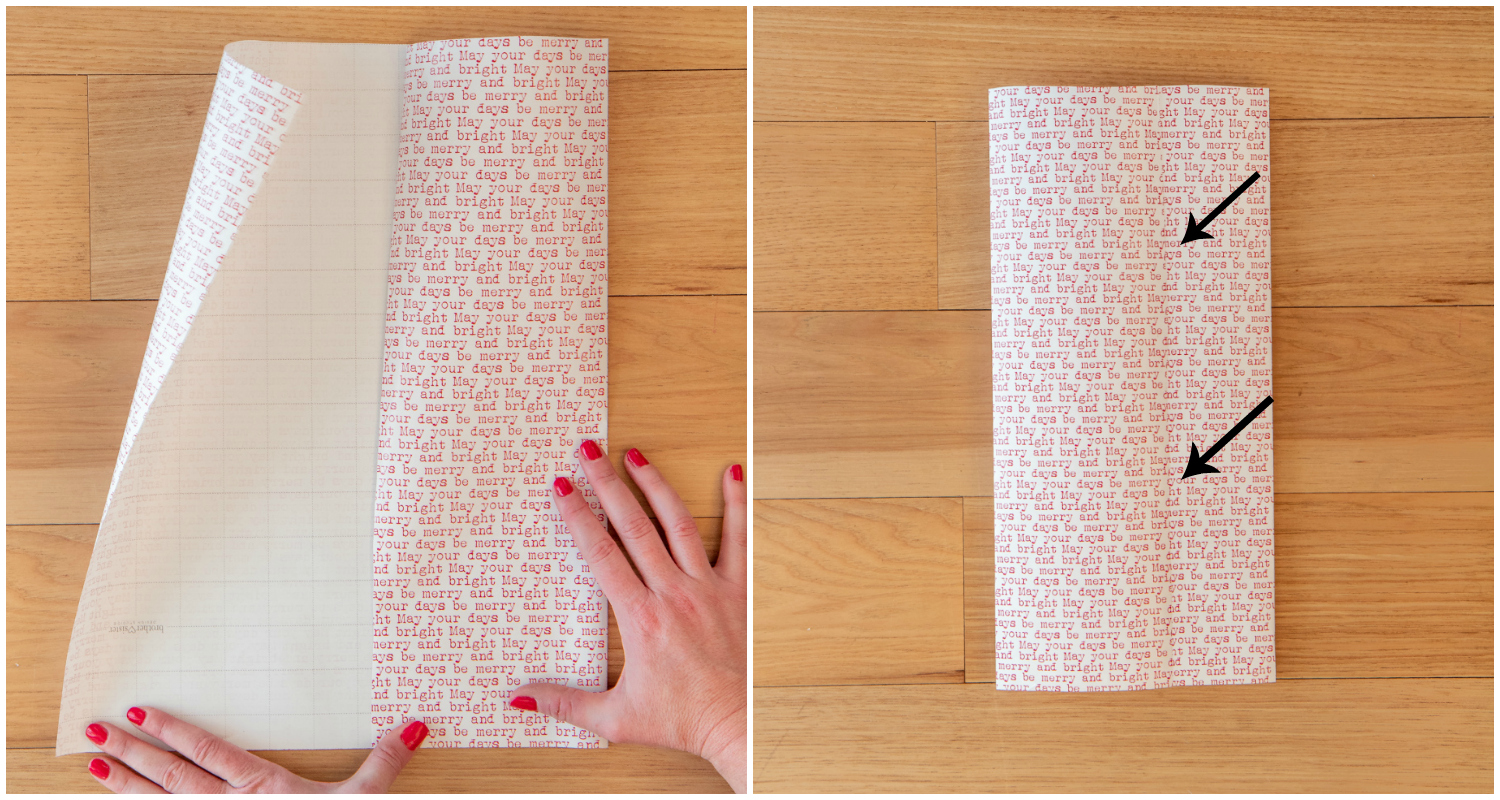
Fold one side in and crease, repeat on the other side, then tape the back shut.

Make a gift bag out of wrapping paper

Fold the bottom edge straight up and crease, this will determine the width of the bag.

Make a gift bag out of wrapping paper

Unfold the bottom and then fold the side edges inward to resemble a triangle, crease both sides.

Make a gift bag out of wrapping paper

Fold each end up like you’re wrapping the end of a boxed present and secure well with tape, then gently open the bag up.

Make a gift bag out of wrapping paper

Place the gift in the bag then fold the top of the bag down.  Seal the top of the bag with tape or staples.

Make a gift bag out of wrapping paper

If you’re not adding a handle simply add a bow and you’re all done.

Make a gift bag out of wrapping paper

To add a handle after the bag is sealed use a hole punch to thread tulle through.  I used a punch that was slightly larger than normal to make this step easier.

Make a gift bag out of wrapping paper

Determine the length you want the handles to be and tie a knot.  Adjust the handles so the knot goes to one side and tie in a bow.  You can experiment with different ribbons for a handle, I like tulle because it’s lightweight and fluffy.

Make a gift bag out of wrapping paper

TIPS

  • Thick sturdy wrapping paper is best, thin wrapping paper from a dollar store may not work as well.
  • You can cut a cardboard base for the inside if you want your bag to have more structure.
  • Pay close attention when using wrapping paper where the pattern goes one direction, as in the picture above, you’ll want the pattern facing up.
  • Only add a handle to lightweight presents or the bag will tear.
  • If you have lots of gifts that are similar in size, make several bags at once, keeping them flat for easy storage.  When your ready to wrap a gift simply open up the bag and seal it.

Make a gift bag out of wrapping paper

I hope this gift wrapping hack helps you!  I’m officially signing off to enjoy this week of Christmas with my family.  Wishing you the Merriest Christmas and a Happy New Year!


Laura

HOLIDAYS

HOW TO FOLD A NAPKIN INTO A CHRISTMAS TREE

How to make Christmas tree napkins

I love a good folded napkin, yes, I am a proud napkin nerd.  Nothing makes a table special like a well folded napkin, and today I want to share with you how easy it is to fold a napkin into a Christmas tree.  To make these Christmas tree shaped napkins you’ll need a square napkin, my favorite napkins are from World Market, they wash well, come in lots of colors, and are very affordable.  I chose green but other colors and patterns would work great too.

How to make Christmas tree napkins

Start by folding the napkin into a square, and rotate the napkin so the ends are facing you.

How to make Christmas tree napkins

Begin folding each napkin layer up, leaving a small border and keeping the points of the napkin lined up.

How to make Christmas tree napkins

Continue folding until all the layers are folded up.  Tip:  Any time I fold napkins I always keep an iron nearby and press every few steps to keep things nice and uniform.  This is totally optional though.

How to make Christmas tree napkins

Carefully flip the napkin over and fold the right end across to the left side of the napkin, creating a point at the bottom.

How to make Christmas tree napkins

Repeat by bringing the left end of the napkin towards the right so both edges create a nice point.  Take the top triangle end of the napkin and tuck it in under a layer.

How to make Christmas tree napkins

Turn the napkin over and tuck each corner either up or down, depending on the look you like best.  Repeat all the way down.

How to make Christmas tree napkins

Once finished I like to give the napkin a quick press with the iron, again optional.

These festive Christmas trees are sure to impress your guests!  You can even add a star at the top of the tree to write your guests’ names out of paper or salt dough.  Be sure to check out my other Christmas blog posts, and next I’ll be sharing my favorite present wrapping hack with you, it’s life changing!

Laura

HOLIDAYS

THE ULTIMATE NAUGHTY & NICE HOT COCOA BAR

The ultimate Naughty & Nice Hot Cocoa Bar

It’s the Christmas season and we love nothing more than to celebrate the festivities with a perfect cup of hot cocoa!  Nothing says holiday cheer like a readily available cup of delicious cocoa, am I right?  l’m always looking for fun ways to celebrate the season with my family, and this year we’ve decided to add a hot cocoa bar to our seasonal fun, but not just any hot cocoa bar, a naughty and nice one!

The ultimate Naughty & Nice Hot Cocoa Bar

The ultimate Naughty & Nice Hot Cocoa Bar

There are many ways you can serve cocoa at your own bar.  I love keeping a thermos of ready-made cocoa on weekends and during Christmas festivities.  If that doesn’t work you can keep hot water in a thermos or air-pot along with cocoa mix on the side.

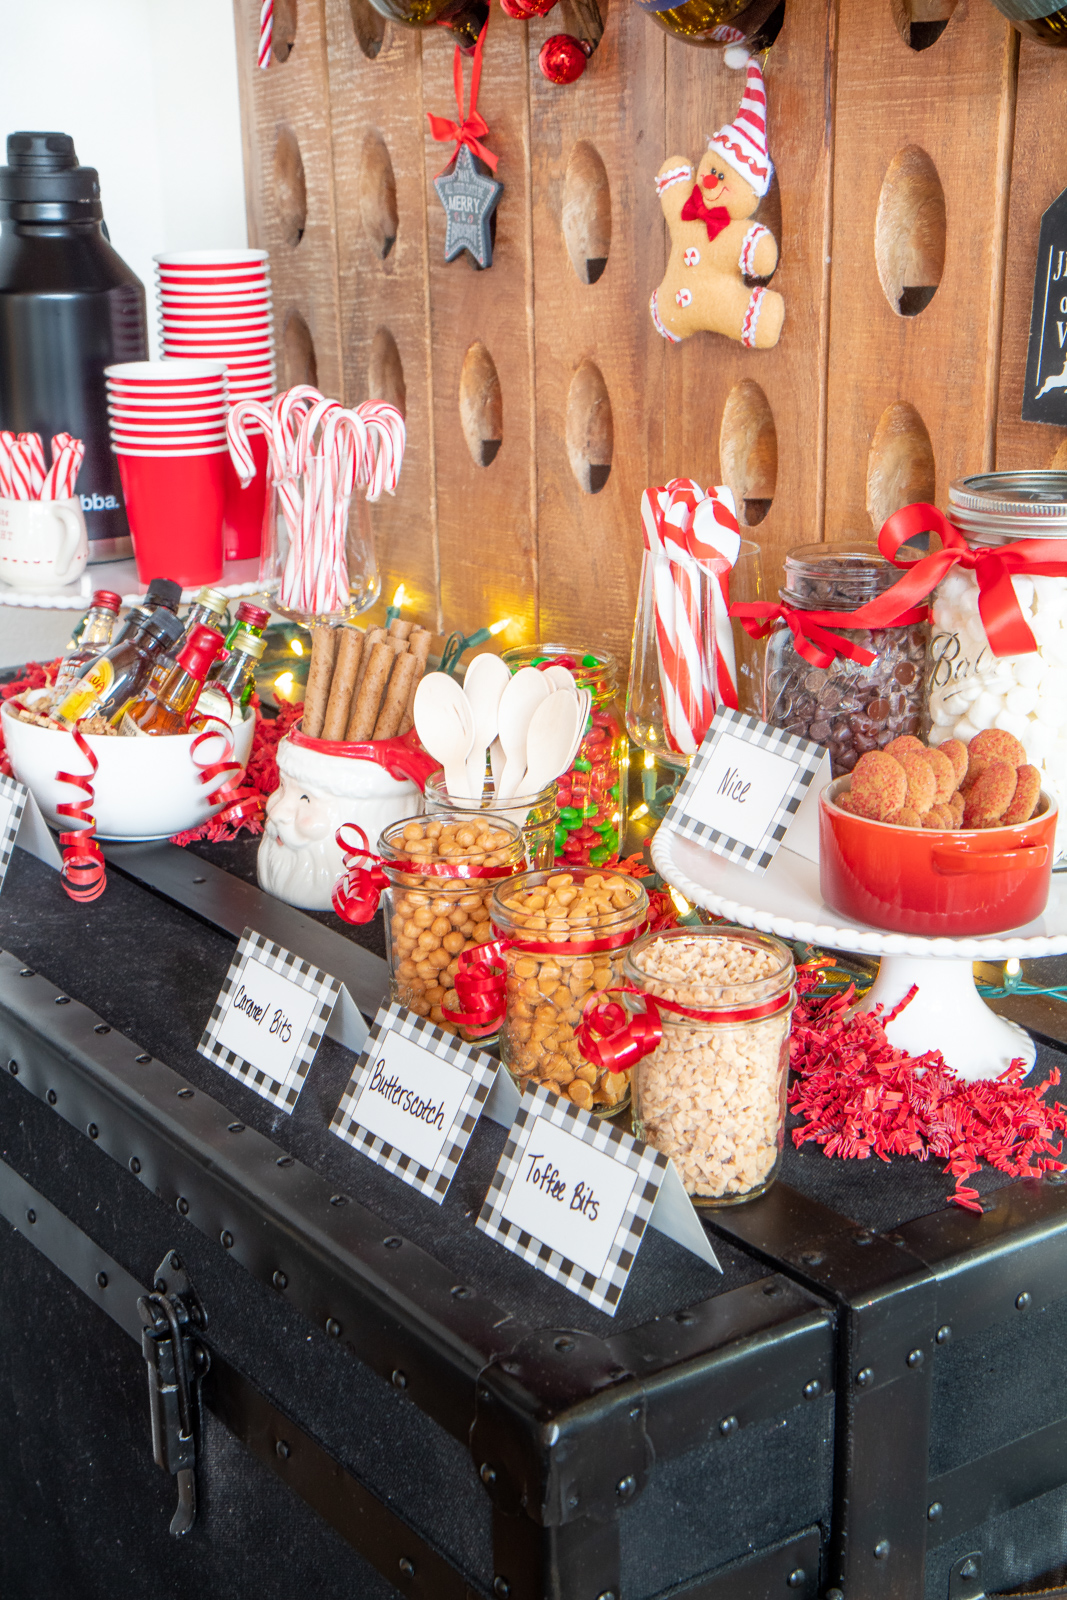
The real treat is with the naughty and nice additions!  With just a few yummy treats you can turn your ordinary cocoa extra chocolatey, or add caramel, butterscotch, peppermint, or have a spiked naughty treat.  There is something for everyone at this naughty and nice cocoa bar, and let’s not forget the perfect cup of cocoa might need a few treats like cookies for dipping too.

I used a variety of mason jars I had on hand to hold all our cocoa treats and just spoon them into cups as needed.  Then at the end of the night I put the lids back on the treats and they’re ready for a new day.

The ultimate Naughty & Nice Hot Cocoa Bar

Below I’ll share with you my favorite cocoa mixers to create your own naughty and nice cocoa bar, but really the sky’s the limit when adding delicious treats.

The ultimate Naughty & Nice Hot Cocoa Bar

Supplies

The ultimate Naughty & Nice Hot Cocoa Bar

  • Hot cocoa – I love the Hershey’s cocoa recipe, Alton Brown has good cocoa recipe too.
  • A thermos, air-pot or slow cooker to keep the cocoa nice and hot
  • Cups or mugs
  • Napkins
  • Place cards or labels
  • Small jars or containers of your choice
  • Spoons for stirring in naughty and nice treats
  • Paper shreds and ribbon to decorate with (optional)

Naughty

The ultimate Naughty & Nice Hot Cocoa Bar

  • Kahlua
  • Bailey’s Irish Cream
  • Maker’s Mark Whiskey
  • Jamesons Whiskey
  • Smirnoff Peppermint Vodka
  • Smirnoff Caramel Vodka
  • Smirnoff Whipped Cream Vodka

Nice

The ultimate Naughty & Nice Hot Cocoa Bar

  • Candy Canes
  • Marshmallows
  • Chocolate Chips
  • Butterscotch Chips
  • Carmel Bits
  • Toffee Bits

Snacks

The ultimate Naughty & Nice Hot Cocoa Bar

  • Pirouette Cookies
  • Gingerbread Cookies
  • Candy

The ultimate Naughty & Nice Hot Cocoa Bar

The ultimate Naughty & Nice Hot Cocoa Bar

Creating your own hot cocoa bar is just so fun!  Who can resist all the yummy flavors and treats?  It’s the perfect way to boost your hot cocoa game for parties, gatherings, or just yourself.  Our family has officially voted for a naughty and nice cocoa bar every year.

It’s the perfect way to celebrate the season, and remember you can be all naughty, all nice, or a little bit of both!


Laura

TRAVEL

5 EASY WINTER HIKES IN ROCKY MOUNTAIN NATIONAL PARK

5 easy winter hikes in Rocky Mountain National Park

Since moving near Rocky Mountain National Park we’ve developed a huge love for hiking, and our favorite time of year is winter.  Once upon a time I used to find winter hiking very intimidating, it does take more planning, but winter hiking is a true gem.  The crowds thin out, the cold crisp air is invigorating, and the views are just incredible, it’s like hiking in a snow globe!

There are lots of amazing trails for all fitness levels throughout Rocky Mountain National Park but today I’m going to share with you my five favorite easy winter trails on the east side of the park.  I’m also listing some of our favorite AFFORDABLE winter essentials for hiking.

5 easy winter hikes in Rocky Mountain National Park

RECOMENDED ITEMS

  • Micro-spikes – These are our favorite, so lightweight and easy to put on.  They are essential for traction in ice and packed snow!
  • Hiking poles – These are our favorite, and come in lots of fun colors, and they work for all seasons.
  • Map or GPS – We use and love the Alltrails.com Pro app, but we also keep a map handy if our battery dies.
  • Base-layer top and bottoms – To insulate the body and wick away sweat, this is my favorite pair and Brian’s.
  • Mid-layer – Such as a fleece top.
  • Waterproof Insulated pants and jackets
  • Warm socks
  • Waterproof gloves 
  • Insulated waterproof hiking boots
  • Hat and neck warmer – or this combo one.
  • Sunglasses Ski googles are a lifesaver on extremely windy days!
  • Sunscreen – Winter sun is intense!
  • Water in an insulated container – Regular water bottles can freeze during winter hiking.
  • Snacks
  • Whistle

Winter weather in Rocky Mountain National Park can be quite unpredictable.  You may not need all of the items above, but it’s a good idea to have them handy just in case.

Essential winter hiking gear

SPRAGUE LAKE

  • Distance 0.9 miles round trip
  • Elevation gain: 10 feet
  • Directions: Enter Rocky Mountain National Park on highway 36, turn left on Bear Lake Road, go about 6 miles and turn left at the sign for Sprague Lake.

Sprague Lake in the winter

Sprague Lake is the perfect easy winter warm up hike for all ages, there is very little elevation gain so it’s wheelchair and stroller friendly too.  Here you’ll see dreamy views of the continental divide, cross bridges, read historical information about the lake, and see children playing on the frozen snow covered lake.  You’ll probably see trout in the babbling stream too.

Sprague Lake in the winter

BEAR LAKE

  • Distance 0.8 miles round trip
  • Elevation gain: 45 feet
  • Directions: From highway 36 enter Rocky Mountain National Park, turn left on Bear Lake Road, go all the way to the end which is a little over 9 miles.

Bear Lake in the winter

Parking at Bear Lake is the summer is a nightmare, you may wait a little bit in the winter for parking depending on the time of day, but overall it’s much easier.  This popular lake trail always has a crowd but don’t let that keep you away.  The views all around the lake are stunning!

Bear Lake in the winter

Walking around Bear Lake is like a true winter wonderland, you’ll see stunning mountain views, gorgeous snow covered pine trees, icicles, and a snowy view of Hallet Peak.  This trail is perfect for all ages.

DREAM LAKE

  • Distance 2.2 miles round trip
  • Elevation gain: 450 feet
  • Directions: The trailhead is at Bear Lake.  From highway 36 enter Rocky Mountain National Park, turn left on Bear Lake Road, go all the way to the end which is a little over 9 miles.

Dream Lake in the winter

Starting at Bear Lake, the hike up to Dream Lake is incredibly stunning in every direction.  Staying on the trail can be tricky at times, especially after fresh snow because people go off the trail a lot.  Pay attention to signs, and it’s a good idea to bring GPS if you’re unfamiliar with this trail.  You’ll start gaining some altitude with this trail but it’s an easy trail as long as the weather cooperates.  Dream Lake can have very bitter cold winds in the winter so dress very warmly, also be prepared for deep snow in spots.

Dream Lake in the winter

The close views of Hallet Peak are absolutely incredible and make any extreme weather worth it.

Dream Lake in the winter

CHASM FALLS

  • Distance: 4.6 miles round trip
  • Elevation Gain: 640 feet
  • Directions: From highway 34 enter Rocky Mountain National Park, turn right at the Old Fall River Road sign and park in the West Alluvial Fan Trailhead parking lot, and continue hiking west along the road past the winter gate.

Chasm Falls in the winter

In the summer Old Fall River Road is a one way road that takes you up to the Alpine Visitor Center.  In the winter the road closes to all vehicles  and it becomes a great hiking trail.  The trail starts out flat, walking through groves of sleeping aspen trees and beautiful snowy mountain views in the distance.  As you near the waterfall you’ll get the heart pumping with a few switchbacks but it’s nothing that in-shape older people or enthusiastic kids can’t handle.  You’ll see a sign for Chasm Falls to the left and follow steps down to the waterfall.

Chasm Falls in the winter

Partially frozen, the waterfall is beautiful!  You can hear and see the water dropping 25 feet under a veil of ice into the icy pools below.  There is railing everywhere so it’s safe and a beautiful photo taking spot!  We usually see only a few other hikers on this trail, which is a nice bonus.

Chasm Falls in the winter

BIERSTADT LAKE

  • Distance 4.4 miles round trip
  • Elevation gain: 630 feet
  • Directions: From highway 36 enter Rocky Mountain National Park, turn left on Bear Lake Road.  Go about 7 miles to the Bierstadt Lake sign and parking lot on the right.

Bierstadt Lake in the winter

Bierstadt Lake is a favorite trail of ours any time of year, but the winter season has a completely different feel from the summer.  Bierstadt Lake has low crowds in the winter making it a quiet peaceful trail.  You’ll begin this trail walking through pine trees, then transition into switchbacks with sweeping views of Long’s Peak and the Continental Divide.  The trail is narrow and often ice packed so traction devices are extremely helpful.

Bierstadt Lake in the winter

Bierstadt Lake in the winter

Once you reach the top you’ll be greeted by a quiet forest of pine trees surrounding the lake.  You can turn around and go back at this point or continue the loop around the lake following the orange tags on the trees to stay on trail. There are clearings along the trees to allow access to the lake.  On a clear day you’ll be able to see sweeping views of the mountains behind the lake.  I love walking around the lake being surrounded by snowy pine trees.  Snow can be quite deep in some areas around the lake, it’s a great spot for snowshoeing too.  We see older kids do this trail all the time, it depends on their comfort level.

Bierstadt Lake in the winter

If you’re visiting Rocky Mountain National Park during the wintertime I hope I’ve convinced you to go on a winter hike.  It’s truly a magical time of year.  Bring sure to bring an insulated pot of hot cocoa to enjoy after your hike!


Laura

Colorado Home

CHRISTMAS 2020 HOME TOUR

Blogger Christmas Home Tour 2020

It’s December and you know what that means… it’s time for the Christmas 2020 home tour!  Obviously this has been a hard year for everyone, not a single person has been exempt from the stress of 2020, which is why it’s so important to cherish and celebrate what we do have.  We all find comfort in different ways, I find mine in creating a well dressed home, and this year my home has been more comforting than I could ever imagine.

Every year I find so much joy in decorating our home for Christmas.  I very much enjoy surprising my family by adding new decorations and switching things around, so our Christmas home is a little bit different every year.  I think it adds a bit of spontaneous fun.

During this month we we snuggle by the fire watching Christmas movies, baking cookies and treats while listening to Christmas music.  We will laugh, we will cry for our loved ones no longer with us, we will open presents, and we will give thanks to our Savior who is born.  It all happens here inside our home and I love sharing it with you.

Outdoor Bench | Doormat | Faux Trees | Outdoor Plaid Pillows | Merry & Bright Top

Last Christmas this room was an huge, unfinished mess.  It gives me so much joy that the media room is finished and gets to join our 2020 Christmas tour.  You can read about our media room before and after HERE.  Our next winter project is to remodel the loft space, so look forward to that joining the 2021 tour.

Sofa | Media Console | Wreaths | Lamp | Christmas Pillows | Birch Trees | Art TV

Blogger Christmas Home Tour 2020

Brian and I joke that we have the hardest living room to photograph ever, but it’s honestly true!  It’s a bright room full of backlit windows and sun glares, we usually wake up at 6 am just to get a few photos before the light gets crazy.  Those big windows and gorgeous views come with a price.  This year we upgraded to a 10 foot tree and we really love it.

Blogger Christmas Home Tour 2020

Every Christmas home needs festive garland and this ornament garland was incredibly simple and fun to make.  You can find the tutorial HERE.

Blogger Christmas Home Tour 2020

Blogger Christmas Home Tour 2020

Blogger Christmas Home Tour 2020

We’re making spirits bright in our house!

Little Christmas Trees | Coffee Table | Leather Chair | Bar Cabinet | Wood Wine Rack | Wine Bottle Opener | Tree Skirt | Bear Footstool | Burlap Sack | Metal Sleigh

Blogger Christmas Home Tour 2020

Our kitchen makeover was finished just in time for the holiday season.  You can read about our mini kitchen makeover click HERE.

Blogger Christmas Home Tour 2020

Christmas Plates | Le Creuset Skillet | Le Creuset 3.5 French Oven

Christmas centerpiece ideas

I recently created this Christmas present centerpiece made out of wrapped up boxed food.  It’s the perfect low waste decoration, and after Christmas unwrap the food and keep it, or even better donate it.  You can view the tutorial HERE.

Christmas decor ideas

Table | Chairs | Mirror | Sconce Lights | Sofa | Wreath

Blogger Christmas Home Tour 2020

Blogger Christmas Home Tour 2020

Can you guess what one of my favorite Christmas movies might be? Hmm.

Blogger Christmas Home Tour 2020|

Red Velvet Quilt | Buffalo Pillows | Merry Christmas Ya Filthy Animal Pillow | Buffalo Plaid Throw | Santa Mugs | Upholstered Bed | Pendant Lights | Nightstands

Merry Christmas blog friends and family!  Thank you for visiting my 2020 Christmas home tour.  I wish you nothing but peace and happiness this month.


Laura

HOLIDAYS

HOW TO MAKE A CHRISTMAS PRESENT CENTERPIECE

December is here and I couldn’t be happier!  The Christmas home tour should be up by the end of the week, but today I want to share with you one of my favorite ways to decorate using little wrapped boxes!  This Christmas present centerpiece is the perfect way to decorate a table top, coffee table, or any other surface that needs some holiday cheer.

Christmas centerpiece ideas

I’m no stranger when it comes to wrapping up little boxes, I find that it makes really cute affordable holiday decor, but this year I decided to take it a step further and turn it into a centerpiece.  Not only is this centerpiece festive, it’s also extremely practical and budget friendly.  Why, you say?  Because we’re wrapping up food boxes!  We all eat food so why not first turn it into a Christmas centerpiece?

How to make a Christmas present centerpiece out of food boxes

SUPPLIES NEEDED

Lots and lots of food boxes!

3-4 rolls of coordinating wrapping paper

Tape & ribbon

Various bows & curly ribbon

How to make a Christmas present centerpiece out of food boxes

What are the best food boxes to wrap?

Walmart and Dollar Tree are great places to find affordable box food in a variety of sizes.  I usually go around finding boxes I like, stacking them together to see if the sizes work.  Some of my favorite food boxes to wrap are Pop Tarts, large food boxes such as hamburger helper or scalloped potatoes, macaroni and cheese boxes, large and small candy boxes, Jiffy cornbread, little boxes of raisins, and jello and pudding boxes.

How to make a Christmas present centerpiece out of food boxes

I want to make this centerpiece, but what if I want to eat the food first?

No worries!  I generally prefer to keep the food in the boxes because it’s easier and I like my boxes to have some weight.  However many times I’ve gently opened the boxes removed the food and taped or hot glued the boxes back shut.  You can always take a photo of the cooking instructions with your phone for later.  If you do remove the food before wrapping you can toss the boxes after Christmas if you like.

How to make a Christmas present centerpiece out of food boxes

INSTRUCTIONS

Start by wrapping all the food boxes in various wrapping paper.  Crank up some music, sip some tea, or have a glass of wine… this is the most time consuming part.

I used regular tape for the gift wrapping but if you want to a cleaner look for the ends you can use double sided tape, and I’ve even used hot glue before to secure the edges.

How to make a Christmas present centerpiece out of food boxes

Create a base using the largest size boxes, then continue stacking the boxes in a random pattern.  Once I finished this step I realized I could use a few more boxes so I went off to the pantry for more cornbread and pudding boxes to wrap.

Once you’re finished with the layout it’s time to start adding bows.  Old bows work great for this so be sure to save them for next year.

How to make a Christmas present centerpiece out of food boxes

Naturally no matter how well you arrange the boxes you’ll end up with a few gaps,  so I like to fill them in with curly ribbon.

Christmas centerpiece ideas

Christmas centerpiece ideas

Christmas centerpiece ideas

Once the Christmas season is over simply unwrap the food and stock it back in your pantry for a later day.  Better yet put a smile on someones face and donate the unopened unwrapped food boxes to a food bank for a family in need!

If you took the food out before you wrapped them you can toss them or keep the boxes for next year.  I hope you enjoy creating your own Christmas present centerpiece, if you do be sure to tag me on Instagram or leave me a photo in my Pinterest pin.


Laura

HOLIDAYS

DIY FROSTED GLITTER CHRISTMAS ORNAMENTS

How to make frosted glitter ornaments

Every January I hit the Christmas sales and I always end up with several boxes of clear craft ornaments.  Over the years my collection of crafting ornaments has grown and grown, yet I never did anything with them.  Recently when I was cleaning out our attic space and I came across all my boxed ornaments I thought ok this is the year… I have got to do something with these.

I’ve been playing around with lots of ways to decorate these ornaments, I came up with several ideas, but I must say these frosted glitter ornaments are so far my favorite!  Plus they’re so easy to make.  I know I throw around the word easy a lot, that’s because I’m not a fan of complicated crafts!  Cheap glue, basic salt, and a little glitter is all you need to make these gorgeous ornaments.   They’re so pretty I’d say they’re gift worthy!

How to make frosted glitter ornaments

SUPPLIES NEEDED

Plain table salt

White or clear glue

Glitter (I used iridescent and fine silver glitter)

Clear glass or plastic ball ornaments

Disposable plates

Craft brush

How to make frosted glitter ornaments

INSTRUCTIONS

How to make frosted glitter ornaments

Grab the bottom of the ornament and starting at the top of the ornament paint on an even layer of glue on half of the ornament.

How to make frosted glitter ornaments

Flip the ornament and gently holding on to the hook paint glue on the bottom half of the ornament.

How to make frosted glitter ornaments

Immediately sprinkle on the salt until you reach your desired frosted look.

How to make frosted glitter ornaments

Then quickly sprinkle on the glitter and let dry.  I carefully put hooks on to let the ornaments dry while they’re hanging on our Christmas tree.  I did however place a few on the table and they dried without any smudges.  The salt stays on amazing well once dried, glitter’s always a pain but it’s just so pretty.

How to make frosted glitter ornaments

How to make frosted glitter ornaments

I did make a batch of these frosted ornaments without glitter, just the salt frost.  I had them hanging on the tree to dry when I looked over and saw my 19 year old daughter licking them.  That’s my Haley Bears… good thing the glue is non-toxic.  Overall I much prefer these ornaments with glitter added.  Not only do they sparkle more in the light like actual frost, it keeps my daughter from licking them!


Laura

Fall

THANKSGIVING LEFTOVER STUFFED MUSHROOMS

Thanksgiving leftover stuffed mushrooms

Let’s hope you still have some Thanksgiving leftovers hanging around because I MUST share this amazing Thanksgiving leftover stuffed mushroom recipe with you!  I really wish I would have shared this delicious recipe with you sooner, but I just created it last night.  Part of my Thanksgiving joy is having lots of leftovers, not just to eat but to play around with in the kitchen.

As I took my first bite of these stuffed mushrooms last night I knew I had a winner.  Brian very willingly went to the store to get more mushrooms… it was that good.  So today while making my second batch I thought I would share this delicious recipe with you.

Thanksgiving leftover stuffed mushrooms

It’s pretty easy to figure out what to do with leftover turkey, but what about the rest of the sides that you tire of quickly?  Leftover dressing dries out, and the leftover cranberries and gravy probably get shoved to the back of the refrigerator where you find them weeks later.   Being an extreme stuffed mushroom lover I decided to go to work and find a creative way to use leftover dressing or stuffing, cranberries, and gravy.  Not only is this recipe delicious it couldn’t be easier!

Thanksgiving leftover recipes

The ingredients are simple and there is no pre-cooking!  My cornbread dressing dries out quickly so I added a few tablespoons of milk to make the mixture pliable, and then blended it in a mini-food processor.  I also pureed the cranberries and added a little water to those and the gravy to thin them out.  If you don’t have a food processor no worries just mix it by hand.  This should be a fun stress-free recipe.

How to clean mushrooms

Proper cleaning of mushrooms is essential for any good stuffed mushroom recipe.  You see, mushrooms are extremely porous and soak up water like a sponge, so I don’t rinse them in a colander.  After removing the stem I use a damp rag or paper towel to clean the top and sides.  I prefer a rag because the texture helps remove dirt.  From there I scoop out the gills with a spoon or strawberry huller to make room for lots of delicious filling.

Thanksgiving leftover stuffed mushrooms

Once my mushrooms are stuffed I top them with a dollap of gravy and then they’re off to the oven.  By the way I used Tyler Florence’s Carmelized Onion and Cornbread Stuffing recipe (cooked separately with a lot more liquid) along with Ina Garten’s Homemade Gravy.  It’s a heavenly stuffed mushroom combination, but I believe any recipe would make a delicious combination.

Find the detailed recipe below.

Thanksgiving leftover stuffed mushrooms

Thanksgiving Leftover Stuffed Mushrooms

Ingredients

  • 2 8 oz pkgs whole white button mushrooms
  • 1 1/2 cups leftover dressing or stuffing
  • 2 tbs milk
  • 1/4 cup shredded parmesan cheese
  • 1/3 cup leftover gravy
  • 1/3 cup leftover cranberries, pureed
  • 2-3 tbs water, to thin the cranberries and gravy
  • 1 tbs olive oil

Instructions

  • Pre-heat oven to 400°.
  • Remove mushroom stems and with a wet paper towel or rag clean the tops and sides of the mushrooms. With a spoon or strawberry huller scoop out the mushroom gills.
  • Place mushrooms in a greased baking dish and drizzle with olive oil.
  • In a bowl or small food processor blend together dressing and milk. If your dressing is really wet you can skip this step. If your dressing is really dry add more milk until its sticks together.
  • Add parmesan cheese and mix together by hand or food processer.
  • Scoop heaping spoonfulls of dressing mixture onto the mushrooms.
  • Thin the gravy with a little water and spoon a little on top of each mushroom.
  • Bake for 20 minutes or until mushrooms are browned and the dressing mixture is hot.
  • While the mushrooms are baking, thin the cranberries with water.
  • Remove from oven, drizzle with cranberry sauce, and serve immediately.

Thanksgiving leftover stuffed mushrooms

Thanksgiving leftover stuffed mushrooms

Can we all agree stuffed mushrooms of any kind are just devine?  Every year I play with leftovers, but this recipe is hands down my favorite, and it makes a fresh side to serve along with leftover turkey too.  Up next I’ll be making a turkey and dressing quiche and a turkey bolognese.  If you have your own fun ways to use Thanksgiving leftovers please do share!


Laura

HOLIDAYS

HOW TO MAKE CHRISTMAS ORNAMENT GARLAND

How to make Christmas ornament garland

Happy Friday!  I hope everyone had a wonderful Thanksgiving, but it’s time to put the fork down and get our Christmas game on.  Soon I’ll have the 2020 Christmas home tour on the blog, but for now I’m still having fun making festive decorations.  Today I’m sharing how to make this Christmas ornament garland, I love how it turned out, but best of all it was crazy easy to make!

How to make Christmas ornament garland

SUPPLIES NEEDED

Craft wire

Christmas ornament balls in various sizes

Yep… that’s all you need, easy right?

How to make Christmas ornament garland

I picked up the majority of my ornaments from The Dollar Tree, you just can’t beat 12 ornaments for a dollar!  Some of my larger ornaments and textured ones came from my ornament graveyard.  I have boxes and boxes of old ornaments that I like to save for crafts.

How to make Christmas ornament garland

INSTRUCTIONS

Measure out the length of wire needed for your space, be sure to measure out a little more than you need so you have extra wire for tying the ends off.  Then simply string the ornaments along the wire using various sizes or colors.

I wanted to let the garland drape off the mantel, so I did need to adjust a few ornaments to the back or the front to lay smoothly.  But what if you want to hang your garland?  No problem!   Simply twist off some wire loops in the back and you’re good to hang.

How to make Christmas ornament garland

Push the ornaments along the wire to ensure there are no gaps and then simply tie each end off.  That’s pretty much it, it’s such an easy Christmas decoration to make that really makes the room pop.

How to make Christmas ornament garland

How to make Christmas ornament garland

I’m partial to red but there are so many fun color combinations you could come up with!  I use a combination of plastic and glass balls, and I prefer the plastic ones because I don’t worry about breaking them.  Plastic is definitely less stress, you can throw it around a bit more.

How to make Christmas ornament garland

Gorgeous, budget friendly, and easy to make!  That’s my kind of Christmas craft right there.  I can’t wait to share some more festive ideas and the home tour with you soon!  Until then stay safe, and I hope you find some great online sales.


Laura

Colorado Home

BUDGET KITCHEN MAKEOVER

Teal kitchen cabinets white subway tile Giani marble countertop

I’m so excited to share our kitchen mini makeover with you!  This is just a temporary makeover until we can do a full remodel when the time is right.  A few weeks ago I decided to give our kitchen a mini makeover, and we are thrilled with the results!

It all started with ordering our new gas range.  Not only was our old electric range falling apart, it was a huge eye sore.  We waited several  months for a sale and then another two months for it to be delivered due to Covid.  I kept thinking about this new amazing gas double oven range sitting in my hideous kitchen.  Some of our other upgrades happened over the last year, like when the microwave stopped working, the larger sink upgrade, building a larger pantry, and the new lighting, but still our new range deserved better so a few weeks before it was delivered I went to serious work!

I spend a TON of time in the kitchen so why not make it pretty even if it is temporary?  I say if it makes you happy then it’s worth it!  Ok, ready to see some before photos?

Budget kitchen makeover

Budget kitchen makeover

Budget kitchen makeover

First up on my list was to do something about the countertop and backsplash.  I debated about using marble contact paper on the countertops, lots of people are doing it and it looks pretty good.  However we use our kitchen hard, so I was convinced it wouldn’t hold up at all.  After a lot of searching I decided to go with the Giani Carrara white marble countertop kit.  Everything you need is included in the kit and there are lots of video tutorials online to help.

Giani Carrara White Marble Epoxy Countertop Kit

Prep work was minimal, just clean with a brillo pad and rinse.  Then you roll on a few coats of the white primer paint and let it dry.  To create the marble veins you simply paint on the grey lines, spray with water, and smudge with a brush until you get the desired effect you’re after.  Last you apply the epoxy, I wasn’t sure that my marble veining looked good but once we applied the glossy epoxy it brought it to life!  The entire countertop process took about 3 days and it was so worth it!

Giani Carrara White Marble Epoxy Countertop Kit

Red Le Creuset pans on wall

For the backsplash I went with a peel and stick subway tile, and it was incredibly easy.  Just measure, cut to size, peel, and stick.  The back is nice and sticky so you can reposition the tiles a few times if needed.  Initially when I opened the package I didn’t think it looked very realistic but now that it’s up I think it looks amazing!  The only downside is that the tiles are really reflective and hard to photograph.

Peel and stick subway tile

The bamboo roman shade is from Lowe’s, I can’t remember the color but it was in stock and cut to size, and the pendant light was an amazing steal for under $30!

Peel and stick subway tile review

Giani Carrara White Marble Epoxy Countertop Kit review

One thing we will definitely be doing in the full kitchen remodel is reconfiguring the cabinets to fit a dishwasher.  Until then I’ve made peace with hand washing dishes.  The small original kitchen sink was so hard to wash dishes in so we upgraded to a single basin work station sink.  It’s been a huge lifesaver!  It comes with a cutting board, a small drying rack, and a colander that fits over the sink.  I was able to toss our large clunky dish drainer, and I purchased an over the sink dish drainer to save space.

Giani Carrara White Marble Epoxy Countertop Kit review

I debated for a while if I should paint the cabinets or leave them alone, but you know I love a good DIY project so you bet I chose to paint them!  In our full kitchen remodel I have my heart set on custom alder cabinets to match our doors but until then I decided to have a bit of fun and paint the cabinets teal.

I experimented with chalk paint because of the low prep work but I wasn’t happy with the color and after a few days the chalk paint looked rough.  Spur of the moment I used our old front door paint.  Yes, I used exterior paint on my cabinets, I had it on hand and it works.  I love the end result.

Teal kitchen cabinets white subway tile

mini kitchen makeover

You bet I love my new kitchen toy, I’ve cooked non-stop since receiving it!  Having a double oven and gas cooktop is a dream.

Kitchen makeover

Cabinets are Sophisticated Teal by the Home Depot Decorator Collection

Pendant Light | Julia Child Quote | Leopard Dishes | Marble Countertop Kit | Subway TilesDish Rack | Workstation Sink | FaucetRug | FloorOven | Le Creuset Dutch Oven | Le Creuset SkilletLe Creuset Square Skillet | Mug Tree Stand


It’s the same kitchen but suddenly it feels so bright and fun now!  Maybe we’ll delay the major kitchen remodel a little longer now and focus on other projects because other than a missing dishwasher I can honestly say I’m happy with the kitchen.

Like I mentioned we use our kitchen hard and I’m curious how the countertop and backsplash will hold up over time.  I’ll definitely be updating, until then feel free to ask me any questions.


Laura