Crafts

APPLE PIE BODY SCRUB

It’s not officially fall yet, but once September 1st gets here all bets are off around here and we go into full fall mode.  The beginning of fall is just so truly magical that I like to be prepared for it so I can savor every precious moment.  To me fall means warm blankets, fuzzy socks, watching the leaves change, and everything smells like cinnamon spice.  I’m a pumpkin spice nut just like everyone else… but another fall favorite of mine are apples.  There is something just so warm and wholesome about apples, the way they look and how they taste and how they smell… I just love them.

I think we can all agree 2020 has been a bit rough on us all… am I right?  We need fall comfort more than we’ve ever needed it and this apple pie body scrub is an easy way to pamper your mind and body right into fall.  It’s the ultimate luxury in the shower, exfoliating and moisturizing your skin while the aroma of apple pie fills your shower.

How to make apple pie scented body scrub

When it comes to body scrubs I strongly prefer using coconut oil over any other oils.  Not only is coconut oil super moisturizing, its light texture is easy to work with and glues all the ingredients together.  As I’ve mentioned before with my other body scrubs it’s important to keep the coconut oil at room temperature, meaning solid, you never want to melt it.

TIP:  Ideally you want to work with refined coconut oil.  Refined coconut oil takes away the coconut smell and taste which is ideal for a non-tropical scrub such as this.  If all you have is unrefined relax… you can absolutely use that as well you might just get a whiff of coconut with your apple pie.

When I make homemade bath and beauty products I like to keep the ingredients as simple as possible.  Coconut oil, basic sugar, spices and other household ingredients.  To intensify the apple pie scent I added a few extras along with my basic spices, but these are optional!  I decided to add a few drops of cinnamon essential oil, and to get that great apple scent I added a little apple extract, which can be a little tricky to find but Amazon to the rescue!

Please note that if you don’t have cinnamon essential oil or apple extract you can still make this scrub with basic pantry spices.  So I’ve listed these items as optional in the recipe.  You can find the recipe and photo steps below.

Apple Pie Body Scrub

Ingredients

  • 1/2 cup coconut oil (preferably refined)
  • 4-5 drops cinnamon oil (optional)
  • 1/4 tsp apple extract (optional)
  • 1 cup brown sugar, packed
  • 1 cup white sugar
  • 3 tsp cinnamon
  • 1 tsp nutmeg
  • 1 tsp allspice
  • a storage container

Instructions

  • In a medium size bowl add coconut oil and mix it with a spoon until it softens up. If you're using cinnamon oil and apple extract add it now with the coconut oil.
  • Add the spices to the coconut oil, mash and stir well to blend.
  • Add the sugars and mix again, using a spoon at first, and then your fingers to remove lumps and completely blend.
  • Store in a clean storage container and use within 3-4 weeks.

Apple Pie Body Scrub Steps

I’ve made this scrub a few times, first with only brown sugar, it was a great scrub, but in the end I decided my favorite was a blend of white and brown sugar.  The texture had a bit more grit which I prefer for a scrub, but it’s up to you.  As with all my body scrub recipes you can tweak them to your liking.  Add a bit more spice, sugar, or coconut oil until you find your happy balance.

How to make apple pie scented body scrub

Fall scented body scrubs

Like all my body scrubs this one should come with a warning.  It smells so good you just might be tempted to eat it while showering!  I don’t know about you but I’m just so happy fall is here and I’m ready for all the cozy goodness it brings.  If you’re an apple lover like me I’ll be sharing my apple crisp within a few weeks.  It smells and tastes like apple pie, but it’s better and easier too!


Laura

RECIPES

SLOW COOKER BEEF STROGANOFF

Slow cooker beef stroganoff recipe

Happy September friends!  On my last blog post I shared with you how every August I just can’t deal with cooking.  Call it end of the hot summer season burn out… I don’t know but like clockwork every August it happens!  The best strategy I’ve learned it to have a pile of easy no brainer recipes that can carry me through the slump.  I recently shared my oh so easy spicy maple salmon recipe and now I’m sharing another oh so easy girl you can do this recipe with my slow cooker beef stroganoff.  It has minimal prep work, you basically just throw everything in the slow cooker and then your free!  Well, you’re free for about 6-8 hours anyway.

Slow cooker beef stroganoff recipe

I love the complete easy laziness that slow cooker or crockpot meals have.  I’m normally NOT a fan of any slow cooked recipe that calls for additional stove top cooking.  When it comes to the slow cooker I want to be the laziest person possible!  Having said that this recipe does call for additional stove top cooking.  What??  I know, but hear me out, we’re just boiling the noodles, and it’s egg noodles, those babies cook fast!  But if noodles aren’t your jam you can skip them altogether and serve with bread.

Easy slow cooker recipes

When  I say this recipe is easy I mean it!  I start with lean pre-chopped stew meat, a little seasoning, add sliced mushrooms, and a rough chopped onion.  That’s it, easy peasy!

8 hours later…..

Easy crockpot recipes

Now the fun starts, building the sauce!  To thicken the sauce a bit I like to ladle out some liquid to a bowl and whisk in some cornstarch until smooth.  With the heat still on the slow cooker I stir the cornstarch mixture back in and let the mixture thicken while I start the noodles.

Slow cooker beef stroganoff recipe

Once the noodles are done right before serving we add sour cream and Dijon mustard to finish the delicious sauce.

Fact: anything with sour cream is incredibly delicious and this sauce certainly doesn’t disappoint.  If you’re not a fan of Dijon don’t let that throw you off, it helps to emulsify the sauce and adds just a hint of tang.  My kids aren’t mustard fans yet they never notice it.  Shh!

Slow cooker beef stroganoff recipe

Slow Cooker Beef Stroganoff

Servings: 8

Equipment

  • Slow cooker

Ingredients

  • 2 lbs beef stew meat
  • 1 yellow or white onion, chopped
  • 1 lb whole mushrooms, rinsed and sliced in half (or use pre-sliced)
  • 1 tbs worcestershire sauce
  • 1 1/2 tsp salt
  • 1/4 tsp pepper
  • 2 tbs cornstarch
  • 3/4 cup sour cream
  • 2 tbs Dijon mustard
  • cooked egg noodles, for serving
  • chopped fresh parsley, for garnish

Instructions

  • Place beef, onion, mushrooms, worcestershire sauce, salt and pepper in a slow cooker.
  • Cover and cook on low 8 hours or high 6 hours, until meat is tender.
  • Ladle 1 cup of the liquid from the slow cooker into a medium size bowl. Add the cornstarch and whisk until smooth. With the heat still on pour the cornstarch mixture back in slow cooker and stir until combined.
  • Cook another 10 minutes until the sauce has thickened. While the sauce is thickening boil the egg noodles according to the package directions.
  • Turn the slow cooker off, or set it to warm and stir in the sour cream and Dijon mustard.
  • Serve over egg noodles and top with fresh parsley.

Easy slow cooker recipes

There you have it, a family friendly easy meal that takes very little time and effort.  This meal is so hearty and satisfying but what I really like is how it doesn’t scream I’ve been cooked in the slow cooker.  Whether you just can’t deal with cooking or your short on time this recipe is perfect!

Fall is coming, who else is bursting with excitement?  The blog will be turning full on fall soon!  Have a great week my pumpkins!


Laura

Main Dishes

5-INGREDIENT SPICY MAPLE SALMON

Spicy Maple Salmon with just 5 ingredients

Every August like clockwork I get completely burned out with cooking.  It’s always been a weird phenomenon with me and I honestly can’t explain it.  Personally I think it’s just the end of the hot summer season that stops all my passion, I’m ready for fall food but the temps are still hot and I’m over it.  Occasionally I’ll get the same feeling late winter but nothing like August, August is epic.  Ok, so you’re wondering why I’m telling you this right?  We all get bored at times in the kitchen and lack the will power.  We still need to eat and we can’t eat every meal at a restaurant, so what do we do?  Cook super easy recipes that require no effort, of course!

Here I am ready to share one of my favorite, easy, no brainer recipes…my spicy maple salmon recipe.  It takes just 5 easy to find ingredients, marinates an hour, and cooks just minutes in the oven.  Pair that with a simple green salad and you’re good to go!

Spicy Maple Salmon with just 5 ingredients

Seriously, this could not be easier!  I just throw maple syrup, spicy sriracha, a little garlic powder, and low sodium soy sauce in a bag.  Toss in the with salmon, marinate an hour, cook, and boom done!  It’s so easy even those who can’t deal with dinner can do this.  It’s perfect for my August cooking burn out or just a quick weeknight meal.

We’ve used Frank’s buffalo sauce in place of the sriracha before with mediocre results… seriously don’t be afraid of the sriracha sauce, it adds a punch that nothing else can without being too spicy.

5 ingredient recipes

I don’t know about you but any time I put a marinade together in a bag it always falls over.  I mean like always!  It looks stable on the counter and as soon as I turn my back it falls and all the liquid spills out.  So now without a doubt I always set my marinade bags in a bowl for stability.  By the way if you’re out of resealable bags you can also marinate in a bowl, just make sure everything is evenly covered.

Easy salmon recipes

Toss in the marinade ingredients, add the salmon, then seal and shake.  Place it back in the refrigerator for about an hour then boom you’re ready for the oven.

Just a few notes, I always use low sodium soy sauce.  I’m a salty girl, I love salt… my last name is Salter after all, but I honestly can’t do full sodium soy sauce, it’s just too intense.  I recommend you also use low sodium but that’s up to you.  I also recommend you use skin on salmon, it can be frozen or fresh but having the skin on adds so much flavor and moisture.  I never do skinless!  Feel free to add a few sliced green onions if you have them on hand, it makes things fancy!  You can find this amazingly easy recipe below but keep reading to find a few more of my recipe tips.

Spicy Maple Salmon with just 5 ingredients

Spicy Maple Salmon

Prep Time35 minutes

Ingredients

  • 4-6 8 oz salmon filets (with skin on preferably)
  • 6 tbs maple syrup
  • 2 tbs low sodium soy sauce
  • 2 tbs sriracha sauce
  • 1 tsp garlic powder
  • gallon size ziploc bag or a bowl to marinade

Instructions

  • In a ziploc bag combine maple syrup, soy sauce, sriracha sauce, and garlic powder.
  • Add the salmon filets to the bag, close and shake to combine.
  • Place the salmon in the refrigerator and let marinate for at least 30 minutes.
  • Pre-heat the oven to 425° and line a rimmed baking sheet with foil or parchment paper.
  • Place the salmon on the pan skin side down and bake 7-9 minutes.

The first time you make this recipe you’ll definitely want to watch the cook time.  Salmon is a bit like steak, some like it rare, others more done.  You can also marinate it a bit longer but I’ve never gone more than 90 minutes.  Sometimes I’ll cook a whole salmon and of course that takes a bit longer, a good 20-25 minutes.  However I am cooking at a high altitude which means a longer cook time so keep an eye on it the first time for the best results.

Spicy Maple Salmon with just 5 ingredients

Pair this spicy maple salmon with some rice and a simple arugula salad and you’re good to go!  In the summer we make this salmon recipe all the time, along with my asian sesame salmon both are perfect satisfying meals.  It’s delicious and healthy!  Am I the only one who gets August cooking burn out?  Please tell me no.  Or maybe you have another month where you’re so over being in the kitchen?  Do tell, I’d love to know.  I do have another easy “I can’t stand to cook another meal ever again” recipe that I’ll be sharing soon.  It’s rich and beefy and cooks in the slow cooker.  Another perfect meal whether you’re just busy or you’re waiting on your cooking passion to come back.

Got any cooking tips or ideas for when you just can’t deal for whatever reason?  Share them in the comments below.  Happy end of summer!


Laura

Colorado Home

MEDIA ROOM & ENTRY REMODEL

Cedar tongue and groove walls

Hurray!  At last our media room is complete, and I am so excited to share the reveal with you!  Remodeling this space during Covid was a challenge, and it really slowed our progress.  We had to schedule wood delivery to our home because local wood supply stores were closed, and lots of items were on backorder for months, like our doors.  It was a frustrating process, but hey we’re done!!  I have lots of photos and so much to share about this space… so grab a drink, you’re going to be here a while!

We previously referred to this room as a basement, I think because our realtor did, but now we’ve renamed this space to the media room.   The next photo is from the realtor website, and I remember looking at it being so confused what this space was.  Having a junky garage space right off the front door with a bedroom and bathroom behind it is weird.  Especially considering we have an attached garage and a larger separate garage on the lower level of our property.

Before I share the rest of the room how about some ugly before photos?  Sorry, they’re a bit blurry… I didn’t check my camera settings.

Brian and I both get PTSD looking at these photos.  Honestly.  This gross space was our bedroom for about 2 months.  I put down clean rugs and we had our mattress and boxspring on the floor while we remodeled the upstairs living room and our future master bedroom.  The front door was in bad shape which meant a TON of bugs, it definitely traumatized me waking up with things crawling around me.

Once we moved into our upstairs bedroom we cleaned out this space and installed a new wood floor.  I did most of the floor installation myself, it was a really satisfying project!  The original wall and ceiling texture was an uneven DIY job so we had the ceiling retextured and centered the light.  Then the room sat untouched for months until after the holidays.  We knew this room would be a workhorse and the details needed a lot of intricate planning.   We needed storage, an entry space, and coat closet, and we decided to move our washer and dryer down to this space as well.  A lot had to go into this small closet, all while dealing with the clunky furnace.

We were really happy with our cedar tongue and groove ceiling upstairs and decided on the same wood for this room’s walls.  Since it’s the first space people see, I wanted the room to feel warm and cozy and set the tone of the rest of the house.  Our home was built to be fire resistant, with cement siding and using all metal beams to frame the house.  The walls bend around the metal beams on this level, we can’t really do anything about that so we just had to work with it.  Luckily the new wood walls help to camouflage it.

Oh how I hate odd placed windows!  We’ve taken out windows before when they didn’t work with our space, but this one needs to stay for ventilation.  I stared at this wall for months trying to decide what to do with the small offset window, I considered a gallery wall or a large bold piece of art.  One day I decided to post on Houzz asking for advice on how to decorate around the window.  Big mistake.

I asked about the wall and instead everyone just started tearing down the room.  They hated my sofa, they said the room was too feminine, someone said my style of decor was all wrong, they hated my sofa pillows, the white baseboards and my favorite part… someone said I should decorate the room like a trading post and put fur on the walls.  It was at this moment I realized that I decorate my home for ME and honestly don’t care if other people like it.

I decided on floating shelves and a bold lamp to draw the eye away from the window.  I’m actually quite happy with how it turned out and now I hardly even notice the off-center window.

Off center window behind sofa

Now yes, the sofa is a little feminine for the room and unfortunately I didn’t think about the sofa buttons against the cedar wood knots.  Yeah, it’s a little busy, but this sofa is bought and paid for so we’re just going to work with it!  Haley has already asked for this sofa when she gets her own apartment in a few years so I’ll buy a sofa with cleaner lines at that time.  In the meantime I think the large pillows and throw blanket help the sofa blend.

Our media living room media

One day on Pinterest I ran across a photo of a wood stained room with white baseboards and trim and I fell in love.  I know white trim with wooden walls isn’t for everyone but we both love the contrast.  It pops!

Knotty alder doors

For a brief moment… and I mean brief we considered building a laundry room in the back of our garage and Brian was considering having a desk somewhere in this room.  Our garage is deep so there was plenty of room, but during the winter I realized I just couldn’t walk in and out of a dirty cold garage for laundry.  So instead Brian built an office for himself in the garage and we squeezed the washer and dryer down here.  The rolling cart is such a lifesaver for doing laundry and saves us so much space.

My favorite part of a room is always the little details.  I’ve always had a thing for the Restoration Hardware chandelier lamps but they’re just so expensive!  I managed to find a cheaper knock off at Overstock, I snagged a coupon and had some rewards to lower the cost.  I love the feminine lamps against the masculine wood wall, it’s the exact effect I wanted.

A glass coffee table has always been my favorite trick to lighten up a room and make it feel bigger.  They’re so easy to take care of and I never worry about spills, I just spray it down with windex and we’re done.

Details… just lots of little details everywhere that I love.

Restoration Hardware knock off chandelier lamp

Our media living room media

Space saving small entryway

Finally the entryway!  We managed to squeeze in a coat closet next to the utility closet.  We chose a double rod to maximize space and went with an Elfa door rack.  Elfa door racks always save the day!  The baskets hold all our weather essentials and the gift wrap attachment holds our umbrellas and hiking poles perfectly!

Elfa giftwarp door rack

Small entryway ideas

More hooks, ya know I love them!  Our entryway is small but it’s quite effective.  The entry shelf and hooks help keep clutter down and our things organized.

The metal S was hanging outside of our last house and over the years it developed a unique rusty patina.  It looks even better now!

Our media living room media

Our media living room media

I’ve always loved black and white photos and I think combined with the gallery frames it created a fantastic modern effect against the warm wood walls.  I love these photos of my kids, they we’re running around having so much fun.  I don’t frame a lot of serious photos, I’m drawn to the quirky ones because it feels more like a captured moment in time.

Our media living room media

There you have it, our media room reveal.  It serves as a great second living area for us.  I am so happy this space is done!  Our new back deck is also finished but I’m having the hardest time finding patio furniture.  Ugh… everything I like said it will ship out in 13-17 weeks.  So that’s holding me up a bit. I know how fun it can be to shop other people’s homes, so below I’ve linked everything below that I can find that is still for sale.

Read my sofa review HERE and my DIY wall art HERE.  Baseboards and trim are Simply White by Benjamin Moore.  Cedar walls are finished with Minwax Polycrylic in Satin.  Roman Shades are in Toledo Canvas, plain fold with a blackout liner.

Wood Floor | Sofa (Grand in Velvet Buckwheat) | Leather Pillows | Ivory Pillows | Teal PillowCoffee TableTrunk Side Table | Table Lamp | Gallery Wall Frames | Giant Metal “S” Letter |  Floating Shelves | Chandelier Floor Lamps | Entry Mirror | Entry Hooks | Black Media Console | Art TV | Candle Holders | Wooden Horse | Cage Entry Light | Room Light | Glass Door Knobs | Laundry Cart | Elfa Door System | Interior Doors 

Have a fabulous week!

Laura

RECIPES

SLOW COOKER WHITE QUESO DIP

Slow cooker white queso dip

Any queso fans out there?  Yeah… I thought so.  Queso has always been our family’s biggest weakness.  We just can’t say no to it.  I mean who can resist melty gooey cheese over a crunchy salty tortilla chip?  Over the years I’ve made tons of different queso recipes and I’ve always cringed at some of the ingredients that go in.  Cream of mushroom soup?  Yeah, once upon a time I was guilty of that, creamy yes, but it doesn’t belong in queso!  I’ve always had issues with Velveeta as well… I’m sorry to all the Velveeta fans out there but unwrapping that orange gelatinous brick of manufactured cheese just grosses me out… I mean it doesn’t even require refrigeration!

With this slow cooker white queso dip we’re getting back to the basics with real cheese!  It’s incredibly easy to make and I’m proud to say it’s our family’s new favorite queso recipe!

Slow cooker white queso dip

In this recipe we use pepper jack cheese, sharp white cheddar, and white American cheese.  I know american cheese is processed too but we’re using a small amount and it’s not artificially colored, so I consider that an overall improvement.

Crazy fact, did you know all cheese is naturally white and it’s colored orange to be more aesthetically pleasing?  We learned that while touring a cheese factory in Wisconsin years ago.

Slow cooker white queso dip

Along with the cubed cheese, we finish the recipe with a brick of cream cheese, garlic powder, milk, and mild verde salsa!  Yeah baby!  Herdez is our verde salsa of choice and the mild gives the perfect amount of heat.

Cream cheese will always be my guilty pleasure, I can eat it straight out of the wrapper!  I prefer full fat because that’s how I roll, feel free to use 2%, just not fat free.  Cook one hour on high or 2 hours on low.  Whisk until smooth and then devour it!

Slow cooker white queso dip

Slow Cooker White Creamy Queso

Servings: 6

Equipment

  • Slow cooker

Ingredients

  • 8 oz cream cheese
  • 1 cup milk
  • 4 oz sharp white cheddar, cubed
  • 8 oz pepperjack cheese, cubed
  • 4 oz white American cheese (we used Kraft Deluxe Slices)
  • 1 tsp garlic powder
  • 1/2 cup mild salsa verde (we used Herdez)
  • 1-2 jalapeno peppers for garnish, chopped, with seeds removed

Instructions

  • Add all the ingredients to a slow cooker except for the jalapeno garnish.
  • Cover and cook on low 2 hours, or high for 1 hour, until melted. Stir until smooth.
  • Serve with chips and jalapeno garnish.

Slow cooker white queso dip

We love how this queso tastes like real cheese.  It’s smooth, creamy, and full of flavor but it still has the slightest bit of cheese grit… reminding us real cheese was used.  Don’t skip on the jalapeño garnish either, once seeded you remove most of the heat and it adds a burst of fresh flavor.

I always make a double batch since we’re queso addicts here.  You can refrigerate any leftovers, just microwave till hot, and add a little milk to thin it out if needed.  Another favorite is serving this queso over grilled chicken or broccoli, it’s seriously delicious!


Laura

Colorado Home

SUMMER TABLESCAPE WITH LEMONS & FLOWERS

DIY Lemon & flower summer tablescape

Nothing is more enjoyable to me than having a nice meal at a beautifully set table.  These days it’s challenging to bring everyone together for a sit down meal, but I’ve noticed having a lovely tablescape encourages people to come together for meal times.  It creates a beautiful, festive-like atmosphere, and it feels like a fun little private party at your table.  I always love creating beautiful tablescapes any time of year and this cheerful summer tablescape is definitely a favorite.

Back on theme with my last hydrangea and rose blog post I’m sharing more of my favorite flowers for the table, but this time I’m adding lemons.  We never have a shortage of lemons in our house, we use them for everything, food, drinks, even decorating.

DIY Lemon & flower summer tablescape

I love the casual summer simplicity of skipping the placemats and other heavy linens and using rustic grapevine chargers instead for texture.  I’m so bummed out these chargers from Ballard Designs already sold out, hopefully they’ll get restocked, and in the meantime I have linked some similar ones at the bottom of this post.

DIY Lemon & flower summer tablescape

DIY Lemon & flower summer tablescape

When it comes to dinner plates I usually stick with white and bring in color and patterns through my napkins, accent plates, and centerpieces.  I’m always on the lookout for accent plates in different colors and patterns.  I find them to be pretty affordable and always make the table pop.  They make perfect appetizer, salad, and dessert plates too.  These buffalo plaid accent plates are pretty amazing, and will work with so many seasons.  I picked them up from Hobby Lobby on sale and have them linked below if you don’t have a store near you.

DIY Lemon & flower summer tablescape

DIY Lemon & flower summer tablescape

Cut hydrangeas can be tricky at times, often they can wilt the next day and it’s very frustrating.  Removing the leaves can help the flowers stay hydrated longer but I prefer to keep the beautiful leaves.  A favorite trick of mine is to cut the stem at a sharp angle and dip each end in alum.  Alum is used for pickling and canning, and you can find at the grocery store in the spice section.  It works beautifully to keep hydrangeas fresh longer and ideally you’ll want to mist the hydrangea with water a few times a day too.  Hydrangeas are thirsty flowers!

DIY Lemon & flower summer tablescape

For the lemon centerpiece I used israeli ruscus as a green filler and it’s commonly found in the floral section of grocery stores.  Israeli ruscus is tough and does fine without much water, it’s been a few days and mine are still bright and perky.  Just cut the stems down to the size you want and arrange them in the lemons.

The roses in the lemon centerpiece are a different story.  Short term for several hours they’ll be fine without water, it you want your roses to last longer arranged with lemons consider floral tubes or placing them in shot glasses with water.

DIY Lemon & flower summer tablescape

I love to dream up different colors and patterns depending on the time of year and enjoy taking inspiration from nature.  The colors and textures are so bright and fresh for summer!  While we don’t have sit down family meals every night, we do make it a point to do it as often as possible.  It’s easy to create a simple tablescape that encourages people to gather around the table.  Sometimes I think the prettier the table the better the food tastes!  Feel inspired and bring your own creativity to the table!

Vase Black & White Buffalo Check Accent Plates | Grapevine Chargers are sold out, HERE and HERE are some similar ones | Pink Napkins are from Pier One, HERE are similar ones


Laura

Crafts

DIY EASY SUMMER HYDRANGEA WREATH

DIY Summer Hydrangea and Rose Wreath

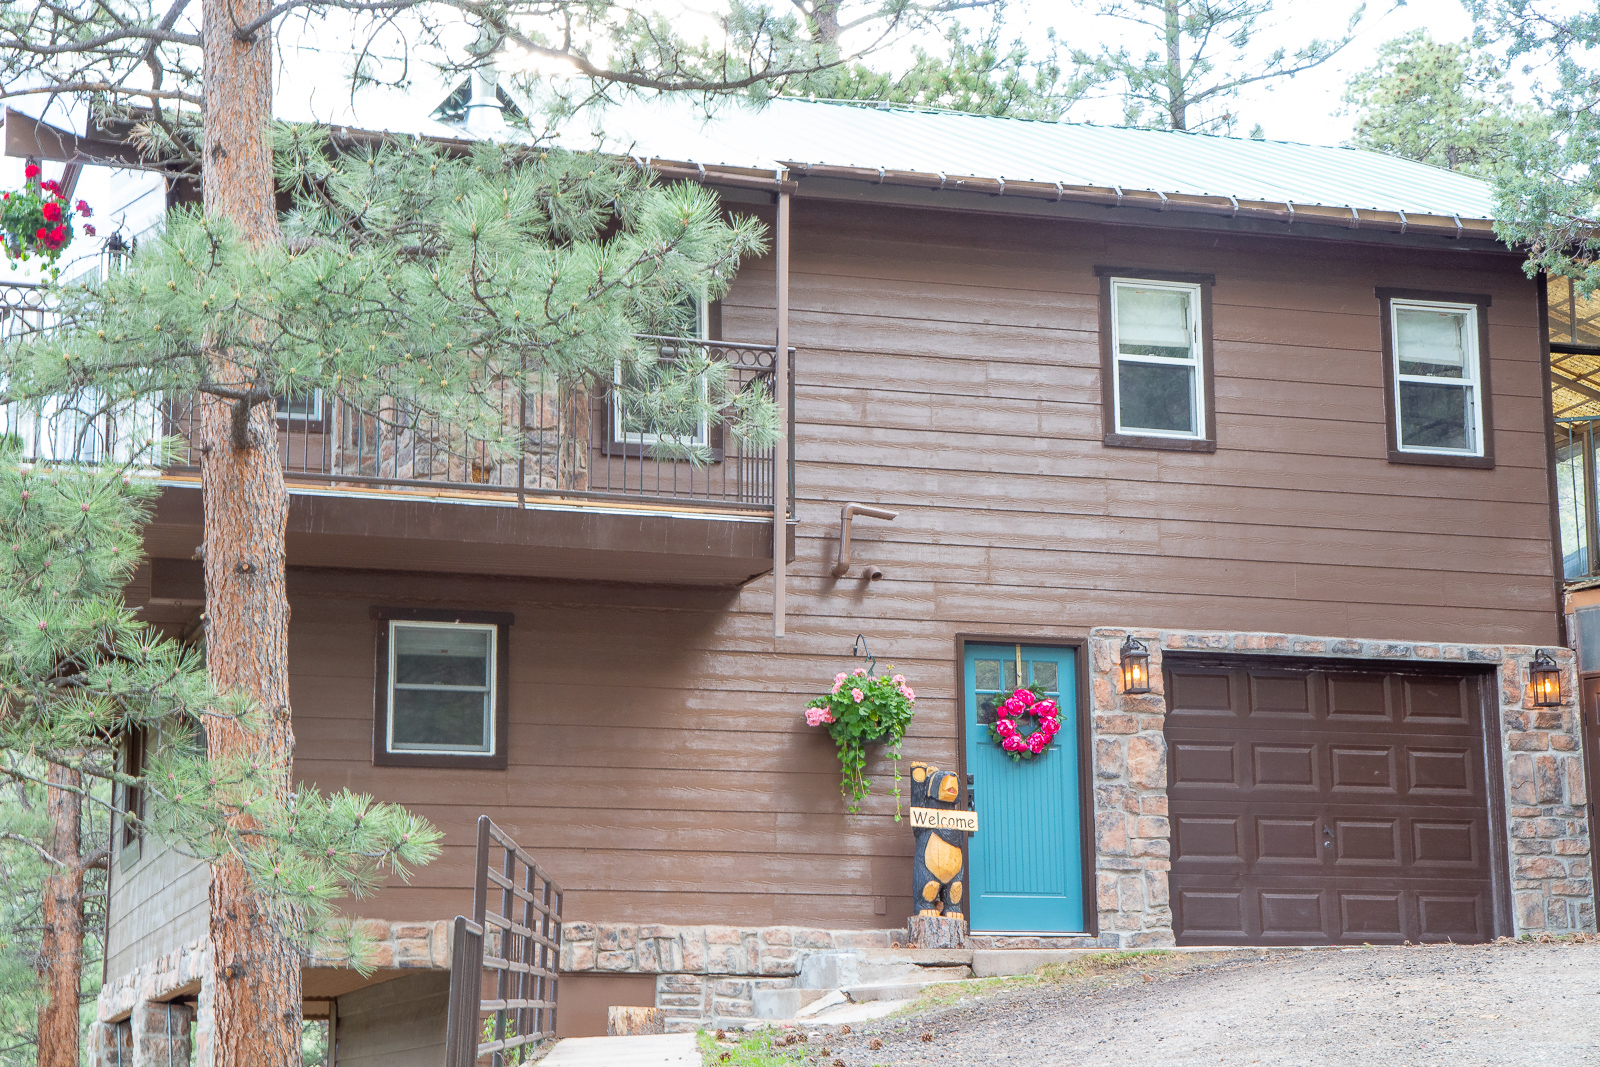
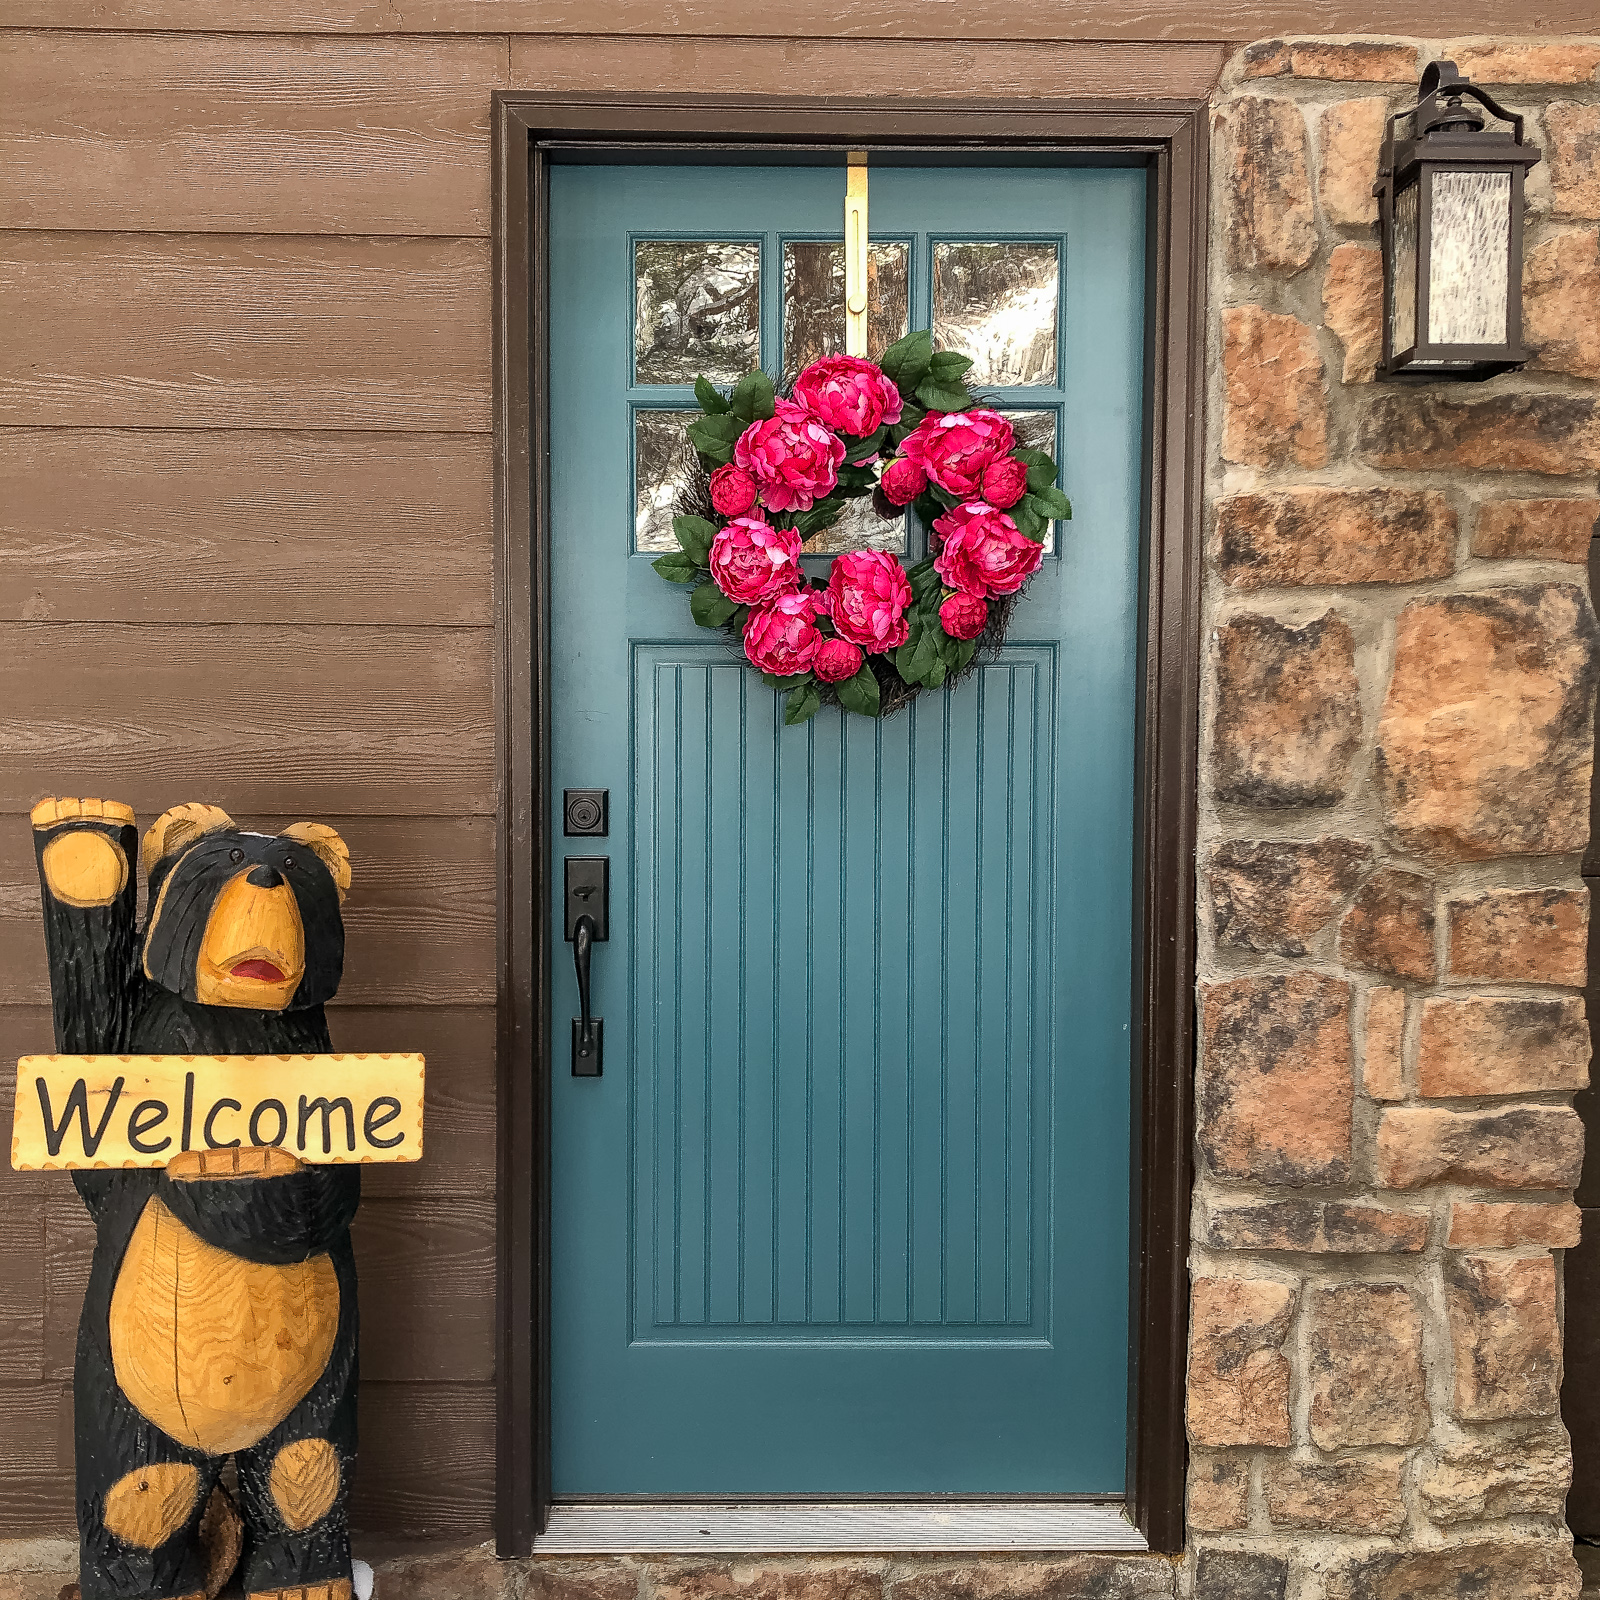
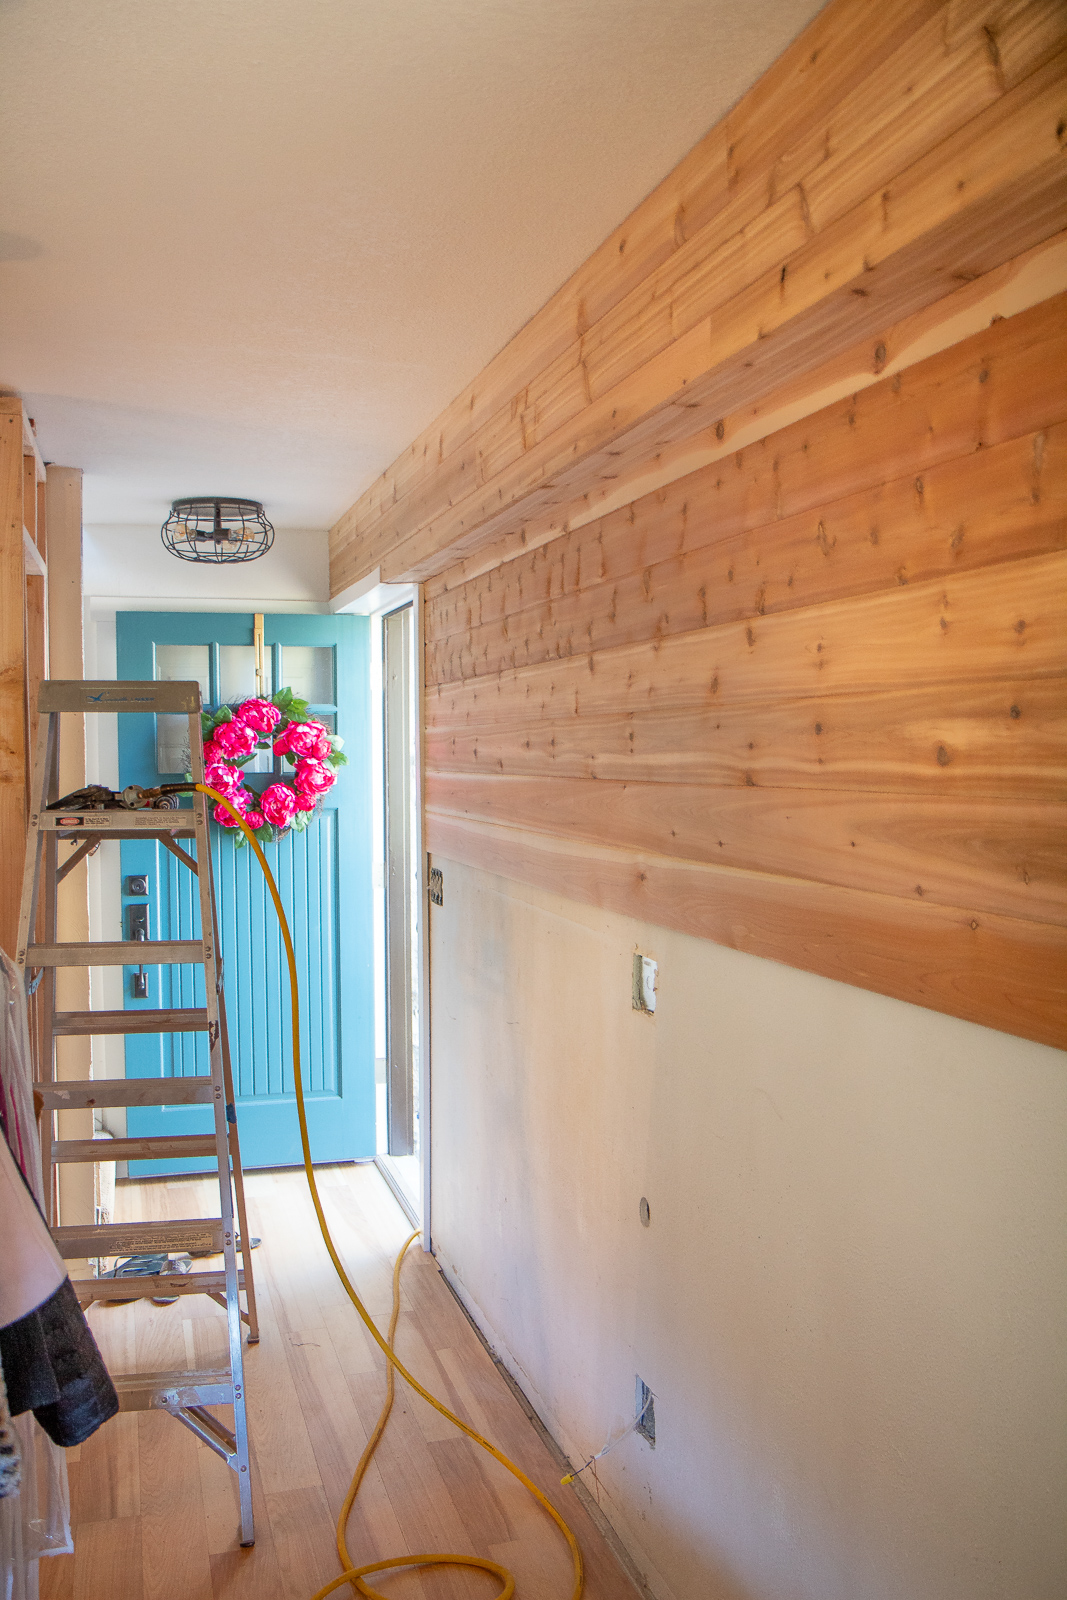
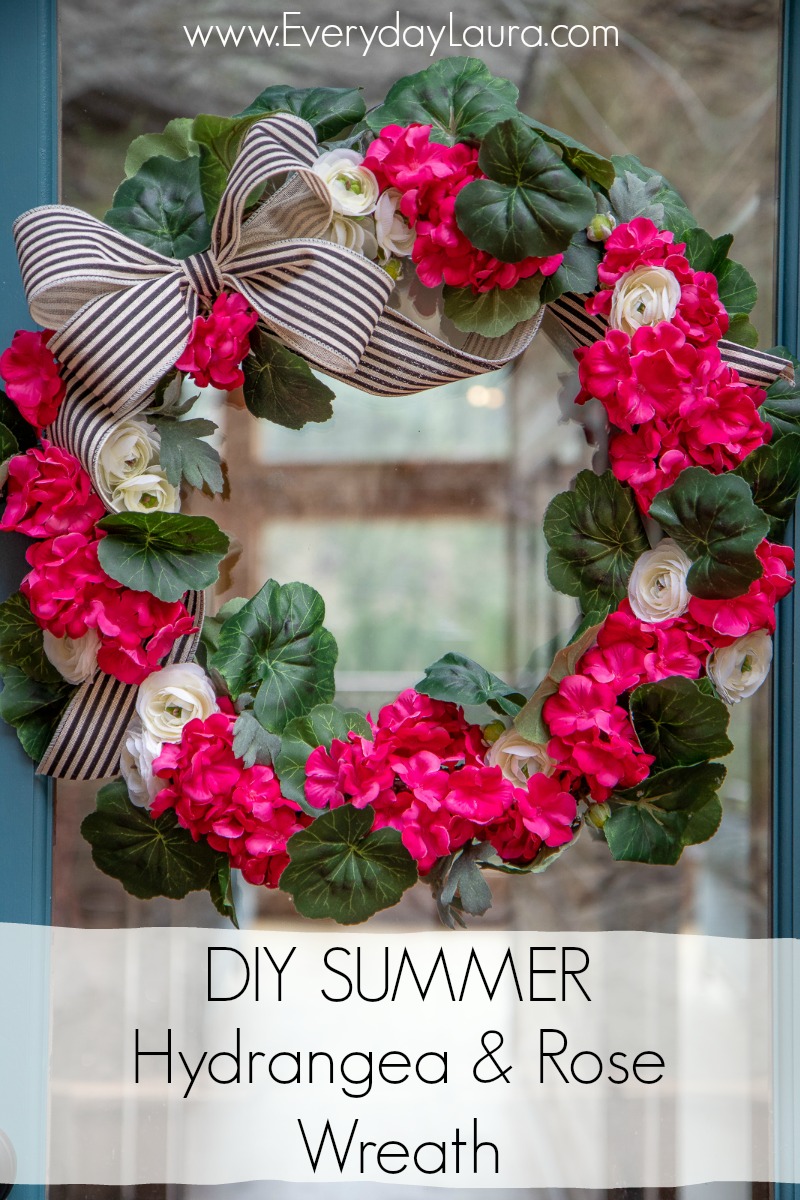
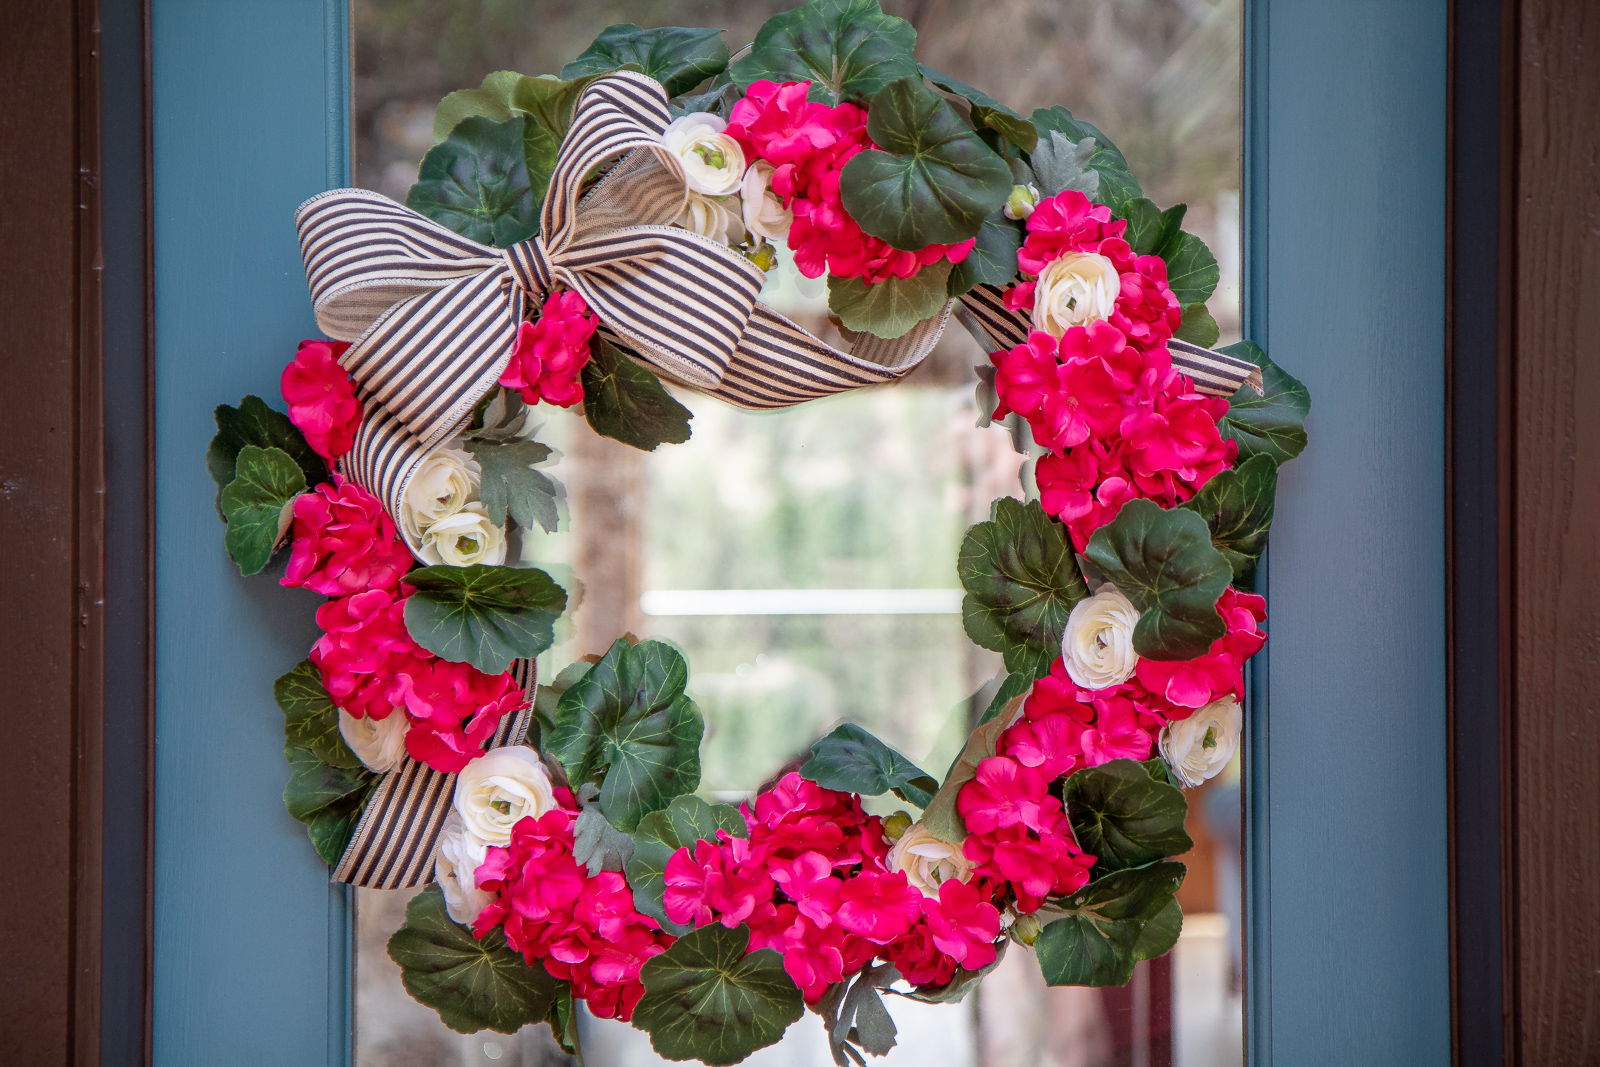
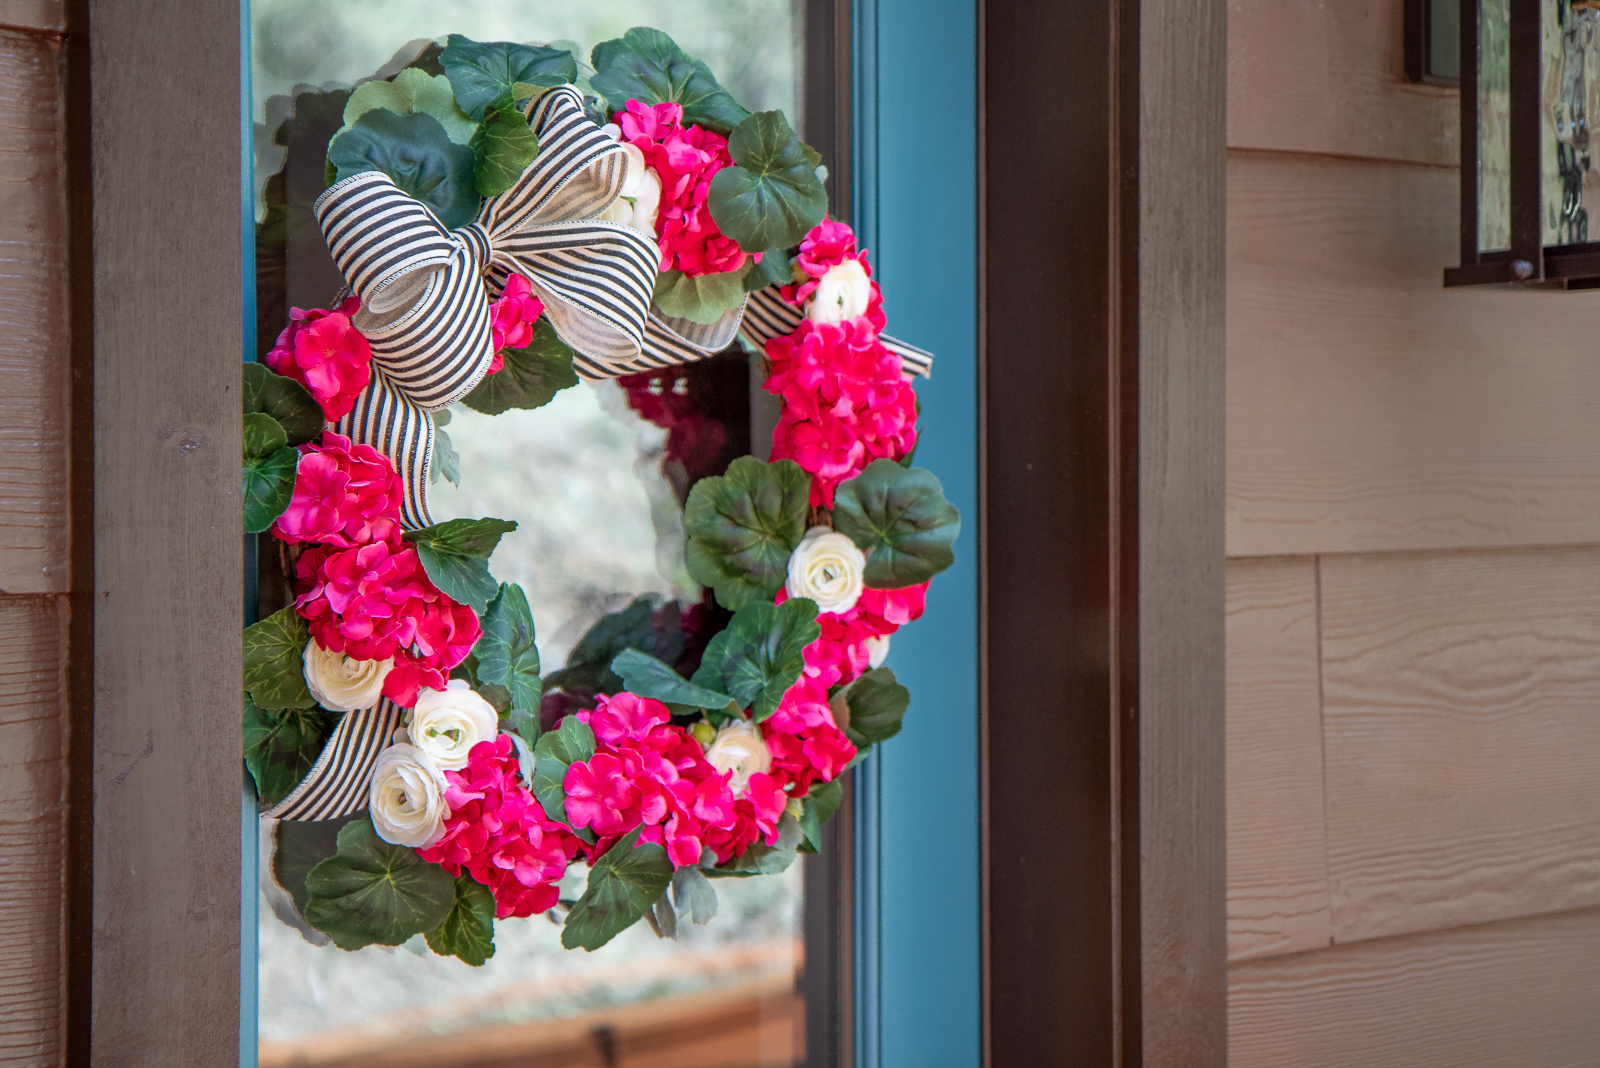
Our back deck is nearly done, I’m just waiting on Brian to finish a few small details and then it will be up on the blog.  In the meantime I’ve noticed how lonely our door looks and decided to make a nice summery wreath for it.  I chose hydrangeas and roses because they’re my favorite summer flowers.  I’m in love with the contrast against our new teal door (Sophisticated Teal from Home Depot) and especially the striped bow!  Stripes are one of my favorite patterns ever, it goes with everything and always puts a smile on my face.

I know I’ve mentioned this before but I’m still mourning the loss of Pier One.  I’m tempted to walk around in a black veil.  Oh Pier One you were so good to me, and I especially loved buying your wreaths.  Sniff sniff.  So it’s time for me to step up my wreath making game, and this pretty summery hydrangea and rose wreath was a perfect way to dive back in.  It’s been so long since I made a wreath I forgot how much fun it is!  Below I’ll show you how I made this easy wreath in under 45 minutes.
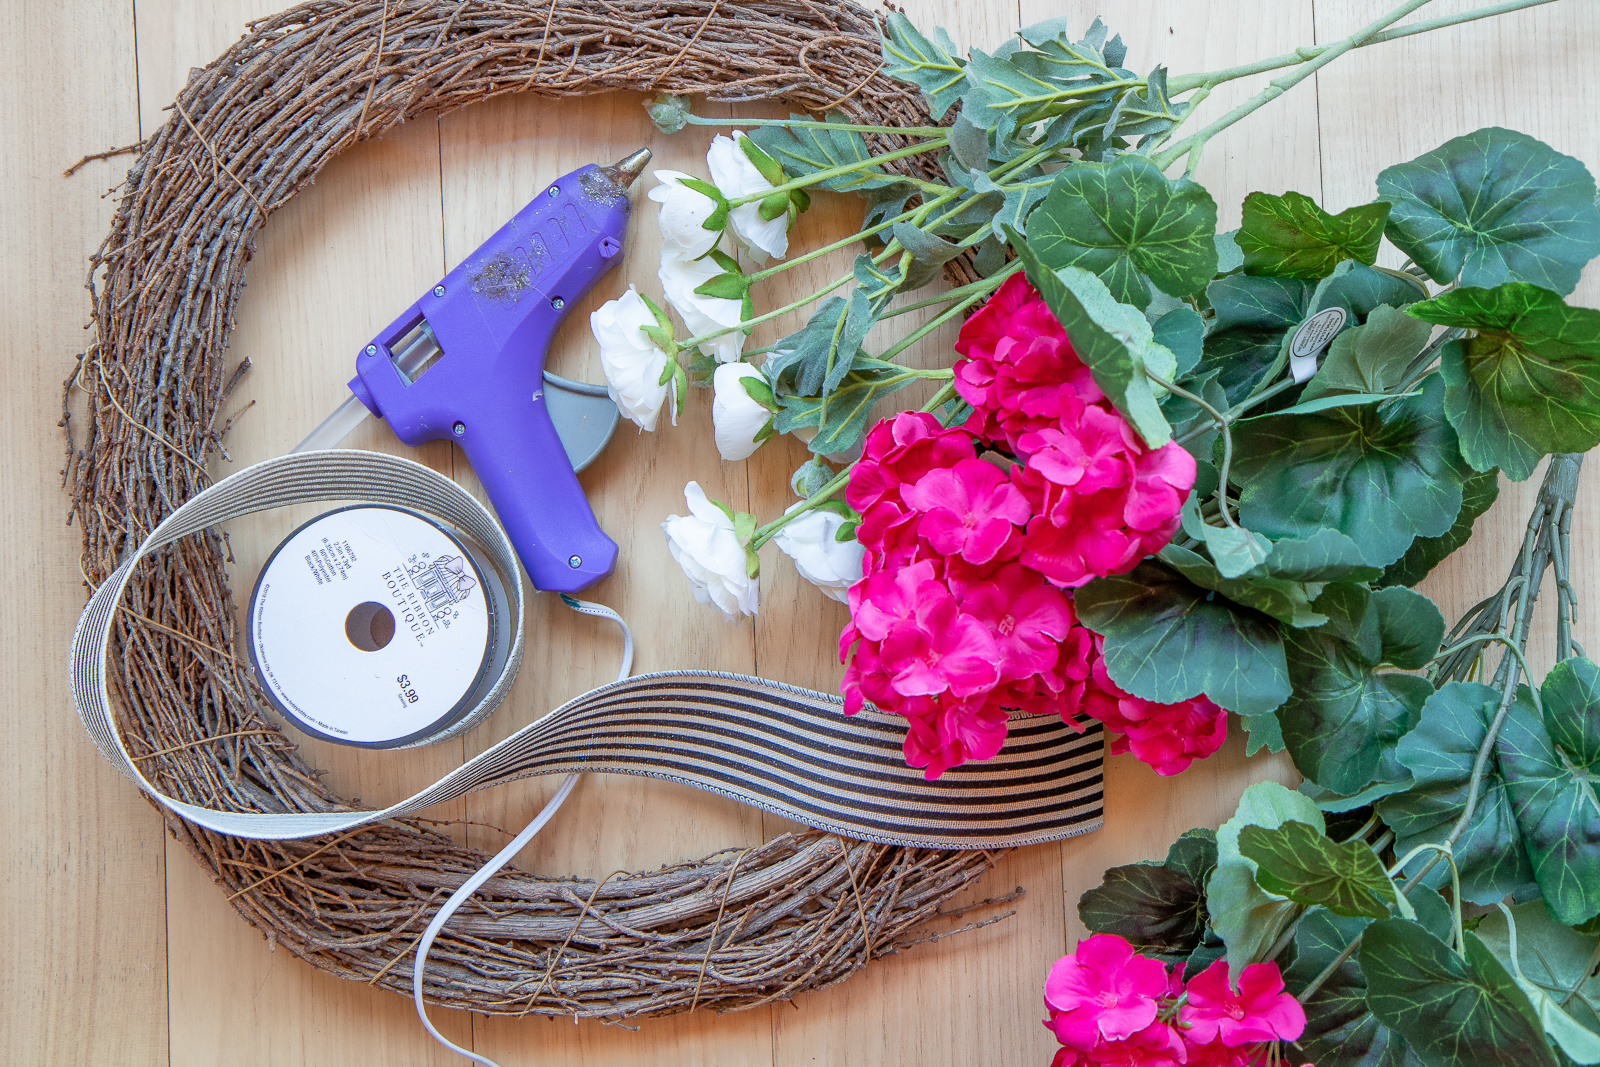
DIY Summer Hydrangea and Rose Wreath

SUPPLIES NEEDED

18 inch twig or vine wreath form

Hydrangea flowers

Rose flowers

Scissors

Wire cutters (for the flowers)

2 inch wire ribbon

Craft wire

Hot glue gun, with extra glue sticks

DIY Summer Hydrangea and Rose Wreath

INSTRUCTIONS

The hardest part of any wreath usually is making the bow, or at least for me it is.  I really hesitated showing you my bow making steps, only because I lack confidence in my skills.  I will say I chose a simple bow style and I really like the simplicity of it.  However, if you’re a bow making rock star feel free to make one of your own style.  There are lots of great tutorials on how to make more complex bows on YouTube.

How to make a simple bow

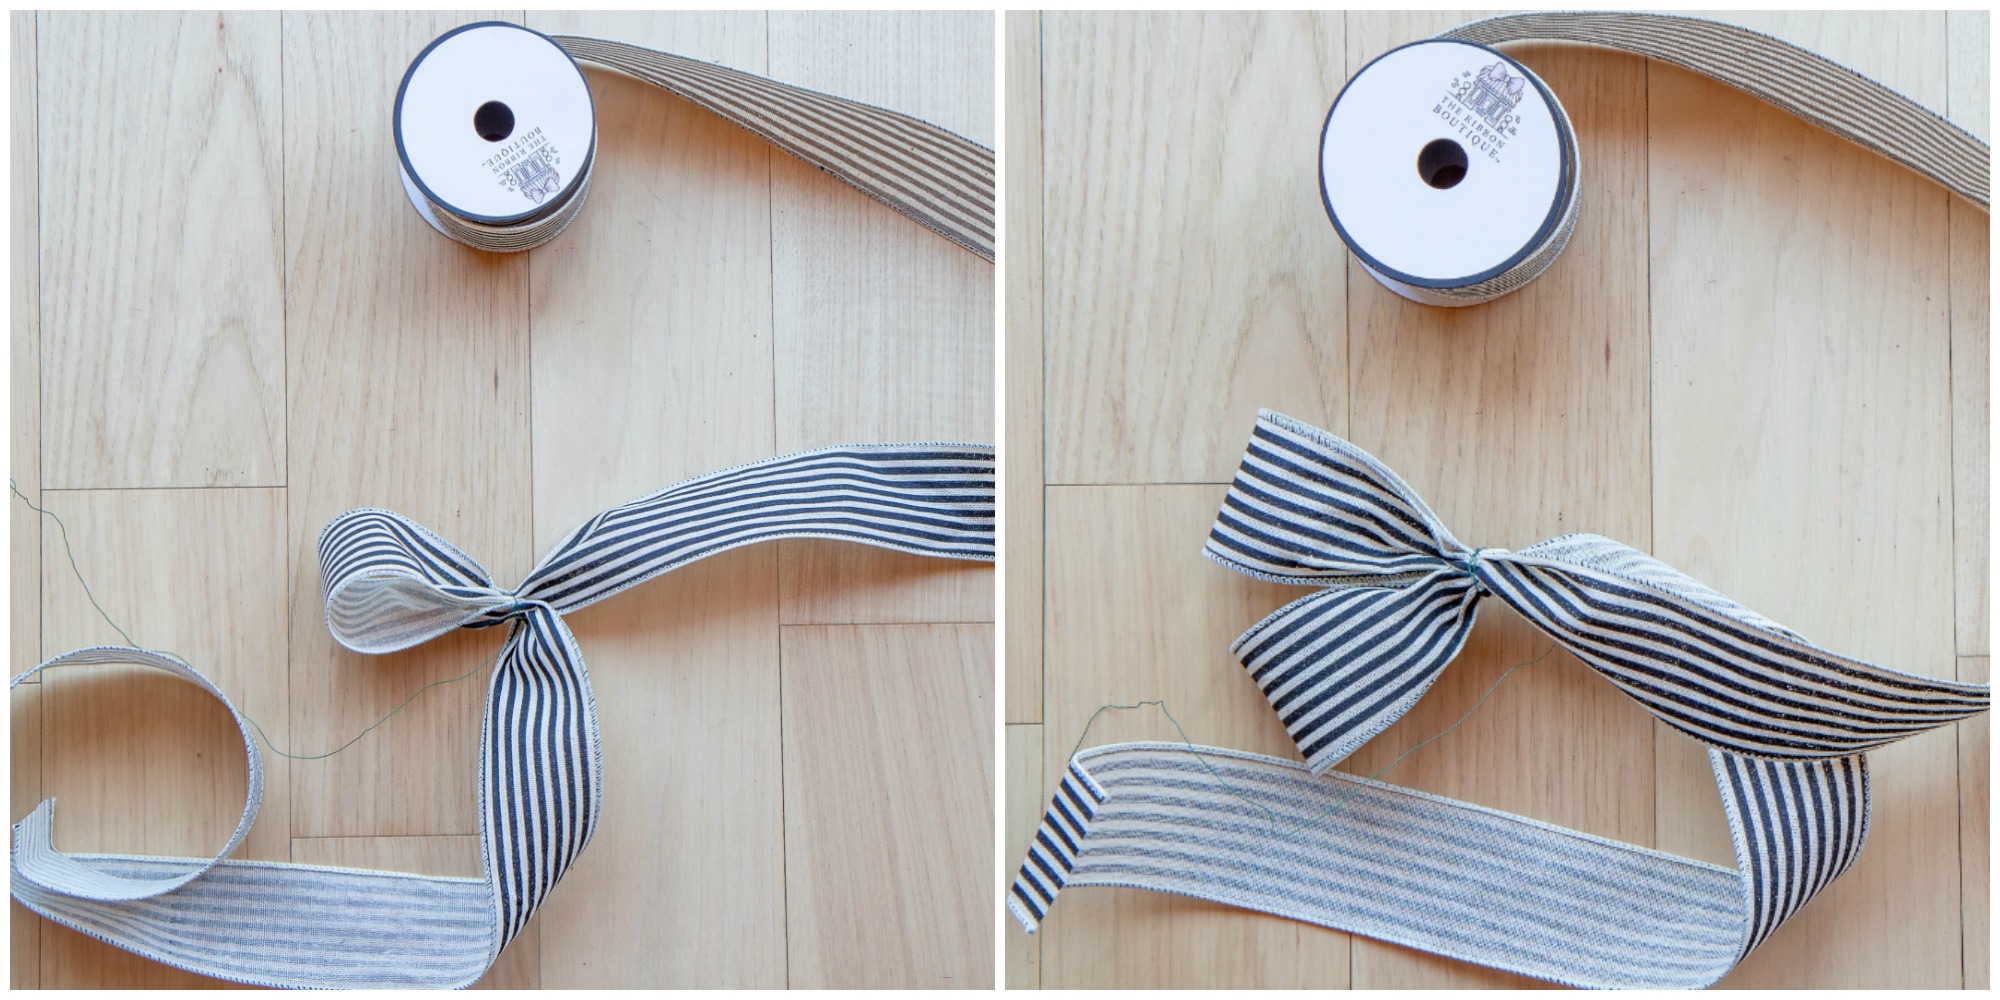
I like to keep my ribbon attached to the spool so I don’t waste any ribbon.  First I pull out a long tail, then I create my first loop and secure it with craft wire.  Next I make a second bow loop and attach it to the first loop with wire.

how to make a simple bow

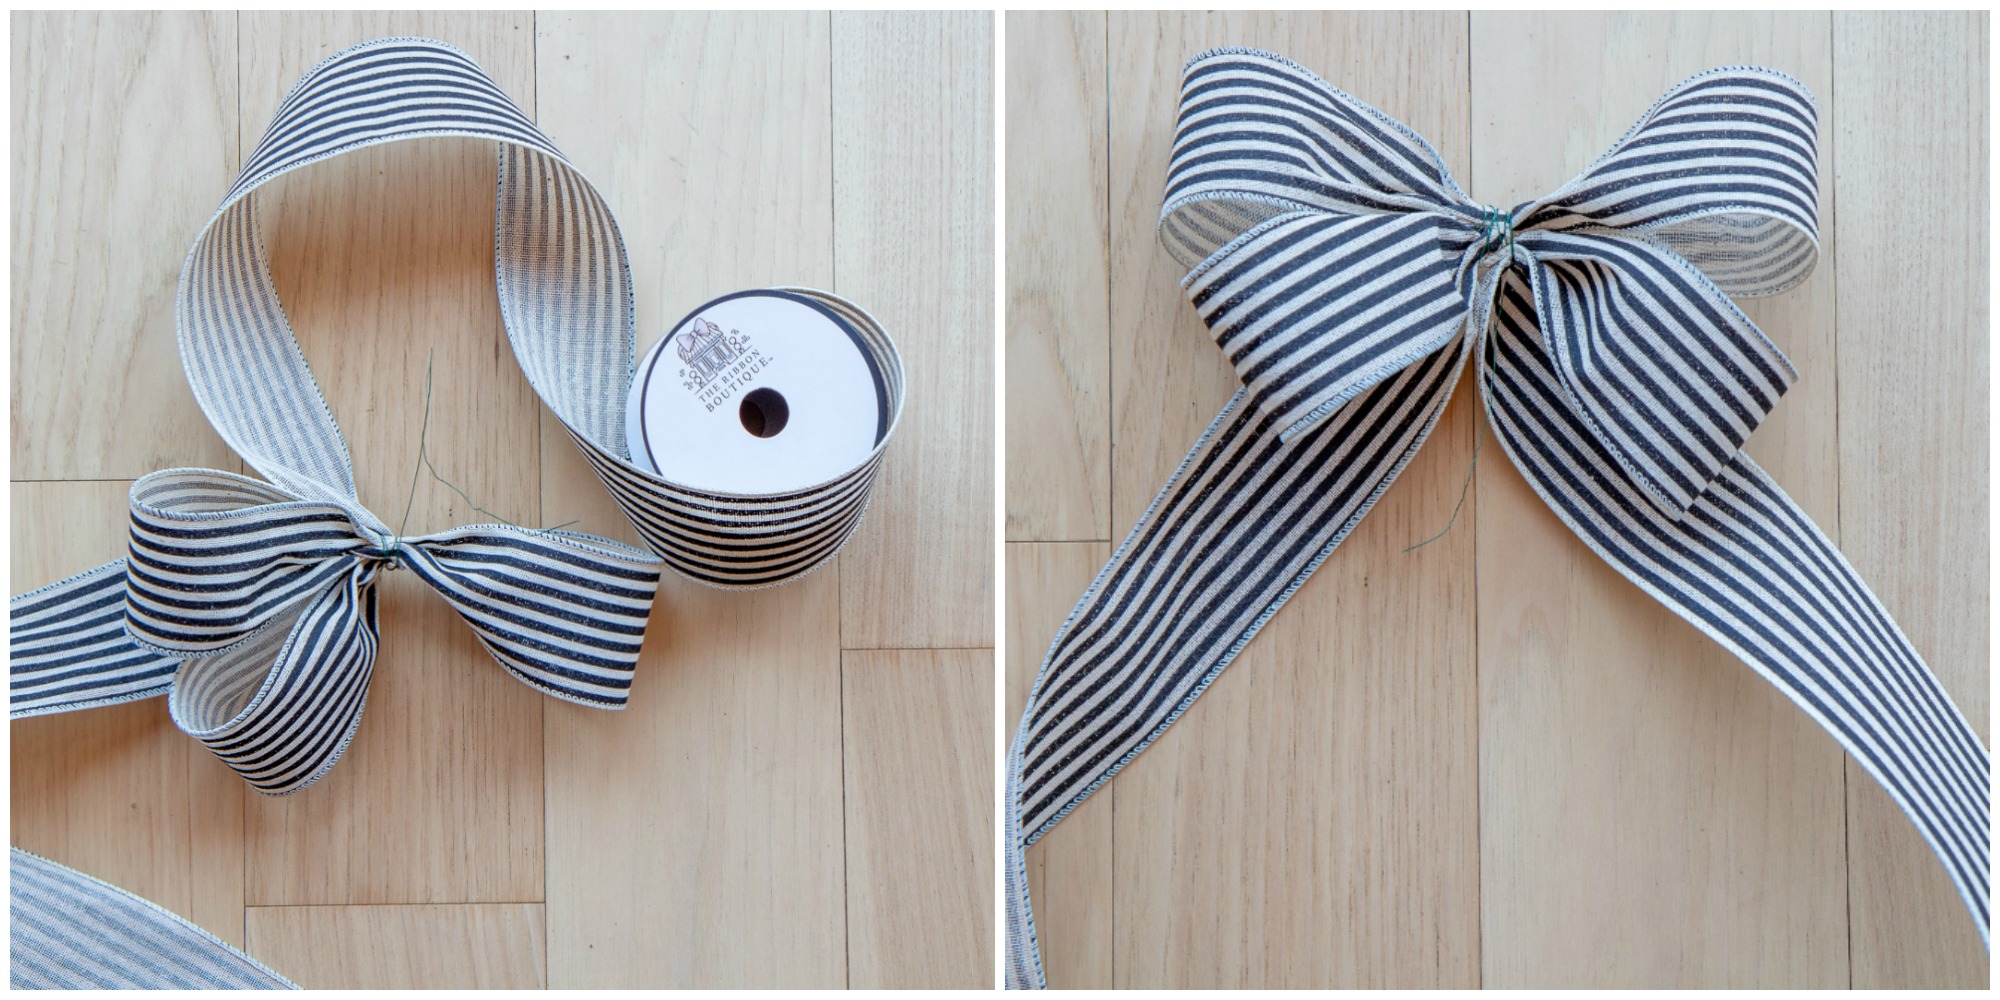
I repeat the process on the other side making a third and fourth loop, again securing the ribbon with wire.  Once finished I cut the ribbon leaving a long tail to match the other side.  I generally prefer wire edged ribbon so it holds its shape better but it’s not essential.

how to make a simple bow

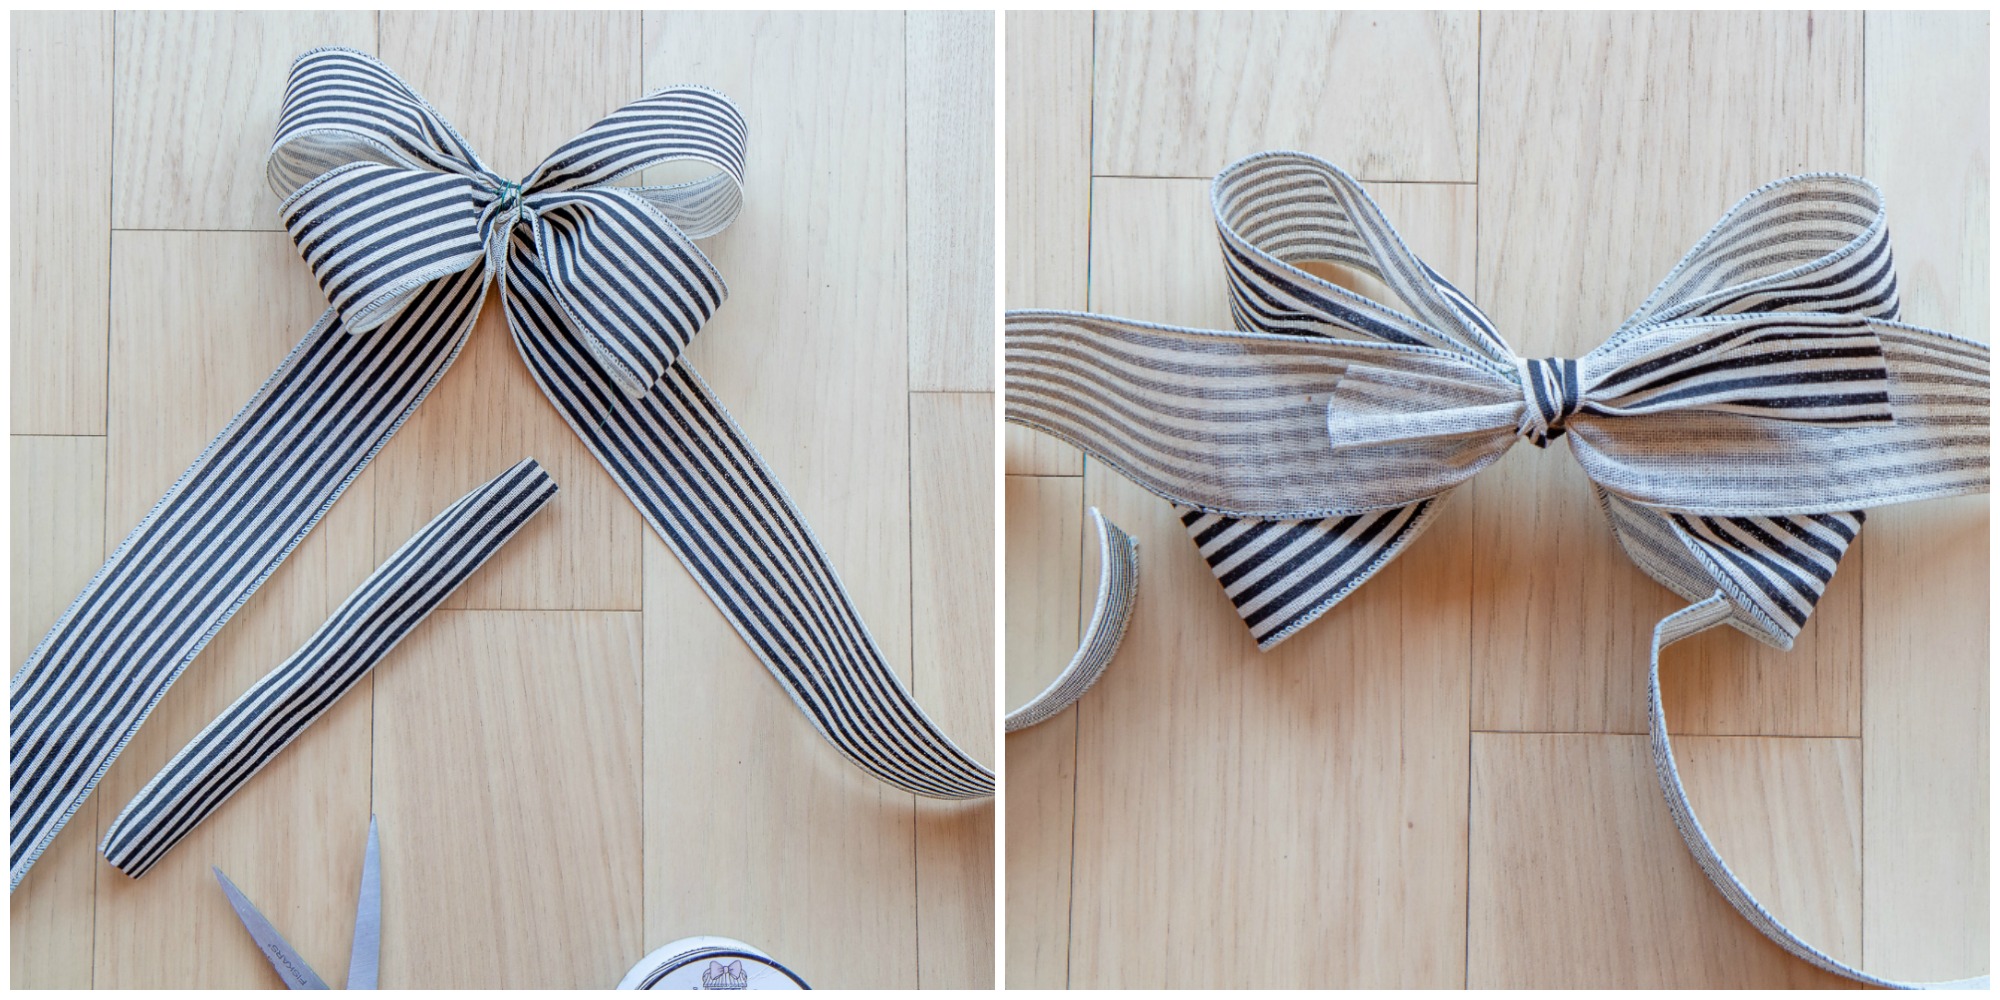
I use another piece of ribbon to finish the bow’s center.  Because wire edge ribbon can be bulky in tight spaces I cut the wire edges off.  From there I slightly scrunched the ribbon up for texture and tied a knot in the back.  You can trim the back ends of the knot if they show, or just leave them.  There you have it, a simple bow you can make in minutes, and I forgot to take a final photo… but you’ll see it below in a sec.

How to make a summer wreath

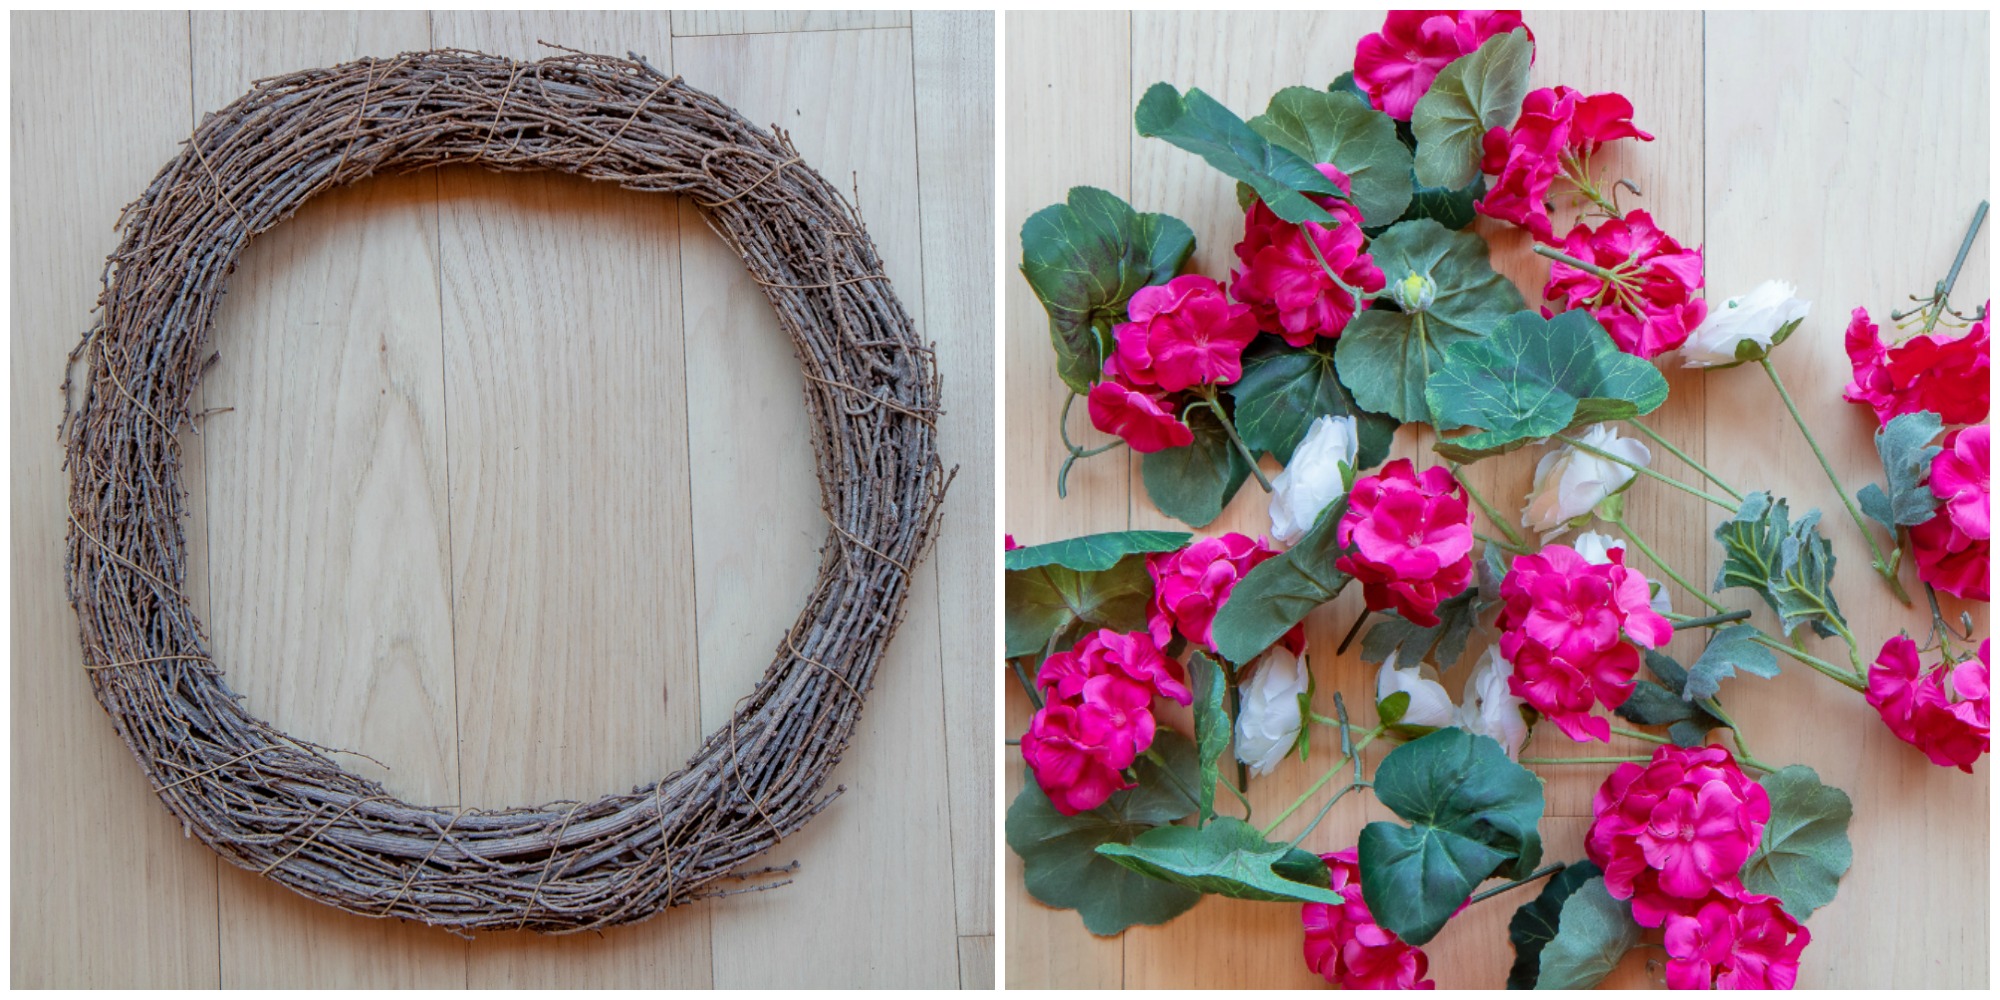
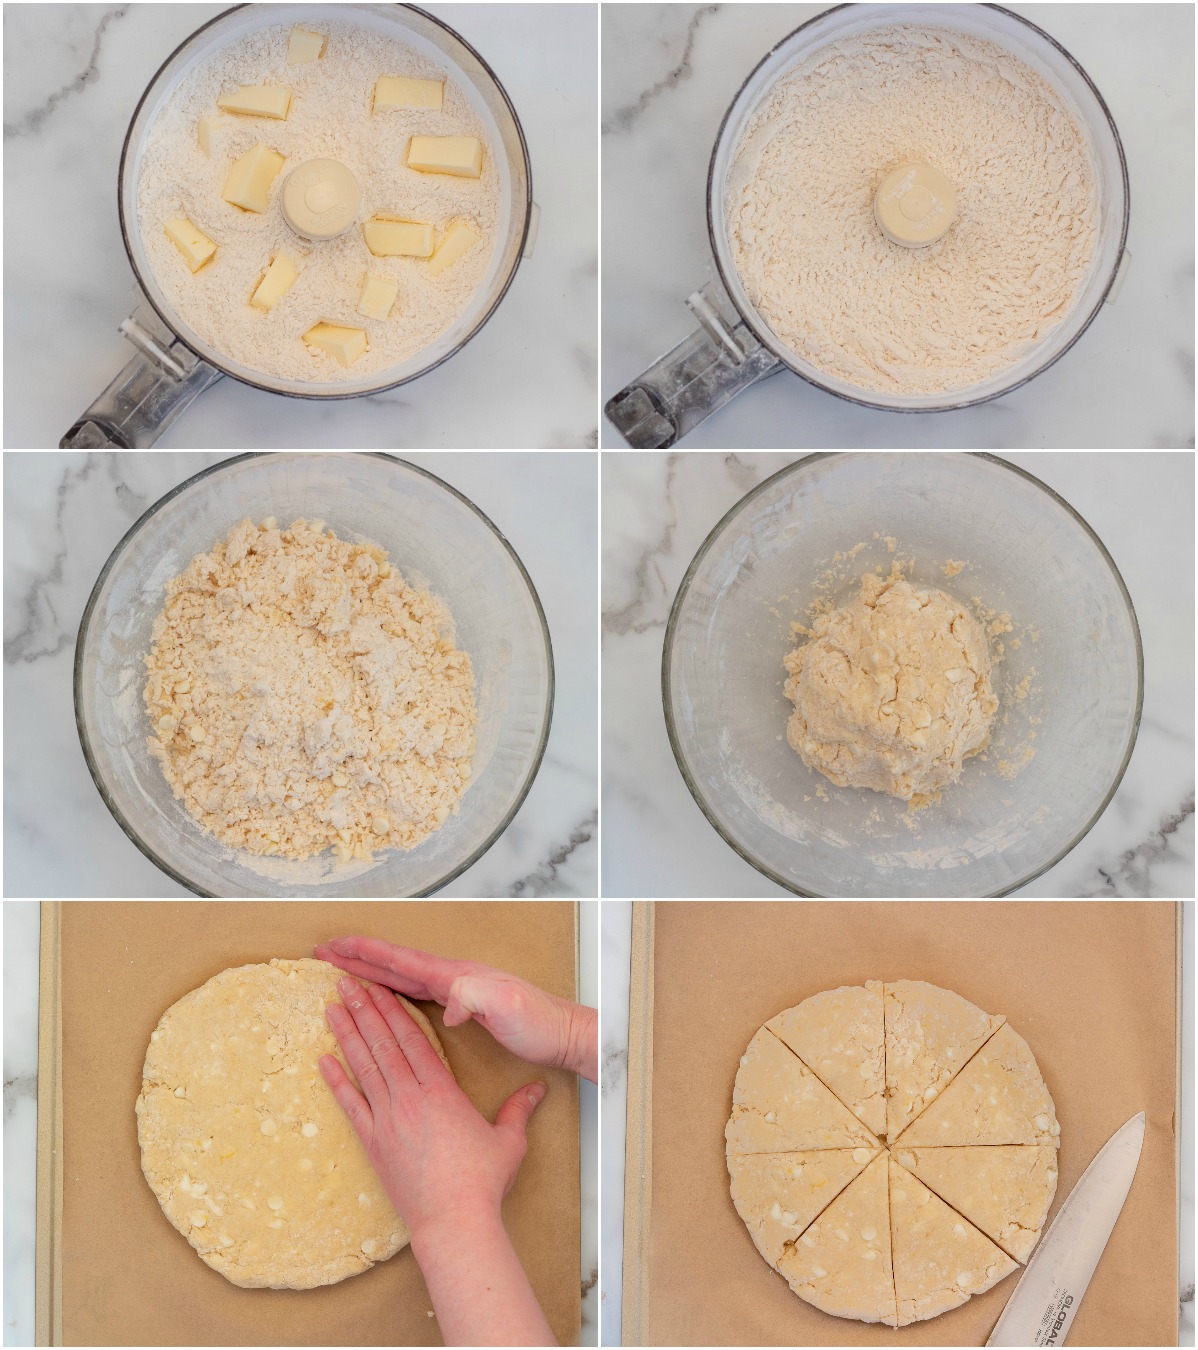
I love making my wreaths on the floor, I get a better visual than sitting at a table and I can also spread out all my stuff!  I bought hydrangea bushes because that’s what was on sale at my craft store and it was cheaper.  Using wire cutters snip the flower heads and leaves to a comfortable length.

How to make a summer wreath

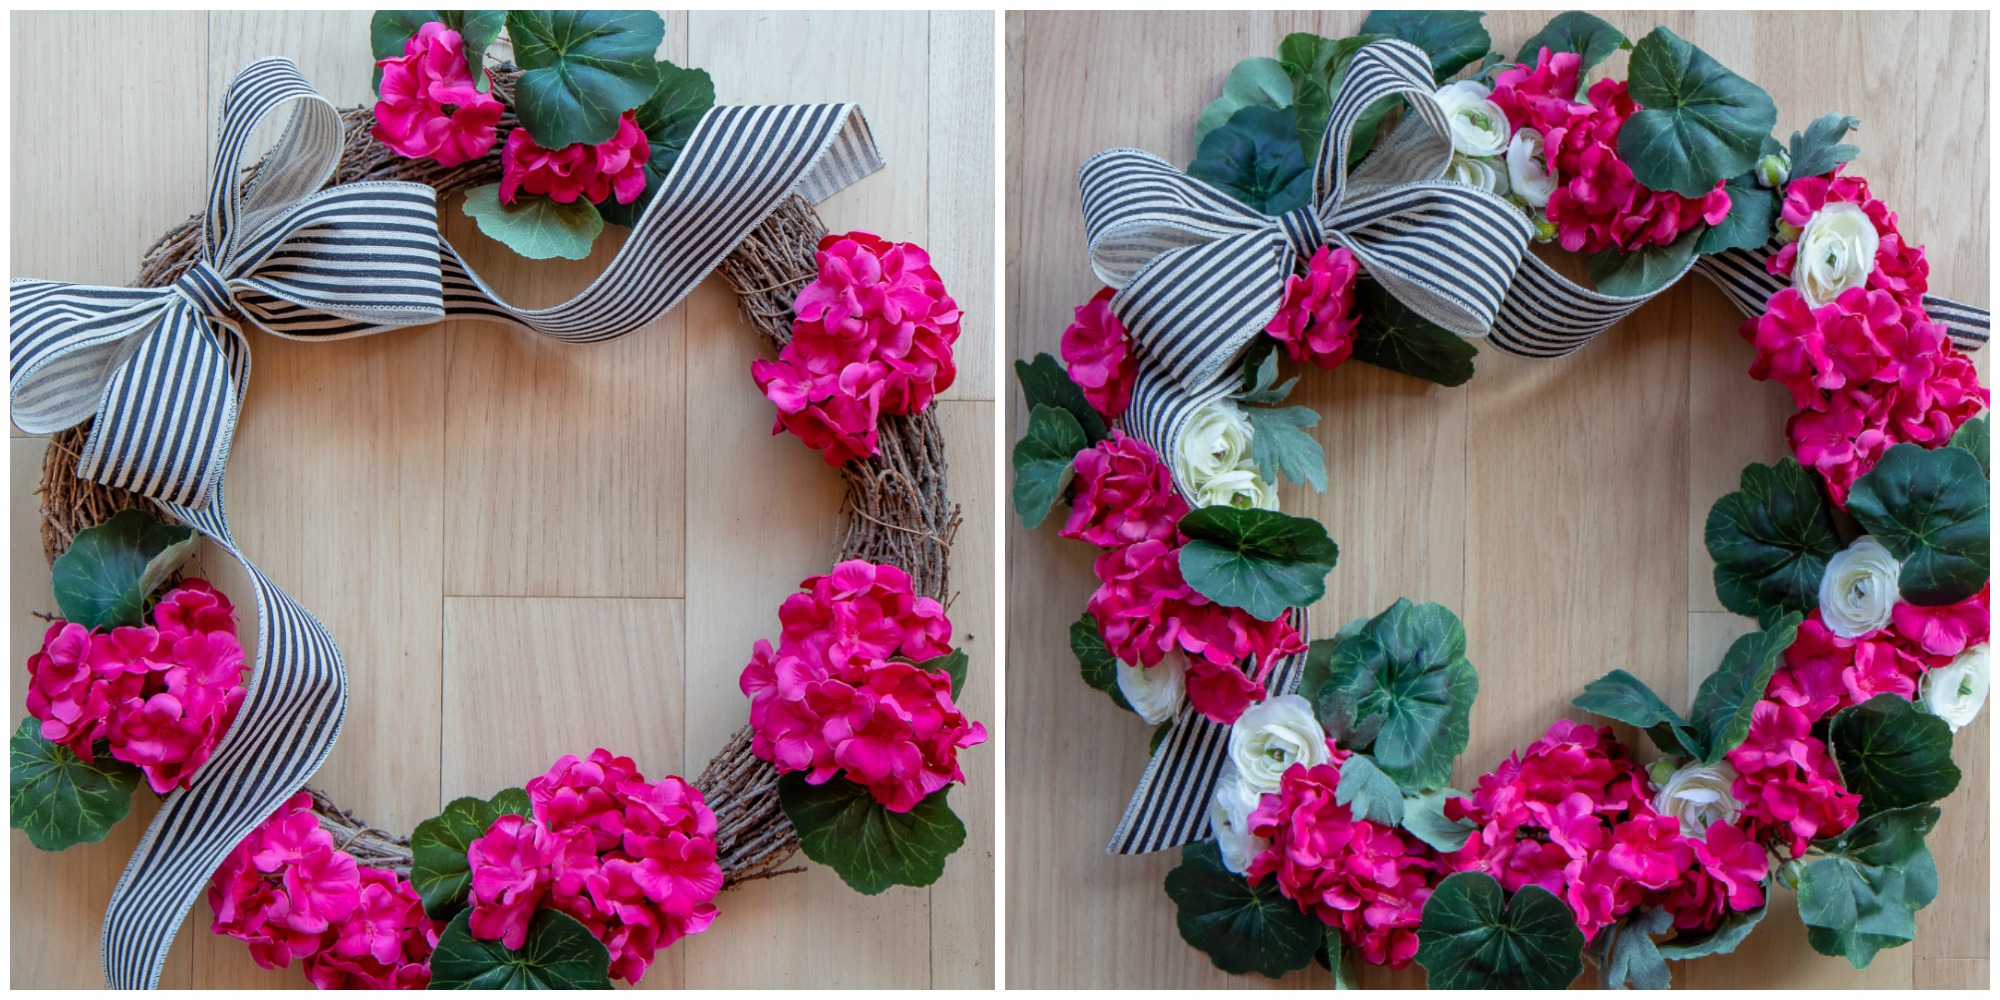
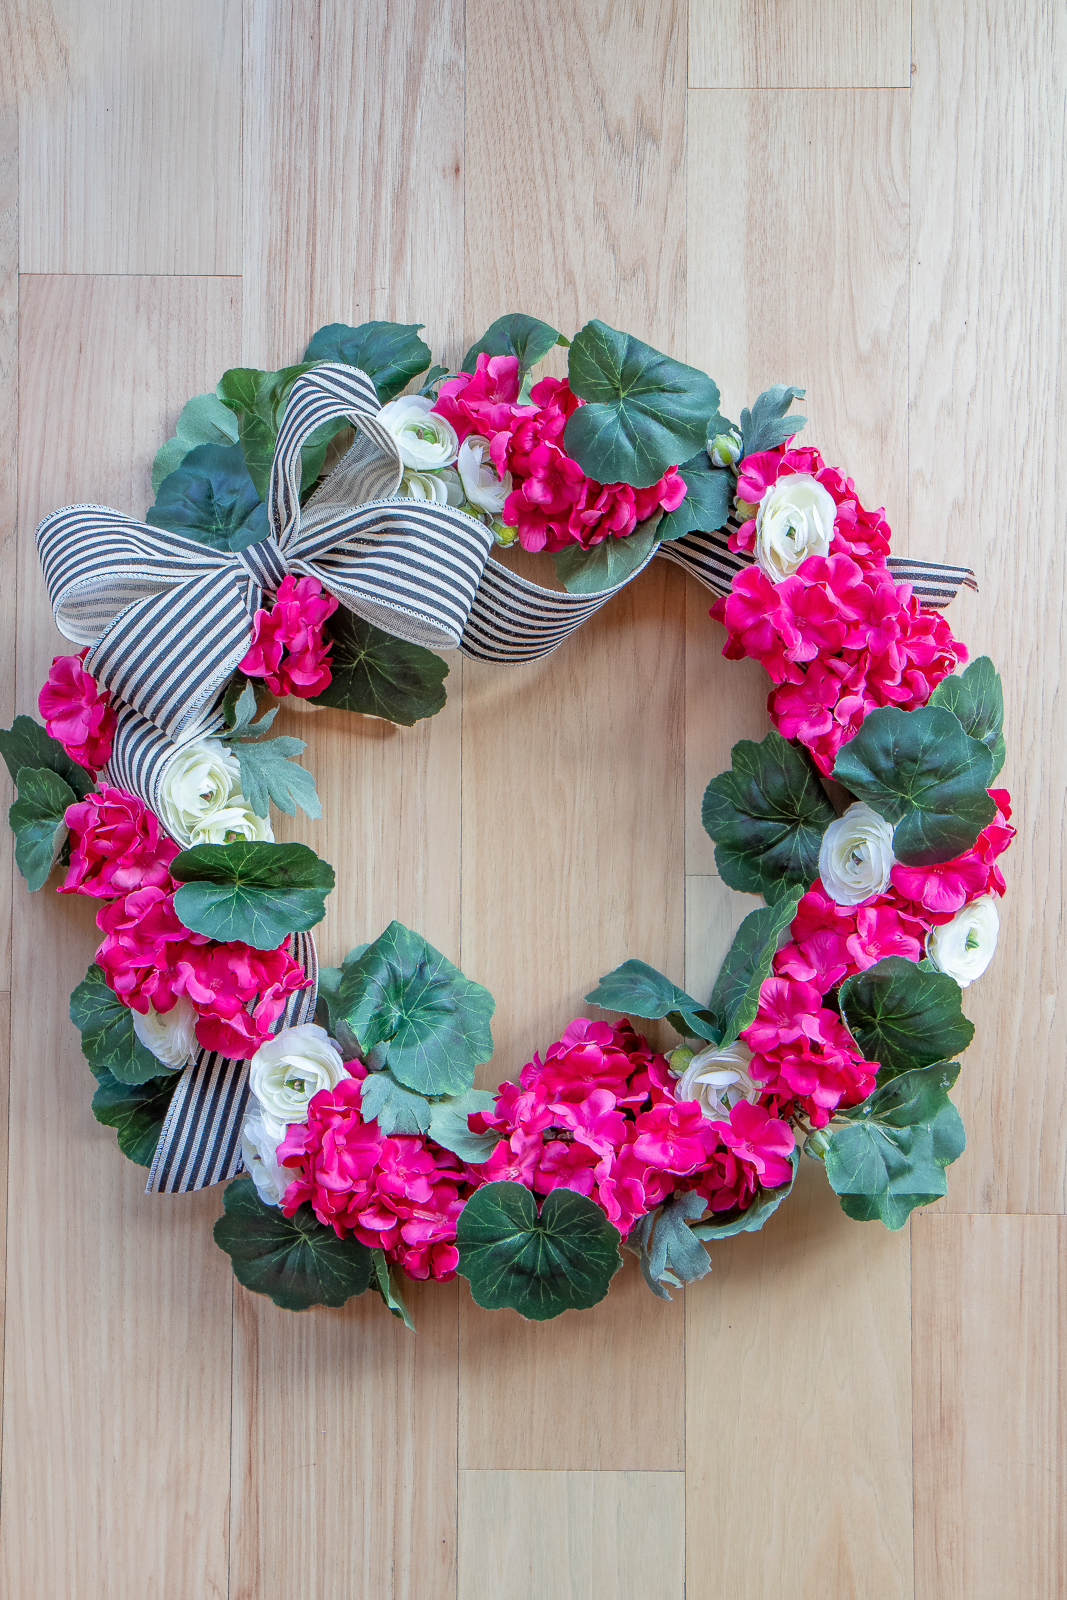
There’s that bow finally!  I started by hot gluing my bow down leaving the ends unattached.  Then I glued the hydrangeas and the ends of the bow down.  I like my bow tails to have a fun flowy look, so I bended them and glued several small sections down.  This is another reason to use wire ribbon, to help shape the ribbon tails.  Lastly I finished the wreath by gluing in my leaves and roses.

DIY Summer Hydrangea and Rose Wreath

So easy!  Who really needs Pier One anyway??  I’m just kidding, I do… come back… come back to me please!  Wreaths can get a little expensive with all the floral and ribbon but I did buy most items on sale.  Here is a breakdown of the cost.

COST

18 inch wreath form $3.99  – from Wal-Mart

Ribbon $1.99 (on sale half price) – from Hobby Lobby

Hydrangea bushes (on sale half price) $5.99 x 3 bushes = $17.97 – from Hobby Lobby

Roses (on sale half price) $3.49 x 3 = $10.47 – from Hobby Lobby

Hot glue sticks & wire, free, because I had them on hand

Grand total = $34.42

How to make a budget floral wreath

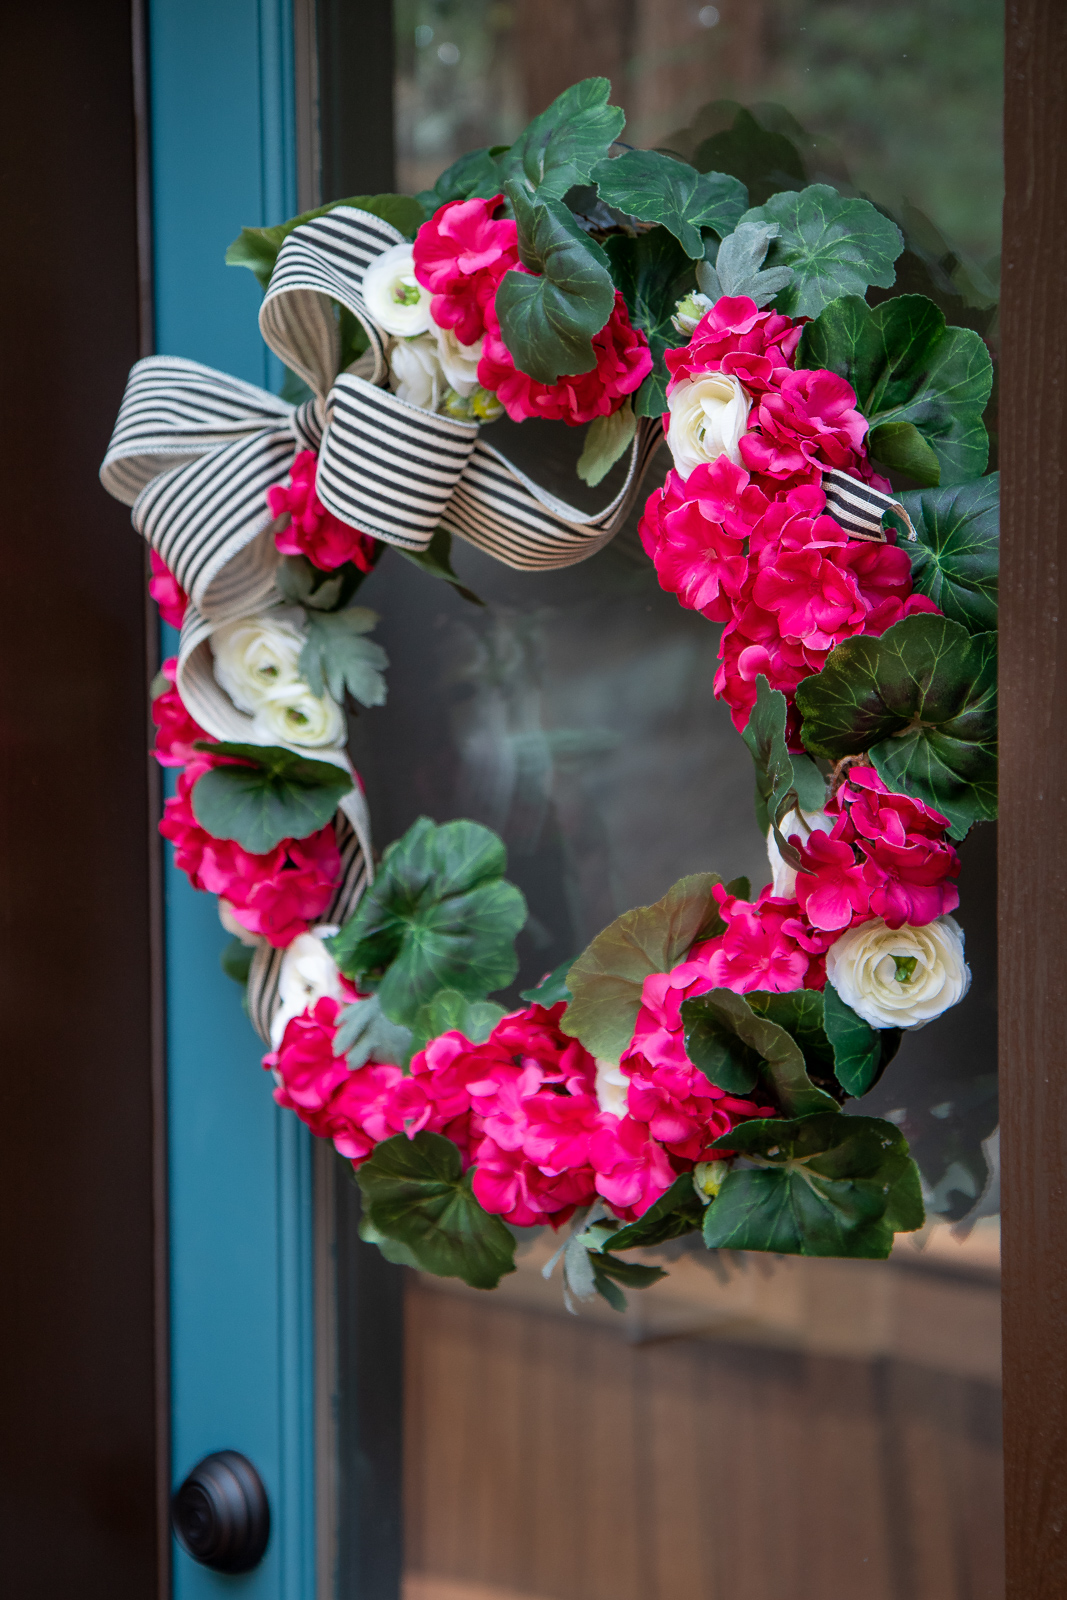
I used a giant suction cup to hang my wreath on the glass, you can usually find them in the floral section of craft stores.  If your door is metal they also have magnetic hooks too.

Budget hydrangea wreath tutorial

There you have it, a quick and easy summery wreath!   I hope you feel inspired to make your own wreath like mine or your make own glorious creation.  I have another hydrangea and rose themed blog post planned for later this week.  I love these happy flowers everywhere!


Laura

Crafts

EASY DIY FINGERPRINT WALL ART

Easy to make DIY fingerprint wall art

Happy Tuesday!  Today I’m excited to share my easy DIY fingerprint wall art with you!  Our media room is nearly complete and should be up on the blog within a few weeks.  Right now I’m focusing on decor items to finish the space, and one of those things is wall art!   Decorating your walls can get expensive quickly, so this time I was determined to stay on a budget.  All the time I see abstract art for sale thinking “Oh I can make that” but I usually forget to.  Not this time!

Recently I was browsing decor and I was instantly attracted to this art from Anthropologie, but when I saw the price I nearly choked!  Of course it’s much larger than I need for my space but I was very much motivated to make my own version.  If your memory is really good you might remember I had a similar print like this from Ballard, in our last house.  It was too small though and was damaged in our last move.

I’m much happier with this wall art, it has more personality and it cost just pennies to make!  I always have extra gallery frames on hand so that certainly kept the cost down.  I’m really fond of the ones from Pottery Barn and love the unique shaped mats, but recently I’ve discovered Target gallery frames and they’re just as great too.  So if you’re needing to freshen up your home with some fun art I’ll show you how quick and easy to make this fingerprint wall art.  It’s perfect for kids to make too!

Easy to make DIY fingerprint wall art

SUPPLIES NEEDED

Any size frame 

Poster board or card stock

Scissors

Black paint

Easy to make DIY fingerprint wall art

INSTRUCTIONS

Easy to make DIY fingerprint wall art

Cut the poster board or card stock down to the frame size.

Easy to make DIY fingerprint wall art

I’m using a mat and I didn’t want to paint the hidden areas so I placed the mat over the poster board and ran my fingernail along the edges so I could so exactly where the mat would be.  This is optional but I found it helpful.  Then I dipped my finger into basic black craft paint and painted dots on the poster board.  I know, super complicated right??

Easy to make DIY fingerprint wall art

Be sure to vary the sizes of the dots for some extra appeal.   Let the paint dry and then BOOM you have instant wall art!  If you’re wondering, the paint dried nicely on the poster board and didn’t create any rippling.  I have such a thing for black and white wall art, it makes my heart sing and looks amazing on our wood walls!

Easy to make DIY fingerprint wall art

I had all my supplies on hand except the poster board and that was under $1.  Canvas art would cost a little more but also look amazing, or maybe a fingerprint accent wall somewhere in your home?  Go get creative and have some fun!

Ok, you’ve had a little sneak peak at our media room… just a peak that’s all you get for now.  I can’t wait to share the rest of the room with you!


Laura

Desserts

RED, WHITE, & BLUE TRIFLE

4th of July Desserts

We’re less than a week away from July 4th and I wanted to share my delicious red, white, and blue trifle dessert with you.  This trifle is an absolute favorite dessert of ours all through the summer but especially for our 4th of July celebrations.  Years ago, and I mean years, I bought this gorgeous trifle bowl at a Southern Living Home party.  I’d never made a trifle before but I was mesmerized by this cute little dish.

Sadly after receiving it my trifle journey didn’t start.  Nope, I tucked it away and completely forgot all about it until one day I found it buried in the back of a cabinet.  Feeling sad for my poor little trifle bowl, I made it a mission to fulfill its destiny by making as many different trifle desserts as possible.  We’ve made every combination you can think of, but this stunning red, white, and blue trifle is a true summer favorite.

Strawberry summer desserts

It’s light and fresh, making it perfect for a hot summer day.  Made with a store bought angel food cake it’s also a breeze to assemble!  You may think this is just a basic angel food and whipped cream dessert with strawberries and blueberries but it is not.  Adding just a few more simple ingredients takes this trifle dessert from good to WOW!  It’s like magic.

Strawberry Blueberry Trifle Dessert

If you’ve ever eaten a store bought angel food cake you probably know they don’t taste the best.  Brushing the store bought angel food cake with an easy-to-make lemon sugar syrup transforms it into something magical.  Yes, you can absolutely make your own angel food cake if time allows, just don’t skimp on the lemon sugar syrup!

Besides the delicious syrup the other secret to this amazing dessert is the cream cheese.  The cream cheese takes this fruit trifle to a new level with its rich creaminess, plus the cream cheese stabilizes the whipped cream so it won’t turn runny.  When preparing sliced strawberry desserts consider using a strawberry slicer, it’s a great timesaver!

4th of July Desserts

Red, White, & Blue Trifle

Servings: 10

Equipment

  • Electric mixer

Ingredients

  • 1/4 cup sugar
  • 1/4 cup fresh lemon juice
  • 1/4 cup water
  • 2/3 cup sugar
  • 1/4 tsp almond extract
  • 1 pre-made angel food cake, sliced into 1 inch slices
  • 2 8 oz containers of cream cheese, softened
  • 2 cups heavy cream, room temperature
  • 2 pints strawberries, rinsed and sliced
  • 2 pints bluberries, rinsed

Instructions

To Prepare the Lemon Syrup

  • Heat 1/4 cup of sugar, water, and lemon juice in a small sauce pan over medium heat, stirring until the sugar dissolves. Remove from the heat and stir in the almond extract. Let cool.

To Prepare the Trifle

  • Brush both sides of the pound cake with the lemon syrup. Then cut the slices in into 1 inch cubes.
  • With an electric mixer beat the cream cheese with 2/3 cup of sugar on medium speed until light and smooth. Add the cream and beat on medium-high until it's the consistency of whipped cream.
  • Arrange half of the cake cubes into a trifle dish, then layer half of the blueberries, spoon half of the cream mixture, followed by half of the strawberries. Repeat the layers one more time, ending with the strawberries and adding extra blueberries for garnish if desired.
  • Chill for 1 hour in the refrigerator, then serve.
  • Cover and refrigerate leftovers for up to 3 days.


My strawberry shortcake poke cake is also another popular summer dessert that’s quite easy to make, and perfect for the 4th.

red, white and blue patriotic trifle

Up on a pedestal a pretty trifle demands attention.  It’s such a pretty dessert isn’t it?  Not only is it pretty but it’s so easy to make and looks amazing on my blue and white tablecloth – and it’s under $10!   My trifle dish is pretty ancient and no longer sold but below I’ve found some gorgeous affordable trifle dishes below and all are under $40.

Don’t hide your trifle bowl in a cabinet and forget all about it like I did.  It’s too pretty and versatile to stash it away!  Use it to serve salads, salsa, and other dips… you can even decorate with it.  Use it as a fruit bowl or to hold candy, potpourri, or other decorative items!   Take care and have a happy safe 4th of July!


Laura

HOLIDAYS

4TH OF JULY FIREWORK ORNAMENTS

Budget DIY 4th of July Decorations

I’m back today with another fun 4th of July craft project!  These firework ornaments are a perfect way to add a little spirit to your home, inside or out.  As I explained in my last blog post, the fireworks were cancelled this year so I’m trying to find cute little ways to keep the fun and excitement in this 4th.  I had a vision of hanging firework decorations that looked like they were floating in the air and I love how these turned out!  Another favorite thing about these ornaments is how cheap they were to make!  You can grab a bag of 100 clothes pins for under $2!  Let me show you how easy they are to make!

Patriotic 4th of July decorations

Clothes pin craft ideas

SUPPLIES NEEDED

Lots of clothes pins – each ornament takes 8 to make

Fishing line for a floating effect, you can also use string or ribbon

Glue (I used the cheap washable stuff from the Dollar Tree) 

Red, white, and blue paint of your choice

Firework decorations

INSTRUCTIONS

Budget DIY 4th of July Decorations

Separate the clothes pins and glue a thin layer of glue to one of the flat sides of the clothes pin, press together and place it on it’s side to dry.  You’ll need 8 clothes pins glued together total, however you only want to glue 7 together at first.

NOTE:  I used basic glue but I think hot glue would also work great.  Sometimes I just don’t want to deal with hot glue drama like finding a plug, glue strings, and 3rd degree finger burns.

Budget DIY 4th of July Decorations

Once the 2 sides of the clothes pins are dried it’s time to assemble and glue the shape.  On a glue-safe surface glue the 4 ends together creating an X shape.  Continue by gluing the side pieces and last the bottom, making sure the center edges stay securely together.  Once the shape is created add a little extra glue so it dries strong.  Let the glue completely dry.

Cut a piece of fishing line to your desired length and glue the clothes pin together with the fishing line in the center.  Once dry, glue the last clothes pin at the top.

Budget DIY 4th of July Decorations

Budget DIY 4th of July Decorations

Once the glue is dry it’s time to paint, I used my favorite Rustoleum gloss spray paint in Apple Red, Sail Blue, and White.  Remember to paint both sides because the ornaments do rotate, adding to the magic!

I placed a piece of tape over the fishing line so I wouldn’t get paint on it.  I did get paint on a few sections of the line but it easily scratched off with my nails.

Easy 4th of July Decorations to Make

Hanging the ornaments is really easy because they’re so light weight.  Inside I was able to hold them up with just tape on my fireplace mantel.  To hang outside I tied the fishing line to thin craft wire and then attached the wire to our string lights.  I guess in theory you could also tie the fishing line directly to whatever surface you want but I was worried it would be hard to untie at the end.

DIY Firework Clothes Pin Ornaments

We hung these from our patio string lights, but they would look adorable anywhere!  Hang them from a chandelier, inside a window, a pergola, or your front porch.

DIY Firework Clothes Pin Ornaments

DIY Firework Ornaments

Ok… I’m kind of obsessed with these now.  I’m already making more because I love the cheerful effect so much!  They seem pretty sturdy too, I dropped some and they didn’t break.  Speaking of the 4th, are you looking for a delicious dessert to make this year?  I’ll be posting my favorite red, white, and blue dessert in a few days that’s so simple to make and tastes AMAZING!


Laura

HOLIDAYS

DIY 4TH OF JULY TISSUE PAPER GARLAND

DIY 4th of July Tissue Paper Garland

Can you believe June is already coming to a close?  It’s time to start planning 4th of July festivities!  It’s funny, I’ve never been a fan of watching the fireworks.  In Texas it was always a miserable experience with extreme heat, bug bites, and insane traffic.  One year we sat in traffic nearly 2 hours!  This year with Covid-19 it was announced the fireworks were cancelled and I was instantly sad.  Yeah… I hate the fireworks but take them away I get even more sad!

Living in the forest, it is an absolute no-no when it comes to home fireworks, I’m not even risking it with sparklers, so I decided to really go overboard with patriotic decorations!  If you’re needing some fun, festive July 4th decor this garland is perfect for you.  Plus it’s very budget friendly, you can find red, white, and blue tissue paper from Walmart or the Dollar Tree for about $1 a package.

Once you get the rhythm down you’ll have this garland made in no time, I had my daughter help me and we flew through this project in no time!

SUPPLIES NEEDED

Red, white, and blue tissue paper

Scissors

Stapler

How to make garland out of tissue paper

INSTRUCTIONS

How to make garland out of tissue paper

To start, layer 3 sheets each of blue, white, and red tissue paper to make a total of 9 sheets.  If your tissue is different sizes cut it down so it’s all the same size.

Fold the tissue paper in half so you have a center crease and cut the tissue paper in half.  Then cut the 2 pieces each in half, so you end up with 4 strips of tissue paper.

How to make garland out of tissue paper

Don’t worry, your cuts don’t need to perfectly line up and the width of the tissue strips is up to you, mine were about 4-5 inches wide.

Take one tissue stack and staple down the center every half inch or so.

How to make garland out of tissue paper

Once you’re about an inch from the end of the tissue stack, overlap a new stack and staple.  Continue stapling down the tissue stack adding more tissue slices until you reach your desired length.

With scissors cut 1/4 inch strips all the way down one side of the tissue paper, leaving about a 1/2-inch center.  The thinner the cuts the better, wider cuts don’t fluff up as well.

DIY 4th of July Tissue Paper Garland

Now repeat cutting strips on the other side but have the cuts offset from each other, see the arrows above.  This helps the spine of the garland be stronger.

Remember it doesn’t need to be perfect, this craft project falls into the “you can’t screw this up” category and I love those!  If your cuts are crooked and wonky it won’t show once fluffed.

DIY 4th of July Tissue Paper Garland

All done, now it’s time to fluff!  With your fingers, fluff and scrunch the tissue until it’s nice and fluffy, be patient, it might take a bit!  Once you’re finished fluffing, if you see any visible staples just scrunch the tissue a little more.  The tissue garland is surprisingly tough, I got a little rough with mine and it was fine.

Budget DIY 4th of July Decorations

How to make 4th of July garland decorations

Budget DIY 4th of July Decorations

How cute and festive is this garland?  It’s the perfect DIY budget 4th of July decoration for some patriotic fun!  I love it on our fireplace mantel, but on the 4th I’ll be moving it outside to our back deck, I can’t wait!  I have more 4th of July projects I’ll be sharing very soon!


Laura

Cocktails & Drinks

WATERMELON MINT ICED TEA

How to make watermelon mint iced tea

Happy Saturday!  June came hard and fast, bringing an interesting mix of weather.  We’ve had cold days plus rain, sleet, and hail, and then those freaking HOT days!  The weather in Colorado flip-flops a lot, and here I thought Texas was bad!  Regardless of the crazy weather, it seems to always be hot when we’re doing outdoor projects, and with outdoor projects you naturally want some refreshing summer drinks.

As much as I wish I could drink chilled coffee drinks and wine all day on summer days (#goals right?), I also need to hydrate so I don’t shrivel up like a raisin.  This watermelon mint tea is so light and refreshing, it’s a perfect hydrating summer drink!  I kinda came up with it by accident and I’m excited to share it with you.

I’ve been a longtime fan of mint tea whether it’s hot or cold, and quite often in the summer we have a watermelon sitting on the kitchen counter.  So why not combine them?  Making watermelon juice sounds complicated but I promise it isn’t!  Before juicing the watermelon I suggest you brew the mint tea and let it cool so the ice doesn’t melt too fast and dilute all the great flavors.  You can always make the tea in advance and chill the tea in the refrigerator until you’re ready to use it.

If you haven’t had watermelon juice before you’re in for a real treat, it’s incredibly delicious and hydrating!  Filled with vitamins A, B6, and C, lots of lycopene, antioxidants, and amino acids, it’s also incredibly healthy!

How to make watermelon juice

Once the tea is prepared, slice up the watermelon into medium sized chunks and just throw it in a blender or food processor.  You’ll want two cups of strained juice for this recipe so blend and repeat the process until you have at least 3 cups.  Once you strain the watermelon you’ll loose a bit of volume, so you’ll want to account for that.  You can also just juice the entire watermelon, watermelon juice is so delicious I know you’ll want extra!

I find the delicate taste of the watermelon to add the perfect amount of sweetness to the tea, if you prefer sweeter tea feel free to add a little sugar to the tea while it’s still warm.

Strain the pureed watermelon using a mesh strainer over a bowl, you can gently scrape the bottom of the strainer with a spoon to speed this process up.  You’ll know when all the liquid is strained out when the remaining contents in the strainer resemble a thick applesauce.  Combine equal parts of the mint tea and watermelon juice, add ice garnish with a sprig of mint, and you’re good to go!

As long as you strain the watermelon it shouldn’t matter if you use a seedless watermelon or one with seeds.  Find the recipe below.

`

Watermelon Mint Iced Tea

Servings: 2

Equipment

  • Blender
  • Strainer

Ingredients

  • 1 watermelon (to make 2 cups of watermelon juice)
  • 2 mint tea bags (we used Tazo)
  • 2 cups water
  • fresh mint leaves (optional)

Instructions

  • Brew the mint tea bags with 2 cups of water, and let cool.
  • Meanwhile, prepare the watermelon for juicing. Slice the watermelon into medium sized chunks, filling the blender about 2/3 of the way full. Blend until smooth, adding more watermelon chunks if necessary until you reach at least 3 cups.
  • Place a mesh strainer over a bowl and pour the watermelon juice through the strainer, stirring with a spoon to strain.
  • Once you've reached 2 cups of strained watermelon juice, combine the juice and tea in a pitcher, and stir to mix.
  • When ready to serve, pour into 2 glasses over ice, and garnish with mint if desired.

Warm summer days call for this healthy refreshing drink!  We’re working on our back deck today and tomorrow, I’m hoping we can finish most of it this weekend.  Whether we do or don’t I can guarantee we will be sipping on some watermelon mint iced tea!  If you come up with any watermelon tea variations I’d love to hear them.  Have a great weekend, stay happy and hydrated!


Laura