Hello and Happy Friday… except is it really Friday? With mandatory stay at home orders, is anyone really keeping track of the days? It’s a struggle. So, as we’ve all learned by now, being forced to stay at home is fun… for the first few days and then suddenly it’s not. Days of binge-watching Netflix becomes boring and we must find creative ways to bring joy into our life. An easy way to accomplish this is by creating small spaces, and I want to share how easy this is. Whether you’re reading this now during the coronavirus chaos or reading this in the future, I’m here to share my love for creating lovely small spaces!
Ask my Mom and she can vouch that I’ve always loved creating pleasing little spaces. I remember being maybe 6 or 7 and I would spend hours setting up what I called “displays” on my shelves and furniture tops. Yeah, I played with my toys sometimes, but mostly I had fun arranging them. I would spend hours swapping different objects until I was satisfied then proudly show my Mom for approval. Cut to many years later, and although my toys might be gone I still love creating these satisfying spaces.
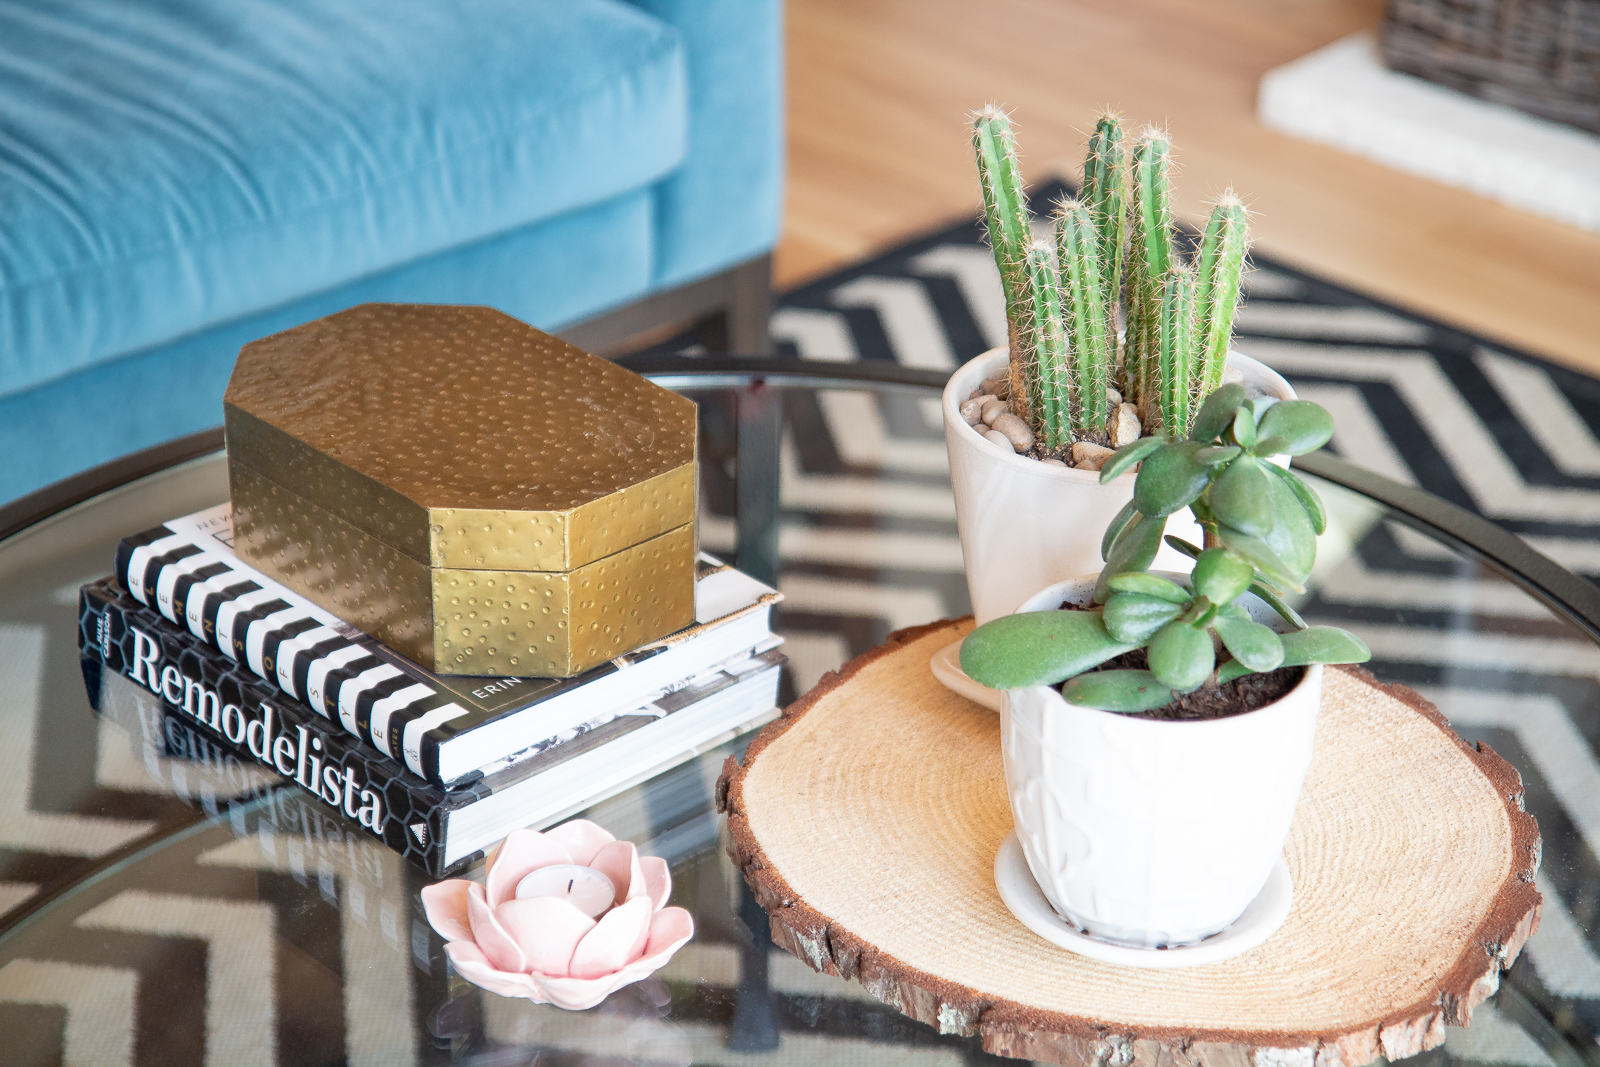
These little spaces give your brain a boost of happiness and joy and I think we could all use a little of that! It’s simple to do this without leaving your house or buying anything, and don’t we all love free home decor? Take a moment and walk around your house, open cabinets, look in drawers, or in the pantry… you have so much to work with even if you don’t realize it! I’m here to just show you a few examples of satisfying small spaces you can create but really the skies the limit.
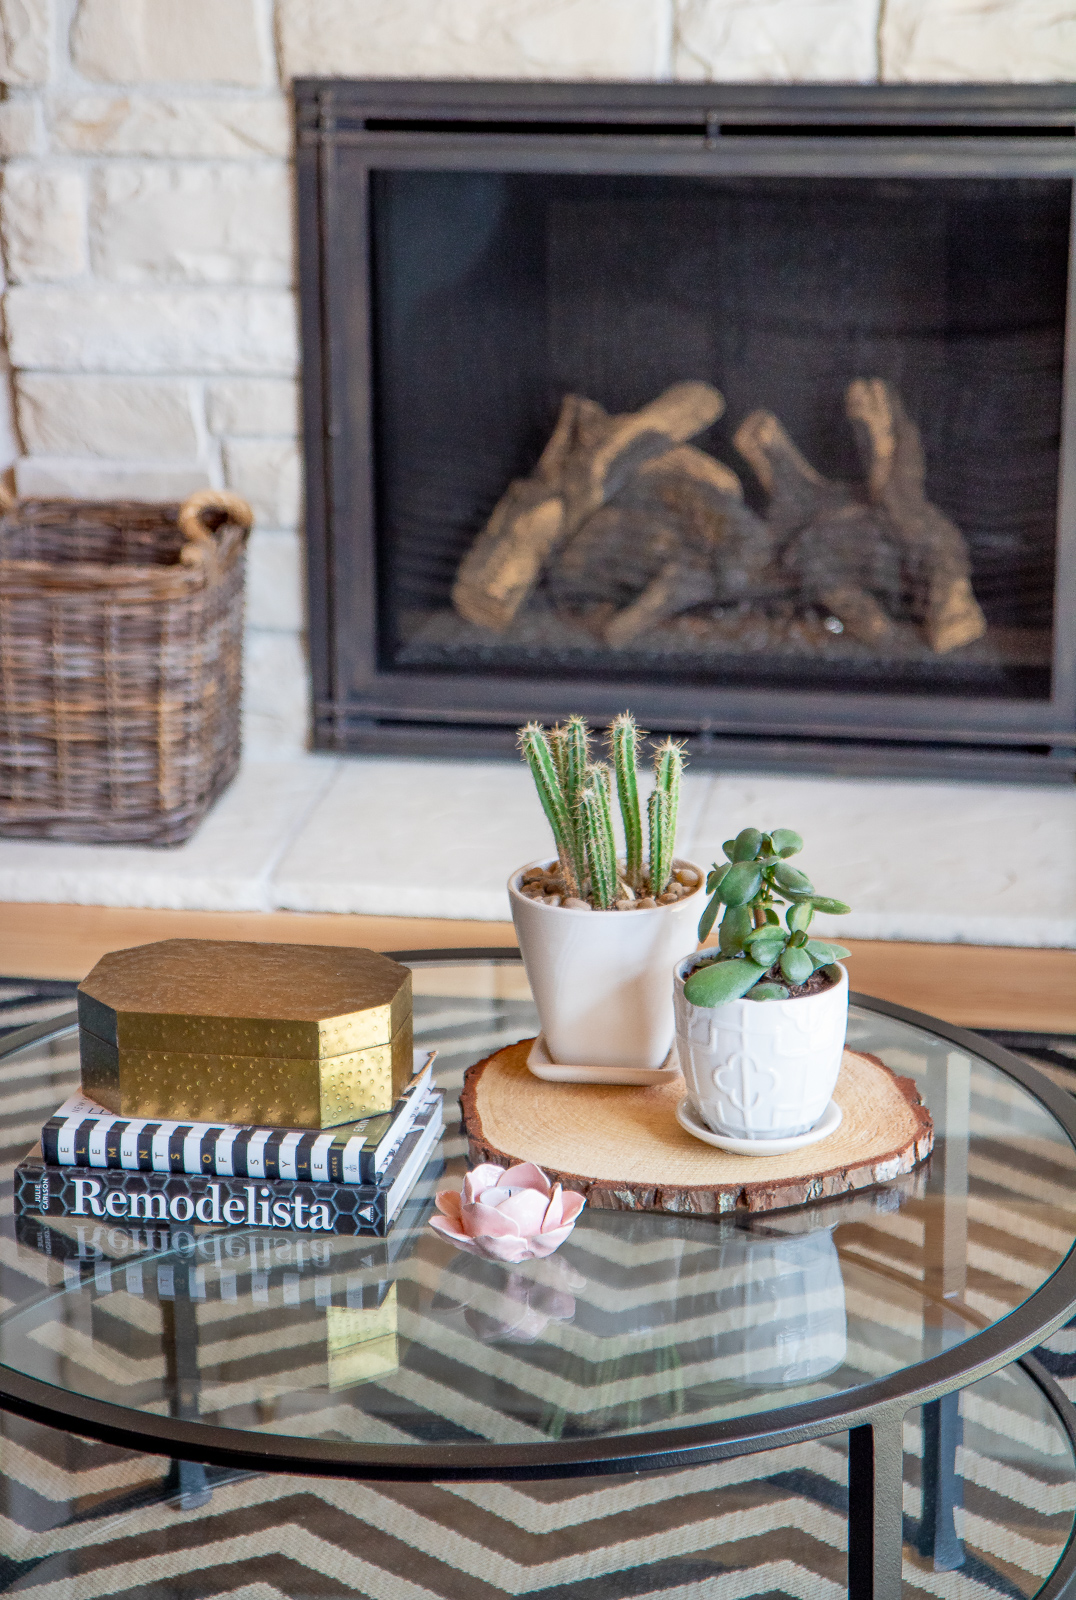
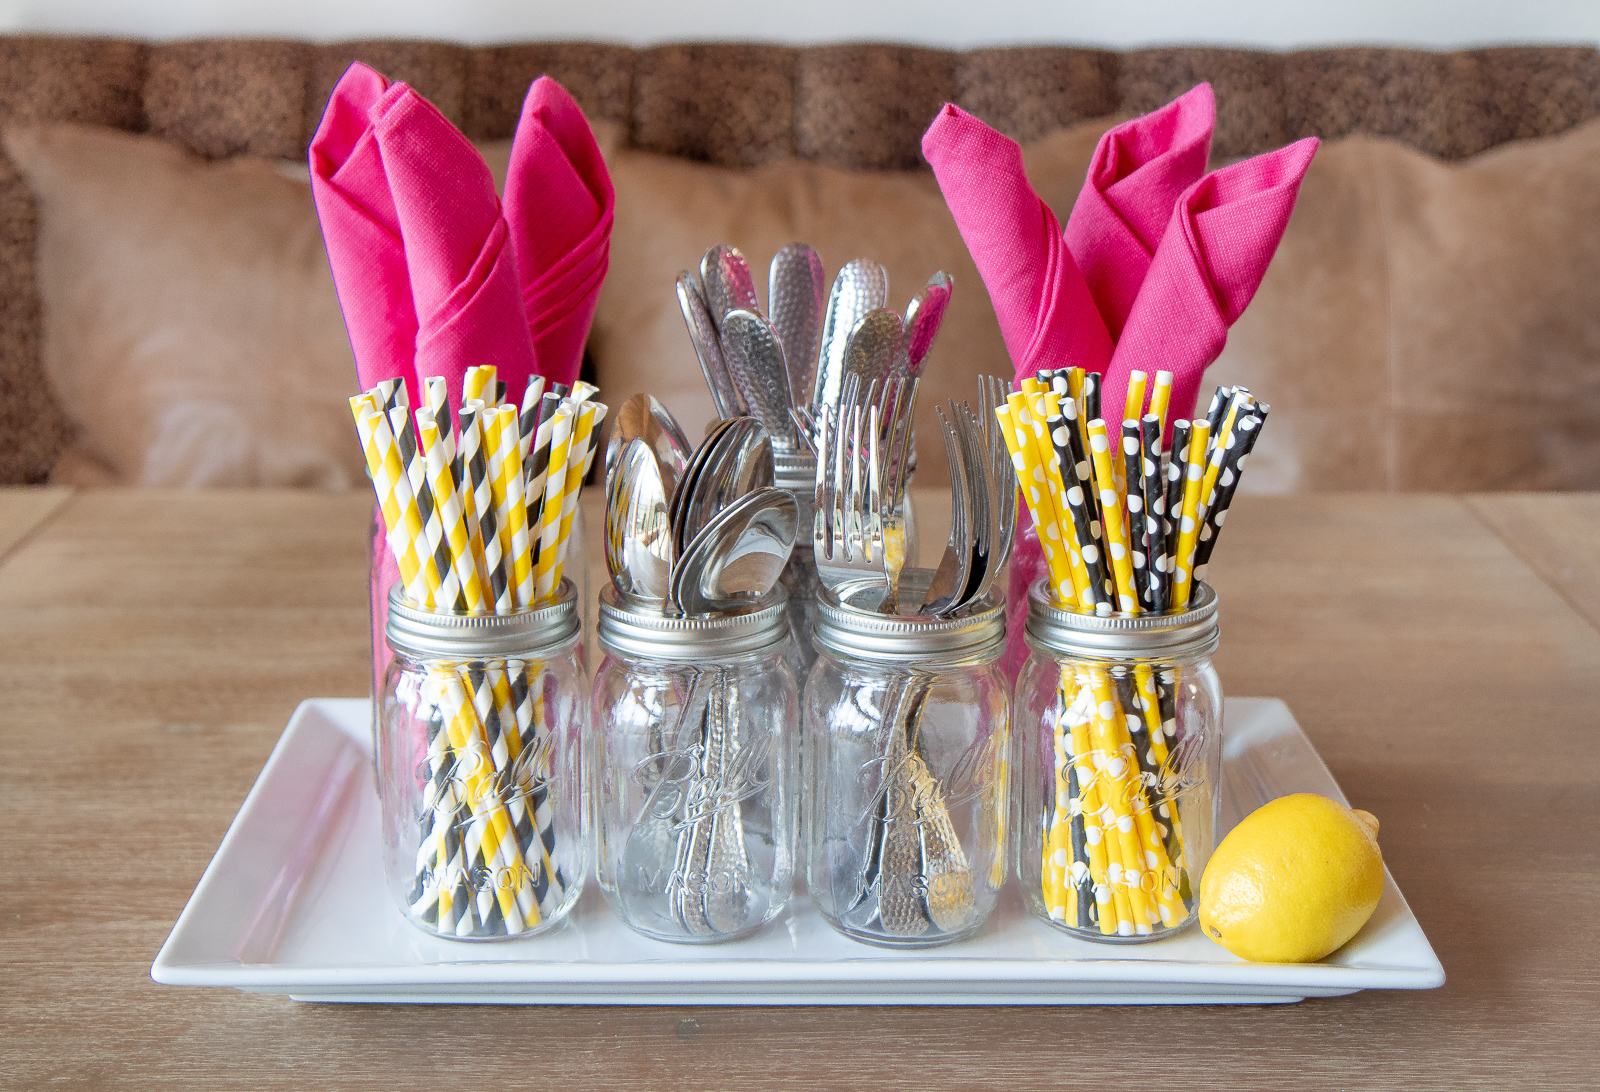
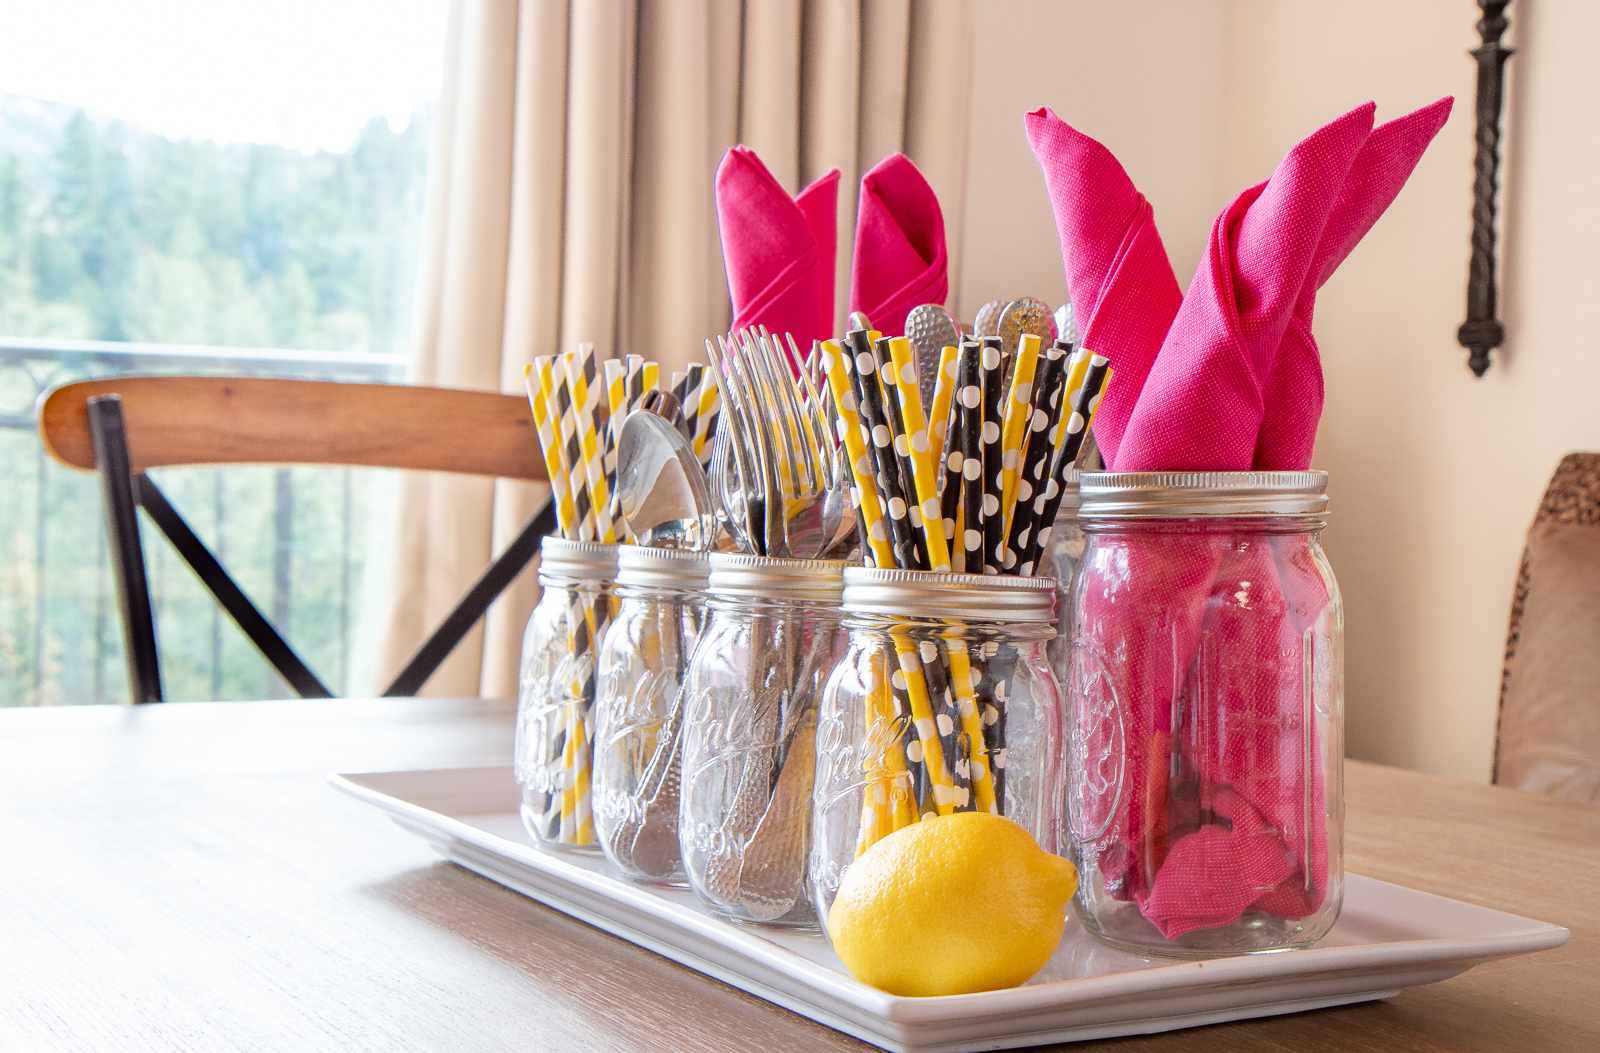
Keeping fresh flowers on the table is my favorite, but that’s not always an option. Once my flowers wilted for good I decided to create a pleasing tabletop buffet caddy that’s also functional. Use a tray, plate, or charger along with jars, cans, or small cups and fill them with flatware, napkins, straws, or any other items you use regularly at meal times.
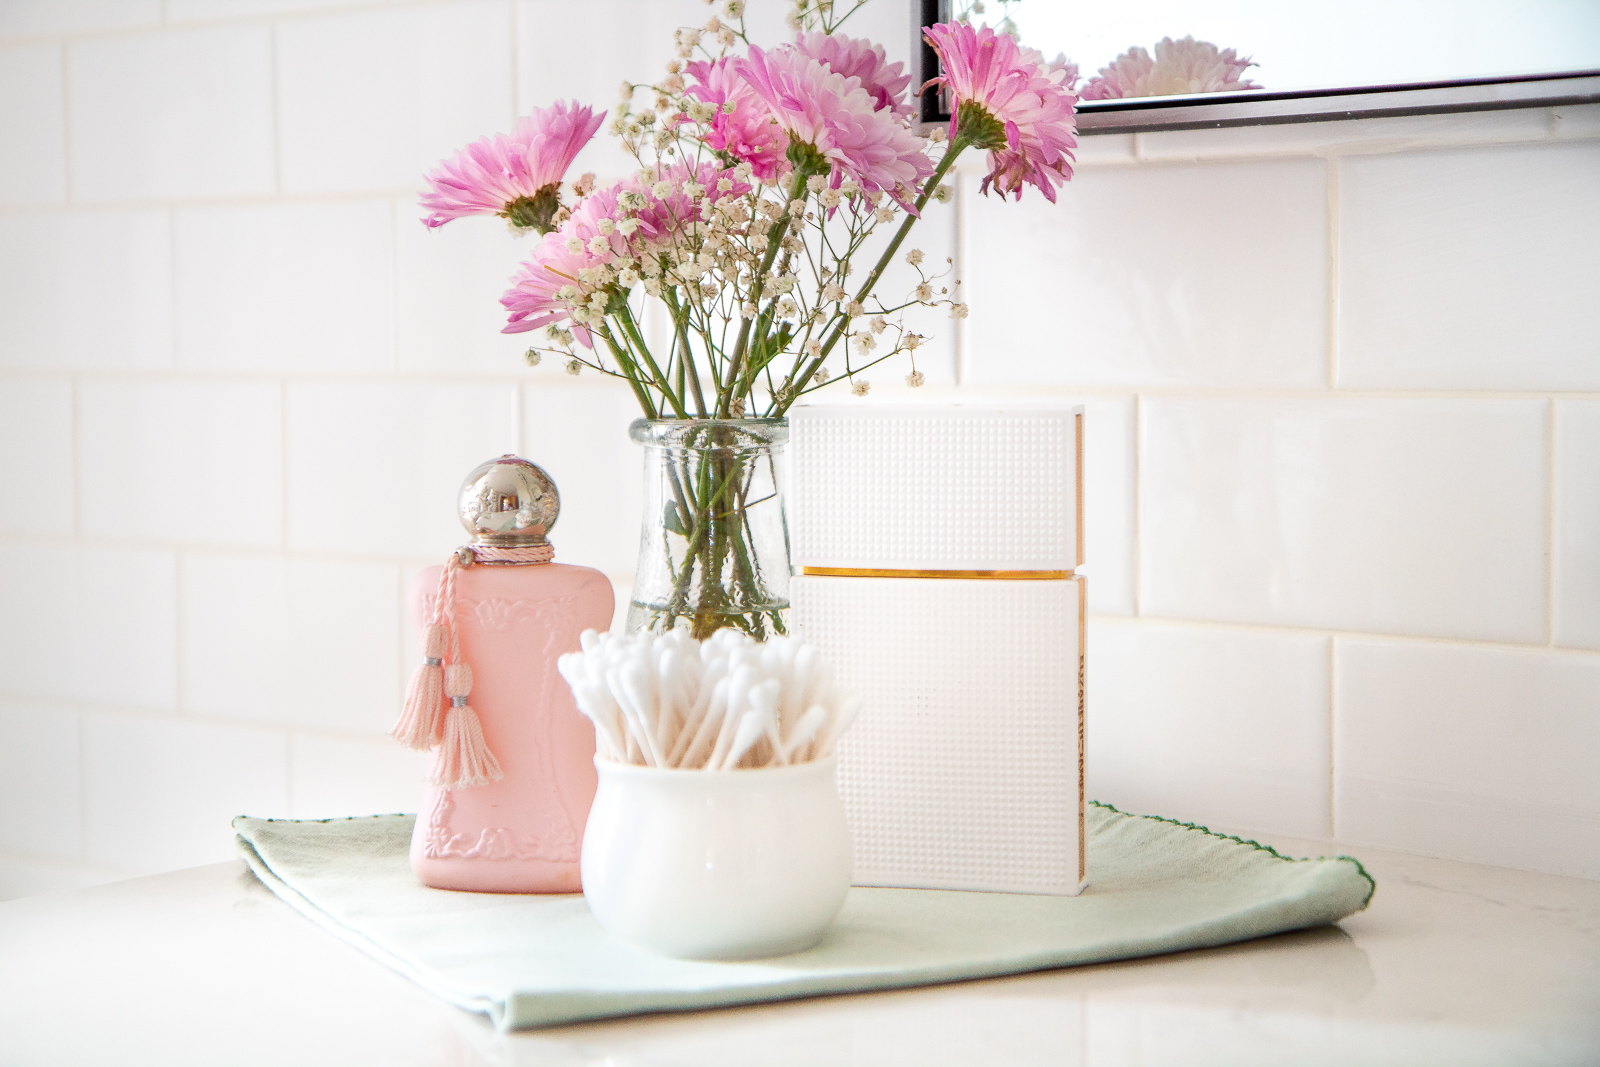
Small items can be grouped in the simplest way like I did on a napkin in our bathroom. Place small bathroom items on a pretty napkin, piece of scrap fabric, or a small plate. Bring out your pretty lotions and potions for pleasing eye decor. I love walking into any room and seeing a cheerful thought out display.
When decorating small spaces you’ll want to follow this basic formula.
Start with a base of some kind. This defines your small space, you can use any kind of fabric, a tray, basket, a book, or even a dinner plate.
Decide if you want if you want your space to be symmetric or asymmetric.
Group together objects that are different sizes and heights for the most pleasing affect. Think tall and short, narrow and wide. Let your objects tell a story.
Add some life to your small space by adding a green plant, fresh fruit, or flowers if you have them.
Use different colors and textures, this can come from woven materials, trays, or even plants. My cactus certainly adds some texture! Be sure to vary your objects when creating the effect you want.
These are just a few examples of my recent small spaces, think about what you can do? Creating a home you love shouldn’t be hard or cost a fortune. Go get creative and create a joyful happy space!
Let’s talk food. Simple, easy, and affordable food! I want to share with you my Creamy Lemon Pasta with Green Peas, a delicious pasta recipe that you can make in 20 minutes or less with just a few simple ingredients. I don’t know about you, but I always have several bags of green peas in the freezer. I find so many uses for them in recipes. They add lots of nutrition, a cheerful pop of color, and are easy on the budget.
You can use any kind of pasta you like but I prefer egg noodles, they’re so comforting and delicious! With all the corona panic, our grocery store shelves have been pretty bare, especially in the pasta section. Luckily we’ve had plenty of egg noodles in stock and they’re my favorite!
I usually buy the biggest bags of frozen peas I can find and I store them in large freezer bags. So whenever I need a small amount of peas I just scoop a little out here and there. My daughter has always been a big green pea lover, she adds them to her eggs and even eats them frozen. I love them too!
In this recipe it’s best to use thawed green peas so they’ll cook faster, but if you’re like me you might forget. No worries, just run the frozen peas a few minutes in a colander under cool water and they thaw pretty fast. You can also use canned peas as well.
Fresh lemon juice really makes this recipe sing, so you’ll need two good size lemons. I usually buy large quantities of lemons and keep them in the refrigerator so they last longer. We use them for everything from lemon water, salad dressings, cocktails, marinades, and yes, lemon bars! Lemons can be kept on the counter if you’ll be using them within a week, otherwise keep them in the refrigerator and they can last a good month, maybe more.
This recipe calls for lemon zest and juice. Be sure and zest your lemons first using a zester or a cheese grater. Then after juicing your lemons be sure to measure out the amount of juice you have before adding it to the recipe. I like using three tablespoons of juice, any more than that I find a bit overpowering. So don’t eyeball it, measure it out and adjust the taste to what you like.
As Julia Child once said, “If you’re afraid of butter use cream.” I love her to pieces… I keep heavy cream on hand at all times, it’s really versatile. However if you’re out of cream you can use butter at a reduced ratio with a little milk (not too much) and you should be good to go. Don’t forget to add a generous dose of freshly ground black pepper and a little parmesan to add even more flavor.
Bring a large pot of salted water to boil. Add noodles, stir, and cook according to package directions.
During the last 5 minutes of the pasta cooking combine cream, lemon zest, salt, and pepper into a small saucepan.
Bring to a boil, then reduce heat, add the green peas, and simmer for 2 minutes.
Drain noodles and return to the pot. Pour creamy mixture over noodles, add lemon juice, and stir to combine. Cook over low heat 1-2 minutes to absorb some of the liquid.
Taste for seasoning, adding extra salt of fresh ground pepper if needed.
Top with fresh parmesan cheese and serve immediately.
With the temperature starting to warm up, this light pasta dish is so fresh and satisfying. Plus it’s cheap, filling, and looks pretty! Things are stressful right now so relax, set the table pretty, and serve up this delicious lemony creamy pasta! With most or all of us trapped at home I’ll be focusing more on simple foods with minimal ingredients and small home projects that require little materials to lift our spirits. Take care!
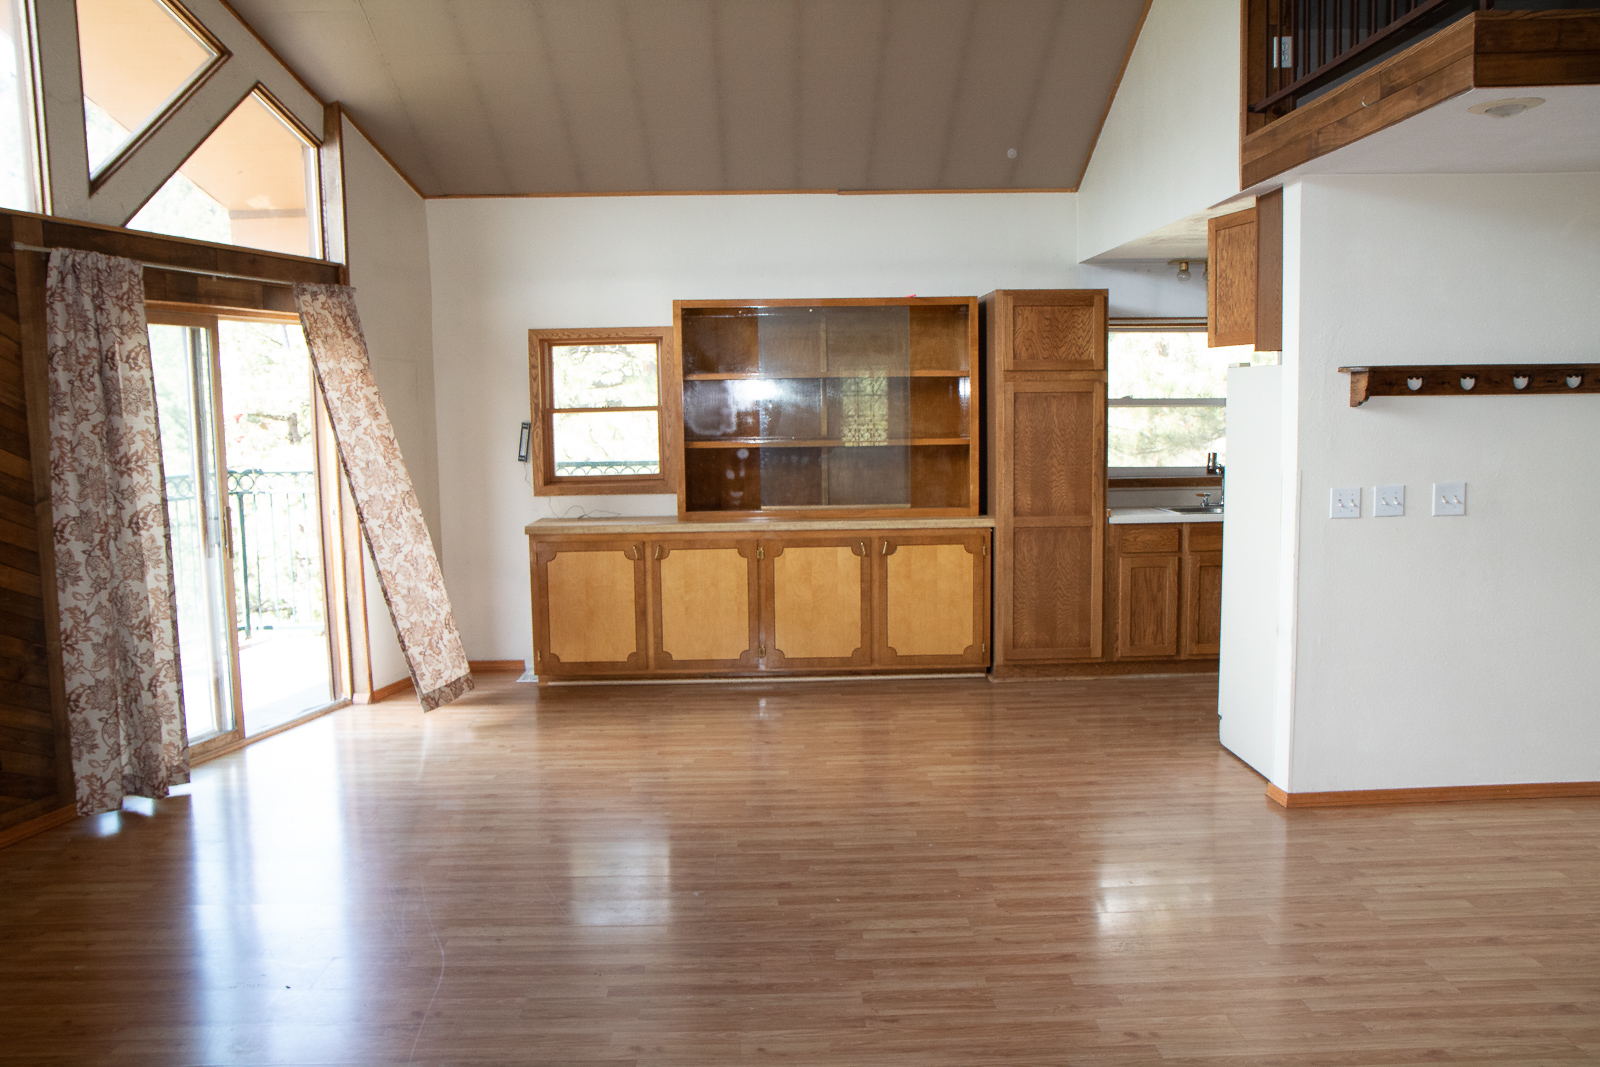
Our new pantry is complete and I’m ready to share it! Like everything else in our home, our pantry is small, but very space efficient. While lots of women fantasize about having huge walk-in closets I dream of a huge walk-in pantry, but it is what it is. I’m very pleased with what we were able to accomplish, though, with this small space. I absolutely HATED our old pantry, I’m not even sure if you could call it a pantry… it was more of a cabinet really, and space was limited. I knew after the holidays when we went back into work mode that this would be our first new project.
Let’s see some before photos of the slow progression of this space.
I didn’t take a before photo of the inside of the pantry but you wouldn’t have believed how crazy it was, especially during the holidays. Every time we opened the door stuff would fall out.
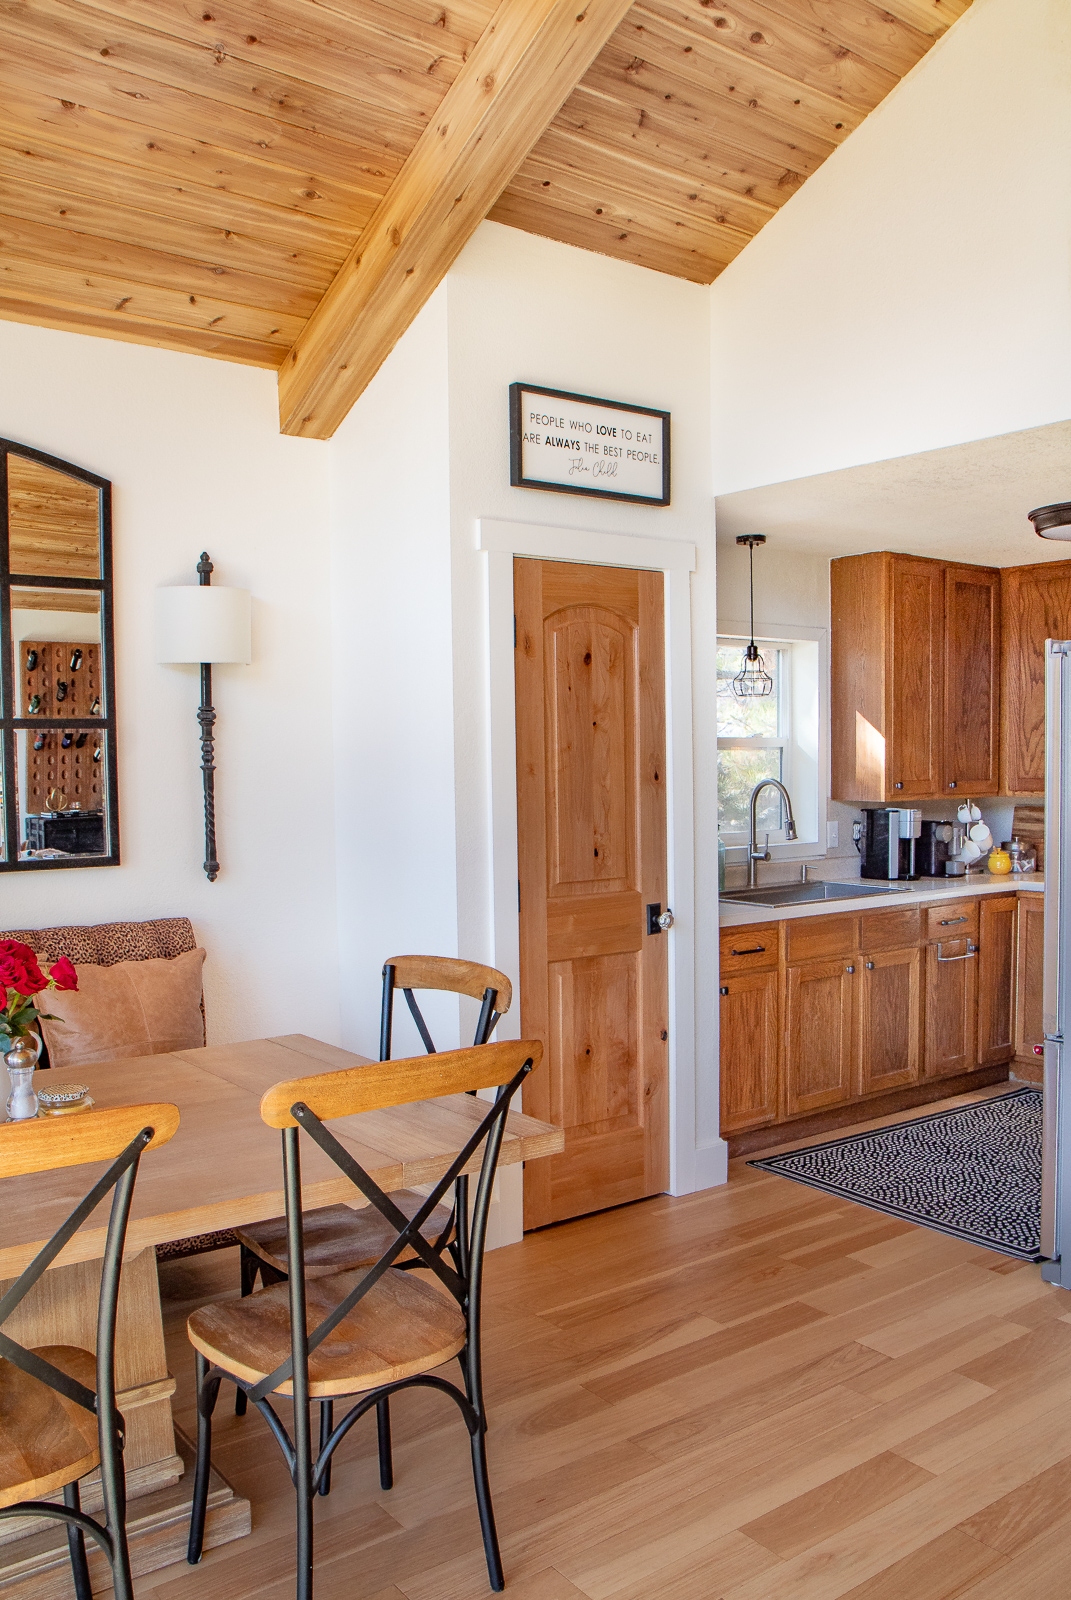
The wood ceiling beams that we had installed last summer created a perfect spot for a larger pantry next to our dining space. I really got lucky on that one… when we had our ceiling done I hadn’t even given the pantry or future kitchen any thought at all because we hadn’t spent much time living here.
The kitchen itself is its own future project but some small changes like cabinet knobs, painting the window, a new sink, and pendant light have already made the kitchen look and feel tremendously better. The cabinets are surprisingly nice but we’ve got to modify them eventually to make room for a dishwasher. You would not believe the hours my daughter and I spend washing dishes. If you ever wonder what I’m doing I’m probably washing dishes.
I’m getting off topic, let’s get back to the pantry. Wanna peak inside??
Brian installed LED lights with a door switch, so when we open the door the lights automatically come on. It’s pretty awesome but the lights did give me some photo glares and shadows, sorry about that!
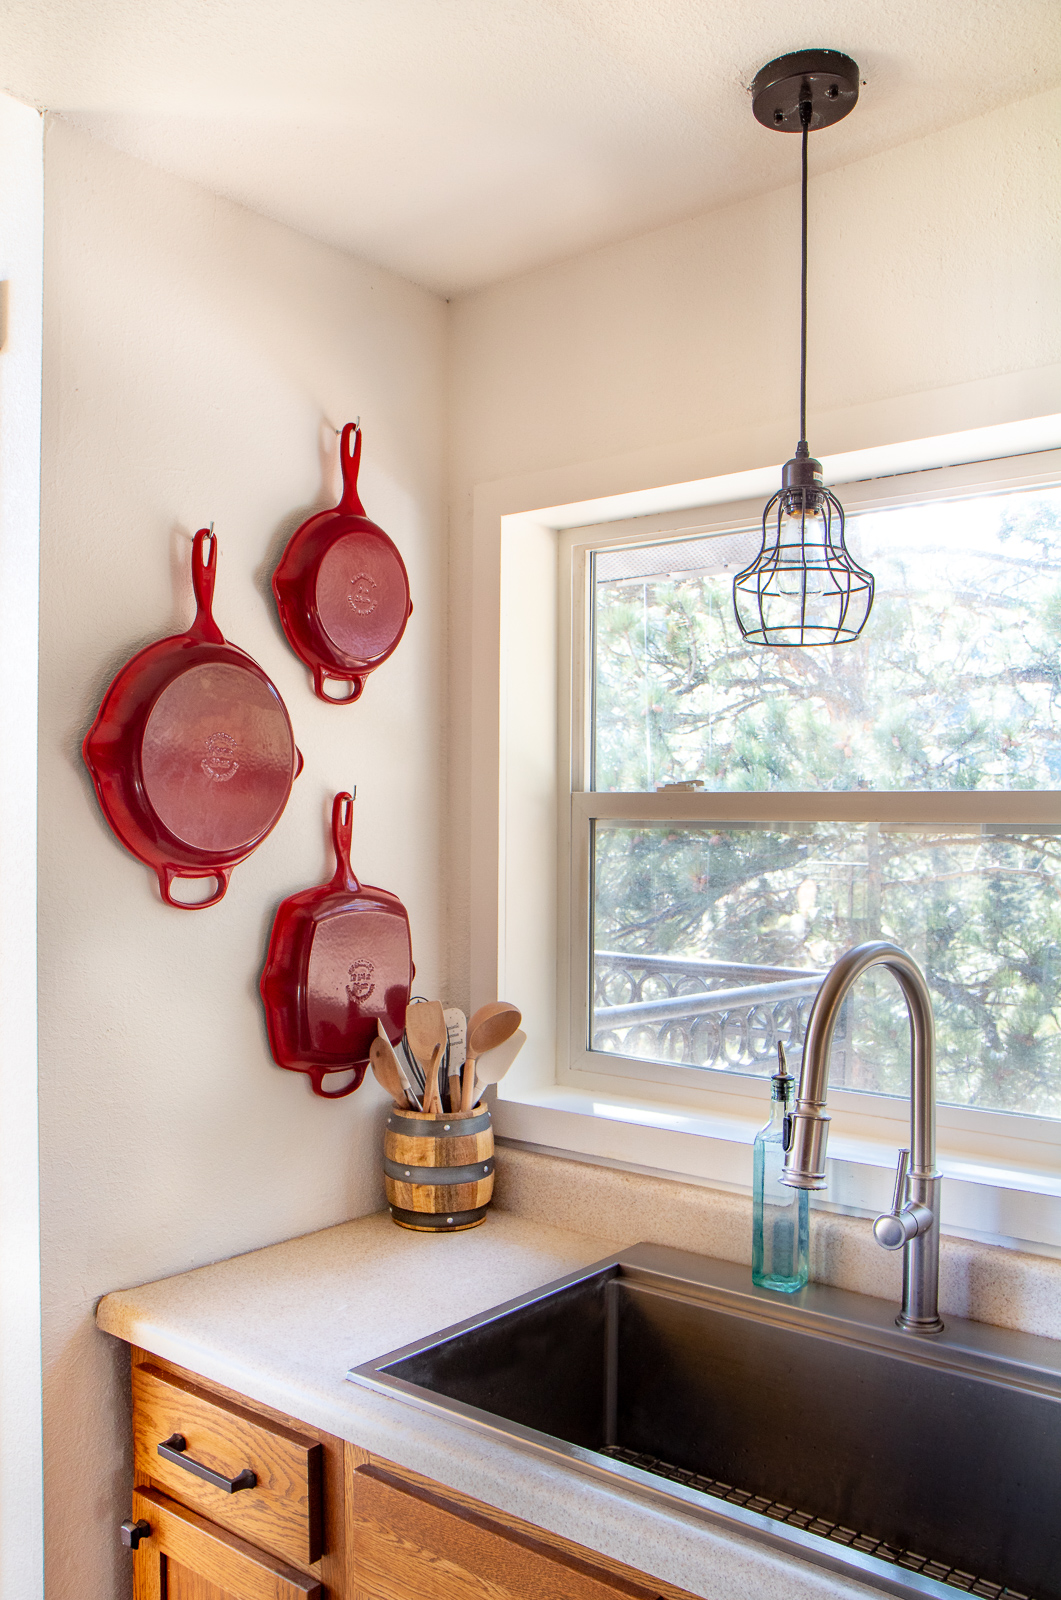
Previously the space between the dining area and kitchen was dull and awkward but now it really connects the spaces nicely and also creates a wall in my kitchen to hang my Le Creuset pans.
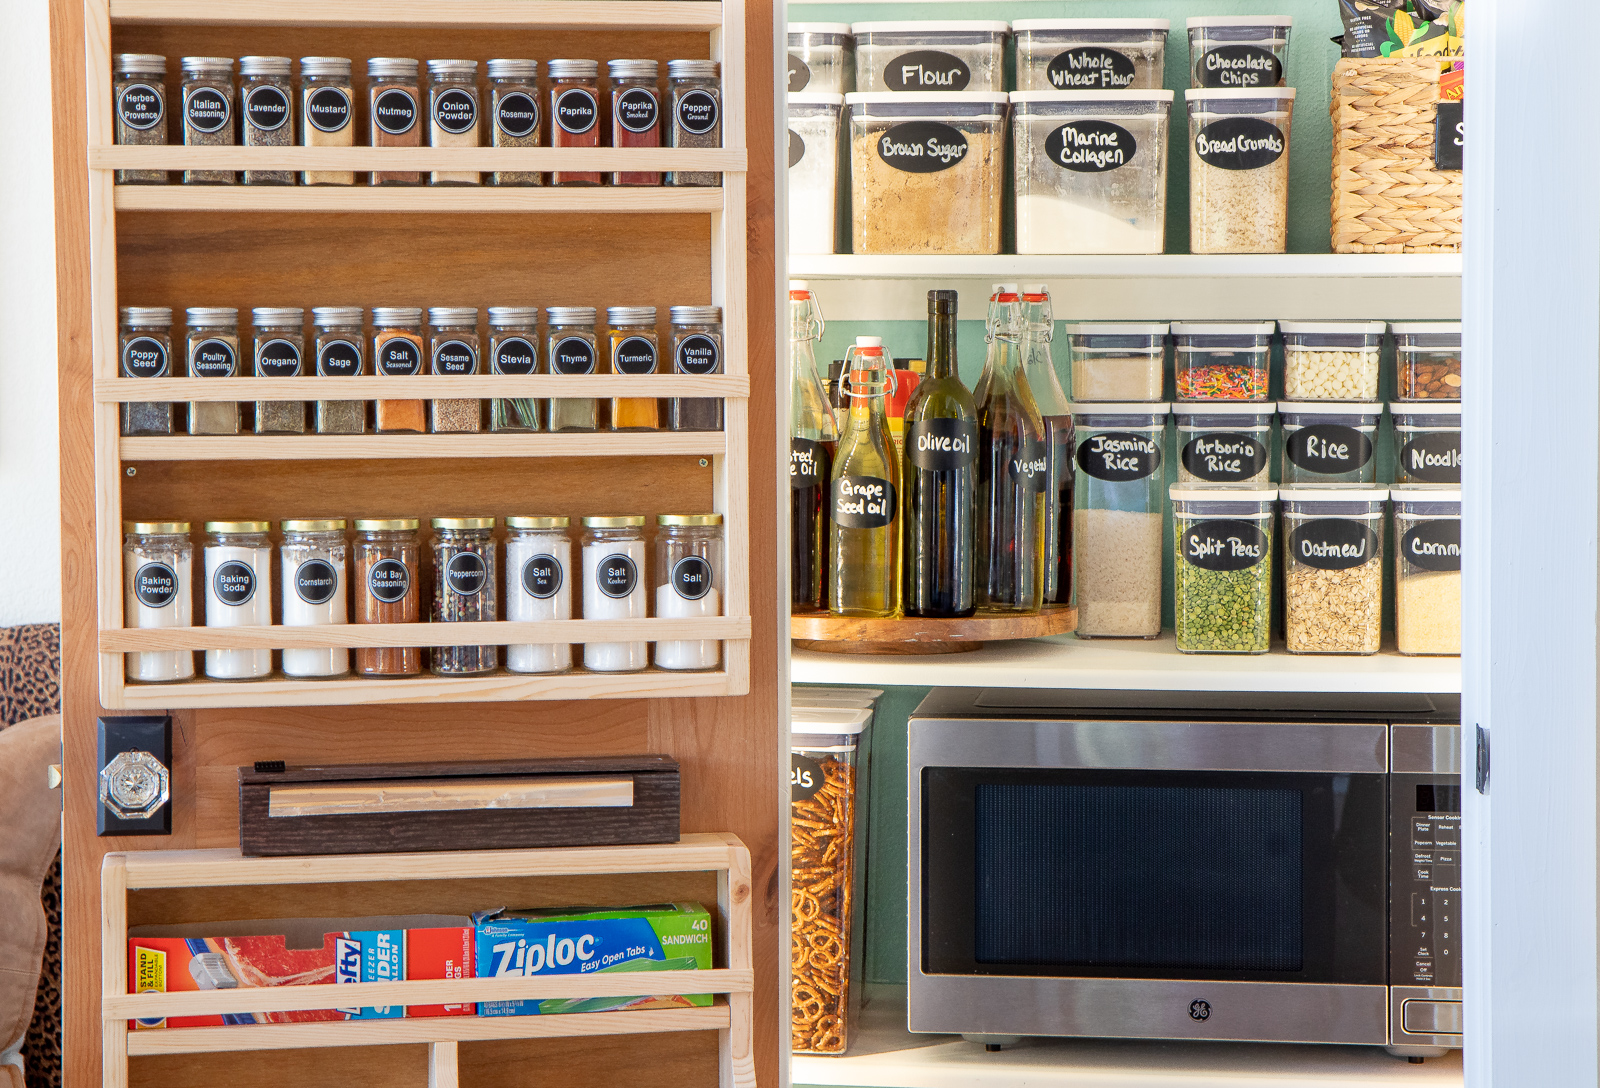
A few months after moving in, the microwave over the stove broke, I was actually relieved because I hated cooking with a microwave in my face. So we went with a counter top microwave, but the kitchen counter space is so limited that it started to crowd the kitchen. I wasn’t sure what to do until one day on Pinterest I saw a microwave inside of a pantry and at that moment my pantry plan came together. Having our microwave in the pantry gives us more kitchen counter space, but it also took away space from the pantry so planning was crucial to make it all work.
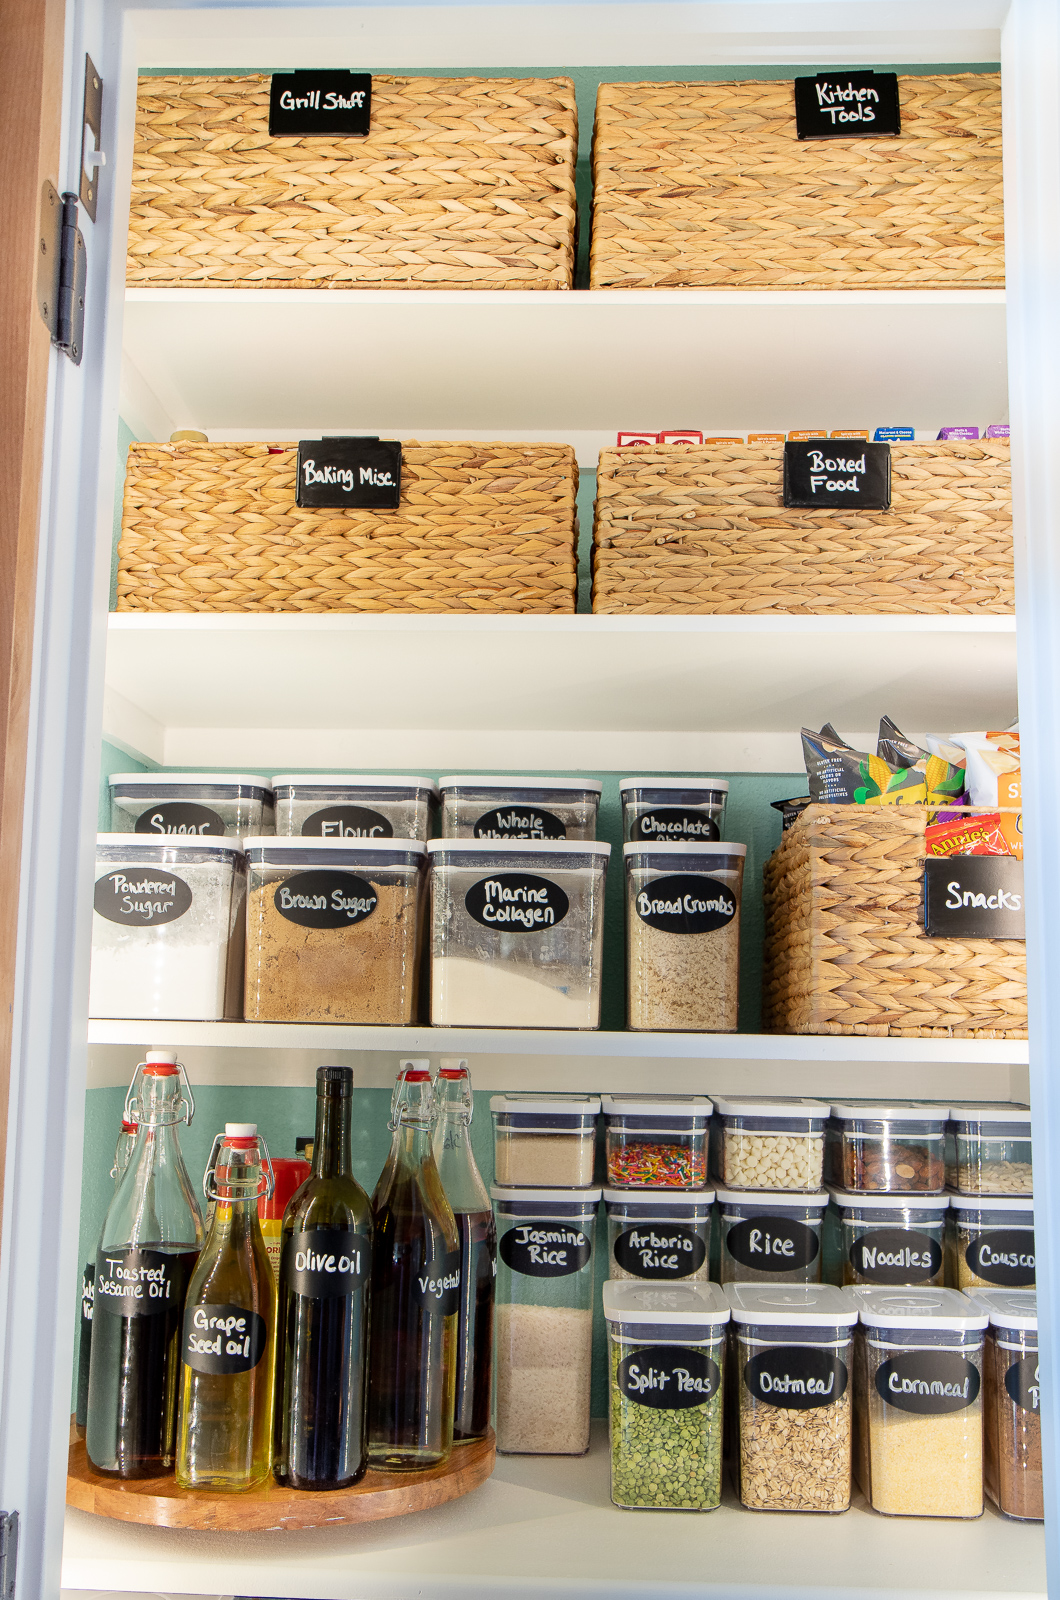
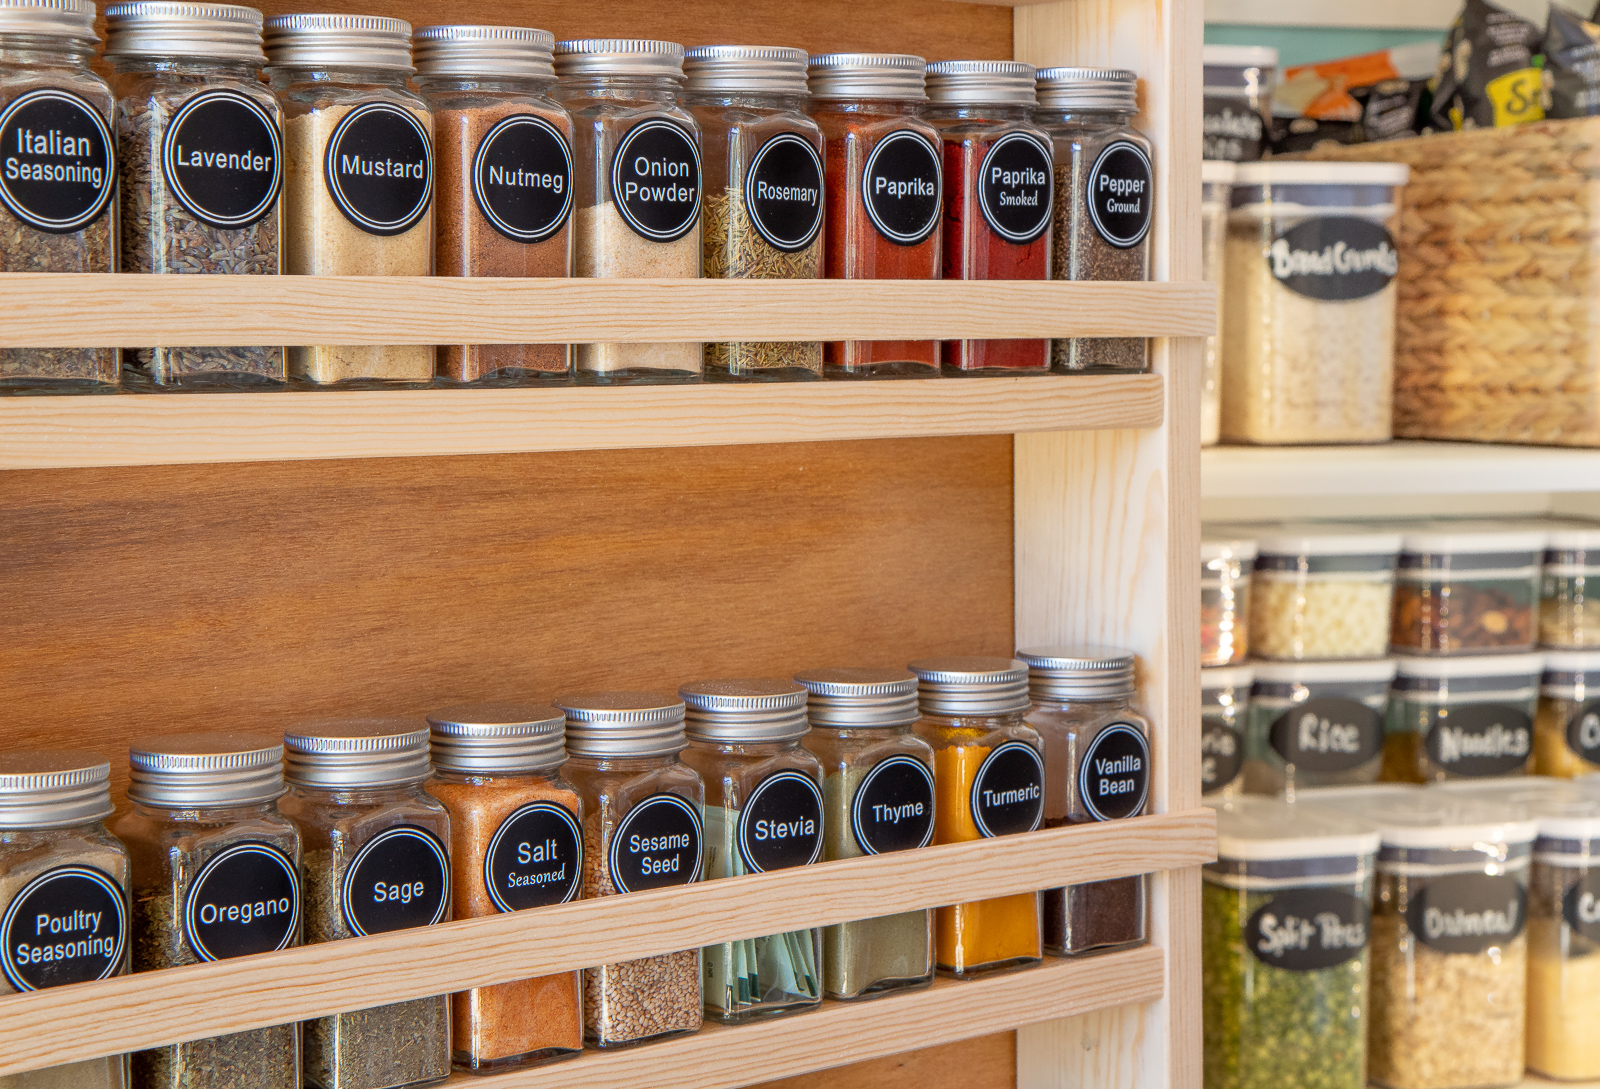
I knew we had to have some type of door rack to give us extra space, we did an Elfa door system in our last pantry but in this instance it didn’t feel right. I don’t know about you but we have a ton of spices! I had them crammed into a cabinet and it was always a mess. One day I found this spice cabinet door rack on Etsy! I love Etsy!! They make half size and full size spice racks. In our door rack I’m able to fit all our spices on top, and the bottom rack holds parchment paper, foil, saran wrap, wax paper, storage bags, espresso pods, and other small kitchen items I use. It holds all the little things that drive you crazy! I was able to free up 2 shelves and a large drawer in the kitchen which I desperately need! The smaller spice jars are from Amazon and came with tons of pre-printed labels, they’re so cute!
We have baskets on the upper shelves to hold miscellaneous food items that aren’t used as much, the Lazy Susan holds our oils, vinegars, and other sauces. My heavily used liquids, such as oils, I like to transfer to glass bottles. My OXO food canisters are incredible too! They come in a wide variety of shapes and heights, they’re stackable and airtight keeping ingredients fresh! I don’t like seeing box clutter in my pantry and you never know how much is left in something. Using clear canisters lets me easily see exactly what ingredients I have and what I need to re-stock. I added peel and stick chalkboard labels, they’re great, you can use chalk or a chalkboard marker and they easily wipe clean when switching out contents.
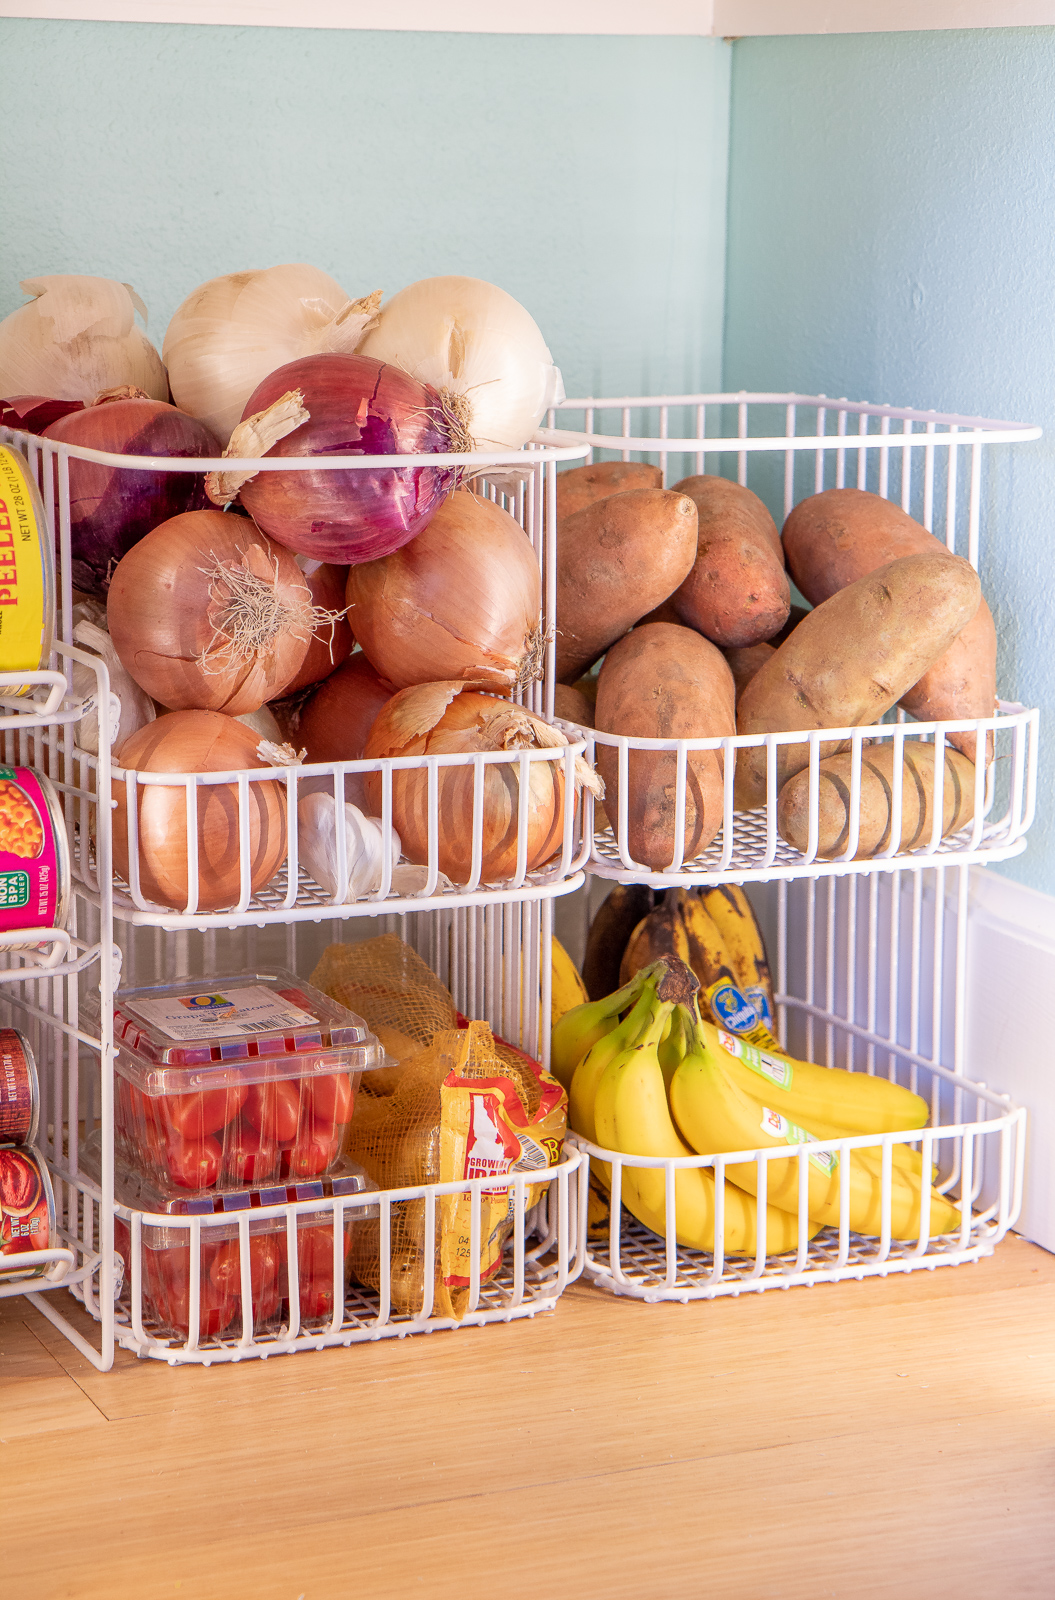
We’ve used the microwave now for weeks, it’s just slightly below counter height and it’s working perfectly for us, it hasn’t been a hassle at all in the pantry, and it’s great hiding the clunky beast! I was able to squeeze in some canisters next to the microwave that we don’t use that often as well as some cookbooks. Due to the height I decided to put our canned goods and produce bins on the bottom. I really like having my produce separated and organized and the gravity can rack has really saved me space on all the cans we have, it’s awesome! Especially my large tomato cans that I can’t live without.
Now when I think “What’s for dinner?” I just open my pantry and see a bunch of organized food ready to be cooked.
Do you ever see pantries in magazines or on Pinterest that are incredibly gorgeous? You wish it could be yours but you know you in reality it won’t work for your family and it’s too hard to maintain. This was me, I spent a long time thinking about what was realistic and easy for us to maintain organization. So far it’s working out well for us.
I like to stay stocked up on lots of staple pantry items and I keep these in a separate storage closet. I was doing this before the coronavirus scare, we frequently get snowed in and our area has had severe flooding before, so it’s always good to be prepared for anything. In fact, here is a recent blog post I wrote about stocking your pantry with staple items in order to stretch your grocery dollar.
My daughter and I have been cooking so much lately and now our kitchen flows so much easier compared to our small cabinet pantry. We have even more food and cooking inspiration. Julia said it best “People who love to eat are always the best people”. Yes they are, I very much agree! She has so many adorable food quotes doesn’t she? Hanging up this little wooden sign above the pantry was just perfect!
The pantry interior paint is Maritime Blue and the shelves and trim are Simply White, both by Benjamin Moore.
I still vividly remember our first trip to Ireland, it was during the week of St. Patrick’s Day and there was so much to take in. I enjoyed everything about the experience, the energy of the city, the happy friendly people, the food, and the Guinness. Yep, the Guinness!! I know not everyone loves Guinness, but I always say if you aren’t a Guinness fan try it in Dublin. When served fresh, the flavor of the beer is absolutely incredible, it’s rich, creamy, and unlike any other beer you’ve probably tasted.
So now you know I love Ireland, and me Guinness. Since my husband and I are an Irish blend ourselves and love good beer we naturally like to get our Saint Paddy’s Day celebration on with delicious food and wait for it… Guinness!
Respect for beef stew! I love how you take basic ingredients and with a little love, care, and a lot of simmering it becomes something special. This stew really comes to life with the rich flavor of the Guinness and the white cheddar mashed potatoes. Together it’s an incredible combination. I use beef but you can substitute lamb too, just don’t skip on the Guinness – St. Patrick will know!
There is nothing better on a chilly day than a big bowl of this Guinness stew served over these rich mashed potatoes. For me it’s the ultimate comfort food!
I’ve been known to double and sometimes even triple this recipe. What can I say? I love my Guinness stew. Another bonus is how freezer friendly this recipe is. Potatoes are known to lose their texture in the freezer but you can easily freeze this recipe. Simply thaw, heat, and whip up the batch of cheddar mashed potatoes separately. Be sure to find a mature sharp white cheddar for the ultimate mashed potato flavor and don’t skip the fresh herbs either, fresh herbs are life to your food… and it’s also green. No pinching here! Be warned you can’t have just one bowl of this Guinness goodness.
In a small bowl combine flour, salt, and pepper and the stew meat, toss to combine.
Add olive oil in a heavy pot over high heat. Brown the meat on all sides, remove the meat with a slotted spoon or tongs and set aside on a plate.
Add the onion and garlic to the pot and cook for 3 minutes. Mix in the tomato paste and cook 2 more minutes.
Pour in Guinness, scraping all the brown bits from the bottom of the pan.
Add the beef back to the pot and add the beef stock. Cover the pot and reduce heat to low. Simmer covered for 1 ½ to 2 hours.
Add carrots to the pot and simmer uncovered for another 30 minutes. If the mixture seems to thicken, thin it out with a little extra beef stock. Start the mashed potatoes during the last 30 minutes while the carrots are simmering.
Peel and dice the potatoes, add them to a large pot covered with water. Boil potatoes until fork tender, or about 25-30 minutes.
Drain the potatoes, add them back to the pot turning off the heat and mash until smooth.
Add grated cheddar cheese, cream, and butter and mix well. You can keep the potatoes warm in the oven if needed while waiting to serve.
When the carrots are tender, remove the stew from heat and carefully taste for seasoning, add additional salt and pepper if needed.
Serve the beef stew in a bowl over mashed potatoes. Sprinkle with fresh minced parsley and thyme.
Saint Patrick’s Day is just days away and oh how I wish I was in Ireland again, but until then this yummy stew will have to do. I’ve blogged some of our adventures in Ireland so if you’re in the mood read Ireland in March and 12 Must See Things to Do in Dublin. Happy eats friends!
THINGS TO DO IN STEAMBOAT SPRINGS COLORADO (BESIDES SKI)
We recently returned from a long weekend in Steamboat Springs for my daughter Ashley’s birthday. My littlest is now 16, how is that even possible? Sniff sniff. She had such a blast… we all did, and I’m so excited to share it with you! Steamboat Springs has lots of great skiing, but what if you visit in the winter and you don’t want to ski? Don’t worry I’m here to give you tips on what to see and do in this snowy paradise!
*UPDATED 2/22/21
STEAMBOAT SNOWMOBILE TOURS
Some of the best snowmobile terrain around is found in Steamboat Springs! I recommend Steamboat Snowmobile Tours for sure! Our guide made sure we felt fully comfortable safety-wise before we started our tour. We felt safe, had a blast, and saw some of the most gorgeous views we’ve ever seen! Be sure to bundle up with waterproof pants, a coat, gloves, and snow boots. Goggles are highly recommended too! Helmets are required and provided. Get more information and make reservations at www.steamboatsnowmobile.com.
GO DOG SLEDDING
Located about 45 minutes outside of Steamboat Springs is Snow Buddy Dog Sled Tours. Here you’ll learn how to harness the dogs, give commands, and learn how to run your own dog team. Drivers and riders can switch half way through to enjoy both experiences. This was such an incredible experience for us! Many of the dogs are rescues, so sweet and playful, and most of all they love to run! You’ll also be treated to warm chocolate chip cookies and a nice hot drink to warm you up. Many of the dogs are available for adoption after a certain age as well.
PLAY IN THE SNOW
Enjoy some of the fluffiest most gorgeous snow around, perfect for snow angels, snowball fights…. or maybe you just want to give the snow a hug? Bundle up and jump in, it’s good clean fun!
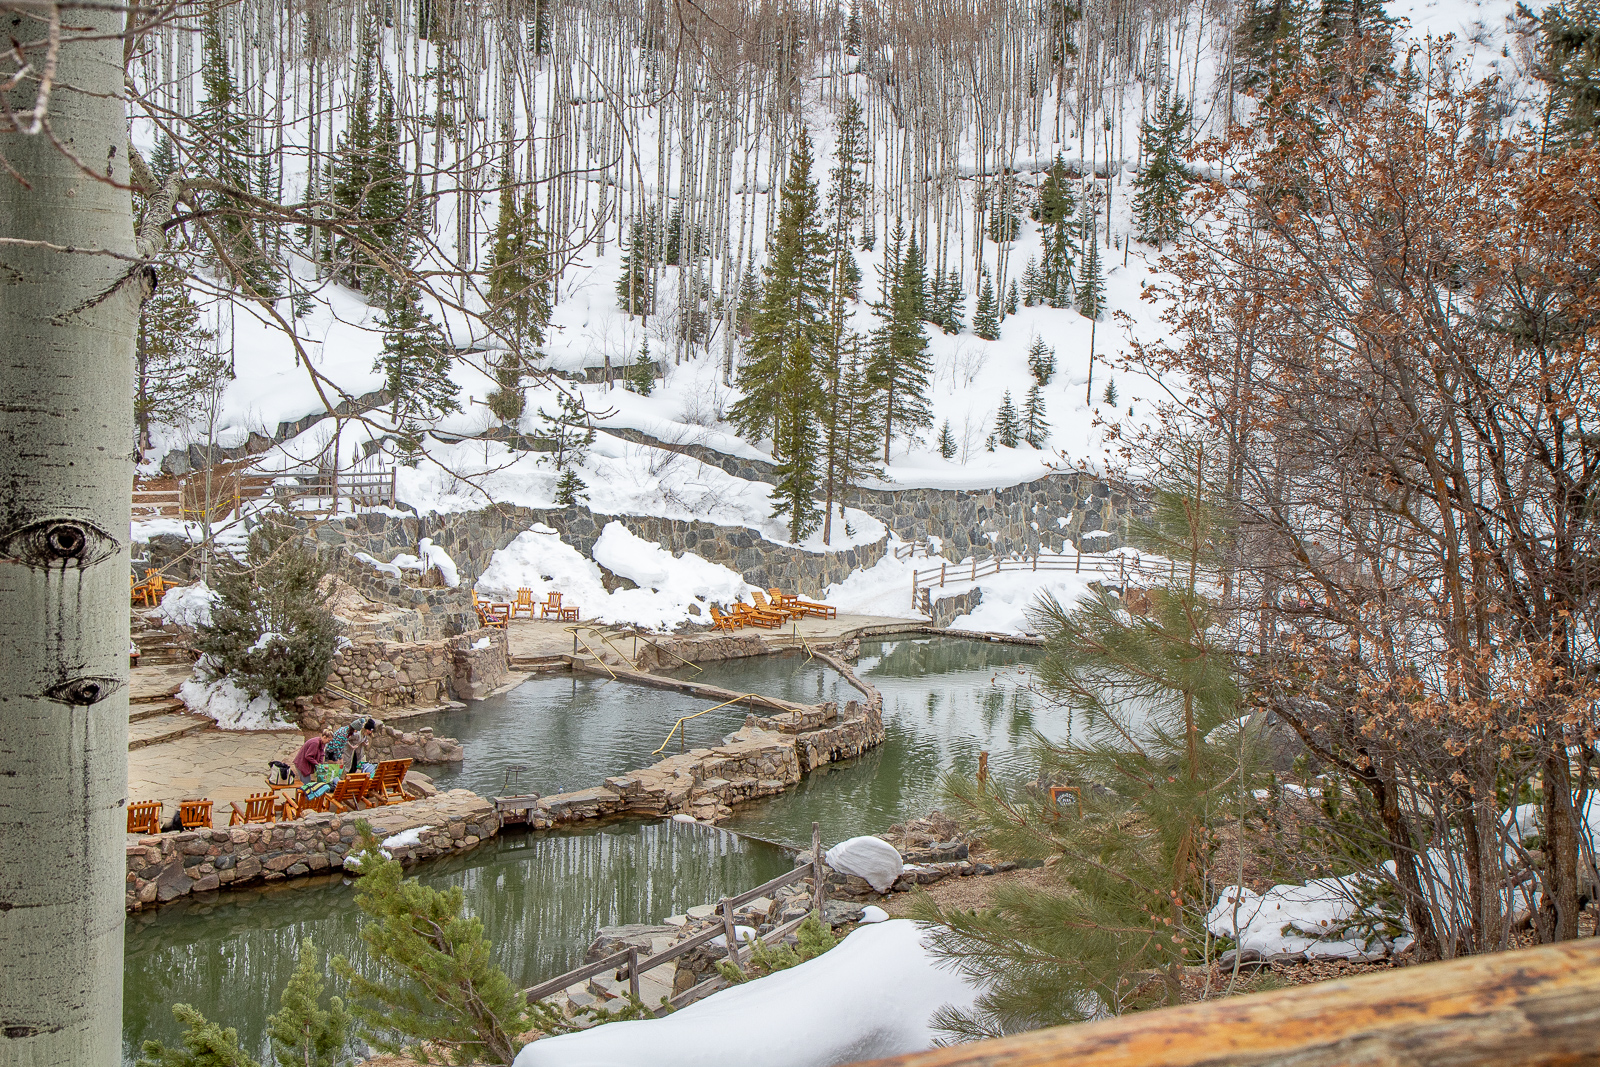
STRAWBERRY PARK HOT SPRINGS
I am quickly turning into a hot springs addict! Seriously you just can’t beat relaxing in the winter Colorado beauty while soaking in toasty warm water. The outdoor beauty is unreal here, it’s nature therapy! There are several hot pools to choose from, and if you’re feeling brave there’s also a cold pool to plunge into. As lovely as Strawberry Park Hot Springs was I feel I the need warn you about a few things.
First of all, the road to the hot springs is bad, and I mean bad! It’s not paved and full of stomach turning potholes, an off road vehicle is ideal. There is a shuttle I believe that can pick people up from the town as well. Also be warned it’s CASH ONLY, no credit or debit cards are accepted. The changing room is tiny, gender-neutral, and not very private – definitely have your swimsuit on under your clothes, the restrooms are also located ridiculously far from the hot springs and no showers are available. Last, be warned it gets crowded very quickly – like 45 minutes after they open quickly! If you can accept these issues than definitely go and enjoy the mineral benefits soaking in this beautiful spot!
Admission ranges from $15-20 depending on the time of year. Be sure to bring your own towels, sandals, and a bathrobe.
TAKE A SLEIGH RIDE TO DINNER
Sleigh rides aren’t just for the Christmas season. The Steamboat Ski resort offers a sleigh ride dinner at their Scandinavian restaurant called Ragnars. After riding up the gondola you’ll be given hot cocoa and blankets to snuggle up in before entering the sleigh. It’s a 10 minute ride the top, you’ll breath in crisp mountain air, possibly catch the sun set, and see a sky full of stars on the way down after dinner. It’s simply beautiful, and cold so dress warm. Ragnars is not accessible by road, and it’s definitely a fun experience. If you want to avoid snow blowing in your face it’s best to sit with your back to the snowcat. Reservations are required, visit www.steamboat.com for more information.
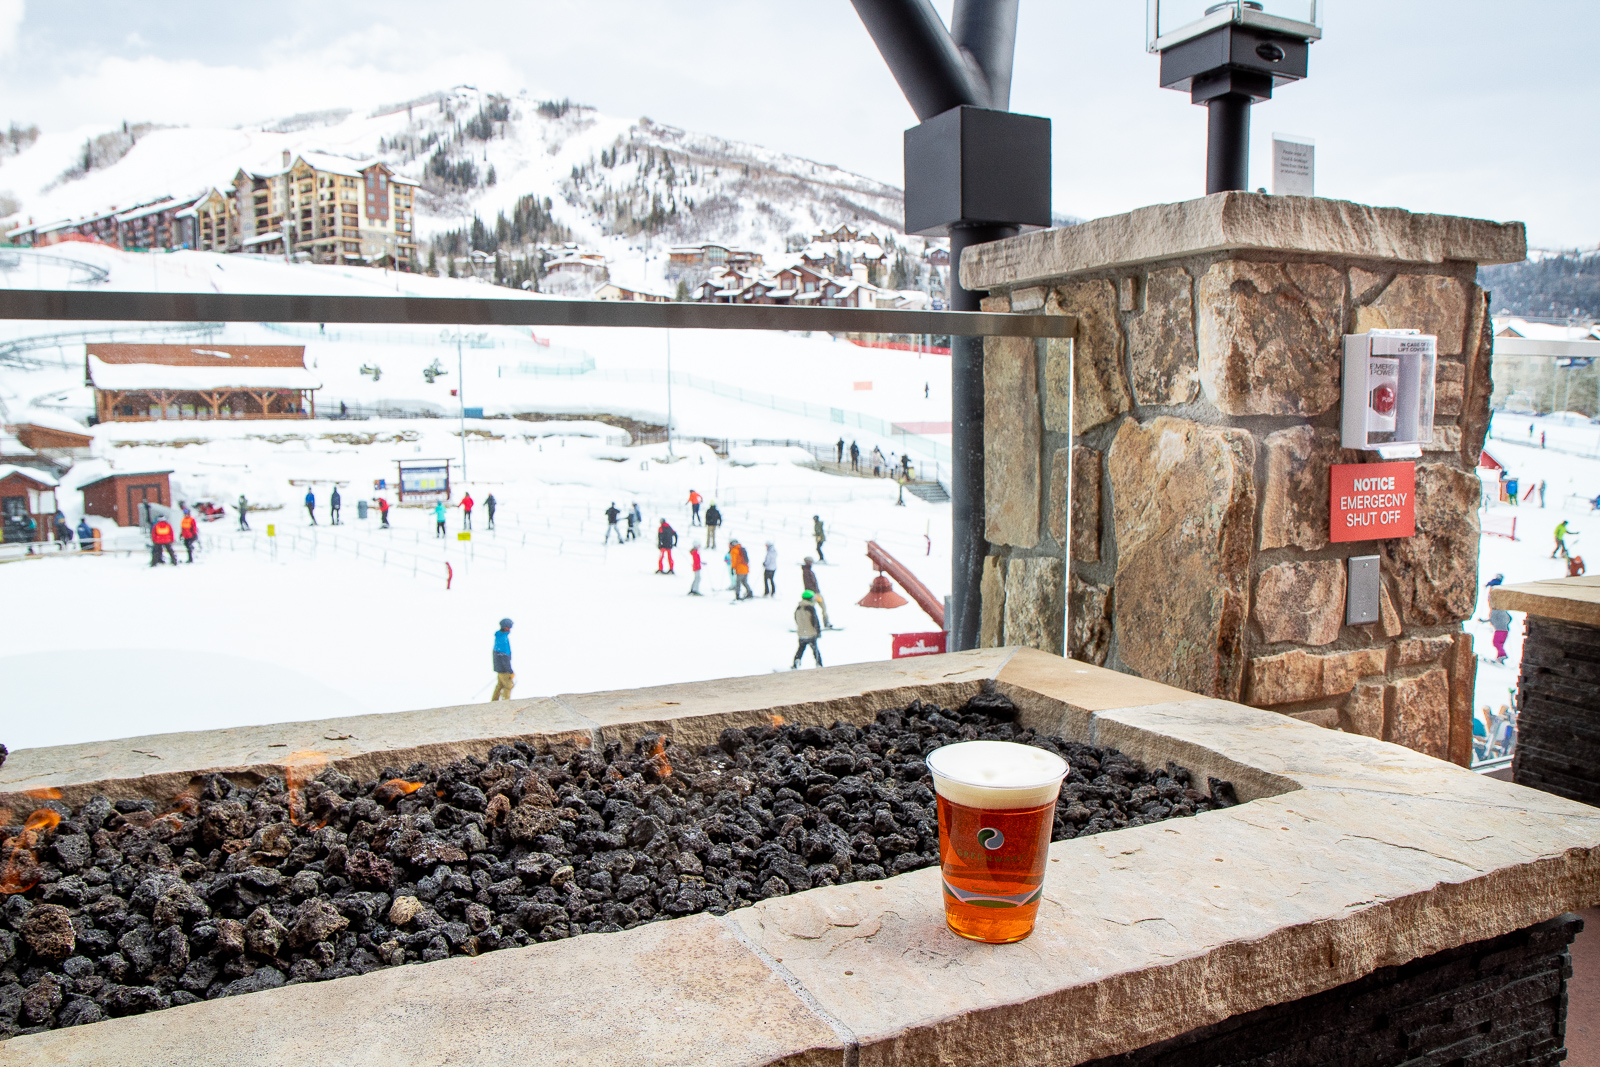
RIDE THE GONDOLA
I don’t know about you but I can never turn down a gondola ride, especially one that’s in a gorgeous winter wonderland. This relaxing ride is a good 10 minutes with views aplenty. There is a restaurant, lounge, and small ski shop at the top, so you can stretch your legs and grab a bite if you like. It’s definitely a fun experience.
SOAK UP THE VIEWS
Whether snow or shine, Steamboat Springs has breathtaking wintery views nearly every place you go! Sometimes you just need to relax and soak up all the gorgeous views! Be sure to take in every moment from downtown to the mountain range!
RIDE THE MOUNTAIN COASTER
The Outlaw Mountain Coaster is open year round, but nothing beats riding the coaster in the snow! Each coaster has it’s own brakes so you control your own speed, whether it’s a slow relaxed ride or a heart pounding fast one you’ll be sure to love it! The coaster operates every day from 11-6 pm and costs $20 per person. Be warned, you’ll want to go more than once!
SHOP ‘TIL YOU DROP
Steamboat Springs has an abundance of unique shopping and restaurants quietly located away from the ski areas. If you’re not feeling the shopping vibe it’s still fun to just stroll down the street and take in the views and atmosphere.
EAT, DRINK, & BE MERRY
There are so many amazing restaurants to pick from in Steamboat Springs you won’t ever go hungry! Below we’ve listed our favorites.
Truffle Pig offers delicious food and great ski views! They have a happy hour with awesome outdoor seating, but be prepared for the ski crowds! Dinner reservations are available on OpenTable.
Table 79 is located downtown and was probably the best restaurant we ate at, it’s my #1 restaurant pick. The atmosphere is modern yet lively and fun with a long list of creative food to choose from. Reservations are available on OpenTable.
The Cabin is a great place for a quick lunch near the ski area, the faux Aspen trees in the dining area added a cute charm too. Reservations are available on OpenTable.
Salt and Lime has some of the best tacos I’ve tasted. We’re always on the lookout for great tacos! Be sure and try the queso too, it’s some of the best I’ve ever eaten. Be warned it does get crowded so be prepared to wait during peak times.
Haizies is located at the top of the gondola. It probably won’t be the best food you’ve ever eaten but it is pretty great considering you’re eating on top of a mountain. You’ll find beautiful views while dining and a nice menu of foods to choose from. Word of advice… avoid ordering anything with lobster and you’ll probably be happy. Reservations are available on OpenTable but you can probably wing it and be ok.
So if you’re not a skier, or maybe you’re like me and just haven’t learned to ski yet (that will be happening next year) still be sure to visit Steamboat Springs in the winter season. There is a ton of stuff to see and do!
Should you need any winter apparel for snow activities (like snowmobiling) you can rent clothing at Christy’s Sports in Steamboat Springs. There are plenty of hotels to pick from based on your needs, I recommend www.Hotels.com. I can’t wait to visit (and hopefully ski) this gorgeous spot again!
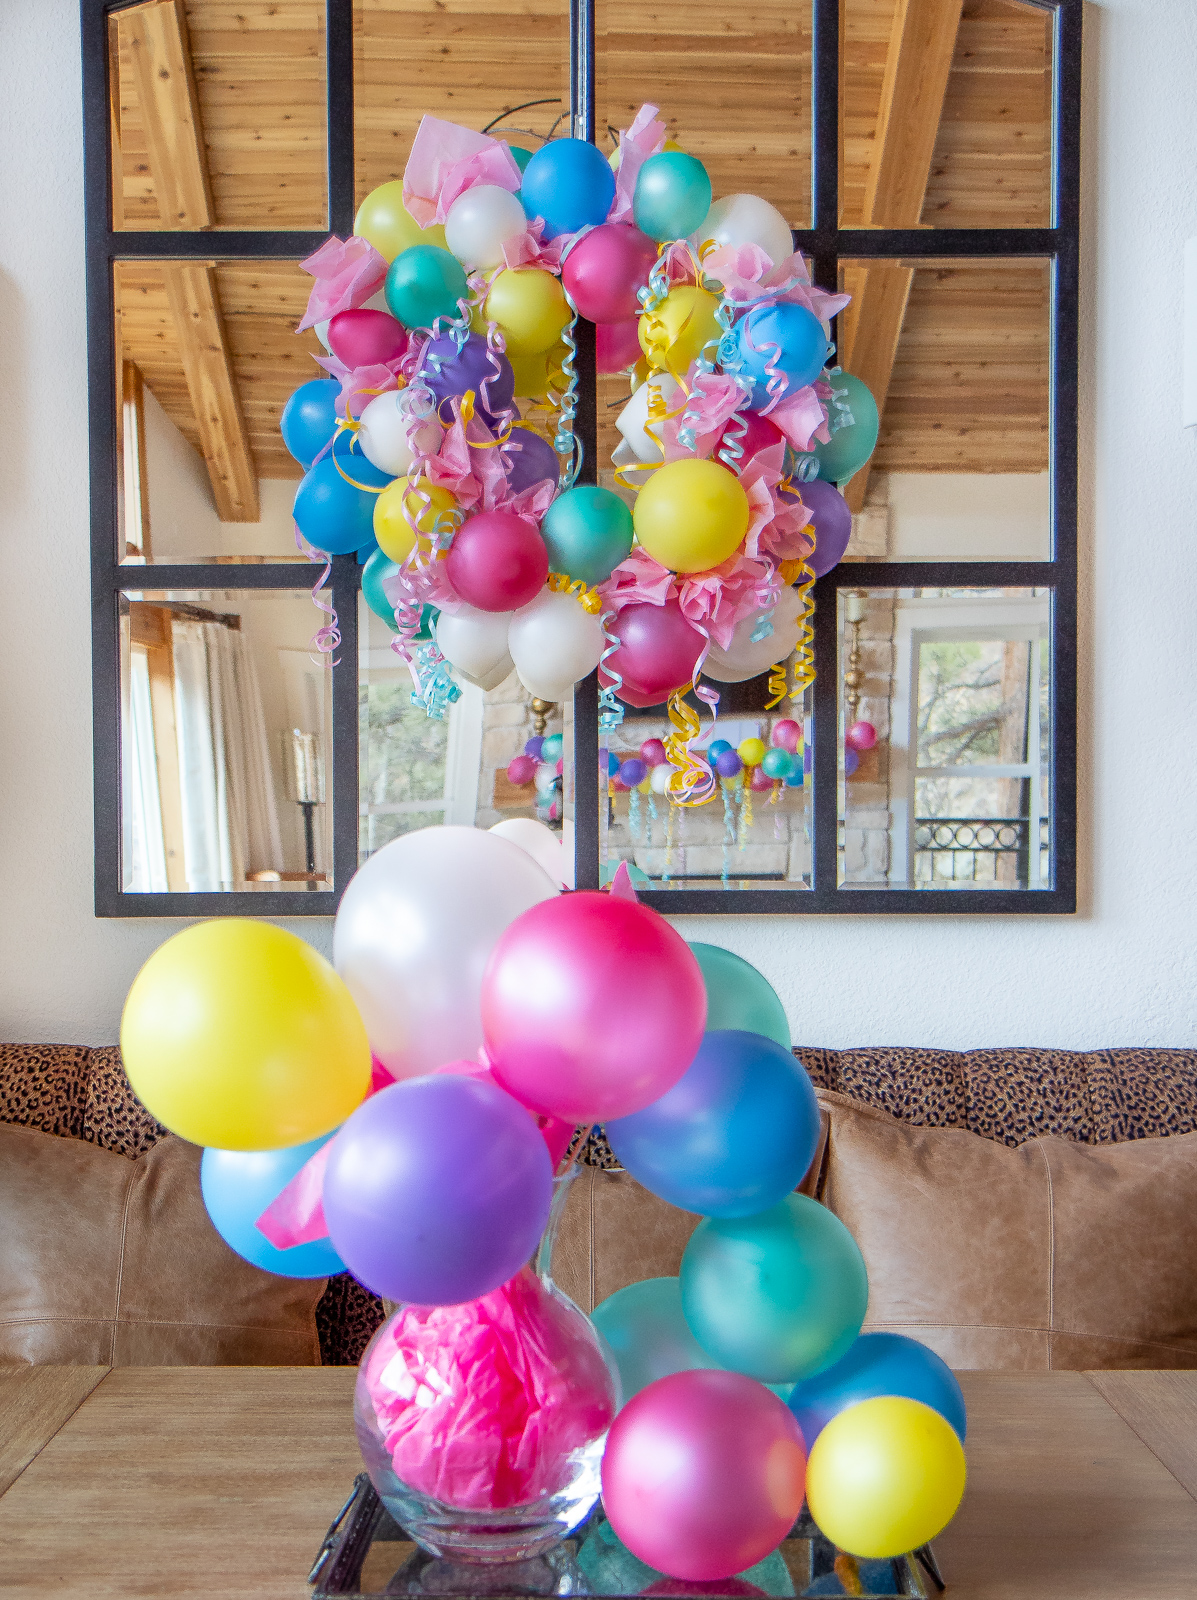
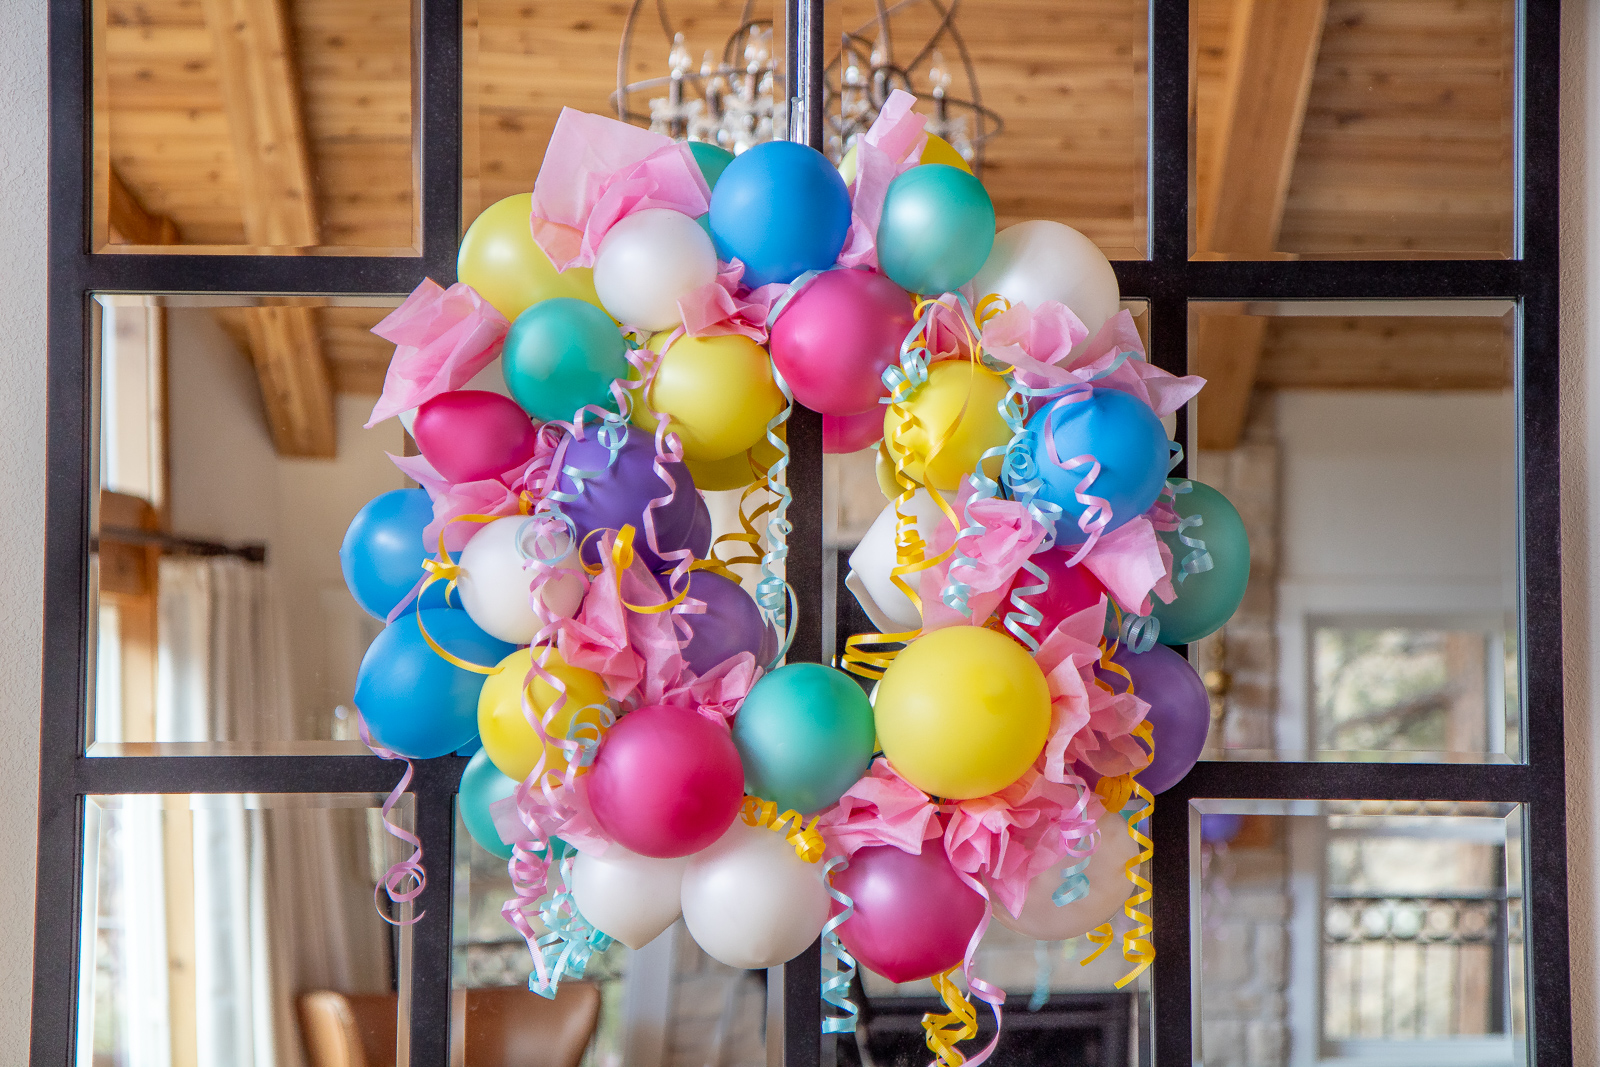
We’re so excited tomorrow is Leap Day!! It’s extra special for us because it’s also my daughter Ashley’s 16th Birthday! We always celebrate her birthday, of course, but I’m known to go a little overboard when her actual birthday comes every 4 years! I saw a pretty bag of pastel balloons for $1 and an idea was born.
What I especially love about this wreath is how inexpensive it was to put together. I think I spent around $8 including the wreath form that can be reused for other wreaths. If you already have a wreath form it will probably cost under $5 to make. I’m big on inexpensive homemade holiday decor, not only is it fun to make but I can toss it if needed because it’s inexpensive. Storage space is lacking in our home, so I can just pop and cut off the balloons and save my wire wreath form for another project.
Another bonus is how quickly you can put this wreath together! It probably took me 20 minutes or less, so easy! I used an 18 inch wreath form and grabbed all of my supplies from the Dollar Tree and Walmart.
SUPPLIES NEEDED
wire wreath form – I used an 18 inch one
balloons – I used two bags
curly ribbon
scissors
tissue paper cut in squares – I used 3 large sheets
A few tips, balloons are cheap so have an extra bag on hand, you may break a balloon, blow it up to the wrong size, or just need more than you think. I also started this project working on a table but about half way through I found it easier to complete the wreath hanging. Be sure to curl the ribbon before attaching it to the balloon wreath, we don’t want scissors near the balloons!
The trickiest part of this wreath was just deciding on a balloon size, so play with the size on the first balloon before you tie it off. Because we are not blowing up the balloons very big you should have a large stretchy end to tie and attach to the wreath.
INSTRUCTIONS
Start by blowing up the balloons to the size you want and tie them off, leaving as much of the stretchy end as possible.
Make a loop with curly ribbon at the top to hang the wreath up.
Cut long strips of ribbon and curl with scissors.
Take some tissue paper and cut it into squares. I cut 6 squares per each tissue paper sheet.
Tie the balloons in a staggering pattern around the wreath. Some balloons will flop around and not look right when you tie them to the wreath. To fix this take 2 balloons and twist them around together. This should help anchor them.
Tie the curly ribbon to the wreath form around the balloons. You can also add the curly ribbon once the balloons are all tied on, just loop them around the balloons to secure them.
Take the cut tissue paper squares and stuff them into the wreath to fill any bare spots and adjust wreath if necessary. That’s it, all done!
Any cookie dough addicts out there? I thought so. In honor of my littlest – who’s not so little anymore, turning 16 this Leap Day – we’re making birthday cake themed cookie dough! I’m always looking for cute new ways to celebrate and this cookie dough is a perfect way to celebrate. It’s rich, delicious, and best of all FOOD SAFE! As with all edible cookie doughs, though, you can’t actually bake cookies with this recipe. It’s missing the crucial ingredients needed to bake, but it is ideal for all those cookie dough fanatics out there.
We’ve all known that eating raw eggs is a big no no, but did you know eating raw flour is also not safe? Eating raw flour puts you at risk for E.Coli, that’s why it’s so important to make special edible cookie dough. So now you can enjoy all the glorious cookie dough goodness without the risk.
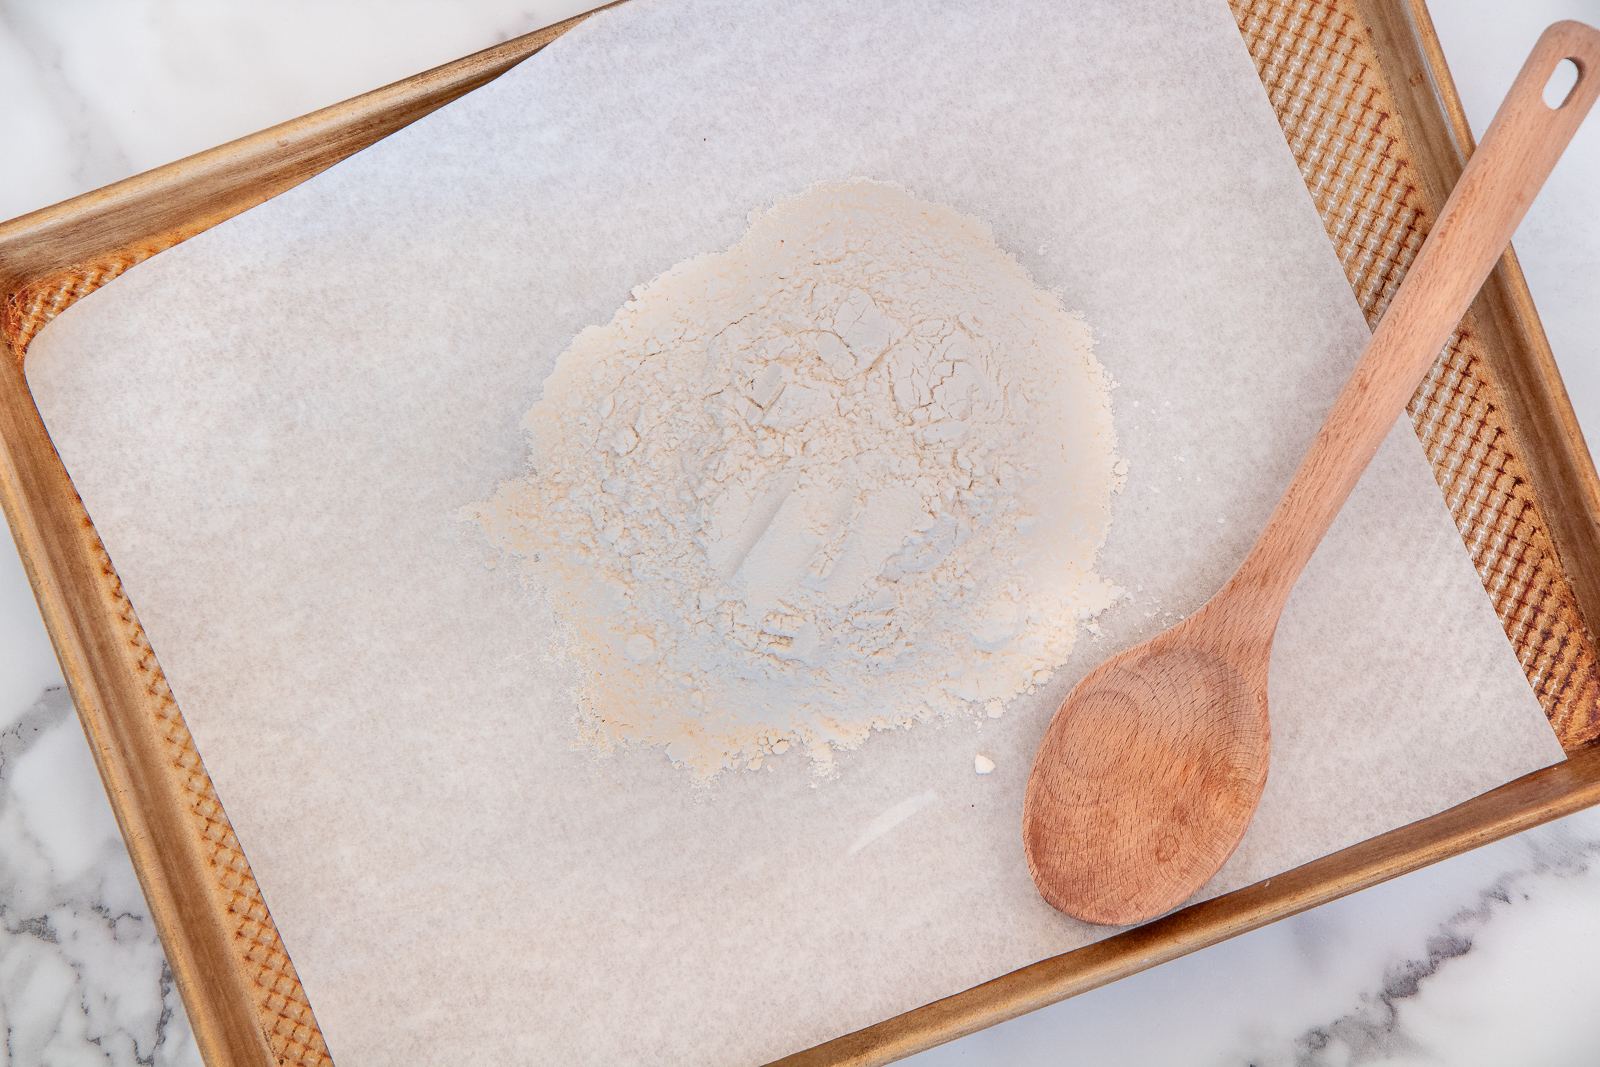
The trick to safe cookie dough (besides leaving the eggs out) is to first toast the flour in the oven. I place the flour on parchment paper on a cookie sheet and bake at 350 for about 12 minutes, you’ll notice the flour turns a bit golden. Then you can pick up the parchment paper and simply pour it into your mixing bowl. Not only does this make the flour safe to eat, the heat cooks off some of the overwhelming flour flavor and this creates a great cookie dough.
We’ve taste tested this recipe several times and I think we created just the right flavor balance with a mix of regular and brown sugar. Add vanilla and a generous dose of sprinkles and white chocolate chips and your left with a heavenly birthday cake tasting cookie dough! Sprinkles just make everything fun… and yummy.
While the flour is toasting you can use this time to gather your ingredients.
Where is the butter? Oh yes… I left it in the mixing bowl. I’m sure you’ve all seen butter before right? A quick tip, your butter must be at room temperature to properly cream with the sugar. If you’re like me and always forget to soften the butter try slicing it up in small pieces. This will help bring the butter to room temperature much faster.
In the recipe I call for unsalted butter but we add salt to the dough. A chef once told me you get a higher quality of butter when you purchase unsalted, so now it’s ingrained in my brain. Feel free so use salted butter if that’s all you have and omit the salt. Am I still talking about butter??
Most of the time we just immediately dig into our cookie dough goodness, but if you prefer a stiffer, chilled dough then be sure to chill it a few hours. This recipe makes a generous 3 cups and you can freeze any leftovers in an airtight container for up to 3 months.
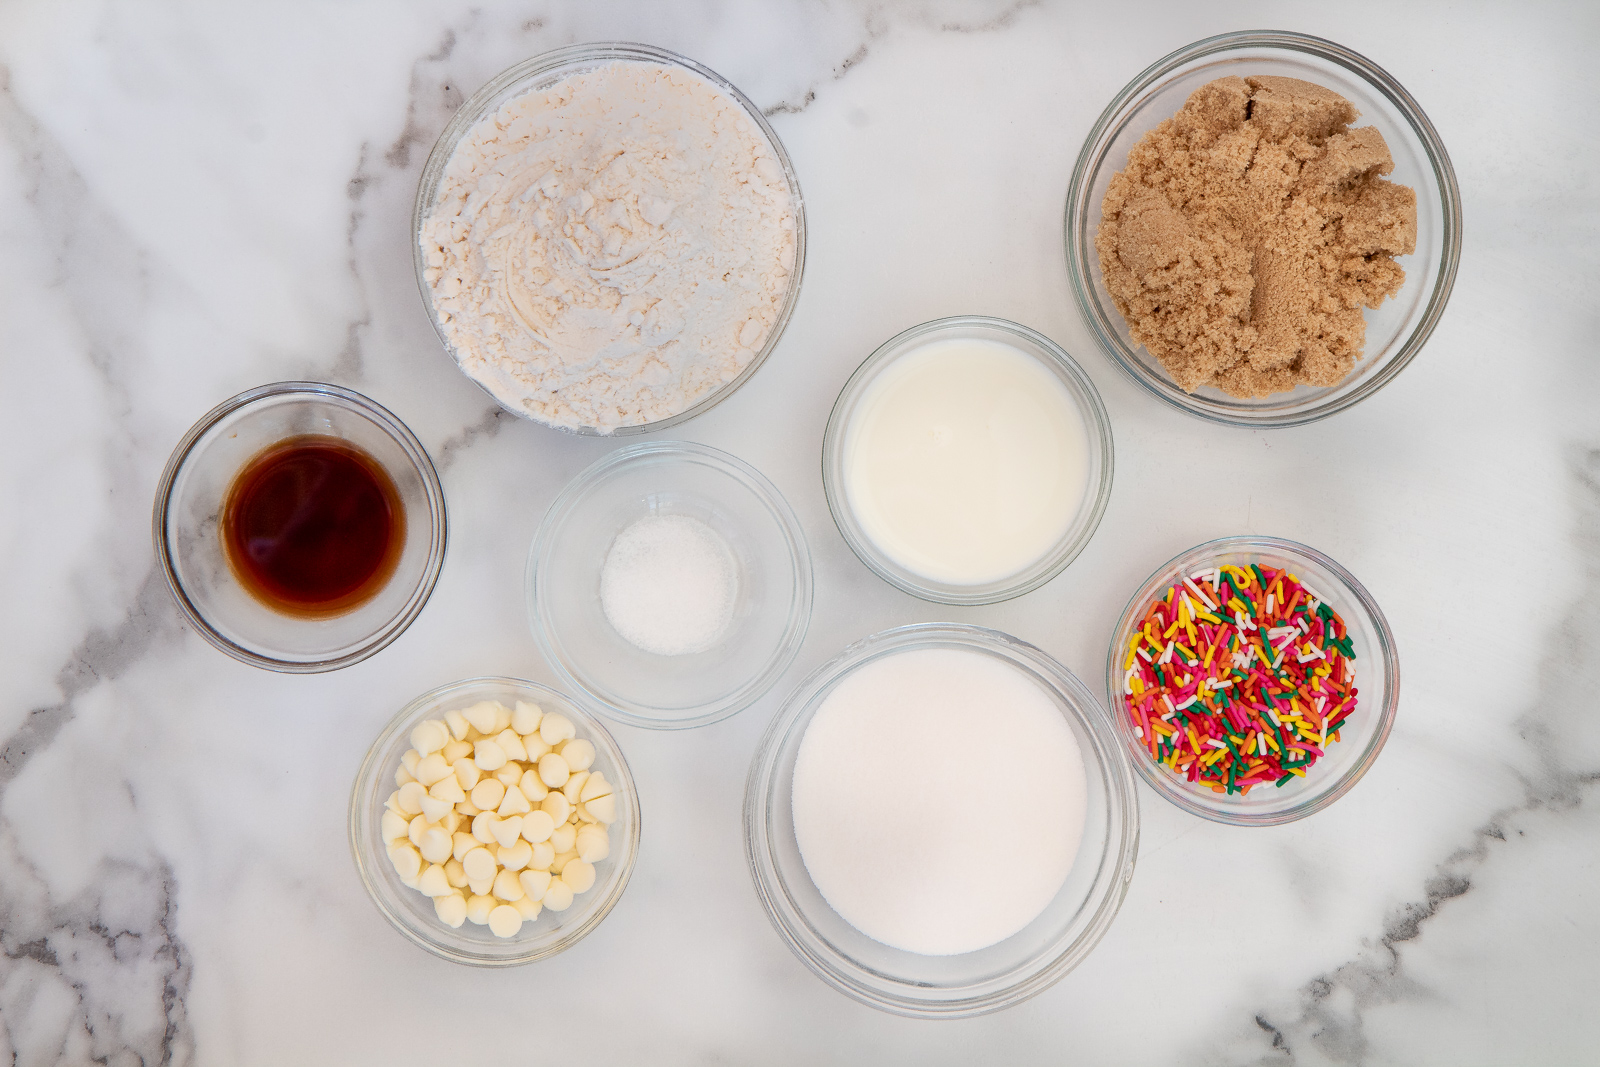
1 1/2sticks (12 tbs)unsalted butter, at room temperature
1/2cupsugar
1/2cupbrown sugar
2tspvanilla extract
1/2tspsalt
1 1/2 cupsflour
1/4cup milk
1/4cuprainbow sprinkles
1/4 cupwhite chocolate chips
Instructions
Place flour in a mound on a foil or parchment lined baking sheet and bake at 350° for 12 minutes or until reaches 160°. Remove from the oven and let cool 10 minutes.
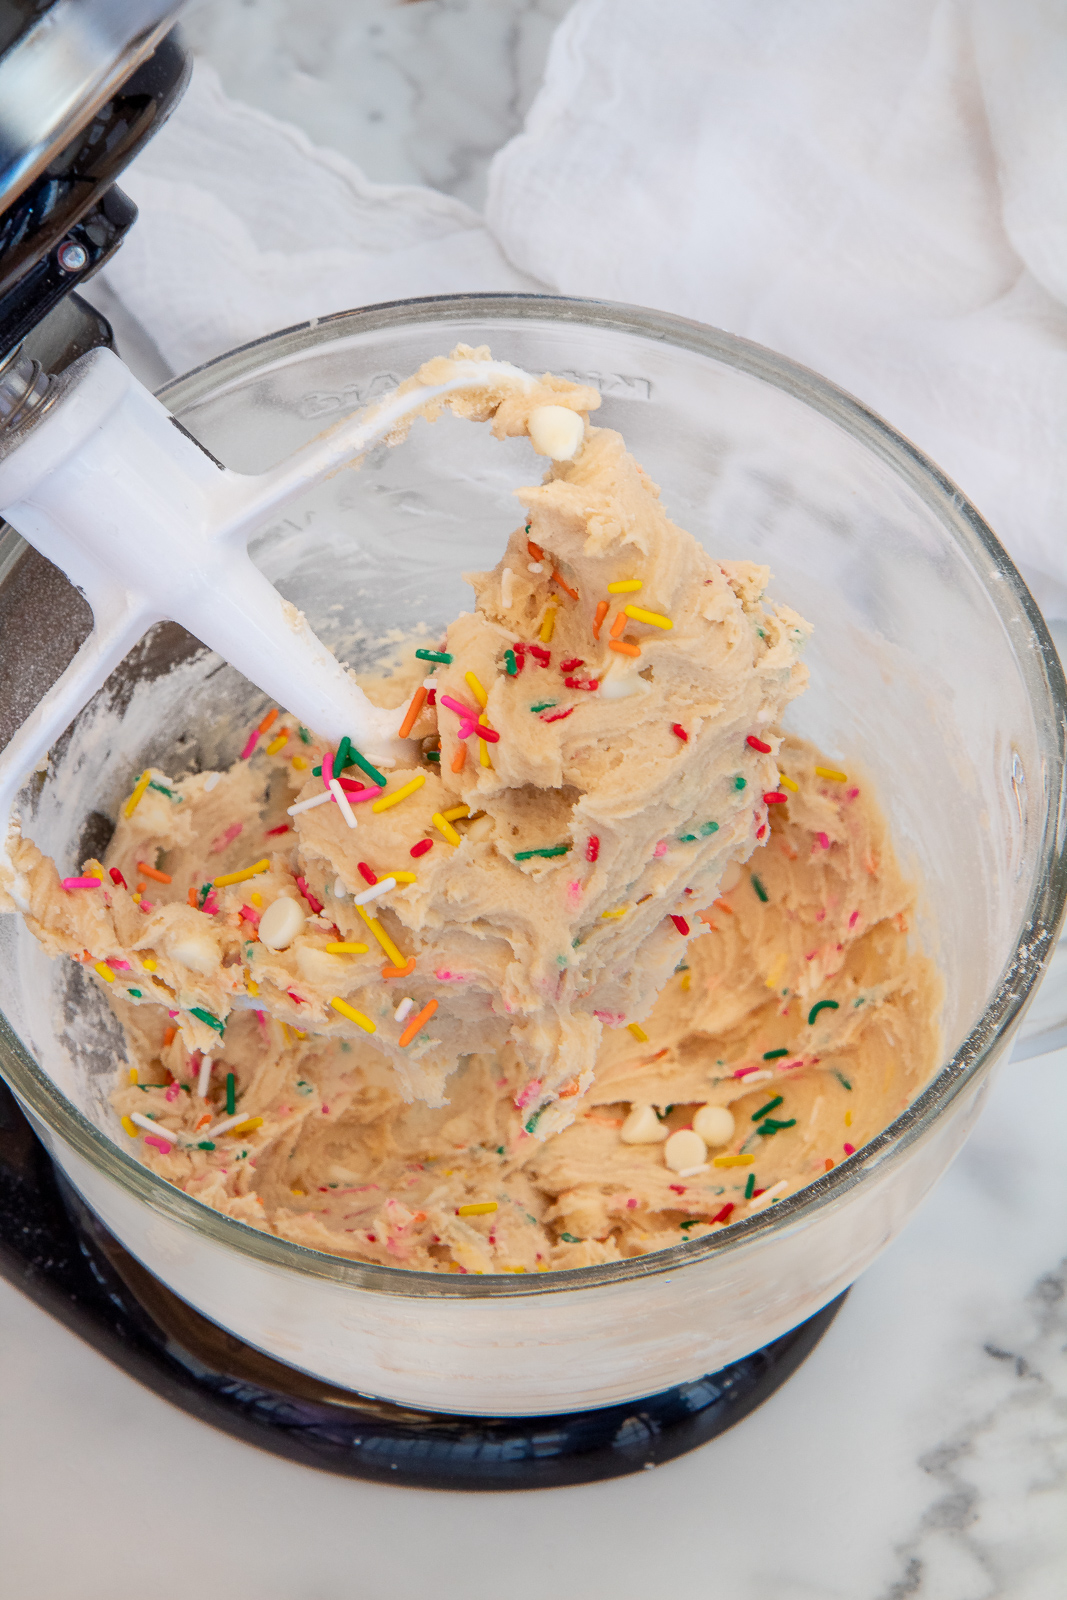
Beat butter, sugar, vanilla, and salt in a bowl with a mixer on low speed until combined. Increase speed to medium and beat until fluffy about 3 minutes.
Reduce speed to low, add the toasted flour, and mix until just combined, add the milk and beat until creamy. Add the sprinkles and chocolate chips and mix until combined.
Serve immediately or refrigerate a few hours if you prefer the dough chilled.
Store leftovers in an airtight container in the refrigerator. Dough can be frozen in an airtight container for up to 3 months.
We’ll be visiting Steamboat Springs for Ashley’s birthday so a fresh batch of this birthday cake cookie dough will be traveling along with us! I’ll also be sharing some of our birthday decorations next on the blog.
We’ve been snowed in all week, it was fun at first until suddenly it wasn’t. After binge watching way too much Netflix I decided it was time to get a little crafty. I’ve also been wanting to decorate for Valentine’s Day, but the reality is I have no idea where my decorations are. Honestly I can’t even remember if they made it through our last move. So hand made Valentine’s Day decor it is!
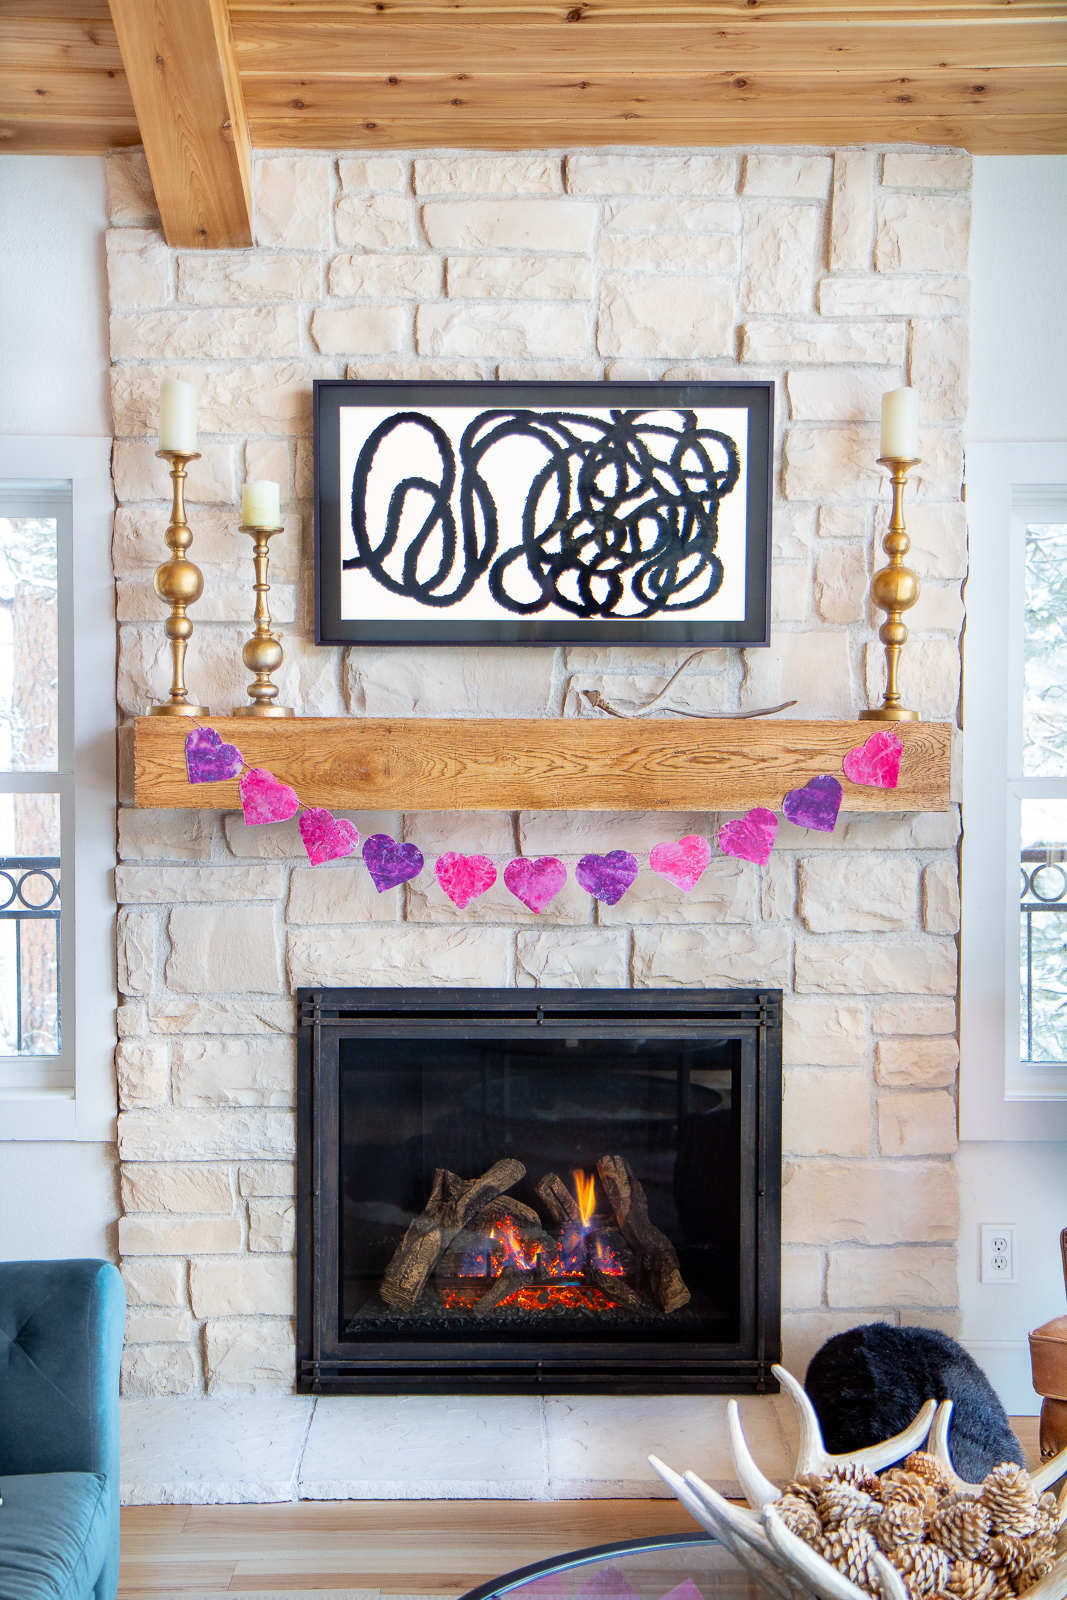
Any time I decorate I always love to start with a festive garland along the fireplace mantel. After scouring the house for crafting supplies I decided we needed to go old school, as in wax paper crayon old school. This craft project brought out my inner child and she loved it. I collected all the crayons in the house I could find and went to work. My garland was done in no time and so fun to make!
SUPPLIES NEEDED
Wax paper
Crayons
Cheese grater
Old towel
Iron
A heart shape to trace (candy lid, cookie cutter, anything you can find)
Pen or pencil
Scissors
Hole punch
String, yarn, or thin ribbon
INSTRUCTIONS
1. Remove paper from the crayons and shred using a cheese grater. Thicker crayons are ideal, regular ones work fine too just go slow so they don’t break.
2. Cut out square or rectangular wax paper pieces and place them on an old towel to protect your surface. Sprinkle grated crayons over the wax paper. A little goes a long way!
3. Place another piece of wax paper on top.
4. With the iron set on low heat, iron the wax paper moving it around until you get the desired effect you want. If you’re worried about crayon residue you can place a paper towel or old rag on top. The small amount of crayon residue I had easily wiped off my iron though.
5. Let the wax paper cool then trace around your heart pattern.
6. Cut around the pattern.
7. Punch holes in each side – you can punch several hearts at once to make it easier. Then thread with yarn, ribbon, or twine. All done!
A FEW TIPS
It gets a little messy grating the crayons, so definitely do this over a towel that way you can shake it out afterwards.
After chipping several nails while grating the crayons I decided to protect my fingers with a sock, what a difference that made! An old glove would work too.
The crayon easily washed off the cheese grater so have no fear! Just some hot soapy water and a sponge and you’re good to go!
Oddly enough, we could not find one single red crayon in the house but we found pink and purple aplenty, it’s so festive and cute! Each heart has a unique stained glass effect!
So make sure you save those old crayons, the color and pattern possibilities are endless! I love using handmade decorations because they can be whipped up at the drop of a hat and are easy on the budget. Plus if storage space is an issue you can always toss them, but I won’t be tossing this garland, it’s way too cute!
After some much needed rest and relaxation I’m back, and I’m so excited to show you all about the amazing town of Glenwood Springs in Colorado. We recently visited there over a long weekend, and it was the perfect place for the three of us to soak, relax, and have some wintery fun. Located about 2 1/2 hours west of Denver and an hour from Aspen, it’s a perfect spot for those visiting Colorado and for locals as well. It’s a great getaway for families and couples any time of year, but I think it really shines in the winter!
THINGS TO DO
Soak in the incredible hot springs! In Glenwood Springs you’ll find 2 incredible hot springs to soak away all your troubles. Plus it’s just a fun experience swimming and relaxing in a pool when it’s freezing cold out. Don’t worry you’ll stay plenty warm while inside the water. Maybe even a little bit too warm at times. The hot springs do occasionally close for maintenance so be sure to check those times online before planning a trip.
WHAT MINERALS ARE IN THE WATER?
Calcium, chloride, sodium, sulfate, potassium, magnesium, iron, zinc, boron, lithium, phosphate, silica, fluoride, and nitrogen make up the thermal heated hot springs. These 15 minerals are found naturally in the water and are perfect for relieving aches and pains, reducing blood pressure, eliminating toxins, and increasing circulation. At times you’ll smell an egg-like smell which comes from the sulfate, which is a compound of sulfur and oxygen, it reminds me of the heath benefits so I find it enjoyable! All these minerals are easily absorbed through the skin and give your body a great health boost. I can verify after a morning and evening of soaking in the natural hot springs Brian and I felt amazing and slept amazing that night and my skin felt incredibly soft and smooth.
WHAT TO BRING TO THE HOT SPRINGS
Definitely bring your bathing suit, you can rent towels but I suggest you bring your own. I also recommend bringing flip flops because the concrete is freezing cold – it’s not pleasant to walk barefoot! You’ll see some people wearing bathrobes walking to and from the pools, it’s not crucial but it would be nice having one. Depending on the weather you might want to bring a hat to keep your head warm, especially at night.
Shown above is the Glenwood Hot Springs Resort. The main big pool is 100 feet wide and kept at 90 degrees, while the smaller therapy pool is kept at 104 degrees. A poolside grill is nearby, and waterslides are open in the summer. Swimsuits are available for rent (gag) as well as towels. Prices range from $18.75-$29.95 depending on age and dates selected, those staying at the hotel get free admission.
Iron Mountain Hot Springs is another great place to visit with 16 smaller mineral pools to choose from and soothing spa music playing. Each pool has a different temperature ranging from 98 to 108 degrees. The 98 degree pools are a wonderful way to ease in, with the 108 pools being quite hot. My favorite pools were around 103. Children under 5 are not allowed in the small mineral pools, there is a larger family pool that allows children of all ages but it is chlorinated. There is a cafe and bar nearby and a locker room with free lockers. Towels are available for rent and there is a small gift shop area. Prices range from $14-$30 depending on age and dates selected.
Walk along the charming downtown area. You’ll find a ton of unique shops and boutiques to browse, and plenty of restaurants to choose from. Or maybe you’ll just want to grab a coffee and take a nice walk to soak up the architecture and the beautiful views.
Ride the gondola up to Adventure Park and take in the beautiful views. Some of the rides are closed during the winter season but don’t let that stop you. With a winter coaster, caves, and gorgeous views it’s still worth a trip up there. There is a cafe with gorgeous views of the mountains with snacks and delicious hot cocoa drinks and adult drinks too.
There are two caves to visit with tours running every 45 minutes. The Fairy Cave is shorter and suited for younger kids. The Kings Row cave is very impressive but it involves lots of stairs. If you only have time for one cave tour I highly suggest Kings Row. You can purchase tickets for the gondola ride only, the gondola and cave, or for the full amusement park.
Soak up the history and have drinks in the gorgeous lobby insideHotel Colorado. With a nearby bar there is plenty of seating in the lobby, so relax, warm yourself by the fire, and take in the historic architecture and the birth of the Teddy Bear. According to legend Teddy Roosevelt stayed at this hotel and after an unsuccessful day of hunting the staff presented him with a stuffed bear to cheer him up. He said “I will call him Teddy.” The term caught on and the popular Teddy Bear was born.
Sunlight Mountain Ski Resort is located about 30 minutes from Glenwood Springs. With affordable rates it’s a great place have some ski and snowmobile adventures. There is on-site lodging plus a restaurant and bar.
WHERE TO STAY
Glenwood Springs Hotelshown above is where we stayed. I chose it because it had a great location to all the attractions. With a mini indoor water park and located right next to the gondola it’s a perfect affordable option for families and kids. There were lots of kids running around, so if your looking for a quiet romantic getaway this is not the hotel for you.
Glenwood Hot Springs Resortis on the pricier side but you can’t beat the convenience of having the hot springs pool steps away from your room. Plus you’ll get free admission into the pool, and there is a full service spa inside the hotel.
Hotel Coloradois a historic hotel built in 1893 with a full service restaurant, bar, coffee shop, and a large beautiful lounge to relax in. Even if you don’t stay here it’s worth stopping by just to admire the building and sip a drink by the fire. It’s located behind the Glenwood Hot Springs Resort so it’s just a short walk to the pool.
Hotel Denver is boutique hotel that offers a 1920’s hip rustic style. Located downtown near shopping and restaurants and across from the Amtrak station, there is plenty to do. Plus it’s just a 6 minute walk to the Glenwood Hot Springs Resort.
Still not sure about where to stay? Check out Hotels.com, our favorite site to book hotels, where you can earn free night stays and save money!
WHERE TO EAT
CO Ranch House was our favorite! We loved the small coziness of the restaurant with modern western decor, with lots of amazing food to choose from as well. Try the blue crab dip, it was incredible!
Rivers is located right along the roaring Fork River, you’ll want to request a table view for sure. The menu has a nice variety with plenty of gluten free options as well. Our favorite was the elk potstickers.
Glenwood Canyon Brewing Companyis located on the first floor of the Hotel Denver. With an excellent food and bar menu this place is a perfect stop and should be on everyones list!
Slope & Hatch is perfect for those in need of delicious tacos. This cozy restaurant is on the smaller side with limited tables so arrive early or you might have to wait a while.
Juicy Lucy’s is a fun lively restaurant bustling with activity. Great happy hour specials, unique appetizers, and great steaks makes this restaurant a great place to stop.
If you’re needing a magical wintery getaway Glenwood Springs is the place for you, your body will thank you for it! I’m already excited to plan another trip before the winter season ends. I need to be in those hot springs again… it’s like soaking in a tub full of Xanax.
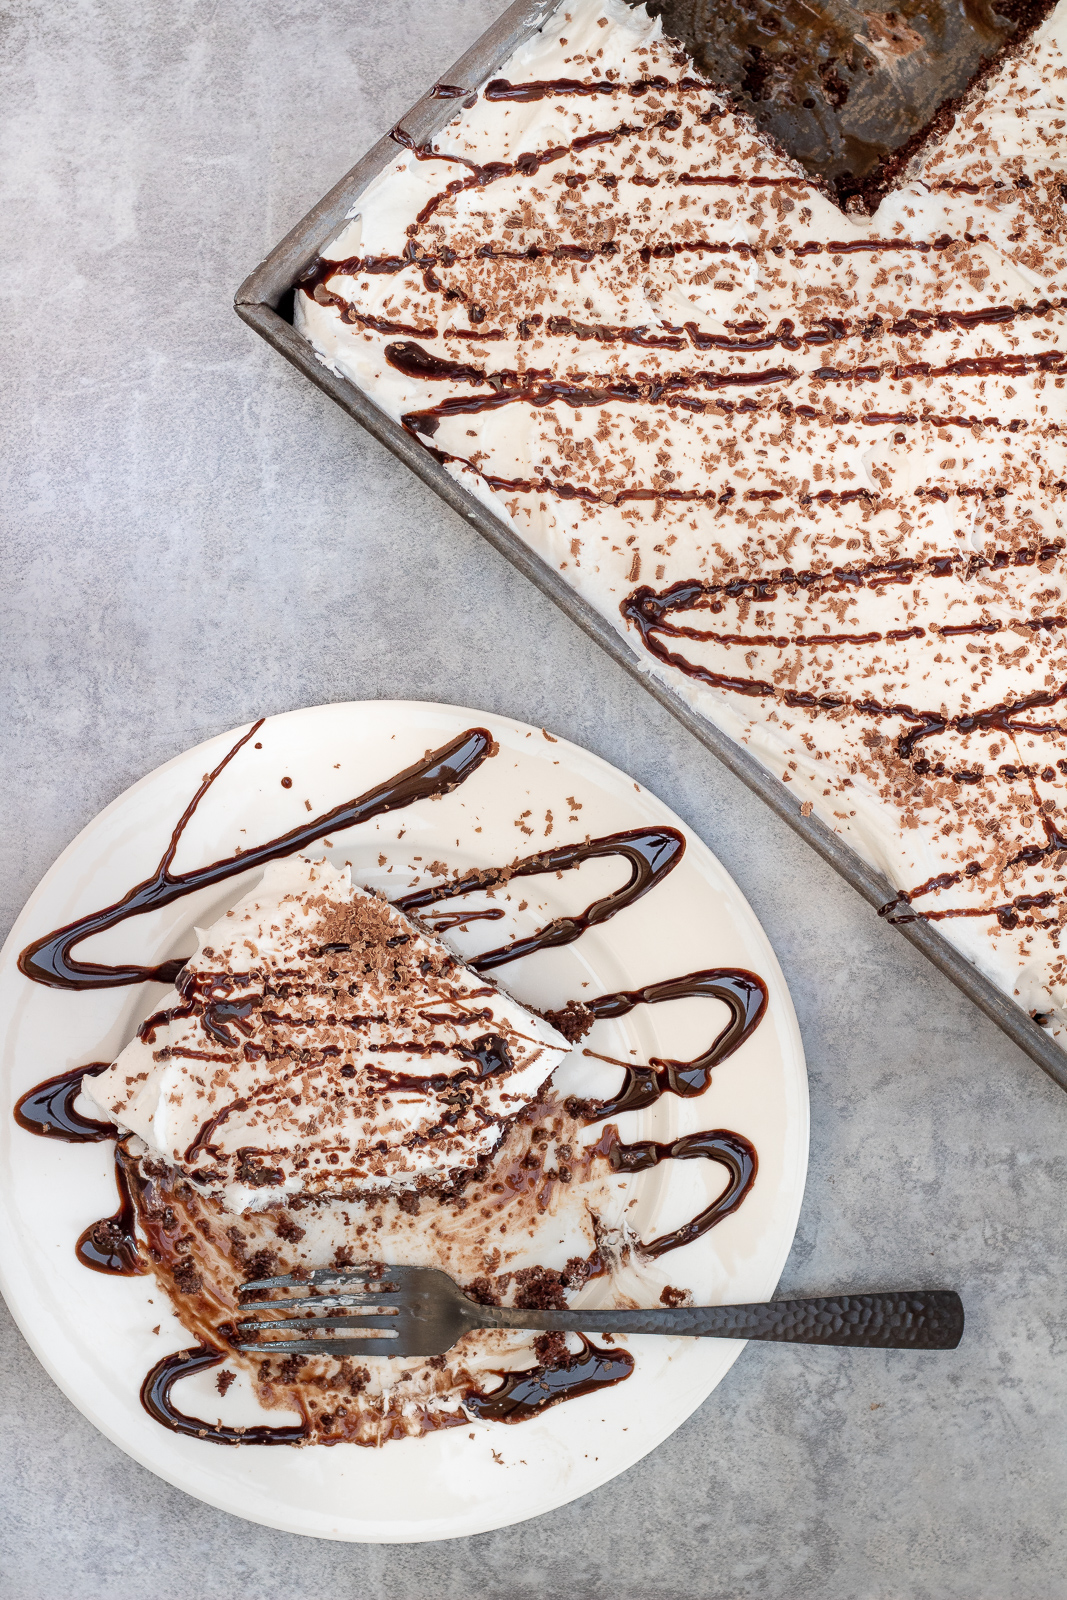
We’re big poke cake fans around here. If you aren’t familiar with poke cake let me tell you exactly what that is. You bake a basic cake, poke holes in it, and simply drown it in delicious toppings that seep down into the cake. It creates a moist, rich, gooey, delicious cake that you serve right out of the pan. They’re simple to make and pretty much foolproof!
This time of year all I want is a good rich cup of cocoa, but hey why not make a hot cocoa cake? Cake good. Cocoa good. Put it together and pass me a fork!
I’ve always had a lot of fun coming up with different combinations, and since yesterday was Brian’s birthday it gave me an excuse to make a hot cocoa flavored poke cake. Gotta love those Christmas birthdays, they keep us on our toes! The first cake I made didn’t make the cut, but the second hot cocoa poke cake certainly did! It got the birthday boy’s seal of approval.
Why do I love poke cakes so much? Poking holes in a cake just feels fun… almost naughty, and pouring on a bunch of delicious toppings is just fun. Plus poke cakes are messy, imperfect, and served right out of the pan. No stress getting the cake out of the pan and no drama trying to get the frosting perfect.
You always want to give your poke cake at least an hour to chill in the refrigerator but I recommend a little longer if possible. I like my poke cakes nice and cold. So hmm… I guess it’s more of a cold cocoa cake huh?
When making this recipe whatever you do don’t skip the cream! It’s essential in giving the chocolate a rich creamy flavor and adding moisture to the cake. To finish off the cake top with whipped topping, a little leftover chocolate syrup, and a grated chocolate. I like to grate up a Hershey’s chocolate bar for a little extra pizazz just like a fancy cup of indulgent hot cocoa. You can also use mini chocolate chips if that’s easier.
Once cake comes out of the oven, poke holes all over the top of the cake using the end of a wooden spoon.
Pour sweetened condensed milk over the top of cake and spread to fill in the holes.
In a small bowl whisk together 8 oz chocolate syrup with heavy cream. Pour over the top of the cake and spread to fill in holes.
Let cake cool to room temperature and then refrigerate at least 1 hour.
Top with whipped topping and garnish with grated chocolate bar and chocolate syrup.
Once you’ve been bitten by the poke cake bug it’s hard to stop making them. The girls and I come up with crazy combinations all the time, it’s so fun. If you have strawberry love try my strawberry shortcake poke cake recipe too! I’ve already got another poke recipe in my head I want to try. Just maybe that will make it on the blog one day too. Need more cocoa love? Try my slow cooker hot chocolate pudding, it’s so rich and delicious with the slow cooker and also stress free.
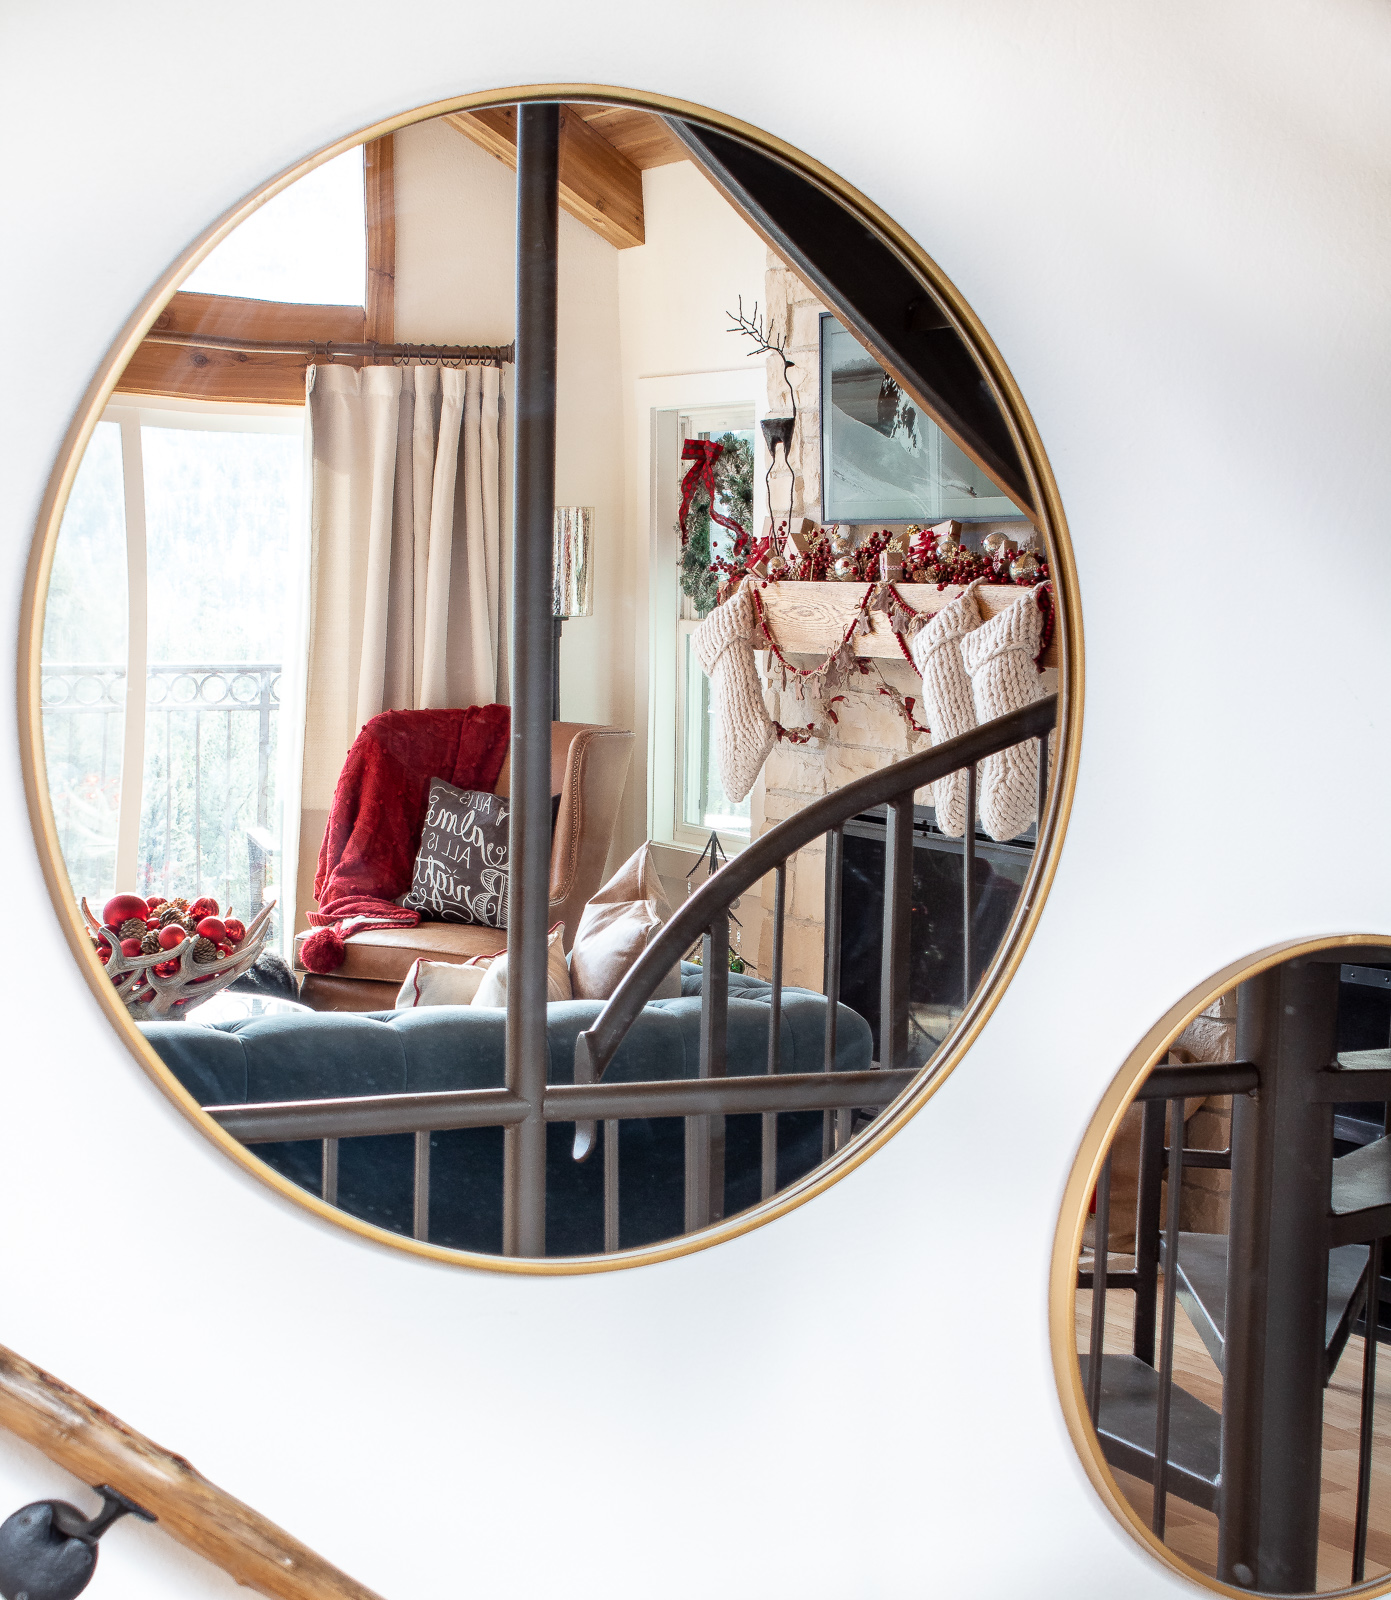
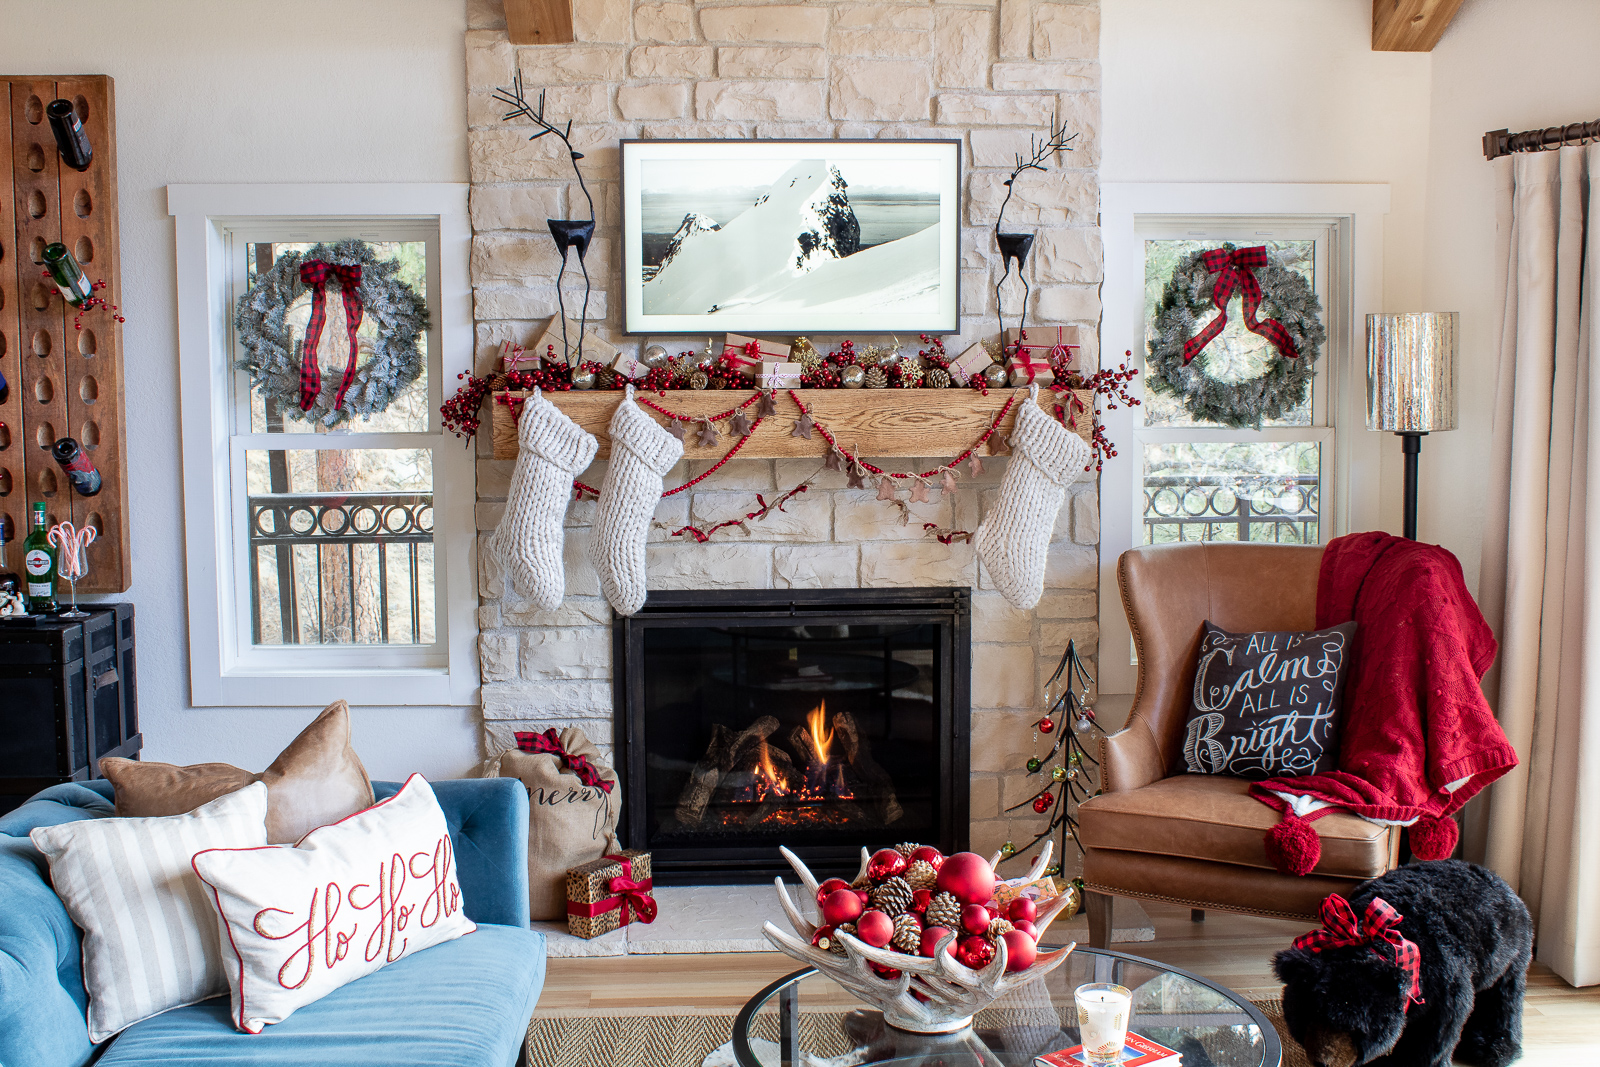
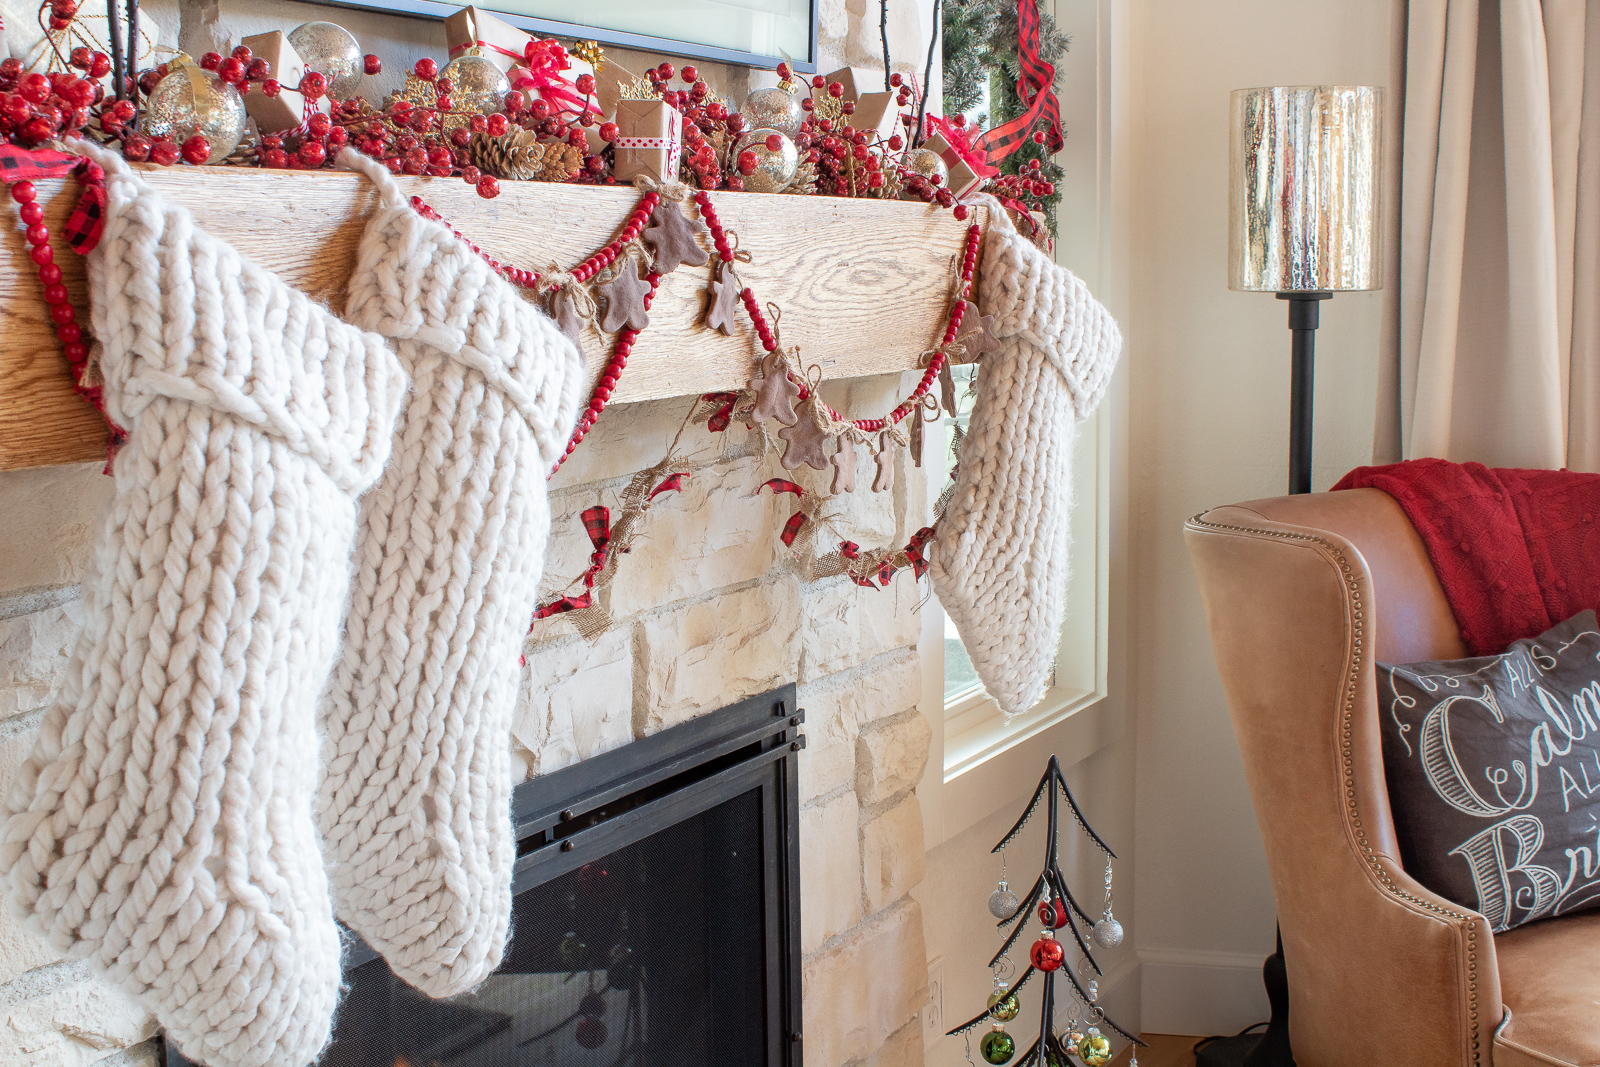
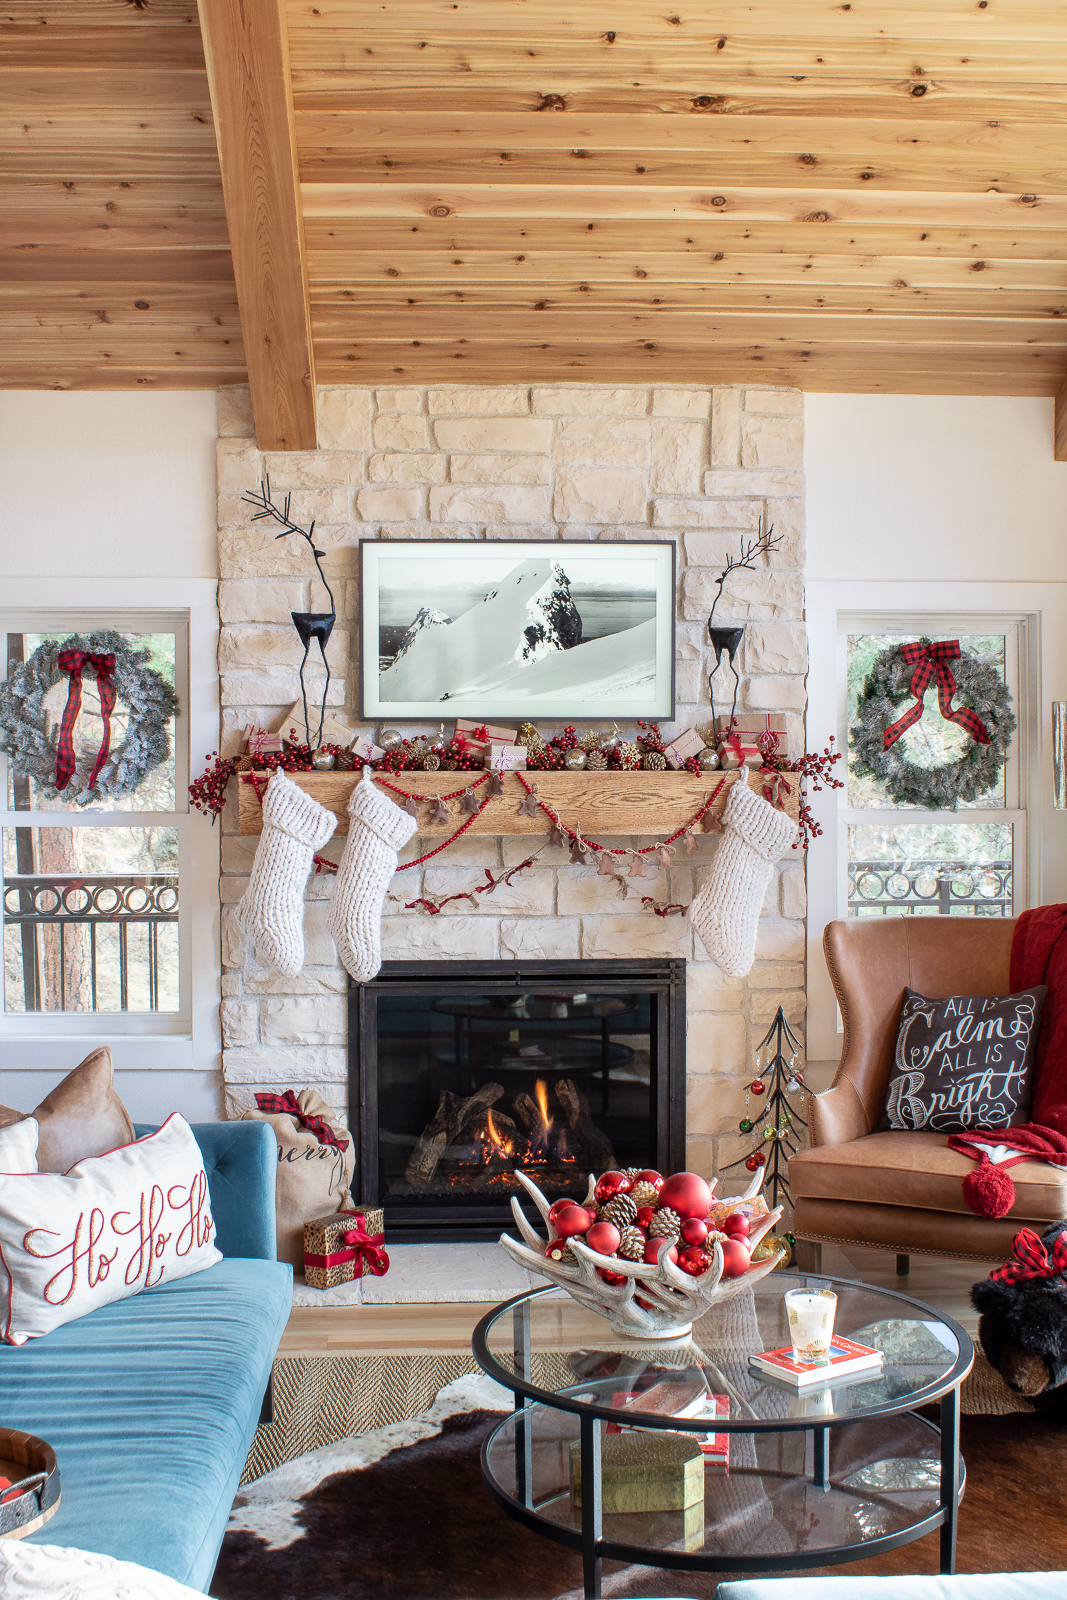
Welcome to our Christmas 2019 home tour. Well… since a big chunk of our house is still in heavy construction mode, it’s more of a mini tour this year. Plus, I’m weeks late putting this on the blog. I gotta tell ya it’s been an exhausting year. Lately I feel like I’m constantly behind on everything, but better late than never I say.
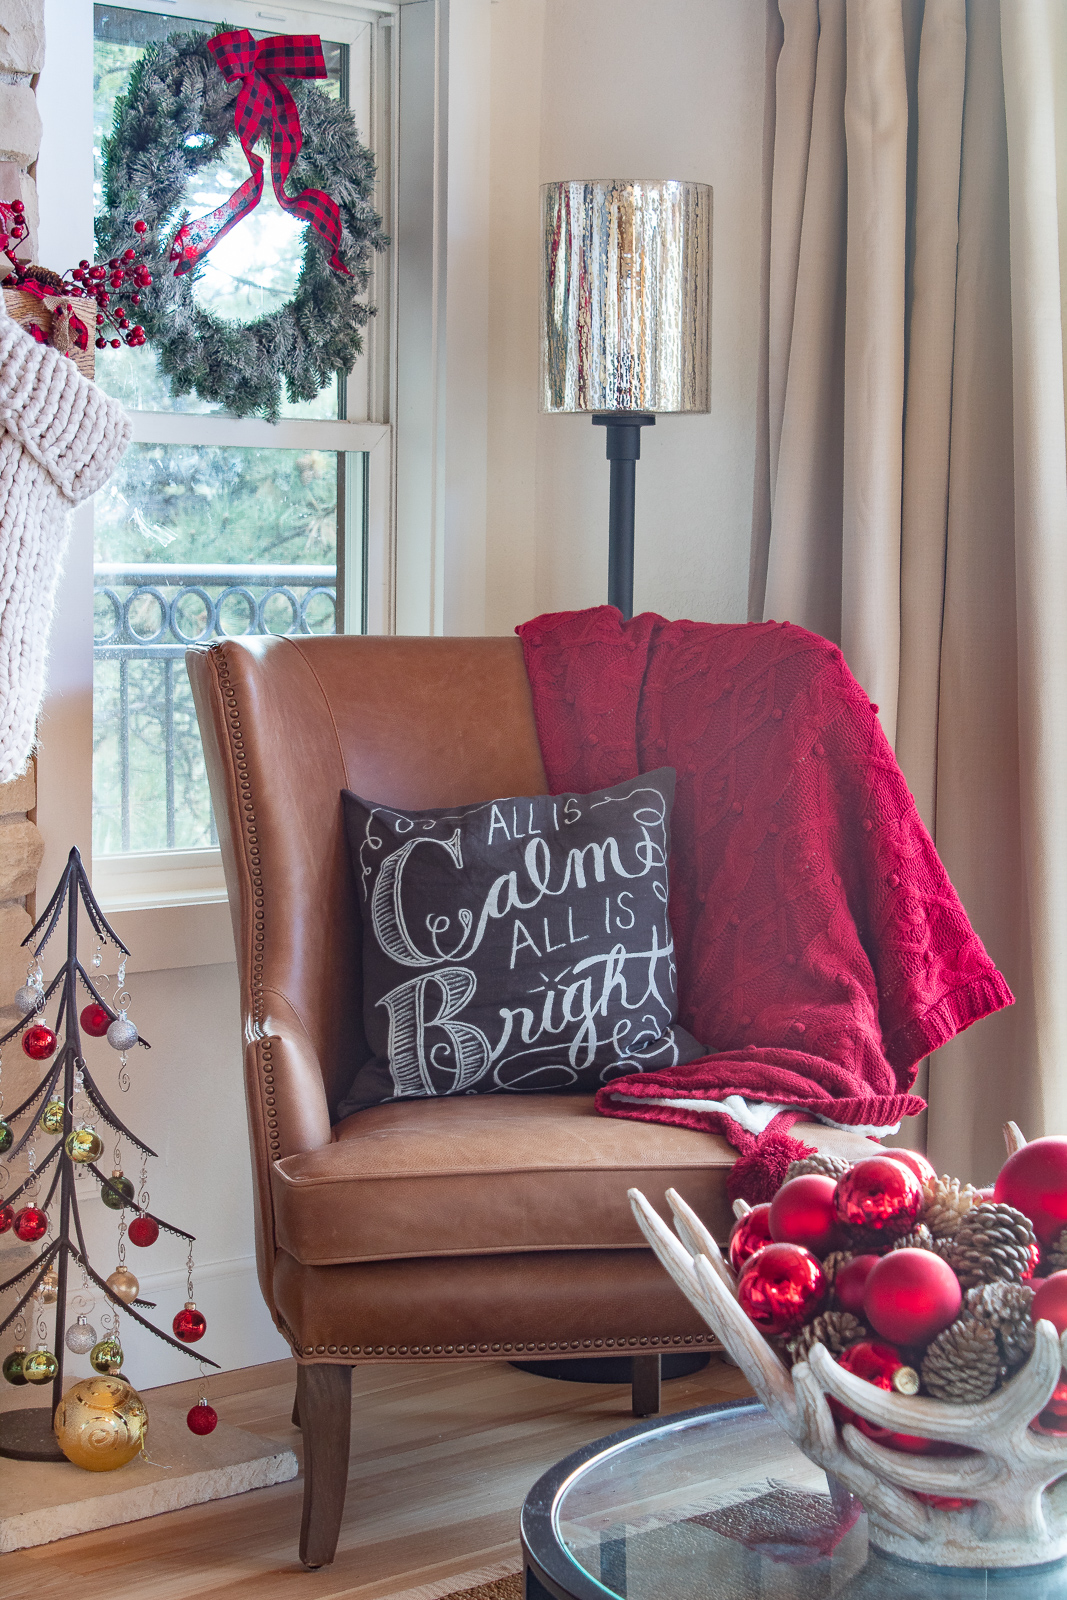
This time of year I love to break out the flannel snowflake sheets and my ever-so-favorite, funny Christmas pillows. If you’re not familiar it’s one of the lines from the Christmas Vacation movie… one of the funniest too!
Last year’s gingerbread salt dough garland I made found a home on our new fireplace mantel. You can easily make your own salt dough ornaments or garland, it’s a really fun Christmas project for all ages.
Every year I like to switch up our Christmas decor, and wouldn’t you know I’m already dreaming about next Christmas’s decorations. Ah… next Christmas when I won’t be so exhausted and more of our home will be finished. I’m going big big big next year!
Last year I mentioned one of my favorite Christmas decorating tricks was wrapping up little tiny boxes. It’s one of my favorite budget tips! I like to use soap, pudding, and other small boxes. Open up the box, remove the contents, tape it back together, and wrap! Decorate the boxes with scrap wrapping paper and ribbon and they look so cute combined with other decorations. At the end of the season you can simply throw them away or save them like I do.
My other trusty Christmas decorating trick is also red ornament balls and pinecones. I can’t get enough! You can read more of my Christmas decorating tips in last years How to Decorate for Christmas on a Budget.
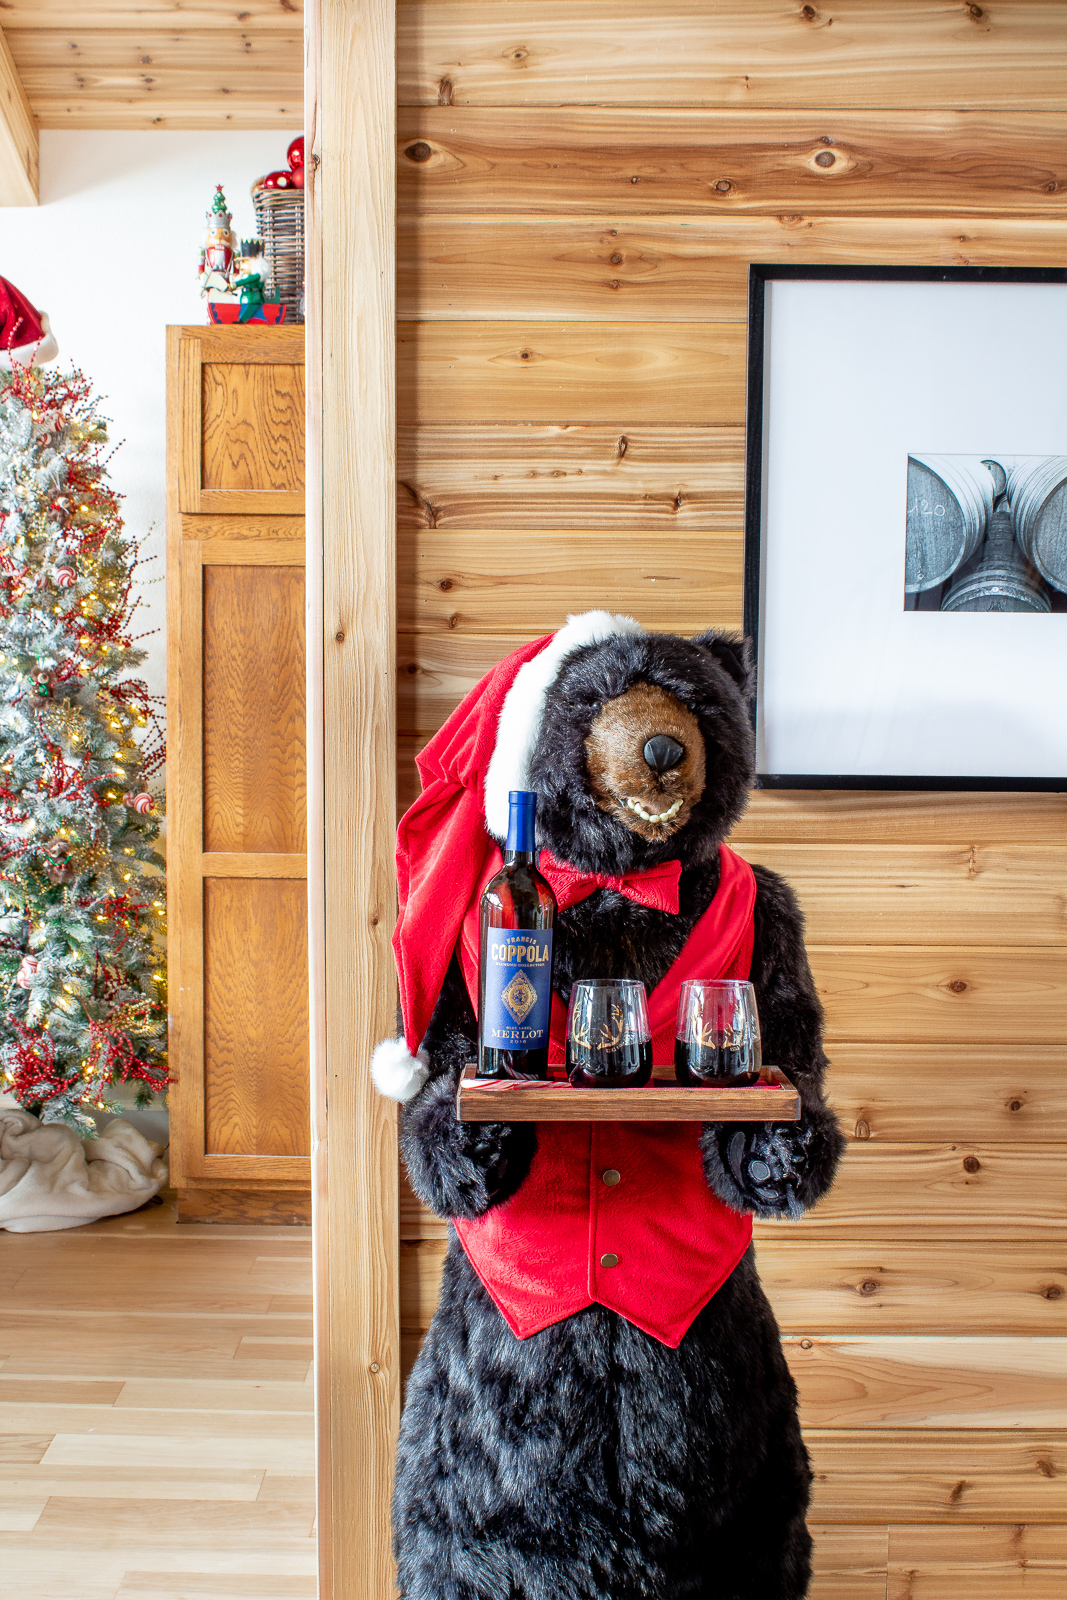
Every year I like to add a new Christmas decoration to our home and this year it was SANTA PAWS!
Santa Paws was meant to be here in our new mountain home, plus he serves me wine… how sweet is that? I scored him 30% off on a Black Friday sale. If you also need a Santa Paws he’s still on sale! His Christmas attire is removable so I may just keep him up year round if I have room.
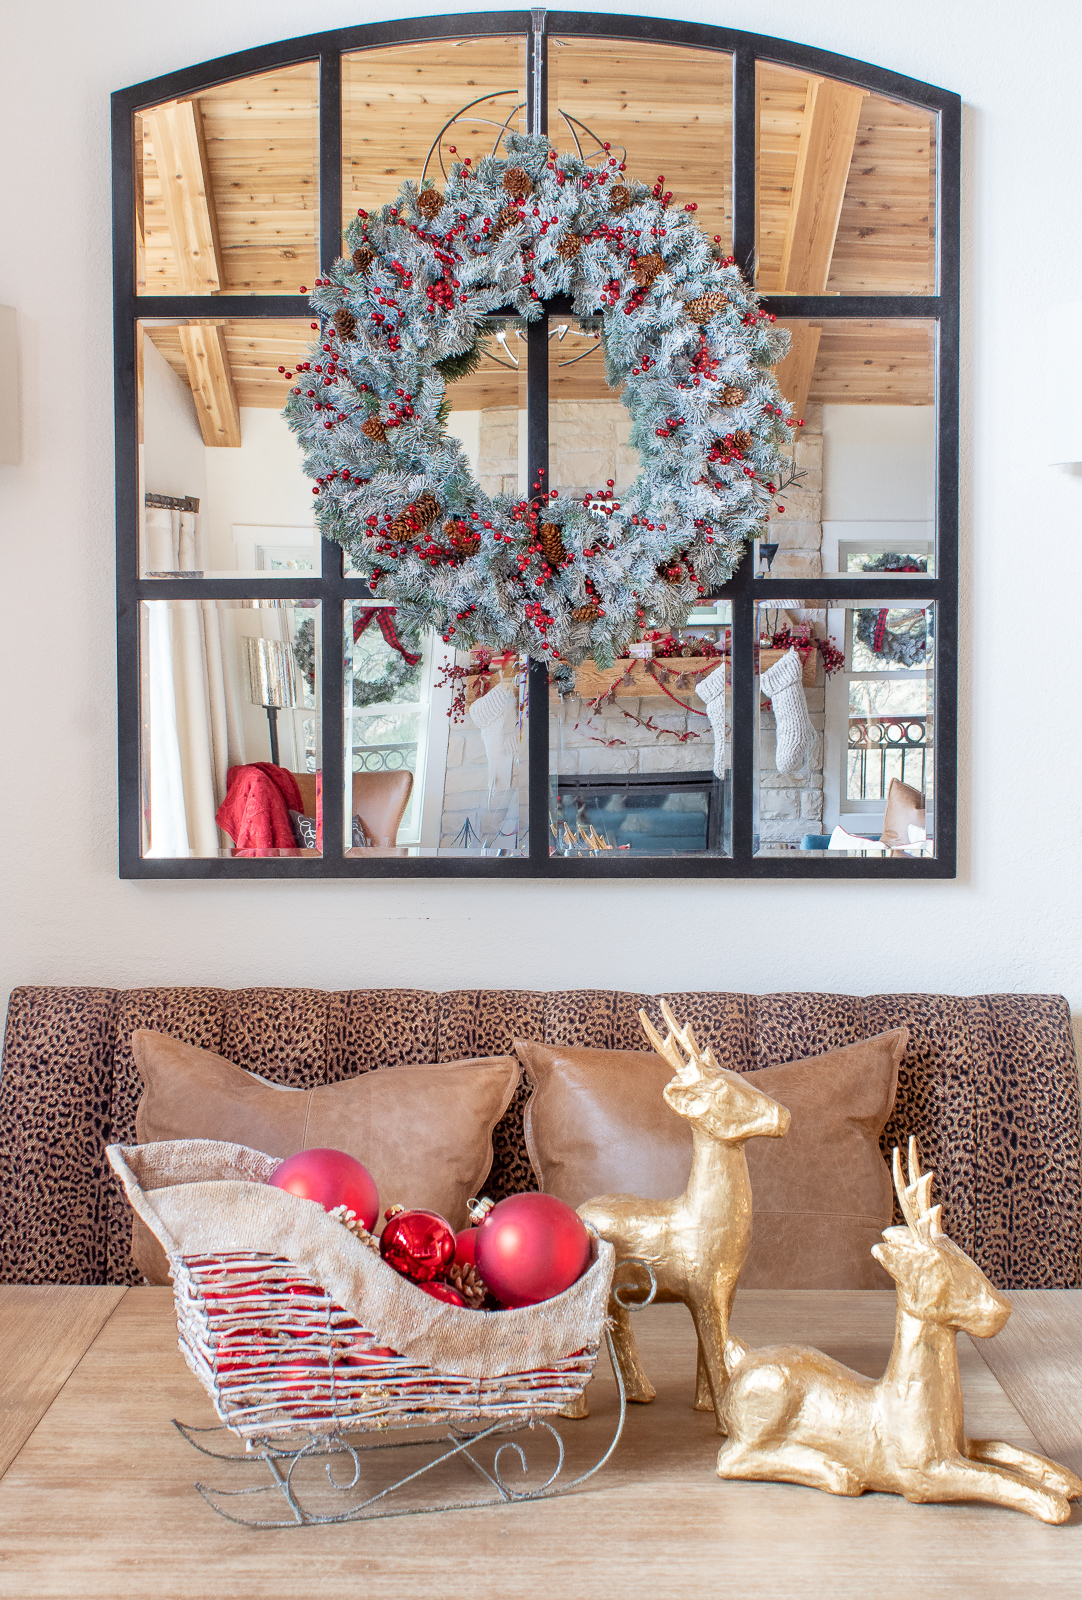
I bought super cheap basic wreaths this year and gave them a little pizazz with SnoFlock, pinecones from the creek nearby, and berries. I’ve got to say having a bag of SnoFlock on hand this time of year is an essential for me. Our bag has lasted me 3 years!
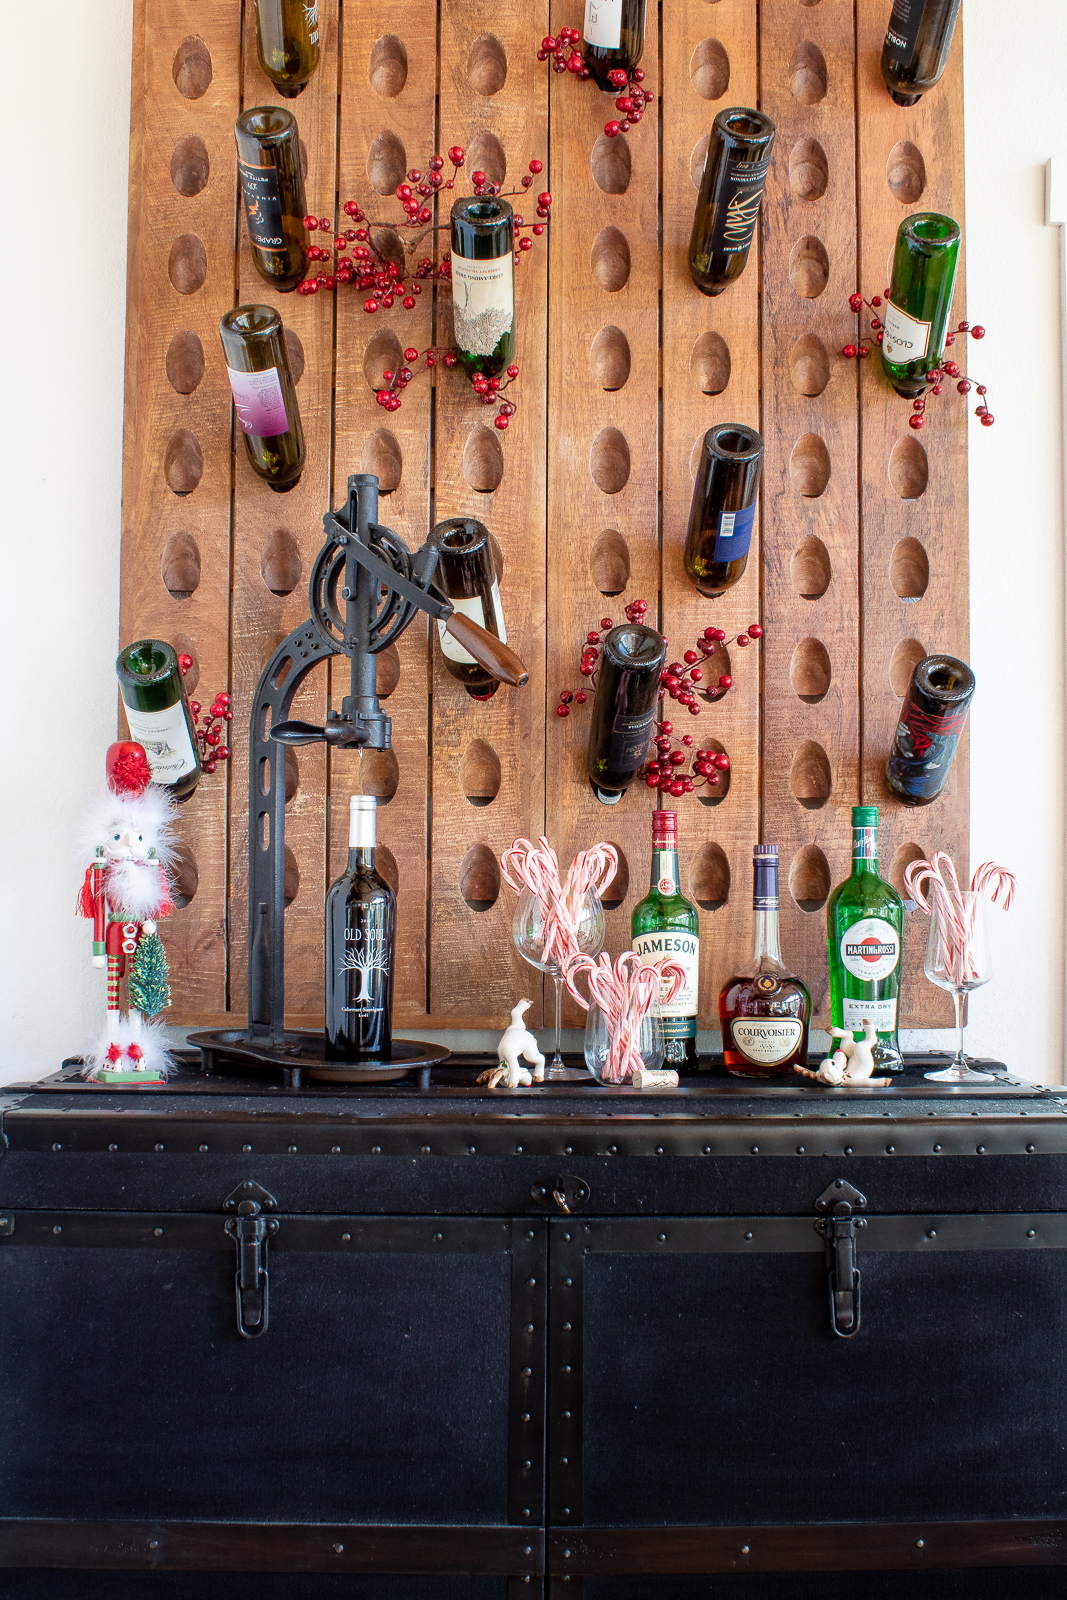
This right here is what I call Christmas cheer… we’re making spirits bright! Break out those extra wine glasses and fill them with candy canes or other small Christmas items for instant, simple decor.
That’s all for our mini Christmas tour. For more ideas be sure and check out last years 2018 Christmas Home Tour!
Laura
Cookie Consent
We use cookies to improve your experience on our site. By using our site, you consent to cookies.
Used to monitor number of Google Analytics server requests when using Google Tag Manager
1 minute
_gid
ID used to identify users for 24 hours after last activity
24 hours
__utmx
Used to determine whether a user is included in an A / B or Multivariate test.
18 months
__utmv
Contains custom information set by the web developer via the _setCustomVar method in Google Analytics. This cookie is updated every time new data is sent to the Google Analytics server.
2 years after last activity
_ga
ID used to identify users
2 years
_ga_
ID used to identify users
2 years
_gali
Used by Google Analytics to determine which links on a page are being clicked
30 seconds
_gac_
Contains information related to marketing campaigns of the user. These are shared with Google AdWords / Google Ads when the Google Ads and Google Analytics accounts are linked together.
90 days
__utmz
Contains information about the traffic source or campaign that directed user to the website. The cookie is set when the GA.js javascript is loaded and updated when data is sent to the Google Anaytics server
6 months after last activity
__utmb
Used to distinguish new sessions and visits. This cookie is set when the GA.js javascript library is loaded and there is no existing __utmb cookie. The cookie is updated every time data is sent to the Google Analytics server.
30 minutes after last activity
__utmc
Used only with old Urchin versions of Google Analytics and not with GA.js. Was used to distinguish between new sessions and visits at the end of a session.
End of session (browser)
__utmt
Used to monitor number of Google Analytics server requests