We just had birthday season in our family… we have the occasional lone birthday but mostly it seems like they come in clusters. It’s funny how that happens, so naturally I thought this would be a perfect time to share my passion of gift wrapping! Confession time: I am that person who used to spend a TON of money on gift wrapping supplies. I quickly realized how silly it was to be spending so much, not to mention the headache keeping my various gift wrapping supplies organized. It was crazy but no longer!
If you follow my blog you know I have a big thing for kraft paper, it’s so versatile and CHEAP! When it comes to kraft paper I prefer the really thin cheap stuff. You can’t beat kraft paper at the Dollar Tree, it’s $1 and easy to work with – a total win! I decided for this year’s birthday season I’d just decorate the packages with stuff I already had around my house.
It was really fun and helped me clear out my overwhelming amount of left over craft supplies. I made a point to photo of each gift before it was sent on its way, most of these ideas are pretty easy to understand. I did however break a few complicated ones down into steps.
PAPER CUT OUTS WITH LEFTOVER PAPER
I love paper crafts which means I always have little bits of paper left over. Use various paper punches to come up with fun designs and shapes. No bow needed here but still lots of fun!
YARN WRAPPED WITH A POM POM BOW
We’ve all got a bundle of yarn stashed away don’t we? You can easily turn that yarn into a festive package. Wrap the yarn around, the messier the better, and simply tie on a yarn pom pom. Simply wrap the yarn around your fingers until it’s thick enough to your liking, carefully remove from fingers and tie off with another strip of yarn, cut the bottom, and fluff. Thank you Ashley for being my fabulous hand model.
A BALLOON BOUQUET BOW
Any time you have a few leftover balloons save them, or stock up at the Dollar Store. Take a bundle of yarn or twine and tape it to your package. Blow the balloons up just slightly and tie them together. I tied the ends of 2 together, the other 3 together, and twisted the ends together. Secure with liquid glue or tape.
LEFTOVER CANDLES
It seems we’ve always got too many candles or not enough, either way I’m always buying them! Create a cheerful gift wrap by gluing candles right on your gift. Have a small puddle of liquid glue, lightly dip the candle, and let dry. Get creative creating flames, anything from pom poms, yarn, or paper will work. Gift wrap lovers like me be sure and find a Happy Birthday stamp!
LOTS OF POM POMS
Ok years ago I bought some bags of pom poms and they’re still going strong. Glue them down, add a simple bow, and poof – fabulous! This makes for a quick gift wrap if you have a hot glue gun on hand.
LEFTOVER RIBBON AND FABRIC SCRAPS
Save every ribbon and fabric scrap! You never know when they might come in handy. Here I used two leftover pieces of lace and a nice strip of ribbon. Use the hot glue gun to shape and glue the ribbon into a floral pattern. So many possibilities!
SAVE SMALL WRAPPING PAPER SCRAPS
Have small amounts of leftover gift wrap? Be sure to save them, it’s a perfect way to jazz up kraft paper. You can come up with endless combinations, add a bow and you’re good to go. You can also use a paper punch for flair.
WEAVED RIBBON
Got extra ribbon? Then get to weaving! This package was one of my favorites. Depending on how much ribbon you have, measure and cut around your box using different ribbons to create a gorgeous look! I taped the pink ribbon ends together first, keeping them off the paper so I could adjust them. Then I weaved my second ribbon and secured with tape. Add a simple tied bow if desired. Think of all the color combinations you can come up with!
I love how a beautifully wrapped gift adds excitement and festivity. Just recently my sister had a birthday and she texted me “thanks for the present you sent me. It’s too pretty to open, so I’ve just been staring at it. It makes me happy”. To me that says it all! The outside of a package is part of the gift too!
You probably noticed most of these birthday gifts were girl themed. Yeah, this birthday season was all girl, boy birthday season comes in the winter and I’m already excited ha! Be sure to check out my Gold Painted Gift Wrap too, it’s simple and perfect for the holidays. Now go grab some cheap kraft paper and have some fun!
It’s my birthday today so I thought I’d blog about one of my favorite things, roses! I love all flowers but I’d have to say roses are probably my favorite. They come in a variety of colors to suit your mood, look great alone or arranged with other flowers, and you can easily grab them at most grocery stores. Nothing brightens my mood more than having roses in our home.
If you follow my blog regularly you know we’ve been going through a massive home remodel in our new Colorado home. It’s been hard, things have been unorganized and dirty with construction dust everywhere. Through all the chaos I’ve made sure to keep a vase of roses in a few rooms. These beautiful flowers have kept me focused and happy through the mess… I call that rose therapy!
Let’s face it though, if you’re like me and love keeping fresh cut roses in your home it’s not cheap! The cost certainly adds up, but I’ve learned lots of tricks through the years on how to extend the life of your roses.
Below I’ll give you my 10 favorite tips on how to keep these beauties fresh and lovely for as long as possible.
1. Keep the roses in water on the way home. I know this is a hassle but keeping roses in water while driving home greatly extends the life, especially if you have a long drive home. You can keep a small bucket with a little water in the bottom if you plan ahead. You can also pour a little water in the flower wrapper bags which are available at most grocery stores. Double or triple bag it, to avoid any leaks.
2. Proper cutting is essential. Roses must always be trimmed before displaying them and sharp clean floral shears or scissors are essential. Cut at a clean 45 degree angle to help with water absorption, and take care not to tear or crush the stem as this can promote bacteria. Be sure to keep leaves out of out of the water line as this will also promote bacteria growth.
3. Trim rose stems in water. When roses are cut and exposed to air a scab can form which prohibits water absorption. A simple solution is to cut the stems in a bowl of water or under running water, then immediately transfer to a vase. Repeat the process if needed to adjust the height of your roses.
4. Always use floral food. When purchasing flowers make sure to use the little packet of powdered floral food. I’m a huge fan of liquid flower food, I find it much quicker to mix and a bottle lasts a long time.
5. Keep the water clean. Having clean water free of bacteria is crucial for prolonging the life of your roses. Be sure to switch out the water every few days water and be sure that leaves of the stem and any falling petals are kept out of the water.
6. Display in a suitable location. Keep your roses happy in a cool area and out of direct sun. Keep away from fruit and houseplants because they emit ethylene gas which can cause your roses to wilt prematurely.
7. Stay hydrated. Roses are very thirsty and need a lot of water to stay hydrated, you need monitor water levels daily. Rose petals absorb water and can help hydrate your arrangement as well. Mist a few times a day with a spray bottle to keep your roses fresh and happy.
8. Always use a clean container. Bacteria is the kiss of death for your roses. It’s crucial to properly wash and sterilize flower vases and containers. Wash all containers with hot soapy water, add a splash of bleach, rinse well, and dry.
9. Remove bad roses immediately. Keep an eye out for any rose that is prematurely wilting and pull it out, just one bad rose can spread bacteria and ruin the entire bunch.
10. Refrigeration slows the aging process. Anytime you’ll be gone for an extended period of time use your refrigerator to extend the life of your roses. You can also do this overnight while sleeping, just remember not to put them near any fruits or vegetables!
I love the impact of a large rose arrangement, but a great budget tip is to create smaller bundles of 2 or 3 roses in smaller containers, and often I’ll just do a single rose bud. I can stretch a dozen roses into several rooms this way and keep the cost down. Some specialty grocery stores like Central Market will sell individual roses which is another budget saver.
I have a large collection of unique vases and containers for flower arranging. I thought I’d share some of my very favorites below with you. I especially have a passion for Rosenthal mini vases. They hold 2-3 flowers and add dramatic style!
Try these tips and you’ll be amazed how much longer your roses will last!
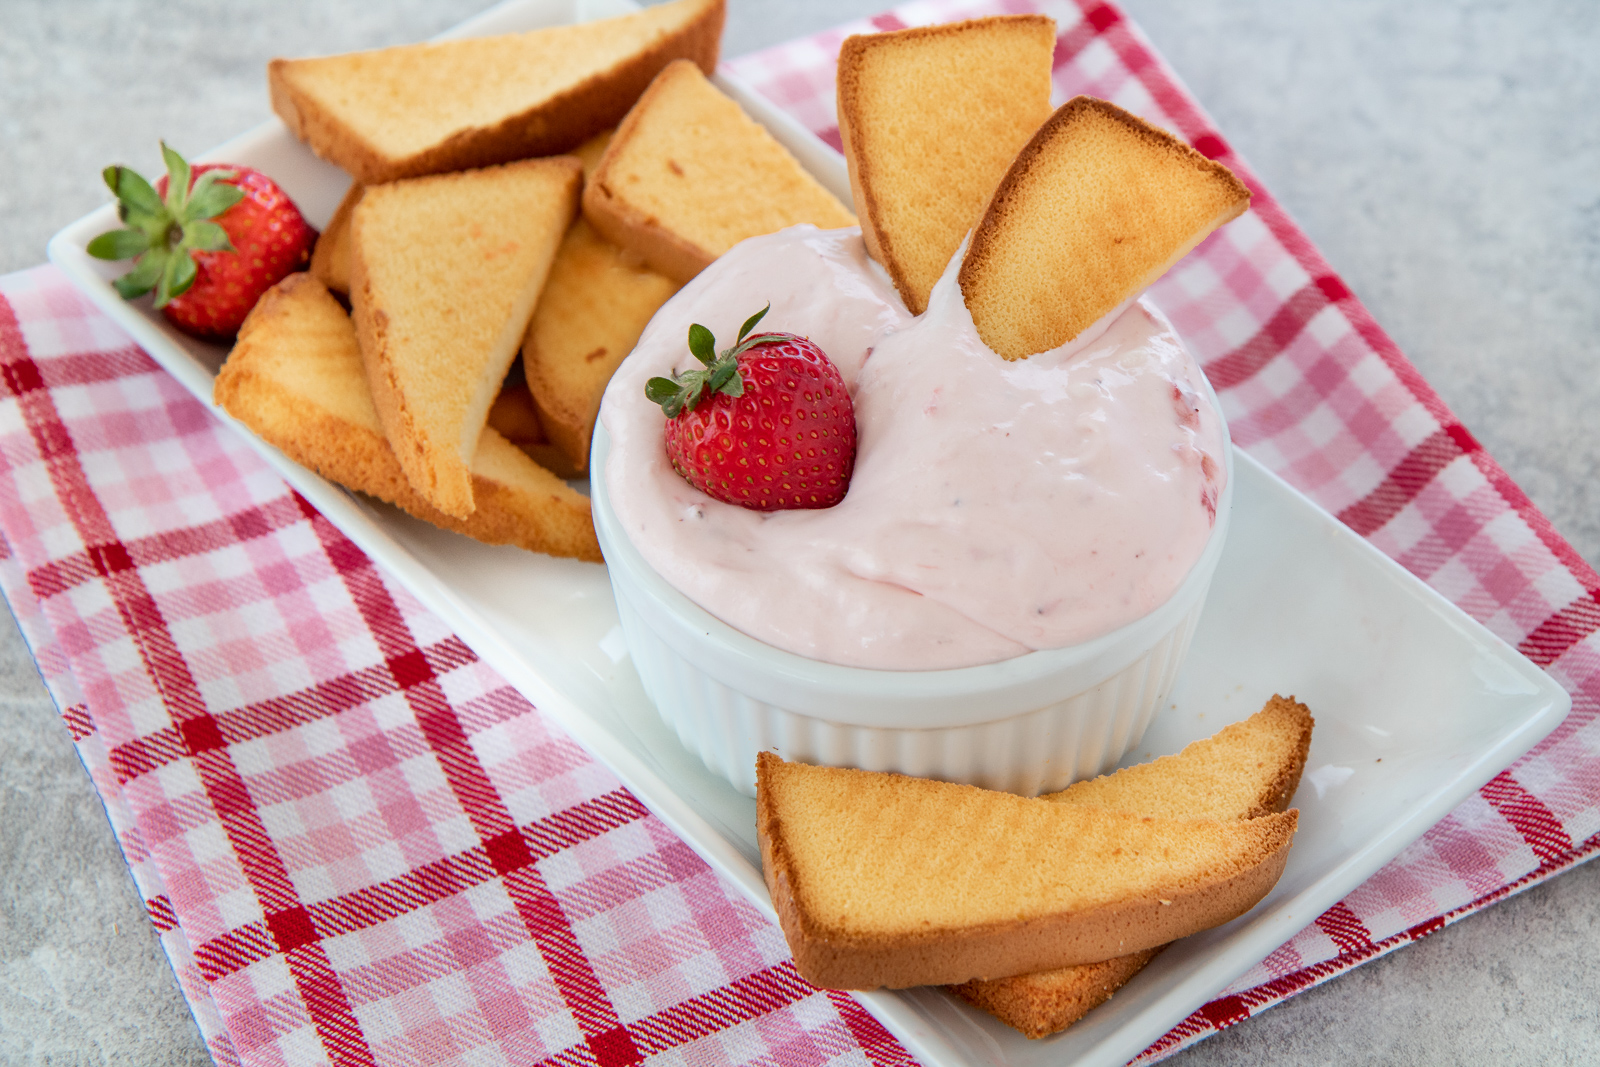
We have strawberry obsession in this house, anyone else? I don’t want to live in a world without them, in the summer we just can’t get enough! Haley and I love to get creative while cooking together in the kitchen… we have so much fun together. Well… until it’s time to clean up, we’re a little messy. Just recently we had an idea to put a fun new twist on strawberry shortcake, and our strawberry shortcake chips and dip dessert idea was born.
I mean who doesn’t love strawberry shortcake? We packed all the delicious flavors of strawberry shortcake into this dessert dip. We’ve combined strawberries with a whipped topping and cream cheese to create a delicious dessert dip that’s rich and creamy but yet still light. The poundcake chips are a fun twist, and so simple to make!
Once you make your own poundcake dessert chips you’ll be hooked wondering what else you can dip them in. Hello chocolate sauce! You can find frozen loaves of poundcake in the frozen desserts section of the grocery store. Slicing them frozen makes it simple to get nice thin slices.
Since moving to the mountains I’ve had a little drama in the kitchen. Things cook a little slower at high altitude and it’s thrown me off a bit. I had to increase my baking time for the chips… I’ve done my best to find a general bake time, and all ovens bake differently, so just keep an eye on the poundcake slices and you’ll be fine.
This dip is delicious served immediately or chilled… either way you can’t go wrong. The recipe makes a little over 2 cups, if you’re having a large gathering consider doubling the recipe.
1cup1 cup sliced frozen strawberries in syrup, thawed
1loaffrozen pound cake
fresh strawberries for garnish and dipping
Instructions
Instructions for the dip:
Beat the cream cheese in a bowl with an electric mixer at medium speed until light and fluffy.
Add the powdered sugar and mix until blended together. On low speed add the frozen strawberries in syrup until combined then gently fold in the Cool Whip.
Serve immediately or refrigerate 1-2 hours if you prefer a thicker chilled dip.
Instructions for the pound cake chips:
Preheat oven to 350°
Slice the frozen pound cake across into 1/4 inch slices, then cut diagonally to form a triangle. Place the pound cake slices in a single layer on 2 baking sheets.
Bake for 5 minutes or until the tops lightly brown. With a spatula turn the slices over and bake another 3-5 minutes until lightly browned and toasted.
Cool on a wire rack and serve with strawberry dip. Store uncovered until serving. Best served immediately or within several hours.
If you love strawberry shortcake or fruit dips you’ll love this recipe. It’s light, refreshing, and FUN! I mean who doesn’t love to dip stuff??Wanting even more strawberry deliciousness? My strawberry shortcake poke cake is a favorite on the blog too.
Happy August everyone! I should have updated the blog weeks ago, but with all the dust and dirt July just slipped by… it’s been pure chaos here. Things haven’t been going smoothly in terms of our cabin remodel… everything has taken 10 times longer than we thought it would, and we’ve ugh… had some issues with our workers. I’m pretty sure we’ve survived the worst and things are starting to turn around because honestly I can’t take anymore stress. For me to be happy, sane, and function properly I need things to be clean, organized, and pretty, and I’ve had the exact opposite. We’ve had workers in our home nearly every day for almost 5 weeks, and that includes some weekends too. It’s really taken a toll on me, there is literally nowhere to go for privacy, and every night I, or I should say we, collapse into bed from exhaustion. I do have some updates to share though.
First of all, we sanded and repainted the metal deck railing. We chose Benjamin Moore Appalachian Brown, this color is going to be used on all our exterior trim and garage, and indoor on our spiral stairs and railing. I love the way that it looks, I took this photo recently after a rain storm. Now we just need to add the deck wood floor, but were waiting on our new glass and sliding doors first.
One thing that has been incredibly frustrating is the amount of junk and trash around our property, then add in all our construction demo and we’ve had an absurd amount of trash. We had a HUGE commercial grade dumpster delivered and it’s been emptied 2 times and it’s ready for another. Wasn’t it nice for the original owners to leave us a broken microwave in the garage from 1987?? #kindness
We decided to remodel the downstairs bathroom first, we’ve nicknamed it the bathroom from Hell. This is where literally everything has gone wrong. We had some workers redo the plumbing, HVAC, and move a gas line (the ceiling was too low because of the gas line). After nearly 3 weeks and still no progress we told them not to come back. They did almost everything wrong! We had plumbing parts put in upside down, and our favorite was the bathtub faucet at chest height. This is a bathtub shower combo mind you, and they knew that. Yet they still argued with us they were right. Can you imagine taking a relaxing bath while water falls 4 feet down into the tub, and then having to stand up to turn the bath water off?? I mean come on! After paying a lot of money to those guys and getting very, very upset, our wonderful general contractor had Brian2 come fix it. Brian2 has been a true gift! He’s so nice and full of knowledge, he’s been teaching Brian1 (my hubby) lots of helpful skills! By the way it’s taken Brian2 10 days to fix all the wonky plumbing Dumb and Dumber did.
The stairs have been a nightmare to deal with, both sets. The spiral stairs had old dirty carpet glued down, the glue was so thick that it took me FOREVER to strip it off. Then we had to get a grinder and smooth off the chunky welding spots, it was bad. From there it’s been a blur of more sanding and patching of the rough uneven metal.
Our main entry stairs are metal and concrete and go straight down… y’all we fall up and down stairs all the time! These are a huge injury waiting to happen so I’ve decided a nice carpet is the way to go. The floor company argued it couldn’t be done but Brian determined never to give up found a solution that lets the stairs be carpeted and still up to code. The stair company finally agreed it would work but we would need to prep the stairs ourselves and chisel out the concrete.
Luckily Brian2 let me borrow his amazing chisel tool thingy. I took out all my frustrations and chiseled up all the concrete myself! Brian1 just finished building the wooden stairs and as soon as the construction calms down I’ll be having carpet installed soon… and I have an awesome wooden branch handrail I can’t wait to install!
My original plan was to have a red front door, with our house painted a richer shade of brown. I quickly realized that was a bad idea, after testing a few shades of red I just accepted it wouldn’t work. It clashed horribly with the stone and just felt wrong. My backup choice was teal, we decided on Home Decorators Sophisticated Teal, the blue color on the left… now if only my new craftsman door would arrive!
As for the living room, we’ve enclosed the closet, that is now in the master bedroom, and brought it up to the ceiling. What a difference it makes!
The gas fireplace is installed and waiting inspection so it can be completed. I’m a bit frustrated our ceiling is still not installed… it’s been in the garage for over a month now! It had to acclimate, be stained, and now we’re just waiting on everyone’s schedules to clear up.
Our master bedroom is coming along nicely. This photo was taken right before Brian2 fixed all the wonky bad wall texture, and Brian1 has built my new closet. We’re planning everything to be super space efficient… I refuse to give up my king sized mattress, so it’s definitely tight. I’m just waiting on baseboards and my doors to be stained, it should be up on the blog within a few weeks.
We did have some drama with these pine doors. This is after staining with a natural colored stain, NOT OKAY! What is with those zebra stripes?? We returned all of our doors and bought knotty alder.
We removed the large cabinet along the wall in the dining area. My plan was always to take out this window, we have plenty of windows and it’s not needed. Because of our open floor plan I won’t have a chandelier over my table… which is so weird for me but it will be so much easier taking tablescape photos without a chandelier knocking us in the head.
We bought a larger deeper table and I have plans to add banquette seating and possibly sconce lighting for ambiance. When we do our kitchen remodel the cabinets will need to be moved left slightly to accomodate a dishwasher so I’ve got to design this space knowing in a year or so the pantry and cabinets will move down a foot or two.
Off topic but I’ve mentioned our house is framed all in steel, isn’t it weird how you can see the beams coming through the walls and ceiling?
Out of sheer frustration I added cabinet knobs and pulls. Seriously it was hurting our hands to open them and they open in weird unexpected directions. It made such a difference! Those tacky lights are next to go.
It’s so funny Haley and I were cooking in the kitchen, it’s tight but doable. She’s like me and loves to cook. I asked “So what are your thoughts on the kitchen.” She said “it’s ok, it works, but I wouldn’t plan on cooking Thanksgiving dinner in it.” That evening my sister texted asking about cooking Thanksgiving together at the cabin. We laughed so hard… I mean maybe it’s possible I don’t know. It was just a funny coincidence. I will say I HATE cooking on this electric stove top, and it’s a nightmare to keep clean. I can’t wait until I get a gas stove top again!!
Those are my updates for now. We’ve been through the worst so fingers crossed things should start moving along quicker. Hopefully I’ll regain my sanity and keep the blog regularly updated again. After our bedroom is done our next focus is to finish the downstairs bathroom, Ashley’s room, then the living room and deck. Plus I’ve got to try to get the cabin exterior painted in the next month of two before cold weather really hits. You might could say I’m a bit overwhelmed. Click here to see more of our cabin before photos.
Taking a break from cabin drama, Haley and I came up with an interesting twist on a new strawberry shortcake themed dessert, so expect that to be on the blog next! Take care!
I’m so excited to share my Trail Ridge Road experience with you today! First of all if you have no idea what Trail Ridge Road is, it’s the highest paved road in any United States National Park. Peaking at 12,183 feet, Trail Ridge Road offers breathtaking views, but it can be very intimidating for those who have a fear of heights, like me. I’ve wanted to do this drive with my husband for quite some time now but I had so many questions and concerns. I’ve heard many say it’s a terrifying drive due to the elevation and lack of shoulders and guard rails, and I’ve also heard it’s not that bad. I wasn’t sure what to believe, being afraid of heights I Googled away yet none of my fears were ever clearly answered. We decided to go for it, with the realization we could stop and turn around at any time. So if you’re confused what to expect driving Trail Ridge Road I’m here to break it down for you with this guide.
WHAT YOU NEED TO KNOW
It’s important to call the Trail Ridge Road Status Line at 970-586-1222 to check the road conditions and possible closures before heading up. The weather can rapidly change in Rocky Mountain National Park and closures can happen suddenly, even in the summer. Trail Ridge Road is an ideal summertime drive. We did ours in early July, but many parts of the road are closed from mid October to the end of May and sometimes into June.
Admission is $25 per car per day and annual passes are available for $70. You’ll be given a park map with admission. We actually splurged for the $80 “American The Beautiful” pass which gives us free admission to any national park.
Make sure you bring a jacket, and plenty of water. Altitude sickness symptoms such as dizziness, headache, and nausea can hit quickly at such a high altitude, and staying hydrated is absolutely crucial. Here is a post I wrote a short while ago with tips to beat altitude sickness. Bring extra water and possibly a few snacks as well.
Rocky Mountain National Park is extremely popular in the summer so plan for crowds. Traffic can back up at times, it’s best to start early in the day and avoid weekends if possible.
Trail Ridge Road does not make a loop. At some point you’ll need to turn around and head back the way you came or you can continue through to Idado Springs and Denver. I’ll explain a little bit more the places you might want to turn around below.
IS THE DRIVE REALLY THAT SCARY?
In my opinion it’s not as scary as I was led to believe. Don’t get me wrong there are some parts of the drive that made me uneasy, but for the most part I was ok. If you have a fear of heights have someone else drive and sit on the passenger side of the car. Most of the scary parts were on the passenger side of the car. As crazy as it sounds it helped me a lot to sit on the scary side because I could look down and see the guard rail or the edge of the road and know we were fine. Sitting on the drivers side I wouldn’t have had that perspective.
I was led to believe there were no guard rails or shoulders. There are actually many rock guard rails and thick trees which give the sense of security. There are plenty of small areas to pull over and parking lots to stop at. It is true there are some steep mountain roads without guardrails but it’s not in many areas.
SHEEP LAKES
We entered the east side of Rocky Mountain National Park from Estes Park, our first stop is Sheep Lakes Overlook. Here you’ll see beautiful views of the glacier-formed lakes and have fun watching the prairie dogs and other wildlife.
HORSEHOE PARK
Next up we we stop at Horseshoe Park Overlook with lovely views of the valley and creek. Parking is very easy at the lower level parking lots.
BEAVER PONDS
We continue up with windy road and stop at Beaver Ponds. The pull off area is quite small and easy to miss without a sign, so be watching for it. You’ll walk a short boardwalk over wetlands ending at a view of the clear creek, it’s definitely worth a stop.
HIDDEN VALLEY PICNIC AREA AND NATURE TRAIL
Hidden Valley is a great place to stop with plenty of parking. Here you’ll find lots of picnic tables, clean restrooms, and hiking trails along the creek. Little ones will love the junior ranger headquarters with ranger led programs at 10:00 am, 11:30 am, 1:00 pm, and 2:30 pm. From this stop the road starts to climb quite a bit in altitude.
MANY PARKS CURVE
After a steep sharp curve you’ll arrive at Many Parks Overlook. The parking lot is opposite the overlook and just past the curve, it can cause traffic delays and backups, because of this we continued a little farther up the road to stop. The road starts to get steep but it’s still very tolerable at this point, there are rock guardrails and dense trees. We found a small pull off area that’s not crowded and took advantage of the views. The snow melting creates pretty waterfalls along the road.
RAINBOW CURVE
Leading up to Rainbow Curve Overlook the road starts getting steeper, and I had my first I’m not so sure about this moment… but keep going it’s worth it! There are rock guardrails along the way. This is a popular stop with a large parking lot and restrooms, it also gets very crowded. Continuing up the road we cross the tree line. If you have a severe fear of heights you may want to consider turning around at this point, but I strongly suggest you keep going to Forest Canyon, it’s magical.
FOREST CANYON
Driving up to Forest Canyon the roads get pretty steep and scary, not consistently but just in certain spots. You’ll still find rock guardrails in some places but not all, a few spots made me uneasy but traffic moves slow and that helps quite a bit. Remember my trick to look at the edge of the road if you can for security, it helps. The parking lot gets very crowded here, we had a short wait but it was worth it, you must stop here! There is a short walk to an overlook that offers dramatic mountain views, it’s hard to capture the true beauty with a camera. If you’ve made it this far don’t stop to go back now continue on to at least Lava Cliffs, it’s not far down the road.
When you hear the lack of guard rails and shoulders on Trail Ridge Road it sounds terrifying but as you can see below that’s not always the case. In my opinion less than 10% of the road is truly scary, a majority of the road just slopes, it’s not a sharp drop off.
ROCK CUT
The amazing snowy mountain views just keep coming with Rock Cut Overlook, you might spot the elk herd grazing on the grass nearby. Next up is Lava Cliffs which is a real treat.
LAVA CLIFFS
The mountains take on a dramatic new look as we approach Lava Cliffs. It was really windy and chilly up here but a gorgeous spot to stop.
GORE RANGE
Gorge Range is the highest point of the road at 12,183 feet and naturally offers dramatic snow covered mountain views. Up ahead is the Alpine Visitor Center which makes a great stopping point if you’re ready to head back.
ALPINE VISITOR CENTER AND TRAIL RIDGE STORE AND CAFE
The Alpine Visitor Center makes a great stopping point and a great spot to stretch your legs. Traffic was very slow turing into the parking lot, but once inside there was plenty of parking. You’ll find restrooms, a large gift shop, and cafe. It’s not a luxury restaurant by any means, but a good spot to grab some cocoa and a muffin. If you’re feeling energetic you can take a long walk uphill to the Alpine Ridge Trail but Ashley was getting a little dizzy and we decided to skip it. If you’re really feeling light headed they sell oxygen in a can for around $10, it can help you catch your breath a little quicker. Behind the visitor center you’ll find more gorgeous mountain views.
This is a great spot to turn around and go back, or you can keep exploring like we did.
POUDRE LAKE
After crossing Medicine Bow Curve we start descending down the mountains and it’s smooth sailing from here when it comes to scary roads. The roads are thickly lined with pine trees and we arrive to Poudre Lake, there are some spots to park off the road. It’s pretty quiet here and the crowds significantly dropped off. We walked around, spotting flowers while listening the the gentle sounds of the stream. As we headed towards Farview Curve we crossed the Continental Divide at Milner Pass.
FARVIEW CURVE
The last iconic mountain view stop along Trail Ridge Road is Farview Curve. From here you’ll need to decide if you want to turn around and go back the way you came or continue to Grand Lake. We decided to venture on and keep exploring.
In between Farview Curve and Grand Lake you’ll find lots of trails and campsites along small lakes and streams. You’ll start seeing a lot more damaged dead trees from the the devastating pine beetle. Seeing the damage is sad yet there is also a rustic natural beauty that’s very appealing.
GRAND LAKE LODGE
Shortly down the road we saw a sign for the historic Grand Lake Lodge and thought why not? What a jewel we found! This beautiful lodge is nestled along Grand Lake, also known as Spirit Lake. The grounds are gorgeous, and the inside has a beautiful bar and restaurant. We sat on the porch swings and sipped a glass of Chardonnay as we stared off to the blue water.
We officially called the end of Trail Ridge Road for us here, although you can stop at any point that works best for you. You can turn around and go back the way you came or make a big loop through Idaho Springs and Denver, just be aware it will take much longer this way. From the Lodge it’s about 90 minutes back to Estes Park without stopping. If you continue through Idaho Springs its 2 1/2 hours back. Those coming from the west side will take this trip in reverse ending up near Estes Park.
We ended up spending about 4-5 hours total on Trail Ridge Road, that includes stopping for all the views, photos, a quick picnic lunch, and our drinks at Grand Lake. It was an absolutely incredible day trip and we enjoyed every single second of it. Yes traffic was slow in spots, there were a few crowds, and scary road spots, but we’re ready to do it again. This is one incredible drive that should be on everyone’s bucket list!
Happy July everyone! June was cold up in our neck of the woods, but the temps are in the 80’s now and it finally feels like summer in Colorado. We’ve been busy with lots of home projects, and at the end of the day I love to relax on the deck with a drink and listen to the creek. Since the summer season is shorter in the mountains I want a drink that screams summer, and these Lavender Lemonade Champagne Cocktails are perfection. The fresh taste of lavender combined with the sour taste of lemons is truly delicious… then we add Champagne and we’ve got a winner here!
These cocktails also gave me a chance to break in my new bar cart! Our new kitchen is so small I had nowhere to store my wine or glasses so I jumped when I found this versatile bar cart at a good price. With various remodeling projects happening our house is pretty much torn up, and this cart is one of my few little cute spots right now. I’ve had lots of fun decorating it and when the construction dust gets crazy I can just roll it away to safety. Plus I can push it around and play flight attendant with it and who doesn’t want to do that?
I have a such a lavender obsession, anyone else? I love the taste and the smell, and it’s so refreshing this time of year. The trick to this amazing cocktail is the lavender simple syrup. Finding lavender flower buds may be tricky for some, I always pick mine up in the bulk spice section of Sprouts. If you have trouble finding food grade dried lavender have no worries there’s always Amazon to the rescue!
Having lavender simple syrup on hand in the summer time is a great idea, not just for this cocktail recipe but you can do all sorts of delicious creative things with it. Store simple syrup in the refrigerator for up to 4 weeks, although it’s so delicious I’m not sure how it could last that long! This recipe makes about 1 and 1/2 cups of syrup. The first time making this recipe add about a cup of simple syrup, stir the cocktail and add the additional 1/2 cup syrup if you’d like a sweeter cocktail.
You’ll want to use fresh lemon juice for this recipe. A cup of lemon juice is usually 6-8 lemons. Those with Kitchen Aid mixers consider getting the citrus juicer attachment. That thing has power, in just a few minutes I can get a cup of juice from 6 lemons plus it’s easy to detach and clean. Those juicing by hand you’ll need more like 8 lemons.
When making Champagne cocktails I just go for a cheap Brut, but Cava also works as well. If you prefer a non-alcoholic version add a bottle of sparkling water for a delicious mocktail.
If you would like more of a diluted cocktail similar to actual lemonade consider adding 1/2 cup to 1 cup of water when mixing the ingredients. We like this cocktail as is without water, it has a stronger tangy sweet flavor, comparable to a margarita. Cocktails are subjective and we all like them a bit different it seems, so taste and play with this recipe the first time you make it.
Optional water if needed to dilute the cocktail – I don’t add any
Ingredients for the lavender simple syrup:
1cupsugar
1cupwater
2tbsdried lavender buds
Instructions
Instructions for the lavender simple syrup:
Bring water and sugar to a boil, stirring to make sure the sugar is completely dissolved. Add the lavender and boil 30 seconds. Leave the pot on the burner, turn off the heat, cover and steep 25-30 minutes. Cool and refrigerate syrup for up to 4 weeks. Makes about 1 1/2 cups of syrup.
Instructions for the cocktail:
In a large pitcher mix 1 cup lemon juice with 1 cup simple syrup, stir to combine. Pour half of the chilled champagne into a large pitcher, letting the bubbles settle, add the remaining champagne and stir to combine. Add more simple syrup to taste if necessary and 1/2 cup of water if needed to dilute the cocktail. Pour into glasses, add garnish (if using garnish) and serve immediately.
Enjoy these fresh summery cocktails and have a happy 4th of July!
Hello again! If you’re wondering what’s up with me and where I’ve been I’ll tell ya. I’ve been flat out exhausted, plain and simple. Moving out of our Texas house really took a lot out of me. I can’t believe how much stuff we had crammed into that house! We took some things with us, we sold a lot of things, and we donated many things as well. It’s really made me realize how much stuff we accumulate as humans and do we really need it all?
I wanted to update the blog sooner but every night we all collapse into bed from exhaustion. The first week at the cabin was definitely rocky. We we’re told that the sellers paid for an $800 move out clean… yeah right. The garage was full of appliances and junk from the 80’s, there was a bunch of old doors, glass, and other construction junk all over the house, cobwebs hanging from the ceiling, and to top it all off a dead bird in the shower.
For the first 2 weeks we had no phone or internet and geez was that rough! The first satellite guy didn’t show up because we didn’t answer our phones to confirm the address. Duh! How can we be home for you and answer our phones with no service? Luckily all is good now and we are in WiFi heaven!
Being a city girl who now has a well water system has been interesting. I’ve learned we have a cistern that doesn’t automatically fill up with well water. So the first night showering I was fully shampooed and suds up only to have the water shut off on me… oh that was not fun!
Our view is absolutely gorgeous though and we love the wildlife. We’ve seen a herd of wild turkeys running around our property and lots of birds including hummingbirds. We’ve seen lots of big horn sheep near our home as well as elk, just not on our property yet. Driving into our little nook of cabins we see a warning sign that there is mountain lion and black bear activity in our area… so that has me a little freaked out. I tried jogging through the area but I had this creepy feeling something was out in the thick trees and weeds watching me so I went home. We spoke with a local near where we live and he said I should carry a pistol while jogging. Uh… nope, not happening. So I went online to Amazon and found a small space stationary bike instead, it folds away when not in use. Now I can workout without having to worry about something eating me.
So let’s get to it and see the cabin shall we? It’s a mess right now, some of the photos really embarrass me. Inside my head, though, I can see the remodeled cabin and it’s beautiful!
What really gets to me is just the sheer amount of junk around the property. There is just so much work to be done, I feel so overwhelmed. The upstairs door will be taken out and replaced with a window, the front door will be replaced, the sunroom to the right will also be removed. We plan on painting the cabin a richer chocolate color. Not feeling the white on a cabin in the Rockies at all!
Y’all these stairs are really stressing me out! They’re welded into the damn frame of the cabin. The whole entire cabin is welded 30 feet into the mountain to be sturdy and fireproof, it’s definitely not going anywhere, but I’m at a loss what to do with these ugly welded entry stairs. I’m thinking my only option is a durable carpet, one that hides dirt… I just don’t know.
The spiral stairs are really cool and we’re going to work with them. It bothers me how sloppy the welding work is, though. Lots of ugly rough spots, we just bought a grinder so hopefully we can smooth everything down.
The view in our living room and dining area is gorgeous. We plan on doing a lot of work to this area. We’re taking out the wood wall and adding glass, a wood stained ceiling, ripping out all the stonework, and adding a new stone gas fireplace.
Everything is off center in this place, look at the fireplace and mantel. That’s just one example, it’s like they didn’t have a tape measure.
This is our dining area, I’m planning it out for maximum space efficiency. The wood cabinet and glass hutch will be removed as well as the window. Awkward placed windows drive me nuts, so out it goes. We have no need for a window there any way. I’ve got some neat plans for this space, if it works out…
The kitchen is small and will probably be last to be redone. I’ve cooked in it a lot, it’s tight but workable. Surprisingly I was able to cram in almost all our kitchen stuff into the cabinets. It definitely holds more than it seems. We no longer have a dishwasher! We’ll eventually get one but I’ve actually found washing dishes by hand a little bit fun. I’m sure the novelty will wear off soon though!
The wrap around deck needs a lot of work but has gorgeous views! My current project is sanding the railing down, and repainting it a deep dark brown. Brian will be replacing some of the sub floor and adding a wood deck to the floor.
Recently we’ve had a lot of rain and it’s been so peaceful and relaxing. Watching the rain fall high from the sky is one of the most incredible things I’ve ever experienced. We open the patio doors, the air is cool, no humidity, and it smells like fresh rain and pine trees.
We have a long steep driveway that winds around down to a creek below. I love how loud the creek is, when we open the windows we can hear it. You can’t tell in the photos how steep our driveway is, I definitely find it intimidating and have yet to drive up or down it, so far Brian does it for me. I’ve also fallen down it and ended up with bruised bloody knees. Another fun learning moment… don’t wear flip flops while walking down to the creek.
These photos are from the lower level, it’s pretty gross.
The office ceiling tiles in the bathroom are a great touch don’t you think? There is also a paper towel holder over the sink!!!! I’m at a loss for words… lets move on.
This sad little room is going to be the master bedroom! Yep, if you’re wondering, those off center windows are driving us crazy. Once you notice it you can’t unsee it. We’re on the fence if we should move the window over or just get over it… we have so much to do we should probably just get over it.
I’ve ordered a pretty, upholstered bed from Pottery Barn, it has storage drawers which I desperately need. The bed will be here in a few weeks so this room needs to come up to my standards fast. It will be small but cute and efficient.
So far we’ve ripped out the carpet, demolished the closet…its size and door frames need to be heavily tweaked, and Brian has cut a hole in the wall that leads to the living room closet. So we will have his and hers closet space. Our closets will need massive Container Store Elfa help!
At the end of the hallway past our future bedroom is our janky sunroom…. thanks to my lil sis for getting me hooked on the word janky! Not only is it a fun word to use, it also perfectly describes our cabin.
Our plans are to rip out the sunroom and build an outdoor pergola. Eventually we’ll attach a multi level deck and possibly add a hot tub for the bears and mountain lions to enjoy.
And the laundry room. What the hell is going on with that stupid light that’s literally touching the cabinet? This is what happens when stupid people design spaces… was that mean?? Sorry… like a lot of things in this cabin I just can’t comprehend this!
No worries the laundry room backs up to the bathroom so we’re moving the laundry room elsewhere, knocking the wall out, and building a nice big master bathroom.
Promise me you’ll never have a wooden toilet seat in your house ok?
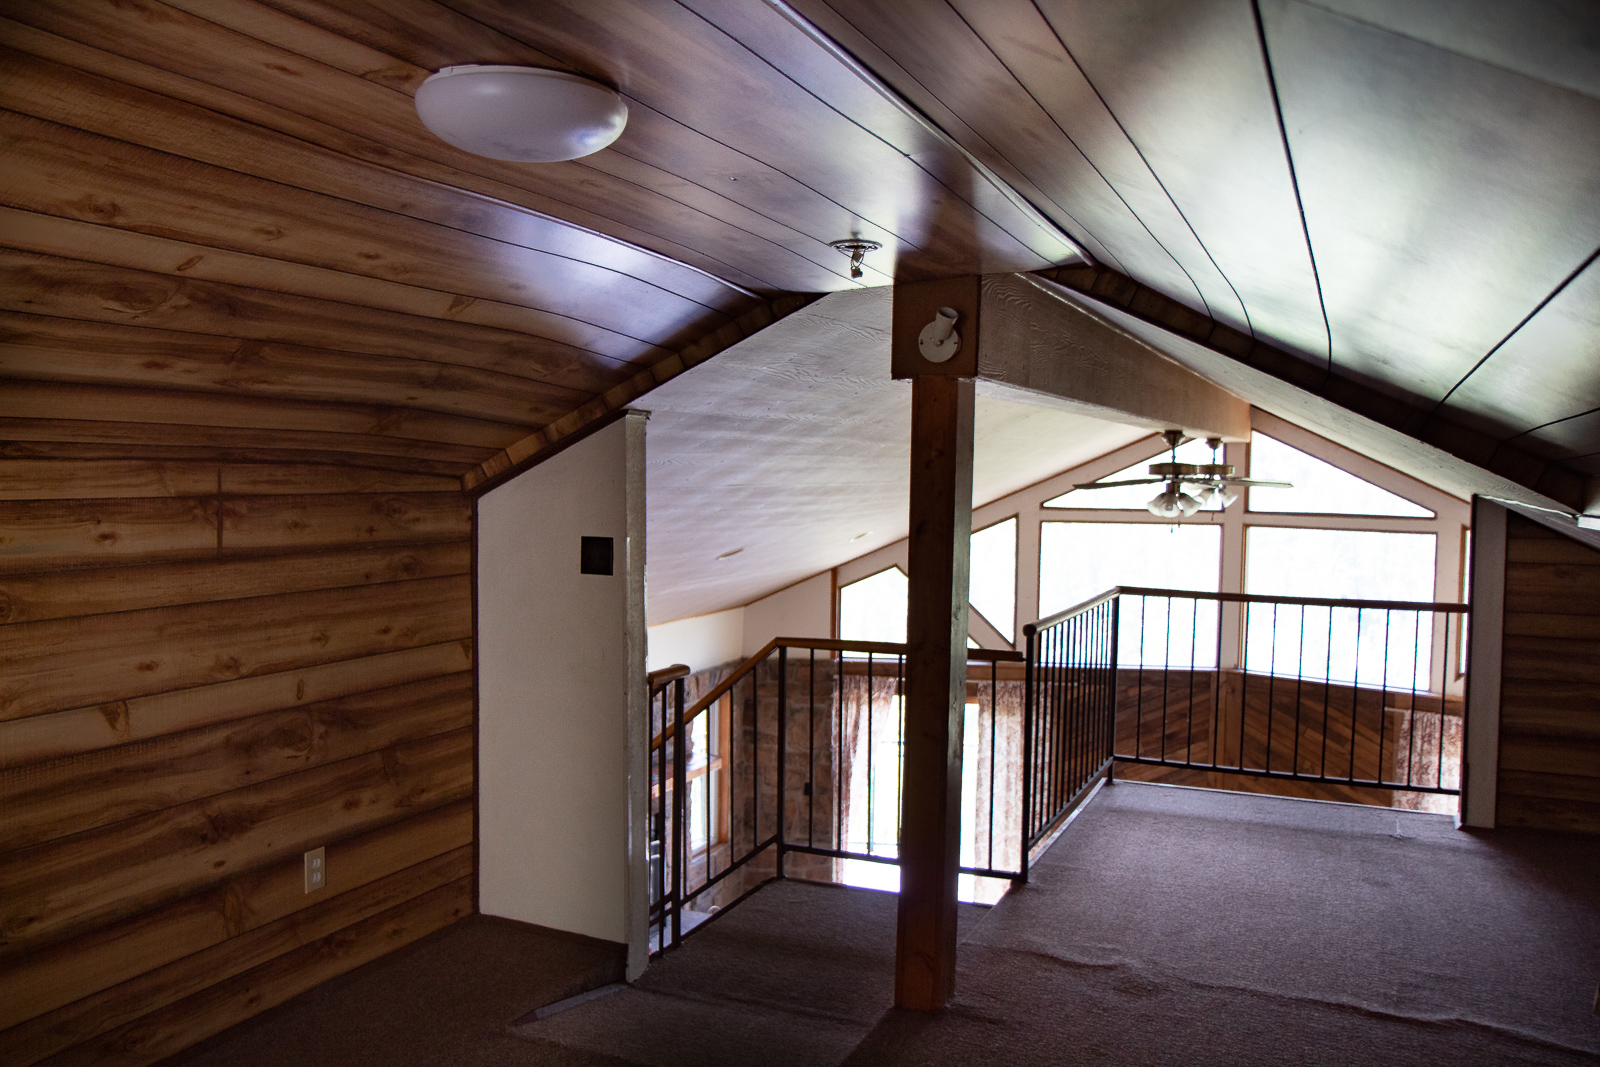
The upstairs loft space is really quirky but cute. I’ve had a lot of fun planning how I want it to look. It’s basically going to be a sleeping and lounging area. The ceiling is low in spots and it gives it a whimsical almost treehouse vibe. I plan on putting a bed across the window with a privacy curtain.
Maybe I’ve seen too many scary movies but these tiny doors freak me out a bit. We need the attic space for sure, but they’ll need to be moved and redone to look less like serial killer doors.
I’ve measured this side nook and a twin bed will fit. I think it would be cute, maybe I’ll add a sconce lamp and a curtain for privacy. It would be a cute nook for a kid or brave adult staying with us. It will have a cute camp vibe.
This cheap paneling is coming down! The wood ceiling in the front the living room will extend into the loft and we will redo the walls.
So that’s our ugly cabin tour! To summarize yes I’m extremely overwhelmed LOL. I’m trying to get in a blogging rhythm again but it’s hard. It’s pure chaos, I’m tired, and everything is dirty and unorganized… so it’s zapping all my creative and mental energy. I’m excited to share our cabin progress, though, and I need major progress to happen soon or I just might lose it. Now I’m off for a day of sanding and scraping followed with a large glass of wine and a shower in our tiny creepy bathroom.
Things have been so hectic lately, I just now had a chance to stop and catch my breath and update the blog. Our house looks so different right now, very little furniture and a lot of boxes. It’s a little bit fun, like camping… but the novelty is starting to wear off.
I’m sad to be leaving our home, but at the same time we’re getting excited to start a new life. It’s time to make memories at our new home! Because we’ve done so many home improvement projects and I’ve redecorated so many times I thought it would be fun to put together a before and after of our Texas home.
We put so much love into this home, painting our tall walls and ceiling was a crazy challenge. That was my paint brush invention… I used UK flag duct tape to attach it to the end of a long pole… we called it the Royal Brush.
Then we had our funny moments, ya know where we added beadboard and a new granite top and then I painted the kitchen island 2 separate times… only to tell Brian to rip it out weeks later. Oopsie…
I know I say this a lot, I forgot how bad our photography was. I mean dude it was bad! A lot of these before photos I took with my caveman iPhone 3 before I even knew I would start a blog. Then once I started the blog we started the long journey of learning photography. It’s not as easy as it looks! Wow, some of these blog images I thought looked really good at the time, and they don’t now. They’re dark and grainy!! We shoot in RAW now and have learned so much not just about photography but the photo editing process as well. Our photos aren’t perfect but they’re much better now… blah blah… ready to see some ugly before photos??
HOUSE BEFORE
The front of the house needed some major curb appeal and the landscaping was boxy and dated.
HOUSE AFTER
I was sad to cut down the tree in the front yard but it was blocking the house and cracking up the driveway. I had always wanted a larger front porch so we ripped out the overgrown shrubs and added stone and decomposed granite for more porch space. We painted the garage doors Texas Leather by Benjamin Moore to add some contrast.
THE ENTRY WAY BEFORE
THE ENTRYWAY AFTER
For as long as I could remember I wanted a wood-stained front door, and it’s been one of our favorite home upgrades. It really added curb appeal and also enhanced the entry way.
THE “FORMAL LIVING ROOM TURNED DINING ROOM” BEFORE
Years ago I switched our formal living and dining to better suit out lifestyle- sorry ancient iPhone pics!
THE NEW DINING ROOM AFTER
THE “DINING ROOM TURNED FORMAL LIVING ROOM” BEFORE
I was craving a light and bright kitchen, the subway tile backsplash is so clean and crisp. Not to mention durable… I’m a messy cook. You can read more about our Kitchen remodel.
THE BREAKFAST NOOK BEFORE
THE BREAKFAST NOOK AFTER
THE HALF BATH BEFORE
THE HALF BATH AFTER
Can you ever have enough white subway tile? I think not, you can read more about Half Bath remodel, this is a tricky little spot to photograph but it’s a favorite.
THE FAMILY ROOM BEFORE
I still cringe at this before photo. I knew the room wasn’t working and needed more visual interest… adding a bunch of red pillows and candles really didn’t help though. The furniture from our previous house just didn’t work size wise either.
I took the gel stain plunge, I mixed two different colors. It an easy project, just a little time consuming, but oh so worth it. I knew the floors would be replaced so I had a great time dripping paint all over. I also did the fireplace mantel.
DOWNSTAIRS HALLWAY BEFORE
NEW FAUX MUDROOM AFTER
I was envious of my friend’s large mudroom so I decided to fake one in our hallway. You can read more about this blog post in faking a mudroom.
MASTER BEDROOM BEFORE
I am laughing so hard at how bad this photo is, it’s the only one I can find that shows the window. I remember this was days after we moved in and I texted Brian this photo. I hated the window over the bed with a passion.
I spent years in denial and placed a piece of painted wood over it, but soon I realized I’d never get over it so we installed sheet rock and texture.
MASTER BEDROOM AFTER
LOVE! In this blog post I show you how easy it is to make this Pottery Barn inspired wall art on a budget.
Aw, much better! I’m not anti window or anything but we have 3 other large ones in the room. You can read more about our master bedroom decor here.
THE GIRLS’ BATHROOM BEFORE
THE GIRLS BATHROOM AFTER
One day while browsing the Tile Shop I saw this mosaic tile and I knew it needed to be in the girls’ bathroom. I go a bit crazy in that store, there is just so much gorgeous stuff. You can read more in my Jack and Jill bathroom post.
THE LOFT BOOKSHELVES BEFORE
THE LOFT BOOKSHELVES AFTER
I love how painting stripes added a nice pop to the area. You can read more about redecorating more in my decorating the loft post.
THE GUEST BATH BEFORE
THE GUEST BATH AFTER
You can read more about our guest bath remodel here.
THE GUEST ROOM BEFORE
This is the only before photo of the guest room I can find. Once my son moved out it became my kitchen cabinet painting room.
THE GUEST ROOM AFTER
You can read about the fun updates to our guest room here.
THE BACK YARD BEFORE
Funny I only have this gross cell phone photo because I was taking photos of the hail. Hey, you guys I snapped the pic with our friendly neighbor Jimmy out. The Jimmy’s always out back, funny I got his head in the photo. Don’t even get me started on that palm tree.
The back yard was a long process, we started by pouring extra concrete and put up a temporary metal pergola while focusing on indoor projects. We also changed our mind on the pathway and went to just stones.
THE PATIO BEFORE
THE PATIO AFTER
The covered patio was a terrific addition to our backyard, I love to curl up on our sectional during a rain storm.
THE FIRE PIT BEFORE
Jimmy put up lattice on the fence and then one sudden day the nightmare ended and he took it down… I must have spent 100 hours praying to the baby Jesus.. and it worked.
We’ve had so many amazing family dinners under our pergola, it’s like an outdoor dining room. Finally the vine is really taking off… now that we’re moving. That’s life for ya.
Well, that about wraps it up! I did do an early blog post on Ashley’s room once, but I decided to leave the girls’ rooms and Brian’s office out. Haley’s never wanted her room on the blog and Brian’s office has always been his messy man space that was better left alone.
As soon as we get settled in next week I’ll be showing you lots of UGLY before photos of our new place. I’m actually a little nervous to share photos because I think it’s horrifically ugly… it has a TON of potential though. Enjoy the rest of the week, I’ll be back soon!
I’m always looking for ways to eat healthier and add low-calorie vegetable dishes to our meals, and cucumbers seems to be a family favorite of ours. We’ve played around with our Thai Cucumber Salad a lot and I think we’ve finally got it just right! With hot summer days quickly approaching it’s such a refreshing salad to make! I seem to be obsessed with all salads that have cucumber as a main ingredient, but this one is hands down my favorite! Do you remember when I recently shared my Asian Sesame Salmon recipe? This pairs fabulously with it as a side.
This salad has amazing flavor, but another reason it shines is how the cucumbers are prepared into long noodle like strips. You can use a vegetable spiralizer or julienne strip peeler like I did in the above photo, it’s such a useful kitchen tool. I do remove most of the green cucumber peel because I find those strips too stiff and they also don’t absorb flavor as well. To preserve the texture of the salad I stop when I get to the seeds.
If wasting the seed part of the cucumber bothers you, why not slice it up and make some delicious cucumber water?
After prepping the cucumbers I mix up the dressing. It’s yummy goodness. Then I simply pour it into a bowl with the cucumbers and toss.
Once mixed together add chopped peanuts and sliced green onions. Amazing!! By the way feel free to add some cilantro instead of the green onions, and for a fresh twist of flavor and add more chili flakes if you like things spicy!
I must confess when I blog my own recipes I have trouble with estimating how many it serves. It seems serving sizes are all over the place these days – especially with us. I have a very hungry husband who can devour a whole entire recipe if I let him, so do I say it serves 1 hungry man or 6 smaller appetites? Like I said it’s hard.
As a side dish to a main meal I’d say it serves 4-6 but Brian and I can easily split this recipe for a light lunch. Feel free to double it if you feel you need more. I wouldn’t recommend making more than you need though because cucumbers get really watery and don’t always keep well.
Make sure you use toasted sesame oil instead of regular, toasted sesame oil adds incredible flavor! When I’m watching my carbs I’ll omit the honey and use stevia drops instead in the dressing. You’ll want to add one drop at a time, whisk together and taste each time with a clean spoon before adding more to make sure you don’t over sweeten it.
Wash and peel cucumbers, then using a vegetable spiralizer or julienne peeler, peel cucumbers into strips stopping once you've reached the seeds, then place in a medium sized bowl.
In a small separate bowl add toasted sesame oil, rice vinegar, chili flakes, honey, and salt, then whisk until combined. Pour over cucumber strips and mix well. Top with chopped peanuts and sliced green onions.
Add extra chili flakes if desired. Best when served immediately.
Like I mentioned above this salad is best served soon after making because cucumbers get watery. We’ve also made this recipe with thinly sliced cucumbers but the julienne strips are our favorite, the flavor distributes better and we can have fun eating them with chop sticks. Haley picked up these chopsticks for us while she was in Japan last summer. I love them!
Raise your hand if you like popsicles…. okay now raise your hand if you like tequila!! If you raised your hand twice keep on reading. Remember I’ve been having summer vibes this week, first with my coconut lime body scrub, and now this. So what better time to blog about these amazing strawberry margarita popsicles?
Drinking margaritas is a blast, but there is something just so fun and satisfying about knowing that I have a frozen margarita popsicle treat waiting for me in the freezer. You know how I love to stock my freezer, and this way we can grab one when we’re hot and sweaty at a moment’s notice. Sorry kids step aside… these popsicles are for grown ups.
When it comes to popsicle molds we’ve gone through a zillion it seems. I don’t like keeping up with all those plastic end pieces, and it never fails we always lose a couple, it’s so frustrating. I’m in love with this new popsicle mold I found from Amazon. It makes perfect professional looking popsicles, with actual wooden sticks, plus there are only 2 pieces to keep up with! Even better this kit comes with its own popsicle sticks, so once it arrives you’re ready to go make popsicles.
I will give you a little warming. Stick to the amount of alcohol in this recipe. I’m from Texas so this girl can handle a strong margarita no problem, but if you add more than the recommended amount of alcohol in this recipe the popsicles will be a little on the slushy side…. and we don’t want that. You’ll still get a nice margarita tequila flavor with this recipe but it won’t be overly harsh tasting.
1pintstrawberries, washed and quartered (about 2 1/2 cups)
Margarita salt for garnish if desired
Instructions
In a blender add lime juice, water, triple sec, and tequila. Add sugar and blend well until it’s completely dissolved. Add the strawberries and blend until just pureed.
Pour the mixture into the popsicle mold, add plastic or wooden sticks, and freeze for at least 6 hours or overnight.
To remove the popsicles run a little cold water over the mold, gently squeeze the ends to loosen, and slowly pull them out. Sprinkle with a little margarita salt if you desire and let the party start! I can’t wait to make more popsicles with this awesome mold, ones my kids can actually eat too… haha!
May is just days away, and here in Texas the temps are starting to warm up fast… summer is just around the corner! Those first few days of wearing shorts and dresses can be a little scary, especially when you’re dealing with dry post-winter skin. So this is where you need a good body scrub on your side. Coconut and lime is such a winning combination in my book!
This is such a fun scrub to make and to use in the shower. It takes me back to my childhood of coconut snow cones in the summer, only with a fresh twist of lime. I don’t know about you but it’s engrained in my brain that coconut is supposed to be blue! Some of my best memories growing up involve having a blue tongue. Using this scrub is like having a tropical summertime party in the shower, it’s calorie free and leaves you with silky soft skin too. Plus I’ll show you how simple it is to make!
It’s really easy to zest a lime using this zester tool, it work’s great for zesting all citrus. Be sure to save the lime for another use. You can use any lime oil, but if you followed my last blog post you know I’ve just gotten started with Young Living so naturally I used their oil. It’s the highest quality and priced affordably. I added a little coconut extract just to up the coconut fun since coconut oil isn’t very fragrant… remember I’m wanting to relive my coconut snow cone days.
You can absolutely leave out the drop of food coloring if you desire but the small amount shouldn’t stain your skin and adds to the blue tropical party! We have white towels and have zero color residue when drying off.
In a medium sized bowl add the coconut oil and stir with a spoon until it softens up. It's important not to melt the coconut oil so your scrub will have a light fluffy texture.
Add the lime zest, lime essential oil, coconut extract, and food coloring to the coconut oil, and stir to blend.
Pour in the sugar, and mix well. Store in a clean container.
As with all homemade body scrubs you’ll want to store them in a cool, dry location and use them within 2-3 weeks. Have no worries about the lime zest spoiling in the mixture, the lime oil is a natural preservative. Take care, though, when using it in the shower not to let water get into your container or it might dissolve the scrub.
Coconut oil makes an incredible moisturizing body scrub. In the winter months when my skin is extra dry I simply rinse it off in the shower and towel dry. My skin is on the oiler side, though, so in the warmer months I need to rinse with a gentle soap or body wash afterwards, but I still feel the moisturizing benefits. Just listen to your skin… you know what’s best. Either way this scrub will leave your skin silky smooth and have you ready for summer!
I’m feeling summer vibes this week so look forward to another post soon that involves limes… and maybe a little tequila. Cheers! Looking for more body scrub recipes? Try my Birthday Cake Body Scrub, it’s another favorite!
My son’s favorite meal growing up was salmon, hands down. Every meal he ever requested was salmon, in fact it’s hard to remember a time when he didn’t order salmon at a restaurant. The kid was obsessed, and still to this day it’s probably his favorite meal. So naturally I’ve acquired some salmon recipes, and this one is an easy delicious favorite. You can easily throw it together last minute, and it pairs beautifully with steamed jasmine rice.
When it comes to salmon, not all is created equally, whether you prefer farm raised or wild caught is a matter of preference. I’m generally not a fan of frozen filets, and I prefer to buy fresh filets and ones cut a little on the thicker side. I use about 3 pounds of salmon and, for this recipe, six 8-ounce filets to be exact.
This recipe calls for just a few simple ingredients, but the secret to the amazing recipe is just one of them. Toasted sesame oil… not just regular sesame oil, it must be toasted! It’s a hassle to find, but it’s a real gem in the kitchen. I always keep toasted sesame oil on hand, it tastes delicious and it really adds flavor depth in recipes! Due to sheer laziness I use garlic powder most of the time in this recipe, but feel free to mince a clove or two. I love fresh garlic, I just hate peeling and mincing it! The little garlic paper sticks to my fingers and gets all over the floor. When I cook with Brian I make that his job, haha.
Don’t forget about the garnish either! Once your salmon is done baking don’t forget the toasted sesame seeds and sliced green onions. It’s the little things like this that really bring the flavor of food alive!
I use my favorite baking sheet from Williams Sonoma, y’all see this pan all the time in my blog posts because I use it for everything! I try to let the marinade sit about 10 minutes or so. If you’re short on time you can skip this step.
Place salmon skin side down on a lightly greased baking sheet.
In a small bowl whisk together mustard, soy sauce, sesame oil, and garlic until smooth, then drizzle half the mixture over the salmon.
Allow the mixture to sit 10 minutes and then bake for 15-20 minutes. Allow the fish to cool a few minutes and then drizzle or brush with the remaining glaze.
Top with toasted sesame seeds and green onions. Serve with steamed rice if desired.
It’s as simple as that, even kids love it. Skip the rice and add steamed veggies and it’s low carb too. Enjoy!